Quantcast
Channel: Scott Hanselman's Blog
Viewing all 1148 articles
Browse latest View live

Exploring your .NET applications with dotnet-monitor

$
0
0

I talked about Cross-platform diagnostic tools for .NET Core and dotnet-trace for .NET Core tracing but I would be remiss if I didn't show and mention "dotnet monitor."

dotnet monitor is an experimental tool that makes it easier to get access to diagnostics information in a dotnet process. If you're running .NET Core within a container - or mostly likely in Kubernetes - this tool offers an insight into your running microservice. Basically it creates a microservice of its own that you can interrogate to better understand what's happening.

HELP! Confused about Kubernetes? Check out http://computerstufftheydidntteachyou.com and my most recent video on Kubernetes and Container Orchestration.

Assuming you have .NET Core installed, you can install dotnet monitor as a global tool:

dotnet tool install -g dotnet-monitor --add-source https://dnceng.pkgs.visualstudio.com/public/_packaging/dotnet5-transport/nuget/v3/index.json --version 5.0.0-preview.*

You then just run it along side your project or running process.

dotnet monitor collect

The developer blog on dotnet monitor shows you how you can share a volume mount between your application container and a container running dotnet monitor if you like. If you're in k8s (Kubernetes) you should run dotnet monitor as a sidecar to your container within the same pod.

It'll start up and you can talk to dotnet monitor with curl, wget, and pipe through jq and hit localhost:52323/processes to get a list of .NET Core processes it can think about.

NOTE: If you are running this locally and get auto redirected to HTTPS then you may have a cached HSTS policy for localhost from other work. Head over to edge://net-internals/#hsts (or chrome://) and scroll to the bottom and delete the Domain Security Policies for localhost.

Now I can curl and see the output. I have my podcast on the left pane in Windows Terminal, dotnet monitor collect in the upper right, and the output lower right.
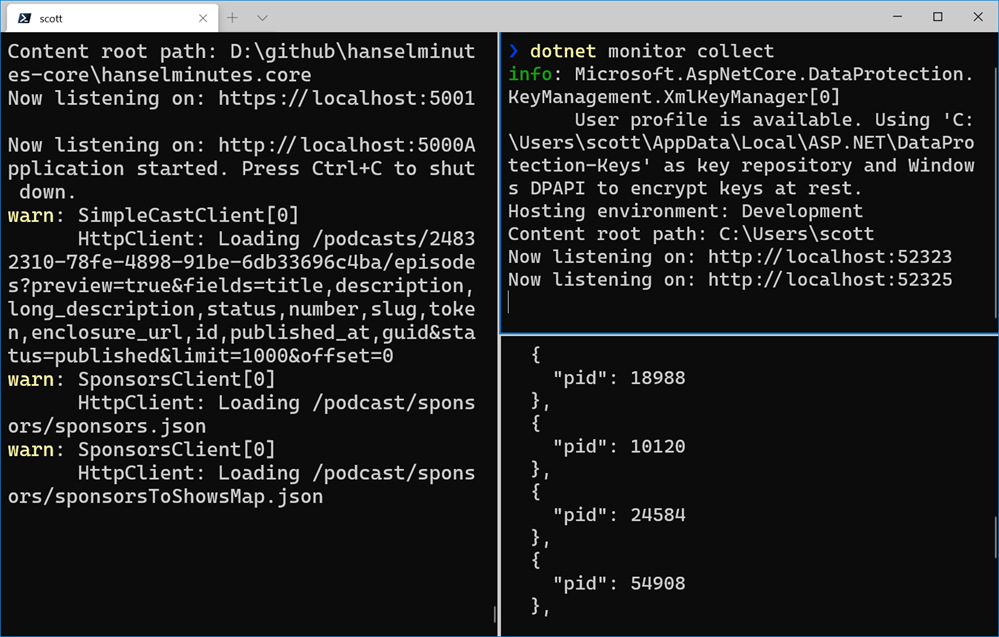
dotnet monitor

Once I figure out my process id (PID) - which will be automatic within a container as there will only be one - I can explore any of these local endpoints:

  • /processes
  • /dump/{pid?}
  • /gcdump/{pid?}
  • /trace/{pid?}
  • /logs/{pid?}
  • /metrics

If you are getting the logs, you'll get a never ending text/event-stream in your browser. I'd recommend you "curl" to see this at the command line.

text/eventstream in your browser

You can also get momentary traces, collect a nettrace file and analyze it in Visual Studio, PerfView or other tools.

The dotnet monitor is experimental, but if you're digging it, head over to the dotnet/diagnostics GitHub and show some support.

SOS and Other Diagnostic Tools

  • SOS - About the SOS debugger extension.
  • dotnet-dump - Dump collection and analysis utility.
  • dotnet-gcdump - Heap analysis tool that collects gcdumps of live .NET processes.
  • dotnet-trace - Enable the collection of events for a running .NET Core Application to a local trace file.
  • dotnet-counters - Monitor performance counters of a .NET Core application in real time.

Hope this helps you!


Sponsor: Upgrade from file systems and SQLite to Actian Zen Edge Data Management. Higher Performance, Scalable, Secure, Embeddable in most any programming language, OS, on 64-bit ARM/Intel Platform.


© 2020 Scott Hanselman. All rights reserved.
     

How to use, open, resize, and split Panes in the Windows Terminal

$
0
0

My love and appreciate for the new open-source Windows Terminal is well-documented. I enjoy customizing the Windows Terminal with a nice prompt.

The Terminal of course has Tabs so you can open many different shells at once within a terminal instance, often I want to do things like Split Screen/Split Pane. "Use Tmux!" you might shout, and that's a valid thing to yell if I was only living in Linux (using WSL2). There are several multi-pane options to choose from within a shell using something like tmux.

However, the Windows Terminal supports a multi-pane view at the Terminal-level, regardless of shell!

There's great docs on setting up hotkeys for this, and you should.

The best way to get started with ZERO setup is to click the main Dropdown in Windows Terminal and hold down the ALT key while you click on a shell!

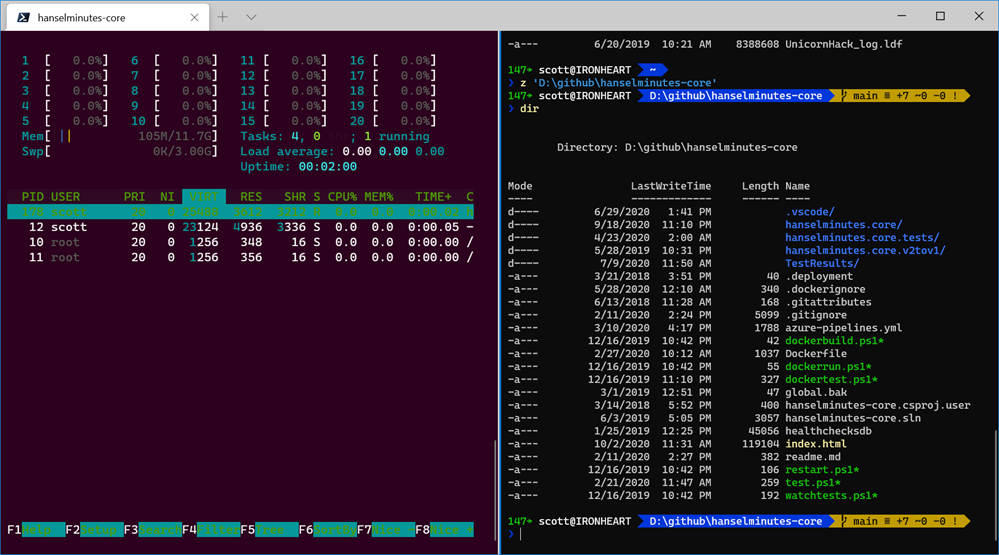
Below you can see Ubuntu/WSL2 on the left running htop, while on the right I'm running PowerShell 7 (powered by .NET Core) and sitting in my podcast's source code directory.

MultiPane Windows Terminal

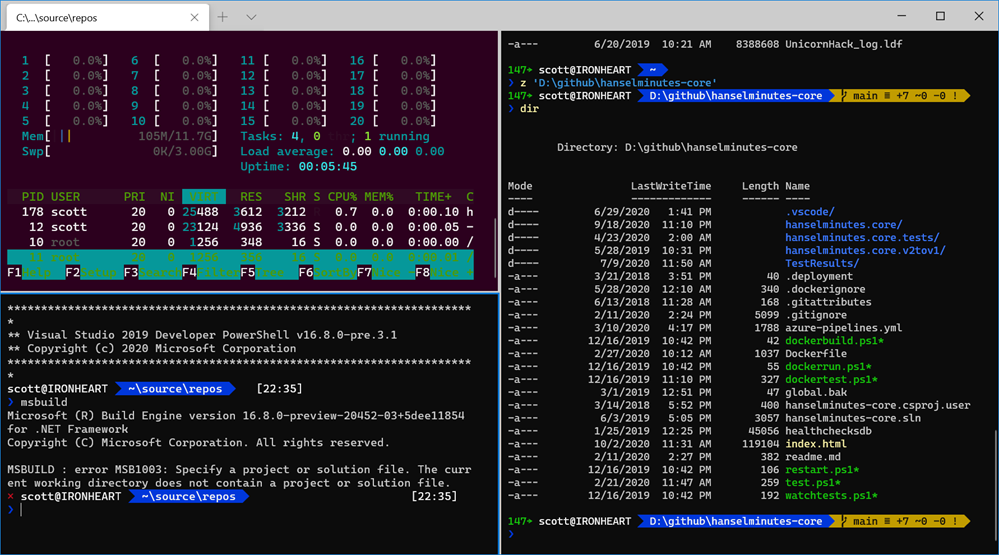
I'll then click the dropdown, hold ALT, and click on the Visual Studio Developer Command Prompt that I've added to the menu. I'm doing this while Ubuntu is the focused pane.

My Windows Terminal Menu

And the result:

Three panes in Windows Terminal

Now you can see the VS2019 prompt in the lower left corner. With hotkeys I can control where panes open.

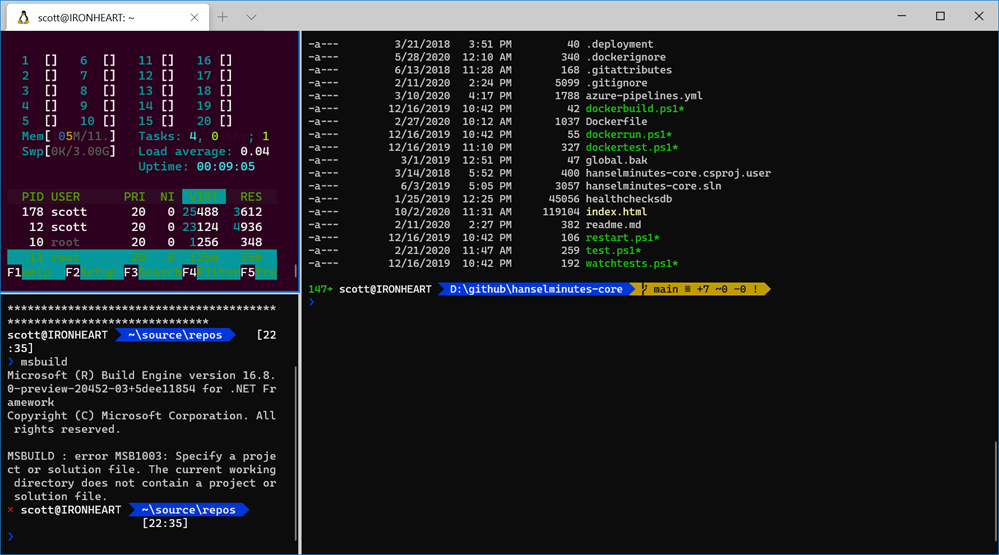
I can even navigate between pans with the ALT key and my arrow keys! Even better, SHIFT+ALT and the arrow keys will resize them!

Resized my Terminal Panes

Go spend some time learning about Panes in Windows Terminal and let me know how it goes for you! It's gonna make your command line life so much better!

ACTION: Finally, please take a moment and subscribe to my YouTube or head over to http://computerstufftheydidntteachyou.com and explore! I'd love to hit 100k subs over there. I heard they give snacks.


Sponsor: Suffering from a lack of clarity around software bugs? Give your customers the experience they deserve and expect with error monitoring from Raygun.com. Installs in minutes, try it today!


© 2020 Scott Hanselman. All rights reserved.
     

How to use autocomplete at the command line for dotnet, git, winget, and more!

$
0
0

Many years ago .NET Core added Command line "tab" completion for .NET Core CLI in PowerShell or bash but few folks have taken the moment it takes to set up.

I enjoy setting up and making my prompt/command line/shell/terminal experience as useful (and pretty) as possible. You have lots of command line shells to choose from on Windows!

Keep in mind these are SHELLs not terminals or alternative consoles. You can run all of these in the Windows Terminal.

  • Classic cmd.exe command prompt (fake DOS!) - Still useful and Clink can make it more bash-y without going full bash.
  • Yori from Malcolm Smith
  • Starship - more on this later, it's somewhat unique
  • Windows PowerShell - a classic because...
  • PowerShell 7 is out and runs literally anywhere, including ARM machines!

I tend to use PowerShell 7 (formerly PowerShell Core) as my main prompt because it's a cross-OS prompt. I can use the same prompt, same functions, same everything on Windows and Linux.

But it's command-line autocompletion that brings me the most joy!

  • git ch<TAB> -> git checkout st<TAB> -> git checkout staging
  • dotnet bu<TAB> -> dotnet build
  • dotnet --list-s<TAB> -> dotnet --list-sdks
  • winget in<TAB> -> winget install -> winget install WinDi<TAB> -> winget install WinDirStat

Once you have successfully tab'ed you way to glory it's hard to stop. With PowerShell and its cousins this is made possible with Register-ArgumentCompleter. Here's what it looks like for the dotnet CLI.

# PowerShell parameter completion shim for the dotnet CLI

Register-ArgumentCompleter -Native -CommandName dotnet -ScriptBlock {
param($commandName, $wordToComplete, $cursorPosition)
dotnet complete --position $cursorPosition "$wordToComplete" | ForEach-Object {
[System.Management.Automation.CompletionResult]::new($_, $_, 'ParameterValue', $_)
}
}

Looks like a lot, but the only part that matters is that when it sees the command "dotnet" and some partial text and the user presses TAB, it will call "dotnet complete" passing in the cursorPosition and the wordToComplete.

NOTE: If you understand how this works, you can easily make your own Argument Completer for those utilities that you use all the time at work! You can make them for the folks at work who use your utilities!

You never actually see this call to "dotnet complete." You just see yourself typing dotnet bui<TAB> and getting a series of choices to tab through!

Here's what happens behind the scenes:

>dotnet complete --position 3 bui

build
build-server
msbuild

You can add these to your $profile. Usually I run 'notepad $profile" at the command line and it will autocreate the correct file in the correct location.

This is a super powerful pattern! You can get autocomplete in Git in PowerShell with PoshGit as well as in WinGet!

What are some more obscure autocompletes that you have added to your PowerShell profile?

ACTION: Finally, please take a moment and subscribe to my YouTube or head over to http://computerstufftheydidntteachyou.com and explore! I'd love to hit 100k subs over there. I heard they give snacks.


Sponsor: Suffering from a lack of clarity around software bugs? Give your customers the experience they deserve and expect with error monitoring from Raygun.com. Installs in minutes, try it today!


© 2020 Scott Hanselman. All rights reserved.
     

It's 2020 and it is time for text mode with Gui.cs

$
0
0

Nearly 16 years ago I complained that Windows is completely missing the TextMode boat. It's 2020 and it's TIME FOR TEXT MODE BABY.

I keep bumping into cool utilities made with Gui.cs. Miguel de Icaza made Midnight Commander (not Norton Commander, but evocative of it) and it's a joy.

Head out to an admin command prompt on your Windows 10 machine now and install it (assuming a recent Windows 10 build, you'll have winget):

winget install GNU.MidnightCommander

You run it with "mc" and even better if you've got Windows Terminal blinged out you'll be able bask in the ASCII COATED GLORY:

Midnight Commander is lovely

It works in WSL as well, since there's a Linux version with "apt install mc" so check that out, too!

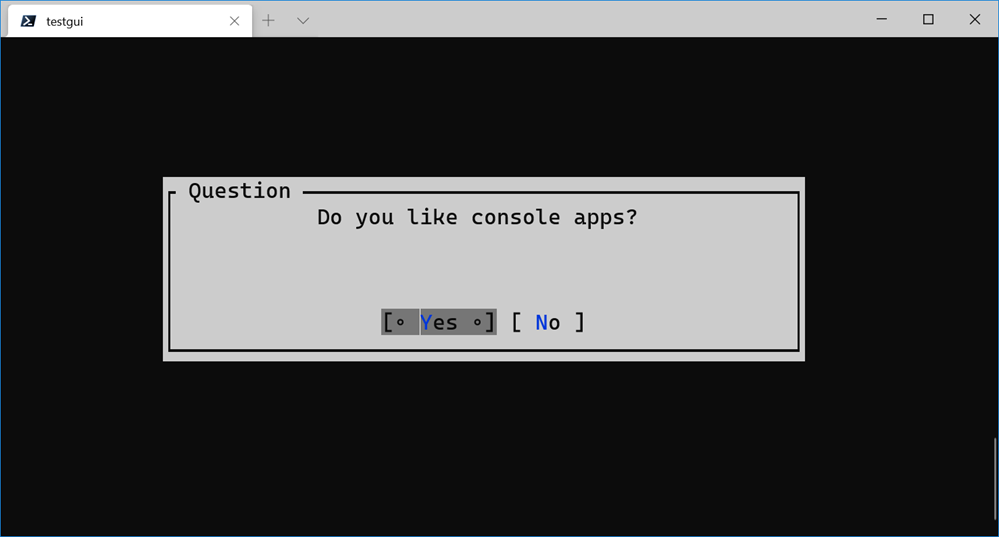
Do YOU want to make apps like this? While Midnight Commander wasn't made with Gui.cs, it could have been. I spent YEARS making awesome text mode apps with TurboVision. Now we can make text mode apps with C#! There is even a complete Xterm/Vt100 emulator as well in the form of TerminalView.cs.

Is it hard? Nah! Go "dotnet new console" then "dotnet add package Terminal.Gui" and then copy these lines over the ones that are given you in Program.cs, then "dotnet run". Boom.

using Terminal.Gui;


class Demo {
static int Main ()
{
Application.Init ();

var n = MessageBox.Query (50, 7,
"Question", "Do you like console apps?", "Yes", "No");

return n;
}
}

There you go! You should go read about it now!

Do you like Console Apps?

If you want to see all the cool text controls you can use, check out the Terminal.Gui UI Catalog app and its source code.

Sure, it's not that new-fangled HTML, but let me tell you, you see these apps every day. The airport, the DMV, the mechanic, the doctor's office. Apps like these are FAST. It's useful to know that these kinds of apps exist...you'll never know when you might need to get back in to TEXT MODE!


Sponsor: Suffering from a lack of clarity around software bugs? Give your customers the experience they deserve and expect with error monitoring from Raygun.com. Installs in minutes, try it today!


© 2020 Scott Hanselman. All rights reserved.
     

Synology DS1520+ is the sweet spot for a home NAS and a private cloud

$
0
0

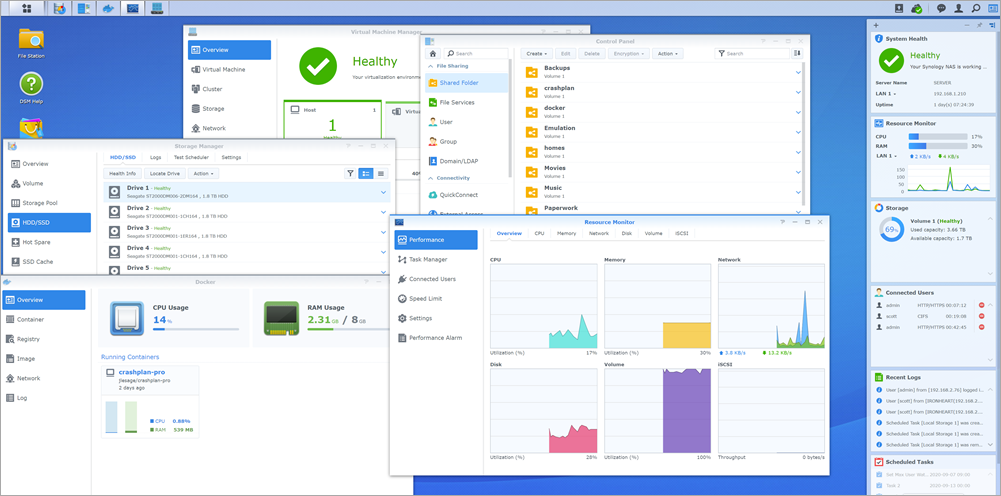
61fje6GaYKLMy long love of Synology products is well-documented. I checked my Amazon history, and I bought my Synology DS1511+ NAS in May of 2011! I have blogged about the joy of having a home server over these last nearly 10 years in a number of posts.

It's great to have a home server - it's a little slice of the cloud, in your home. I like home servers because while I trust the cloud, I trust a computer I can touch about 1% more than someone else's computer.

NOTE: When I review gadgets and products, I often use Amazon Affiliate Links. I donate the small amount I make from you using these links, Dear Reader, to my kids' charter school. Thanks for using and clicking these links to support!

Anyway, my Synology DS1511+ is about ten years old and it's working great but I am using it more and more and throwing more and more at it. It did have some challenges running a Minecraft Server recently, on top of all its other responsibilities.

I use Seagate 2TB disks and I run 4 of them in the 5 bay device, with a fifth drive as a hot spare. If a drive goes bad - which happens about every 2 to 3 years - the Synology will rebuild with the spare, then I pull the dead drive. I have two additional 2TB unopened Seagate Drives ready to go, so when this happens it's as close to a non-event as possible.

Synology is amazing

I have every digital photo and digital video and family document we've created since 1998. I've also got local backups of my Gmail from hanselman.com which goes back to before Gmail started when I was running my own POP3 mail server. It's all easily less than 5TB. Remember also that Google Takeout can get you Zips of all your data! Back. It. All. Up!

Twenty years of photographs

Fast forward to today and Synology came out with the Synology 5 Bay NAS DiskStation DS1520+. It's basically a ten year's newer clone of my 1511+ workhorse, updated and refreshed! It's WAY faster. It was immediately noticeable on startup. File access is faster, indexing is faster, my Docker images start faster.

Now, a little more money would get you a 6 bay NAS and just $150 will get you a 2 bay, but I love the size and power of a 5 bay for our home and my office. Four disks are for my array and 1 is that hot swap drive. I think that for small businesses or home offices five bays is the perfect size and price - about $600-700 USD.

The Synology 1520+ has 4 GbE network ports (which is nice with Link Aggregation in a busy house), supports two eSATA externals (I use one to backup the backup to a single disk, as I believe in the Backup Rule of Three and you should, too!) and works with any SATA drives, 2.5" or 3.5". One of the big reasons that attracted me to this update is that there's slots for 2 x M.2 2280 NVMe SSDs for caching. I put a 512G M.2 drive in there to accelerate file system access.

5 Drives in a Synology

If you want, you can have up to 15 drives using two DX517 drive expanders up to 240TB, but with just 4 slots and large drives like Seagate Ironwolf drives in the 10TB to 18TB range, storage is really a non-issue. I use Seagate 2TB drives because they're plentiful and like $50. We treat it like a massive infinite local disk in the house that everyone can talk to. We named it SERVER, so it's just \\SERVsynoER for everyone.

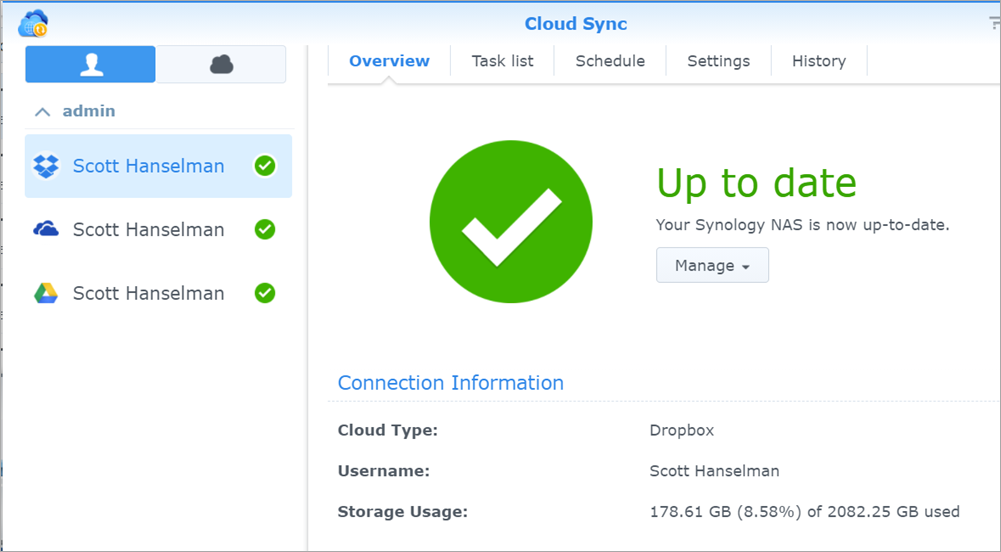
The Synology OS software is deep and broad and runs entirely in your browser. You'll figure it out very quickly as it's all windows and wizards. I am a fan of the Cloud Sync feature that I use to backup my Google Drive, Dropbox, and One Drive. Again, this is a level of paranoia, but damned if I'm gonna get locked out of my own data.

Synology Cloud Sync

The Synology HyperBackup goes in any direction using whatever cloud and whatever tools you are familiar with. You want Rsync? Cool. Want to backup to Azure or AWS? Cool.

Backup to Azure from a Synology

I was concerned that migrating would be hard or involved basically starting over from scratch, but since I was moving between two models in the same family (I was moving from a 1511+ to a 1520+, even 10 years later) It was literally just move the drives in order and boot up. Took 10 minutes. For movement between device families or to new drives there's at least three good options.

It was actually scarily simple, given there's ten years of history here. I moved the drives (maintaining order) and booted up the new 1520+ and was greeted with this screen:

Migrate your Synology

I clicked Migrate twice and was all set.

image

If you are migrating and upgrading, I'd be sure to read the section on HDD Migration and look closely at the table, considering your Source and Destination NAS models.

So far this new Synology is WAY snappier, runs Docker faster, can run Virtual Machines now (although in 8 gigs, only small utility ones), and the SSD cache has made browsing family photos whip fast. All in all, it feels like a 10 year refresh BUT it's the same size.

SSD Cache in a Synology

My home NAS is sitting quietly on a shelf in my office. The kids and spouse are having their PCs backed up in the background, family photos and DVD backups are all available easily (and there are Synology iPhone apps as well to view the files).

Synology devices specifically - and home NAS devices generally - are a great addition to techie homes. There's a bunch of 1st and 3rd party packages you can run on it to make it as much or little a part of your Home IT setup as you like. It can run DHCP and DNS, iTunes Servers, Mail, Chat Servers, or even their own web-based Office clients. Take a look at the Synology 1520+ if you're in the market for a home or business NAS. I'm looking forward to another 10 years with this NAS.


Sponsor: Suffering from a lack of clarity around software bugs? Give your customers the experience they deserve and expect with error monitoring from Raygun.com. Installs in minutes, try it today!


© 2020 Scott Hanselman. All rights reserved.
     

How to use a Raspberry Pi 4 as a Minecraft Java Server

$
0
0

imageMy 14 year old got tired of paying $7.99 for Minecraft Realm so he could host his friends in their world. He was just hosting on his laptop and then forwarding a port but that means his friends can't connect unless he's actively running. I was running a Minecraft Server in a Docker container on my Synology NAS but I thought teaching him how to run Minecraft Server on a Raspberry Pi 4 we had lying around would be a good learning moment.

First, set up your Raspberry Pi. I like NOOBS as it's super easy to setup. If you want to make things faster for setup and possibly set up your Pi without having to connect a monitor, mouse, or keyboard, mount your SSD card and create a new empty file named ssh, without any extension, inside the boot directory to enable ssh on boot. Remember the default user name is pi and the password is raspberry.

SSH over to your Raspberry Pi. You can use Putty, but I like using Windows 10's built-in SSH. Do your standard update stuff, and also install a JDK:

sudo apt update

sudo apt upgrade
sudo apt install default-jdk

There are other Minecraft 3rd party Java Servers you can use, the most popular being Spigot, but the easiest server you can run is the one from Minecraft themselves.

Go to https://www.minecraft.net/en-us/download/server in a browser. It'll say something like "Download minecraft_server.1.16.2.jar and run it with the following command." That version number and URL will change in the future. Right-click and copy link into your clipboard We are going to PASTE it (right click with your mouse) after the "wget" below. So we'll make a folder, download the server.jar, then run it.

cd ~

mkdir MinecraftServer
cd MinecraftServer
wget https://launcher.mojang.com/v1/objects/c5f6fb23c3876461d46ec380421e42b289789530/server.jar
java -Xmx2500M -Xms2500M -jar server.jar nogui

You'll get a warning that you didn't accept the EULA, so now open "pico eula.txt" and set eula=true, then hit Ctrl-X and Yes to save the new file. Press the up key and run your command again.

java -Xmx2500M -Xms2500M -jar server.jar nogui

You could also make a start.sh text file with pico then chmod +x to make it an easier single command way to start your server. Since I have a Raspberry Pi 4 with 4g gigs of RAM and it'll be doing just this one server, I felt 2500 megs of RAM was a sweet spot. Java ran out of memory at 3 gigs.

You can then run ifconfig at and command line and get your Pi's IP address, or type hostname to get its name. Then you can connect to your world with that name or ip.

Running Minecraft Servers

Performance Issues with Complex Worlds

With very large Minecraft worlds or worlds like my son's with 500+ Iron Golems and Chickens, you may get an error like

[Server Watchdog/FATAL]: A single server tick took 60.00 seconds (should be max 0.05)

You can workaround this in a few ways. You can gently overclock your Pi4 if it has a fan by adding this to the end of your /boot/config.txt (read articles on overclocking a Pi to be safe)

over_voltage=3

arm_freq=1850

And/or you can disable the Minecraft internal watchdog for ticks by setting max-tick-time to -1 in your server's server.properties file.

We solved our issue by killing about 480+ Iron Golems with

/kill @e[type=minecraft:iron_golem]

but that's up to you. Just be aware that the Pi is fast but not thousands of moving entities in Minecraft fast. For us this works great though and is teaching my kids about the command line, editing text files, and ssh'ing into things.


Sponsor: Never miss a beat with Seq. Live application logs and health checks. Download the Windows installer or pull the Docker image now.


© 2020 Scott Hanselman. All rights reserved.
     

What is the cloud? Explained

$
0
0

I'm continuing my "Computer Stuff They Didn't Teach You" series on YouTube. Please subscribe! I've set a personal goal to get to 100k subs by Christmas.

This episode is very special as it features a Surface Duo *AND* a 1U Rack-Mounted Azure Stack Edge! It's a gentle and clear explanation of cloud computing.

This 20 min video talks about the components of a computer, starting with a Raspberry Pi, Laptops, Phones, Desktops, then moving up to a massively powerful Azure Stack Edge rack mounted device, until finally talking about the Cloud itself. It consists of millions and millions of computers all working together to make the world turn.

You may know all these things BUT you may also enjoy some of the analogies to explain to non-technical partner how the cloud works as well as "what exactly it is you do!?"

I hope you enjoy watching it as much as I enjoyed making it! Go subscribe now!


Sponsor: Never miss a beat with Seq. Live application logs and health checks. Download the Windows installer or pull the Docker image now.


© 2020 Scott Hanselman. All rights reserved.
     

Cross-platform diagnostic tools for .NET Core

$
0
0

.NET Core is cross-platform and open-source. Tell someone, maybe your boss.

A good reminder. It's been this way for a half decade but I'm still bumping into folks who have never heard this. Moving forward, .NET 5 will be a unification of the .NET Framework you may have heard for years, and the new .NET Core I like talking about, PLUS great goodness, tools and libraries from Mono and Xamarin. It's one cross-platform .NET with a number greater than 4. Because 5 > 4, natch.

NOTE: If you like, you can learn all about What is .NET? over on my YouTube.

Now you've made some software, maybe for Windows, maybe Mac, maybe Linux. There's a lot of ways to diagnose your apps in .NET Core, from the Docs:

  • Logging and tracing are related techniques. They refer to instrumenting code to create log files. The files record the details of what a program does. These details can be used to diagnose the most complex problems. When combined with time stamps, these techniques are also valuable in performance investigations.
  • Unit testing is a key component of continuous integration and deployment of high-quality software. Unit tests are designed to give you an early warning when you break something.
  • Debug Linux dumps explains how to collect and analyze dumps on Linux.

But I want to talk about the...

.NET Core Diagnostic Global Tools

First, let's start with...

dotnet-counters

dotnet tool install --global dotnet-counters

Now that I've installed it, I can see what .NET Core apps I'm running, like a local version of my Hanselminutes podcast site.

dotnet counters ps

18996 hanselminutes.core D:\github\hanselminutes-core\hanselminutes.core\bin\Debug\netcoreapp3.1\hanselminutes.core.exe
14376 PowerLauncher C:\Program Files\PowerToys\modules\launcher\PowerLauncher.exe
24276 pwsh C:\Program Files\PowerShell\7\pwsh.exe

I also see PowerShell 7 in there that I'm running in Windows Terminal. Pwsh is also written in cross platform .NET Core.

I'll run it again with a process id, in this case that of my podcast site:

dotnet counters monitor --process-id 18996

Here I'll get a nice constantly refreshing taskman/processmonitor of sorts in the form of dotnet-countersperformance counters:

dotnet-monitor

Again this works outside Visual Studio and it works everywhere. You can watch them and react, or collect them to a file.

dotnet-dump

The dotnet-dump tool is a way to collect and analyze Windows and Linux core dumps without a native debugger. Although it's not yet supported on macOS, it works on Windows and Linux.

With a similar syntax, I'll dump the process:

dotnet dump collect -p 18996

Writing full to D:\github\hanselminutes-core\hanselminutes.core\dump_20200918_224648.dmp
Complete

Then I'll start an interactive analysis shell session. You can run SOS (Son of Strike) commands to analyze crashes and the garbage collector (GC), but it isn't a native debugger so things like displaying native stack frames aren't supported.

dotnet dump analyze .\dump_20200918_224648.dmp

Loading core dump: .\dump_20200918_224648.dmp ...
Ready to process analysis commands. Type 'help' to list available commands or 'help [command]' to get detailed help on a command.
Type 'quit' or 'exit' to exit the session.
>

There's tons to explore. Debugging production dumps like this is a lost art.

Exploring in dotnet dump

You can also do live Garbage Collector dumps with

dotnet-gcdump

GCDump is:

"a way to collect GC (Garbage Collector) dumps of live .NET processes. It uses the EventPipe technology, which is a cross-platform alternative to ETW on Windows. GC dumps are created by triggering a GC in the target process, turning on special events, and regenerating the graph of object roots from the event stream. This process allows for GC dumps to be collected while the process is running and with minimal overhead."

Once you have a dump you can analyze it in Visual Studio or PerfView on GitHub.

PerfView

Sometimes you may capture a dump from one machine and analyze it on another. For that you may want to download the right symbols to debug your core dumps or minidumps. For that you'll use

dotnet-symbol

This is great for Linux debugging with lldb.

"Running dotnet-symbol against a dump file will, by default, download all the modules, symbols, and DAC/DBI files needed to debug the dump including the managed assemblies. Because SOS can now download symbols when needed, most Linux core dumps can be analyzed using lldb with only the host (dotnet) and debugging modules."

Interesting in some real tutorials on how to use these tools? Why not learn:

In the next blog post I'll look at dotnet trace and flame graphs!


Sponsor: Have you tried developing in Rider yet? This fast and feature-rich cross-platform IDE improves your code for .NET, ASP.NET, .NET Core, Xamarin, and Unity applications on Windows, Mac, and Linux.


© 2020 Scott Hanselman. All rights reserved.
     

dotnet-trace for .NET Core tracing in PerfView, SpeedScope, Chromium Event Trace Profiling, Flame graphs and more!

$
0
0

Speedscope.app is an online "flamegraph visualizer" that you can also install offline. It's open source and on GitHub. It will allow you to view flamegraphs that have been generated by diagnostic tools, but Speedscope is good at dealing with large files without issues or crashing. There's lots of choices in viewers of flamegraphs, but this is a good one.

Adam Sitnik has a great blog about how he implemented flamegraphs for .NET.

Speedscope has a simple file format in JSON, and PerfView already exists is free and open source. PerfView is something you should download now and throw in your PATH. You'll need it someday.

We saw in the last blog post that I did a GC Dump of my running podcast site, free command line tools. Now I'll do a live running trace with

dotnet-trace

So I'll just dotnet trace ps and then

dotnet trace collect -p 18996

Which gives me this live running trace until I stop it:

Provider Name                           Keywords            Level               Enabled By

Microsoft-DotNETCore-SampleProfiler 0x0000000000000000 Informational(4) --profile
Microsoft-Windows-DotNETRuntime 0x00000014C14FCCBD Informational(4) --profile

Process : D:\github\hanselminutes-core\hanselminutes.core\bin\Debug\netcoreapp3.1\hanselminutes.core.exe
Output File : C:\Users\scott\trace.nettrace

[00:00:00:15] Recording trace 866.708 (KB)
Stopping the trace. This may take up to minutes depending on the application being traced.

Trace completed.

Even though this ran for just 15 seconds I collected many thousands of traces. If I need to, I can now find out EXACTLY what's happening in even short timeframes OR I can visualize what's happening over longer timeframes.

Ah, but check out this switch for dotnet trace!

 --format <Chromium|NetTrace|Speedscope>

That's a useful game changer! Let's try a few, maybe Speedcope and that interestingly named Chromium format. ;)

NOTE: If you have any errors with Speedscope format, make sure to "dotnet tool update -g dotnet-trace"

Now you'll get a something.speedscope.json that you can open and view in SpeedScope. You'll see a WEALTH of info. Remember that these formats aren't .NET specific. They aren't language specific at all. If you have a stack trace and can sample what's going on then you can make a trace that can be presented as a number of visualizations, most notably a flamegraph. This is 'how computers work' stuff, not '.NET stuff." It's great that these tools can interoperate so nicely.

There is so much info that you'll want to make you own with dotnet trace and explore. Be sure to scroll and CTRL-scroll to zoom around. Also be sure to look at the thread picker at the top center in the black title area of SpeedScope.

Speedscope.app

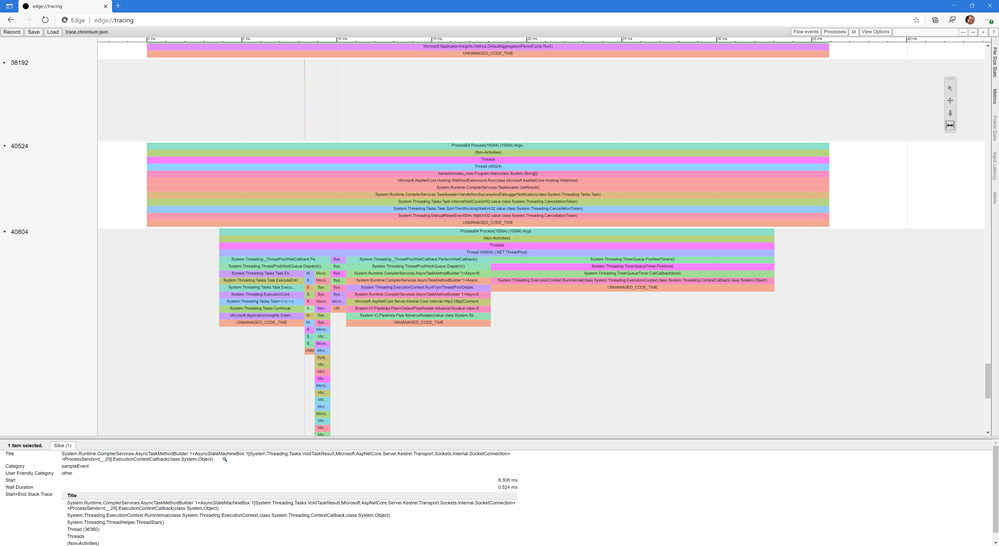
Remember how I pushed that this isn't language specific? Try going to edge://tracing/ in new Edge or in chrome://tracing in Chrome and load up a dotnet trace created with --format Chromium! Now you can use the Trace Event Profiling Tool!

Same data, different perspective! But this time you're using the tracing format that Chromium uses to analyze your .NET Core traces! The dotnet-trace tool is very very powerful.

image

Be sure to go read about Analysing .NET start-up time with Flamegraphs at Matt Warren's lovely blog.


Sponsor: Have you tried developing in Rider yet? This fast and feature-rich cross-platform IDE improves your code for .NET, ASP.NET, .NET Core, Xamarin, and Unity applications on Windows, Mac, and Linux.


© 2020 Scott Hanselman. All rights reserved.
     

Blazor WebAssembly on Azure Static Web Apps

$
0
0

Blazing Pizza Blazor AppMany apps today are just static files on the front end - HTML and JavaScript - with something powerful on the server side. They aren't "static apps" as they have very dynamic front end experiences, but they are static in that their HTML isn't dynamically generated.

As such, you don't need to spend the money on an Azure Web App when an Azure Static Web App will do! These apps get free SSL certs, custom domains, web hosting for static content, and fit into a natural git-based workflow for publishing. You can build modern web applications with JavaScript frameworks and libraries like Angular, React, Svelte, Vue, or using Blazor to create WebAssembly applications, with an Azure Functions back-end or publish static sites with frameworks like Gatsby, Hugo, VuePress.

But there's big news out of Ignite this week, with Azure Static Web Apps now supporting Blazor applications. You can develop and deploy a frontend and a serverless API written entirely in .NET.

To get started "hello world style" there is a GitHub repository template that's a starting point. It's a basic web app with a client that uses Blazor and .NET that is run on the client-side in your browser using WebAssembly.

Called it! It's almost a decade later and yes, JavaScript (and WebAssembly) is the assembly language for the web!

So the client runs in the browser written in C#, the server runs as a serverless Azure Function (meaning no identifiable VM, and it just scales as needed) also written in C#, and this client and server share a data model between Blazor and Functions also written in...wait for it...C#.

An app like this can basically scale forever, cheaply. It can put the browser to work (which was basically hanging out waiting for anglebrackets anyway) and when it needs data, it can call back to Functions, or even Azure CosmosDB.

Be sure to check out this complete Tutorial: Building a static web app with Blazor in Azure Static Web Apps! All you need is a GitHub account and any free Azure Account.

If you want more guided learning, check out the 12 unit module on Microsoft Learn. It shouldn't take more than an hour and you'll learn how to Publish a Blazor WebAssembly app and .NET API with Azure Static Web Apps.

Resources

Also be sure to check out the Day 2 Microsoft Ignite Keynote by yours truly! The app I made and demo in the keynote? Made with Blazor and Azure Static Web Apps, natch! The keynote is happening in three time zones so you can see it at a time that works for you...or on-demand!


Sponsor: Upgrade from file systems and SQLite to Actian Zen Edge Data Management. Higher Performance, Scalable, Secure, Embeddable in most any programming language, OS, on 64-bit ARM/Intel Platform.


© 2020 Scott Hanselman. All rights reserved.
     

Exploring your .NET applications with dotnet-monitor

$
0
0

I talked about Cross-platform diagnostic tools for .NET Core and dotnet-trace for .NET Core tracing but I would be remiss if I didn't show and mention "dotnet monitor."

dotnet monitor is an experimental tool that makes it easier to get access to diagnostics information in a dotnet process. If you're running .NET Core within a container - or mostly likely in Kubernetes - this tool offers an insight into your running microservice. Basically it creates a microservice of its own that you can interrogate to better understand what's happening.

HELP! Confused about Kubernetes? Check out http://computerstufftheydidntteachyou.com and my most recent video on Kubernetes and Container Orchestration.

Assuming you have .NET Core installed, you can install dotnet monitor as a global tool:

dotnet tool install -g dotnet-monitor --add-source https://dnceng.pkgs.visualstudio.com/public/_packaging/dotnet5-transport/nuget/v3/index.json --version 5.0.0-preview.*

You then just run it along side your project or running process.

dotnet monitor collect

The developer blog on dotnet monitor shows you how you can share a volume mount between your application container and a container running dotnet monitor if you like. If you're in k8s (Kubernetes) you should run dotnet monitor as a sidecar to your container within the same pod.

It'll start up and you can talk to dotnet monitor with curl, wget, and pipe through jq and hit localhost:52323/processes to get a list of .NET Core processes it can think about.

NOTE: If you are running this locally and get auto redirected to HTTPS then you may have a cached HSTS policy for localhost from other work. Head over to edge://net-internals/#hsts (or chrome://) and scroll to the bottom and delete the Domain Security Policies for localhost.

Now I can curl and see the output. I have my podcast on the left pane in Windows Terminal, dotnet monitor collect in the upper right, and the output lower right.

dotnet monitor

Once I figure out my process id (PID) - which will be automatic within a container as there will only be one - I can explore any of these local endpoints:

  • /processes
  • /dump/{pid?}
  • /gcdump/{pid?}
  • /trace/{pid?}
  • /logs/{pid?}
  • /metrics

If you are getting the logs, you'll get a never ending text/event-stream in your browser. I'd recommend you "curl" to see this at the command line.

text/eventstream in your browser

You can also get momentary traces, collect a nettrace file and analyze it in Visual Studio, PerfView or other tools.

The dotnet monitor is experimental, but if you're digging it, head over to the dotnet/diagnostics GitHub and show some support.

SOS and Other Diagnostic Tools

  • SOS - About the SOS debugger extension.
  • dotnet-dump - Dump collection and analysis utility.
  • dotnet-gcdump - Heap analysis tool that collects gcdumps of live .NET processes.
  • dotnet-trace - Enable the collection of events for a running .NET Core Application to a local trace file.
  • dotnet-counters - Monitor performance counters of a .NET Core application in real time.

Hope this helps you!


Sponsor: Upgrade from file systems and SQLite to Actian Zen Edge Data Management. Higher Performance, Scalable, Secure, Embeddable in most any programming language, OS, on 64-bit ARM/Intel Platform.


© 2020 Scott Hanselman. All rights reserved.
     

How to use, open, resize, and split Panes in the Windows Terminal

$
0
0

My love and appreciate for the new open-source Windows Terminal is well-documented. I enjoy customizing the Windows Terminal with a nice prompt.

The Terminal of course has Tabs so you can open many different shells at once within a terminal instance, often I want to do things like Split Screen/Split Pane. "Use Tmux!" you might shout, and that's a valid thing to yell if I was only living in Linux (using WSL2). There are several multi-pane options to choose from within a shell using something like tmux.

However, the Windows Terminal supports a multi-pane view at the Terminal-level, regardless of shell!

There's great docs on setting up hotkeys for this, and you should.

The best way to get started with ZERO setup is to click the main Dropdown in Windows Terminal and hold down the ALT key while you click on a shell!

Below you can see Ubuntu/WSL2 on the left running htop, while on the right I'm running PowerShell 7 (powered by .NET Core) and sitting in my podcast's source code directory.

MultiPane Windows Terminal

I'll then click the dropdown, hold ALT, and click on the Visual Studio Developer Command Prompt that I've added to the menu. I'm doing this while Ubuntu is the focused pane.

My Windows Terminal Menu

And the result:

Three panes in Windows Terminal

Now you can see the VS2019 prompt in the lower left corner. With hotkeys I can control where panes open.

I can even navigate between pans with the ALT key and my arrow keys! Even better, SHIFT+ALT and the arrow keys will resize them!

Resized my Terminal Panes

Go spend some time learning about Panes in Windows Terminal and let me know how it goes for you! It's gonna make your command line life so much better!

ACTION: Finally, please take a moment and subscribe to my YouTube or head over to http://computerstufftheydidntteachyou.com and explore! I'd love to hit 100k subs over there. I heard they give snacks.


Sponsor: Suffering from a lack of clarity around software bugs? Give your customers the experience they deserve and expect with error monitoring from Raygun.com. Installs in minutes, try it today!


© 2020 Scott Hanselman. All rights reserved.
     

How to use autocomplete at the command line for dotnet, git, winget, and more!

$
0
0

Many years ago .NET Core added Command line "tab" completion for .NET Core CLI in PowerShell or bash but few folks have taken the moment it takes to set up.

I enjoy setting up and making my prompt/command line/shell/terminal experience as useful (and pretty) as possible. You have lots of command line shells to choose from on Windows!

Keep in mind these are SHELLs not terminals or alternative consoles. You can run all of these in the Windows Terminal.

  • Classic cmd.exe command prompt (fake DOS!) - Still useful and Clink can make it more bash-y without going full bash.
  • Yori from Malcolm Smith
  • Starship - more on this later, it's somewhat unique
  • Windows PowerShell - a classic because...
  • PowerShell 7 is out and runs literally anywhere, including ARM machines!

I tend to use PowerShell 7 (formerly PowerShell Core) as my main prompt because it's a cross-OS prompt. I can use the same prompt, same functions, same everything on Windows and Linux.

But it's command-line autocompletion that brings me the most joy!

  • git ch<TAB> -> git checkout st<TAB> -> git checkout staging
  • dotnet bu<TAB> -> dotnet build
  • dotnet --list-s<TAB> -> dotnet --list-sdks
  • winget in<TAB> -> winget install -> winget install WinDi<TAB> -> winget install WinDirStat

Once you have successfully tab'ed you way to glory it's hard to stop. With PowerShell and its cousins this is made possible with Register-ArgumentCompleter. Here's what it looks like for the dotnet CLI.

# PowerShell parameter completion shim for the dotnet CLI

Register-ArgumentCompleter -Native -CommandName dotnet -ScriptBlock {
param($commandName, $wordToComplete, $cursorPosition)
dotnet complete --position $cursorPosition "$wordToComplete" | ForEach-Object {
[System.Management.Automation.CompletionResult]::new($_, $_, 'ParameterValue', $_)
}
}

Looks like a lot, but the only part that matters is that when it sees the command "dotnet" and some partial text and the user presses TAB, it will call "dotnet complete" passing in the cursorPosition and the wordToComplete.

NOTE: If you understand how this works, you can easily make your own Argument Completer for those utilities that you use all the time at work! You can make them for the folks at work who use your utilities!

You never actually see this call to "dotnet complete." You just see yourself typing dotnet bui<TAB> and getting a series of choices to tab through!

Here's what happens behind the scenes:

>dotnet complete --position 3 bui

build
build-server
msbuild

You can add these to your $profile. Usually I run 'notepad $profile" at the command line and it will autocreate the correct file in the correct location.

This is a super powerful pattern! You can get autocomplete in Git in PowerShell with PoshGit as well as in WinGet!

What are some more obscure autocompletes that you have added to your PowerShell profile?

ACTION: Finally, please take a moment and subscribe to my YouTube or head over to http://computerstufftheydidntteachyou.com and explore! I'd love to hit 100k subs over there. I heard they give snacks.


Sponsor: Suffering from a lack of clarity around software bugs? Give your customers the experience they deserve and expect with error monitoring from Raygun.com. Installs in minutes, try it today!


© 2020 Scott Hanselman. All rights reserved.
     

Keeping your WSL Linux instances up to date automatically within Windows 10

$
0
0

image[3]Hayden Barnes from Canonical, the folks that work on Ubuntu (lovely blog, check out it) had a great tweet where he recommended using the Windows Task Scheduler (think of it as a graphical cron job manager) to keep your WSL Linux instances up to date.

There's a few things to unpack here to get into the details.

First, if you run wsl --list -v you'll see all the WSL Linux Instances on your machine.

> wsl --list -v

NAME STATE VERSION
* Ubuntu-18.04 Running 2
kali-linux Stopped 1
Alpine Stopped 1
Ubuntu-20.04 Stopped 2
WLinux Running 2
docker-desktop-data Stopped 2
docker-desktop Stopped 2

You can I see I have a few. I spend most of my time in the Ubuntu instances, but I also occasionally drop into the kali-linux and WLinux instances. If I'm using LTS (long term support) distros then there's minimal risk (my opinion) in "apt get update" and "apt get upgrade"-ing them every week or so. I could even do it unattended.

I could set up a Task Scheduler and make an "on login" task or a weekly task that calls wsl.exe and passes in -d for distro, along with the name of the distro, run as root with -u and -e for the command. For example:

wsl -d "Wlinux" -u root -e apt update

wsl -d "Wlinux" -u root -e apt upgrade -y

Since I have several WSL instances, I could also make a "updateall.cmd" or .bat or .ps1 script and run them occasionally to keep them all updated on my own. Just change the -d and include the name of each distro. One could imagine a group policy as well for large enterprises to do the same thing for developers using a custom or managed WSL instance.

You would not want to update or mess with the docker- managed WSL instances above as they exist only to run your Docker Desktop-managed containers. Leave that to Docker to manage.

It's a whole new world out there, and I'm loving how I can move easily between multiple Linuxes on Windows 10. Check out my YouTube on WSL2 and please subscribe over there.


Sponsor: Never miss a beat with Seq. Live application logs and health checks. Download the Windows installer or pull the Docker image now.


© 2020 Scott Hanselman. All rights reserved.
     

Migrating this blog to Azure. It's done. Now the work begins.

$
0
0

imageI have been running this https://hanselman.com/blog for almost 20 years. Like coming up on 19 I believe.

Recently it moved from being:

  • a 13(?) year old .NET Framework app called DasBlog running on ASP.NET and a Windows Server on real metal hardware

to

Finally. This blog, the main site, and the podcast site are all running on Azure Web Apps, built in Azure DevOps, and managed by Azure Front Door and watched by Application Insights. Yes I pay for it with cash, I have no unlimited free Azure credits other than my $100 MSDN account.

Mark and I have been pairing on this for months and having a wonderful time. In fact, it's been about a year since this started.

Moving this blog is a significant achievement for a number of reasons, IMHO.

  • If we did it right:
    • you didn't notice anything
    • The URLs look cooler.
    • We broke nothing in SEO.
    • Perf is better.
    • Before I could deploy the site a few times a year, and was afraid of it. Yesterday I deployed 11 times.
  • It was .NET 1.1, then 2.0, then 3.5, then 4.0, then stuck for 8 years.
    • It ran on a real Windows Server 2008 machine (no VM) at Sherweb who has been a great partner for years. Extremely reliable hosting!
    • Now it's on Azure under Linux
  • We upgraded the ASP.NET WebForms app to ASP.NET Core with Mark's genius idea of splitting the app responsibilities such that the original DasBlog blog templating language could be converted to simple Razor pages and we could use ASP.NET TagHelpers to replace WebForms controls.
    • This allowed me to port my template over in a day with minimal changes.
    • Once it compiled under .NET Core it was easy to move it from Windows to Linux and testing in WSL first.
    • We then just moved the other dependent projects to .NET Standard 2 and compiled the while thing as a .NET Core 3.1 LTS (Long Term Support) app. In fact, scroll down to the VERY bottom of this page and you can see what version we're on.
  • I set up CI/CD for the main site hanselman.com, this blog, and hanselminutes.com.
    • There are 3 sites now, all behind a reverse proxy from Azure Front Door to handle SSL, Firewalls, and more.

Next steps? Keep it running, watch for errors, 5xx and 4xx and make small incremental changes. The pages are still heavy, while ASP.NET has server response time under 20ms, there's still 2 sec of JavaScript and bunch of old crap to clean up. I've also got two decades of links, so I'm fixing 404s as they are reported or they show up in Application Insights. I made a Dashboard here:

image

I'm going spend the next month or so blogging about the process and experience in as much detail as I can.

Here's some articles I've already written on the subject:

If you find any issues with this blog like

  • Broken links and 404s where you wouldn't expect them
  • Broken images, zero byte images, giant images
  • General oddness

Please file them here https://github.com/shanselman/hanselman.com-bugs and let me know!

Oh, and please subscribe to my YouTube and tell your friends. It's lovely.


Sponsor: Never miss a beat with Seq. Live application logs and health checks. Download the Windows installer or pull the Docker image now.


© 2020 Scott Hanselman. All rights reserved.
     

Classic Path.DirectorySeparatorChar gotchas when moving from .NET Core on Windows to Linux

$
0
0

It's a Unix System, I know this!An important step in moving my blog to Azure was to consider getting this .NET app, now a .NET Core app, to run on Linux AND Windows. Being able to run on Linux and Windows would give me and others a wider choice of hosting, allow hosting in Linux Containers, and for me, save me money as Linux Hosting tends to be cheaper, even on Azure.

Getting something to compile on Linux is not the same as getting it to run, of course.

Additionally, something might run well in one context and not other. My partner Mark (poppastring) on this project has been running this code on .NET for a while, albeit on Windows. Additionally he runs on IIS in /blog as a subapplication. I run on Linux on Azure, and while I'm also on /blog, my site is behind Azure Front Door as a reverse proxy which handles the domain/blog/path and forwards along domain/path to the app.

Long story short, it's worked on both his blog and mine, until I tried to post a new blog post.

I use Open Live Writer (open sourced version of Windows Live Writer) to make a MetaWebLog API call to my blog. There's multiple calls to upload the binaries (PNGs) and a path is returned.  A newly uploaded binary might have a path like https://hanselman.com/blog/content/binary/something.png. The file on disk (from the server's perspective) might be d:\whatever\site\wwwroot\content\binary\something.png.

This is 15 year old ASP.NET 1, so there's some idiomatic stuff going on here that isn't modern, plus the vars have been added for watch window debugging, but do you see the potential issue?

private string GetAbsoluteFileUri(string fullPath, out string relFileUri)

{
var relPath = fullPath.Replace(contentLocation, "").TrimStart('\\');
var relUri = new Uri( relPath, UriKind.Relative);
relFileUri = relUri.ToString();
return new Uri(binaryRoot, relPath).ToString();
}

That '\\' is making a big assumption. A reasonable one in 2003, but a big one today. It's trimming a backslash off the start of the passed in string. Then the Uri constructor starts coming things and we're mixing and matching \ and / and we end up with truncated URLs that don't resolve.

Assumptions about path separators are a top issue when moving .NET code to Linux or Mac, and it's often buried deep in utiltiy methods like this.

var relPath = fullPath.Replace(contentLocation, String.Empty).TrimStart(Path.DirectorySeparatorChar);

We can use the correct constant for Path.DirectorySeparatorChar, or the little-known AltDirectorySeparatorChar as Windows supports both. That's why this code works on Mark's Windows deployment but doesn't break until it runs on my Linux deployment.

DOCS: Note that Windows supports either the forward slash (which is returned by the AltDirectorySeparatorChar field) or the backslash (which is returned by the DirectorySeparatorChar field) as path separator characters, while Unix-based systems support only the forward slash.

It's also worth noting that each OS has different invalid path chars. I have some 404'ed images because some of my files have leading spaces on Linux but underscores on Windows. More on that )(and other obscure but fun bugs/behaviors) in future posts.

static void Main()

{
Console.WriteLine($"Path.DirectorySeparatorChar: '{Path.DirectorySeparatorChar}'");
Console.WriteLine($"Path.AltDirectorySeparatorChar: '{Path.AltDirectorySeparatorChar}'");
Console.WriteLine($"Path.PathSeparator: '{Path.PathSeparator}'");
Console.WriteLine($"Path.VolumeSeparatorChar: '{Path.VolumeSeparatorChar}'");
var invalidChars = Path.GetInvalidPathChars();
Console.WriteLine($"Path.GetInvalidPathChars:");
for (int ctr = 0; ctr < invalidChars.Length; ctr++)
{
Console.Write($" U+{Convert.ToUInt16(invalidChars[ctr]):X4} ");
if ((ctr + 1) % 10 == 0) Console.WriteLine();
}
Console.WriteLine();
}

Here's some articles I've already written on the subject of legacy migrations to the cloud.

If you find any issues with this blog like

  • Broken links and 404s where you wouldn't expect them
  • Broken images, zero byte images, giant images
  • General oddness

Please file them here https://github.com/shanselman/hanselman.com-bugs and let me know!

Oh, and please subscribe to my YouTube and tell your friends. It's lovely.


Sponsor: Have you tried developing in Rider yet? This fast and feature-rich cross-platform IDE improves your code for .NET, ASP.NET, .NET Core, Xamarin, and Unity applications on Windows, Mac, and Linux.


© 2020 Scott Hanselman. All rights reserved.
     

Upgrading the Storage Pool, Drives, and File System in a Synology to Btrfs

$
0
0

Making a 21TB Synology Storage PoolI recently moved my home NAS over from a Synology DS1511 that I got in May of 2011 to a DS1520 that just came out.

I have blogged about the joy of having a home server over these last nearly 10 years in a number of posts.

That migration to the new Synology is complete, and I used the existing 2TB Seagate drives from before. These were Seagate 2TB Barracudas which are quite affordable. They aren't NAS rated though, and I'm starting to generate a LOT of video since working from home. I've also recently setup Synology Active Backup on the machines in the house, so everyone's system is imaged weekly, plus I've got our G-Suite accounts backed up locally.

REFERRAL LINKS: I use Amazon links in posts like this. When you use them, you're supporting this blog, my writing, and helping pay for hosting. Thanks!

I wanted to get reliable large drives that are also NAS-rated (vibration and duty cycle) and the sweet spot right for LARGE drives now is a 10TB Seagate IronWolf NAS drive. You can also get 4TB drives for under $100! I'm "running a business" here so I'm going to deduct these drives and make the investment so I got 4 drives. I could have also got two 18TBs, or three 12TBs to similar effect. These drives will be added to the pool and become a RAID'ed roughly 21TB.

My Synology was running the ext4 file system on Volume1, so the process to migrate two all new drives and an all new file system was very manual, but very possible:

  • Use a spare slot and add one drive.
    • I had a hot spare in my 5 drive NAS so I removed it to make a spare slot. At this point I have my 4x2TB and 1x10TB in slots.
  • Make a new Storage Pool on the one drive
  • Make a new Volume with the newer Btrfs file system to get snapshots, self-healing, and better mirroring.
  • Copy everything from Volume1 to Volume2.
    • I copied from my /volume1 to /volume2. I made all new shares that were "Videos2" and "Software2" with the intention to rename them to be the primaries later.
  • Remove Volume1 by removing a drive at a time until the Synology decides it's "failed" and can be totally forgotten.
    • As I removed a 2TB drive, I replace it with a 10TB and expanded the new Storage Pool and the Volume2. These expansions take time as there's a complete consistency check.
    • Repeat this step for each drive.
  • You can either leave a single drive as Volume1 and keep your Synology Applications on them, or you can
  • When I've removed the final Storage Pool (as seen in the pic below) and my apps are either reinstalled on Volume 2 or I've moved them, I renamed all my shares from "Software2" etc to Software, removing the appended "2."

The wholes process took a few days with checkpoints in between. Be ready to have a plan, go slow, and execute on that plan, checking in as the file system consistency checks itself.

Removing drives

To be clear, another way would have been to copy EVERYTHING off to a single external drive, torch the whole Synology install, install the new drives, and copy back to the new install. There would have been a momentary risk there, with the single external holding everything. It's up to you, depending on your definitions of "easy" and "hassle." My way was somewhat tedious, but relatively risk free. Net net - it worked. Consider what works for you before you do anything drastic. Make a LOT OF BACKUPS. Practice the Backup Rule of Three.

Note you CAN remove all but one drive from a Synology as the "OS" seems to be mirrored on each drive. However, your apps are almost always on /volume1/@apps

Some Synology devices have 10Gbs connectors, but the one I have has 4x1Gbs. Next, I'll Link Aggregate those 4 ports, and with a 10Gbps desktop network card be cable to at get 300-400MB/s disk access between my main Desktop and the NAS.

The Seagate drives have worked great so far. My only criticism is that the drives are somewhat louder (clickier) than their Western Digital counterparts. This isn't a problem as the NAS is in a closet, but I suspect I'd notice the sound if I had 4 or 5 drives going full speed with the NAS sitting on my desk.

Here are my other Synology posts:

Hope this helps!


Sponsor: Have you tried developing in Rider yet? This fast and feature-rich cross-platform IDE improves your code for .NET, ASP.NET, .NET Core, Xamarin, and Unity applications on Windows, Mac, and Linux.


© 2020 Scott Hanselman. All rights reserved.
     

Don't ever break a URL if you can help it

$
0
0

404Back in 2017 I said "URLs are UI" and I stand by it. At the time, however, I was running this 18 year old blog using ASP.NET WebForms and the URL was, ahem, https://www.hanselman.com/blog/URLsAreUI.aspx

The blog post got on Hacker News and folks were not impressed with my PascalCasing but were particularly offended by the .aspx extension shouting "this is the technology this blog is written in!" A rightfully valid complaint, to be clear.

ASP.NET MVC has supported extensionless URLs for nearly a decade but I have been just using and enjoying my blog. I've been slowly moving my three "Hanselman, Inc" (it's not really a company) sites over to Azure, to Linux, and to ASP.NET Core. You can actually scroll to the bottom of this site and see the git commit hash AND CI/CD Build (both private links) that this production instance was built and deployed from.

As tastes change, from anglebrackets to curly braces to significant whitespace, they also change in URL styles, from .cgi extesnions, to my PascalCased.aspx, to the more 'modern' lowercased kebab-casing of today.

But how does one change 6000 URLs without breaking their Google Juice? I have history here. Here's a 17 year old blog post...the URL isn't broken. It's important to never change a URL and if you do, always offer a redirect.

When Mark Downie and I discussed moving the venerable .NET blog engine "DasBlog" over to .NET Core, we decided that no matter what, we'd allow for choice in URL style without breaking URLs. His blog runs DasBlog Core also and applies these same techniques.

We decided on two layers of URL management.

  • An optional and configurable XML file in the older IIS Rewrite format that users can update to taste.
    • Why? Users with old blogs like me already have rules in this IISRewrite format. Even though I now run on Linux and there's no IIS to be found, the file exists and works. So we use the IIS Rewrite Module to consume these files. It's a wonderful compatibility feature of ASP.NET Core.
  • The core/base Endpoints that DasBlog would support on its own. This would include a matrix of every URL format that DasBlog has ever supported in the last 10 years.

Here's that code. There may be terser ways to express this, but this is super clear. With or without extension, without or without year/month/day.

app.UseEndpoints(endpoints =>

{
endpoints.MapHealthChecks("/healthcheck");

if (dasBlogSettings.SiteConfiguration.EnableTitlePermaLinkUnique)
{
endpoints.MapControllerRoute(
"Original Post Format",
"~/{year:int}/{month:int}/{day:int}/{posttitle}.aspx",
new { controller = "BlogPost", action = "Post", posttitle = "" });

endpoints.MapControllerRoute(
"New Post Format",
"~/{year:int}/{month:int}/{day:int}/{posttitle}",
new { controller = "BlogPost", action = "Post", postitle = "" });
}
else
{
endpoints.MapControllerRoute(
"Original Post Format",
"~/{posttitle}.aspx",
new { controller = "BlogPost", action = "Post", posttitle = "" });

endpoints.MapControllerRoute(
"New Post Format",
"~/{posttitle}",
new { controller = "BlogPost", action = "Post", postitle = "" });

}
endpoints.MapControllerRoute(
name: "default", "~/{controller=Home}/{action=Index}/{id?}");
});

If someone shows up at any of the half dozen URL formats I've had over the years they'll get a 301 permanent redirect to the canonical one.

The old IIS format is added to our site with just two lines:

var options = new RewriteOptions().AddIISUrlRewrite(env.ContentRootFileProvider, IISUrlRewriteConfigPath);

app.UseRewriter(options);

And offers rewrites to everything that used to be. Even thousands of old RSS readers (yes, truly) that continually hit my blog will get the right new clean URLs with rules like this:

<rule name="Redirect RSS syndication" stopProcessing="true">

<match url="^SyndicationService.asmx/GetRss" />
<action type="Redirect" url="/blog/feed/rss" redirectType="Permanent" />
</rule>

Or even when posts used GUIDs (not sure what we were thinking, Clemens!):

<rule name="Very old perm;alink style (guid)" stopProcessing="true">

<match url="^PermaLink.aspx" />
<conditions>
<add input="{QUERY_STRING}" pattern="&amp;?guid=(.*)" />
</conditions>
<action type="Redirect" url="/blog/post/{C:1}" redirectType="Permanent" />
</rule>

We also always try to express rel="canonical" to tell search engines which link is the official - canonical - one. We've also autogenerated Google Sitemaps for over 14 years.

What's the point here? I care about my URLs. I want them to stick around. Every 404 is someone having a bad experience and some thoughtful rules at multiple layers with the flexibility to easily add others will ensure that even 10-20 year old references to my blog will still resolve!

Oh, and that article that they didn't like over on Hacker News? It's automatically now https://www.hanselman.com/blog/urls-are-ui so that's nice, too!

Here's some articles I've already written on the subject of moving this blog to the cloud:

If you find any issues with this blog like

  • Broken links and 404s where you wouldn't expect them
  • Broken images, zero byte images, giant images
  • General oddness

Please file them here https://github.com/shanselman/hanselman.com-bugs and let me know!


Sponsor: Suffering from a lack of clarity around software bugs? Give your customers the experience they deserve and expect with error monitoring from Raygun.com. Installs in minutes, try it today!


© 2020 Scott Hanselman. All rights reserved.
     

Using the ASP.NET Core Environment Feature to manage Development vs. Production for any config file type

$
0
0

ASP.NET Core can understand what "environment" it's running under. For me, that's "development," "test," "staging," "production," but for you it can be whatever makes you happy. By default, ASP.NET understand Development, Staging, and Production.

You can the change how your app behaves by asking "IsDevelopment" to do certain things. For example:

if (env.IsDevelopment())

{
app.UseDeveloperExceptionPage();
}

if (env.IsProduction() || env.IsStaging() || env.IsEnvironment("Staging_2"))
{
app.UseExceptionHandler("/Error");
}

There are helpers for the standard environments, or I can just pass in a string.

You can also make Environmental decisions with taghelpers like this in your Views/Razor Pages. I did this when I dynamically generated my robots.txt files:

@page

@{
Layout = null;
this.Response.ContentType = "text/plain";
}
# /robots.txt file for http://www.hanselman.com/
User-agent: *
<environment include="Development,Staging">Disallow: /</environment>
<environment include="Production">Disallow: /blog/private
Disallow: /blog/secret
Disallow: /blog/somethingelse</environment>

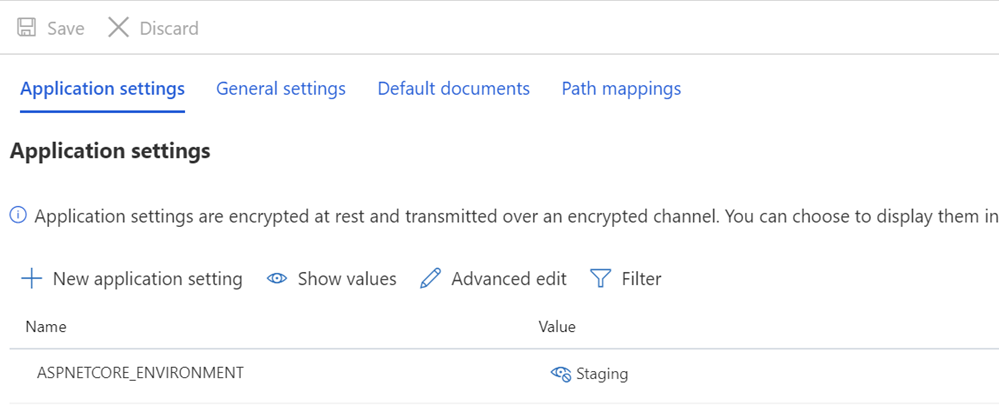
This is a really nice way to include things like banners or JavaScript when your site is running in a certain environment. These are easily set as environment variables if you're running in a container. If you're running in an Azure App Service you set the environment from the Config blade:

Now that I've moved this blog to Azure, we have a number of config files that are specific to this blog. Since the configuration features of ASP.NET are so flexible it was easy to extend this idea of environments to our own config files.

Our Startup class sets up the filesnames of our various config files. Note the second line, if we have no environment, we just look for the regular file name.

public Startup(IWebHostEnvironment env)

{
hostingEnvironment = env;

var envname = string.IsNullOrWhiteSpace(hostingEnvironment.EnvironmentName) ?
"." : string.Format($".{hostingEnvironment.EnvironmentName}.");

SiteSecurityConfigPath = Path.Combine("Config", $"siteSecurity{envname}config");
IISUrlRewriteConfigPath = Path.Combine("Config", $"IISUrlRewrite{envname}config");
SiteConfigPath = Path.Combine("Config", $"site{envname}config");
MetaConfigPath = Path.Combine("Config", $"meta{envname}config");
AppSettingsConfigPath = $"appsettings.json";

...

Here's the files in my Visual Studio. Note that another benefit of this naming structure is that the files nest nicely underneath their parent file.

Nested config files

The formalization of environments is not a new thing, but the adoption of it deeply into our application at every level has allowed us to move from dev to staging to production very easily. It's very likely that you have done this in your application, but you may have rolled your own solution. Take a look if you can remove code and adopt this built in technique.

Here's some articles I've already written on the subject of moving this blog to the cloud:

If you find any issues with this blog like

  • Broken links and 404s where you wouldn't expect them
  • Broken images, zero byte images, giant images
  • General oddness

Please file them here https://github.com/shanselman/hanselman.com-bugs and let me know!


Sponsor: Suffering from a lack of clarity around software bugs? Give your customers the experience they deserve and expect with error monitoring from Raygun.com. Installs in minutes, try it today!


© 2020 Scott Hanselman. All rights reserved.
     
Viewing all 1148 articles
Browse latest View live


<script src="https://jsc.adskeeper.com/r/s/rssing.com.1596347.js" async> </script>