Quantcast
Channel: Scott Hanselman's Blog
Viewing all 1148 articles
Browse latest View live

How to make separate Work and Personal Profiles with the New Microsoft Edge on Beyonce's Internet

$
0
0

Edge for WerkI'm a long time Chrome user but have been slowly finding myself using the new Edge (Edgium?) and am now basically living in it full time.

Why?

  • My work use O365/M365 logins and it is great with a "Work profile" and "Personal profile" that keeps EVERYTHING separate.
  • It even has a "open link as Work/Personal" right click menu that I use WAY more often than I would have thought.
    Open Link as Work
  • It'll auto switch you to Work or Personal logins when you end up getting a OneDrive link or are logging into Azure.
  • Runs on my last Windows 7 machine through my Windows 10 machines, and <GASP> since it syncs everything AND has work/personal profiles I use it on my iPhone 11 Max.

But the main reason? I really like the way it deals with PWAs - Progressive Web Apps. Basically "make this website an app." I'll pretend if you pretend. You can use Outlook, Twitter, Gmail, Teams, TONS of websites as apps that are no-install. They all still run in Edge (with the Chromium heart) but they are pinned to your taskbar and/or start menu. A bunch of folks on my team legit don't install Office or Teams anymore. They use all of Office.com as a PWA. I was surprised but it works.

Here's some of my installed PWAs/apps:

Install this site as an app

If I visit Twitter.com for example and click the Circle with the Plus inside it in the URL bar, I'll see this.

image

Once it's "installed" I can pin it and run it and it looks like this in the taskbar. Four of these apps are PWAs with Edge. Gmail's icon is lame and old looking. They should fix that for their PWA.

Pinned apps with Edge

Lovely.

Making custom Pinned Edge icons with Profiles

I mentioned profiles before. Here's mine. I have no idea why I bothered to hide the emails.

Edge profile picker

The picker is nice, but I actually wanted TWO DIFFERENT EDGES pinned to my Taskbar. A Work and a Personal Edge. I find it easier to compartmentalize and easier than switching.

UPDATE: It seems as of a recent version of Edge you can just open Edge the usual way, switch to the Profile you want, then right click the running Edge in your Taskbar and "Pin to Taskbar" and you'll get your custom Edge with the Profile Directory switch correctly configured! Super convenient. That means the manual steps below are not needed unless you want to understand the internals, add a custom switch (which can also be done from Properties), or apply a custom icon.

Right click your Desktop and say New Shortcut from the right click menu.
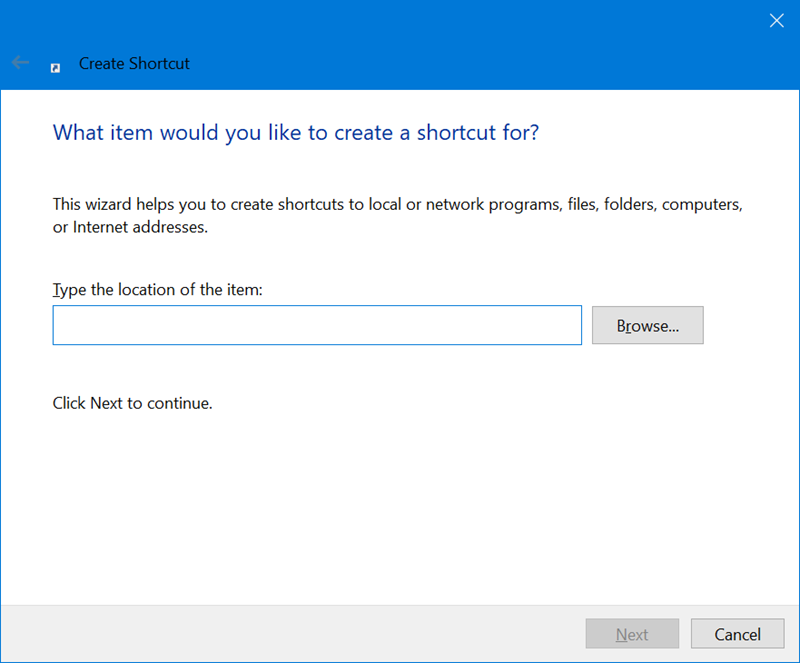
File | New Shortcut

Put this in the location box above but change USERNAME to the right one for YOUR folder structure. And note --profile-directory. You can find your Profile folders in C:\Users\USERNAME\AppData\Local\Microsoft\Edge SxS\User Data. Mine are Profile 1 and 2, where 1 is my first Personal one and 2 is Work. Check yours and do the right thing. Note also the msGuidedSwitchAllowed switch that is optional. That tells you if you want Edge to suggest another profile if you visit a website that you really need your Work (or anotherr profile) logged in for.

"C:\Users\USERNAME\AppData\Local\Microsoft\Edge SxS\Application\msedge.exe" --profile-directory="Profile 2" --enable-features=msGuidedSwitchAllowed

Paste this in and hit Next, then Name the shortcut. If you like, use an Icon Editor and make a custom icon overlay for your work or personal Edge so you can tell the difference! I like Liquid Icon for simple editing or Greenfish Icon Editor.

I thought about using the Microsoft logo as an overlay for work but instead chose Beyoncé, so it's Edge for Werk.

image

Since it's a custom profile it can have a custom icon. Edge will make one for you you can use with YOUR face in your Profile X folder as mentioned above. Now my Desktop has two Edge icons, just like I like it.

I can also have the Canary (early builds), Dev version, or Stable Edge pinned. Lots of choices.

Edge for Werk

This makes it easy for me to run and keep track of what context I'm running in when I'm using a personal machine for Work.

Also note if you go to edge://settings/profiles/multiProfileSettings you can decide which profile a new URL external link will open with! You can also turn off Auto profile switching if you like.
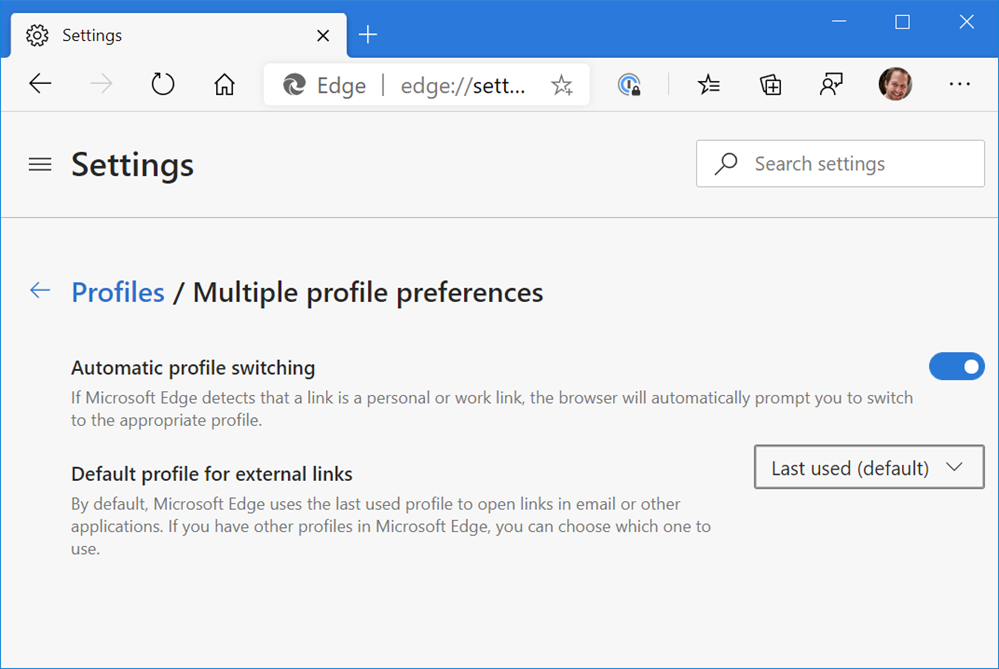
Multiple profile preferences

All this, plus PWAs has made my browsing on Beyoncé's Internet quite nice lately.


Sponsor: Have you tried developing in Rider yet? This fast and feature-rich cross-platform IDE improves your code for .NET, ASP.NET, .NET Core, Xamarin, and Unity applications on Windows, Mac, and Linux.


© 2020 Scott Hanselman. All rights reserved.
     

Exploring the .NET open source hybrid ORM library RepoDB

$
0
0

ShutterstockIt's nice to explore alternatives, especially in open source software. Just because there's a way, or an "official" way doesn't mean it's the best way.

Today I'm looking at RepoDb. It says it's "a hybrid ORM library for .NET. It is your best alternative ORM to both Dapper and Entity Framework." Cool, let's take a look.

Michael Pendon, the author puts his micro-ORM in the same category as Dapper and EF. He says "RepoDb is a new hybrid micro-ORM for .NET designed to cater the missing pieces of both micro-ORMs and macro-ORMs (aka full-ORMs). Both are fast, efficient and easy-to-use. They are also addressing different use-cases."

Dapper is a great and venerable library that is great if you love SQL. Repo is a hybrid ORM and offers more than one way to query, and support a bunch of popular databases:

Here's some example code:

/* Dapper */

using (var connection = new SqlConnection(ConnectionString))
{
var customers = connection.Query<Customer>("SELECT Id, Name, DateOfBirth, CreatedDateUtc FROM [dbo].[Customer];");
}

/* RepoDb - Raw */
using (var connection = new SqlConnection(ConnectionString))
{
var customers = connection.ExecuteQuery<Customer>("SELECT Id, Name, DateOfBirth, CreatedDateUtc FROM [dbo].[Customer];");
}

/* RepoDb - Fluent */
using (var connection = new SqlConnection(ConnectionString))
{
var customers = connection.QueryAll<Customer>();
}

I like RepoDB's strongly typed Fluent insertion syntax:

/* RepoDb - Fluent */

using (var connection = new SqlConnection(connectionString))
{
var id = connection.Insert<Customer, int>(new Customer
{
Name = "John Doe",
DateOfBirth = DateTime.Parse("1970/01/01"),
CreatedDateUtc = DateTime.UtcNow
});
}

Speaking of inserts, it's BulkInsert (my least favorite thing to do) is super clean:

using (var connection = new SqlConnection(ConnectionString))

{
var customers = GenerateCustomers(1000);
var insertedRows = connection.BulkInsert(customers);
}

The most interesting part of RepoDB is that it formally acknowledges 2nd layer caches and has a whole section on caching in the excellent RepoDB official documentation. I have a whole LazyCache subsystem behind my podcast site that is super fast but added some complexity to the code with more Func<T> that I would have preferred.

This is super clean, just passing in an ICache when you start the connection and then mention the key when querying.

var cache = CacheFactory.GetMemoryCache();

using (var connection = new SqlConnection(connectionString).EnsureOpen())
{
var products = connection.QueryAll<Product>(cacheKey: "products", cache: cache);
}

using (var repository = new DbRepository<Product, SqlConnection>(connectionString))
{
var products = repository.QueryAll(cacheKey: "products");
}

It also shows how to do generated cache keys...also clean:

// An example of the second cache key convention:

var cache = CacheFactory.GetMemoryCache();
using (var connection = new SqlConnection(connectionString).EnsureOpen())
{
var productId = 5;
Query<Product>(product => product.Id == productId,
cacheKey: $"product-id-{productId}",
cache: cache);
}

And of course, if you like to drop into SQL directly for whatever reason, you can .ExecuteQuery() and call sprocs or use inline SQL as you like. So far I'm enjoying RepoDB very much. It's thoughtfully designed and well documented and fast. Give it a try and see if you like it to?

Why don't you head over to https://github.com/mikependon/RepoDb now and GIVE THEM A STAR. Encourage open source. Try it on your own project and go tweet the author and share your thoughts!


Sponsor: Have you tried developing in Rider yet? This fast and feature-rich cross-platform IDE improves your code for .NET, ASP.NET, .NET Core, Xamarin, and Unity applications on Windows, Mac, and Linux.


© 2020 Scott Hanselman. All rights reserved.
     

Finding Joy in Making Happy Little Computer Videos on YouTube

$
0
0

Happy little coding videosWe're all remote and it's sad, but I've found some new joy of late in rebooting my little low-traffic newsletter AND making YouTube videos when the kids are asleep. You can go subscribe to my YouTube now and I encourage you to explore the Playlists.

I'm enjoying doing videos on topics like:

Here's some very recent videos I'm proud of!

Learning Git 101

But the Videos that people really seem to have enjoyed (which was surprising to me) was in this Playlist on "Computer Stuff They Didn't Teach You."

They are simple, calm, and quiet. Virtually no editing - it's all done in one shot - and I explain various topics around computers. Only one person complained that my voice made them fall asleep, so that's good!

I'll be updating videos more often while it remains enjoyable and folks appreciate it. I will try to do some more Git videos soon on squashing, cherry picking, rebasing, and maintaining your branch while main keeps moving forward.

I hope you enjoy them!


Sponsor: Centralize and search structured application logs to confidently diagnose problems - even faster and easier with [Seq 2020.1]!


© 2020 Scott Hanselman. All rights reserved.
     

Official Support for Remote Debugging a .NET Core Linux app in WSL2 from Visual Studio on Windows

$
0
0

I've blogged before about Developing on Docker with the new and improved Visual Studio Container Tools (and WSL2) and also Remote Debugging a .NET Core Linux app in WSL2 from Visual Studio on Windows.

It's the second one that I'm talking about today. You can now run .NET Core console and web apps in WSL2 and debug them directly from Visual Studio 2019!

What do you need?

Here's the experience in Visual Studio 2019 when the extension is installed. It "just works" and it makes it super easy to switch between running on Windows (under IIS or the Kestrel web server or under Kestrel under your default Linux distribution.

WSL 2 in the Visual Studio Debugging Menu

Check this out, you can see that .NET Core, from the Linux/WSL 2 perspective, is loaded out of /usr/share/dotnet/shared but my source remains on my /mnt/d drive (my Windows D:) and debugging Just Works.

image

You'll also notice that we are running on https://localhost:5001 and that localhost and ports from the Windows point of view maps to localhost and points (via a local tunnel that's transparent) to WSL 2.

How does the SSL cert work if WSL 2's Linux Kestrel web server is serving it?

You can see that there's a symbolic link between my WSL ~/.aspnet folder and my local profile in Windows so that this app shares SSL certs and that the same cert is served with Kestrel on Windows and Kestrel on Linux.

scott@IRONHEART:~$ cd .aspnet

scott@IRONHEART:~/.aspnet$ ls
DataProtection-Keys https
scott@IRONHEART:~/.aspnet$ cd https/
scott@IRONHEART:~/.aspnet/https$ ls
hanselminutes.core.pfx
scott@IRONHEART:~/.aspnet/https$ ls -alogF
total 12
drwxr-xr-x 2 4096 Jun 23 17:02 ./
drwxr-xr-x 4 4096 Jun 23 17:02 ../
lrwxrwxrwx 1 71 Jun 23 17:02 hanselminutes.core.pfx
->
/mnt/c/Users/scott/AppData/Roaming/ASP.NET/Https/hanselminutes.core.pfx*
scott@IRONHEART:~/.aspnet/https$

I broke that line up with the symbolic link -> along 3 lines so it wouldn't wrap on this blog.

Now you can run and debug .NET Core apps on Windows and Linux using both VS Code and Visual Studio 2019! I'm using Visual Studio 2019's free Community Edition and it works great. This helps me save money as I've moved my Podcast site to Linux in Azure and it makes my local development better match my cloud reality. Give it a try!


Sponsor: Centralize and search structured application logs to confidently diagnose problems - even faster and easier with Seq 2020.1!


© 2020 Scott Hanselman. All rights reserved.
     

How do I find which directory my .NET Core console application was started in or is running from?

$
0
0

stressedI got a great question emailed to me today. And while I could find the answer and email them back, I also have a limited number of keystrokes. Plus, every question that moves knowledge forward is a gift, and I don't want to ignore a gift. So instead, I've email my new friend a link to this blog!

Here is their question:

The tl;dr question: how do I find which directory the app was started in?

I have a CLI app in .NET Core 3 that is supposed to sit in your apps folder you have in your path, do something when you run it, then exit.

Unfortunately, it needs a single line of configuration (an API key), which store in a text file. I want to keep the app portable (ie. avoid going into other directories), so I want to store the config file right next to the executable.

And since I want it to be small and easily distributed, I set up .NET to merge and prune the EXE on build. (I think I got the idea from your blog btw, thanks! :) It is a simple app that does a single task, so I figure it should be one EXE, not 50 megabytes in 80 files.

And there the problem lies: If the config file is right next to the exe, I need to know where the exe is located. BUT, it seems that when I have the entire app built into a single EXE like this, .NET actually extracts the embedded DLL to some temporary location in my filesystem, then runs it from there. Every method for finding the startup assembly's location I have found, either by googling or exploring with reflection while it runs, only gives me the location in the temp directory, not the one where the app was actually launched from. The app then attempts to load the config file from this temp directory, which obviously fails.

Let's break this problem down:

  • .NET 3.1 LTS (long term support) has a cool feature where you can ship a single EXE with no dependencies. You ship "myapp.exe" and it just works. One file, no install.
    • When you run the EXE in .NET 3.1, the system "unzips" the app and its dependencies into a temp folder.
  • If you have a config file like myapp.exe.config, you'd like the user to keep that file NEXT TO THE EXE. That way you have two files next to each other and it's simple.
    • But how do you find this config file if you got started from a random temp folder?

Here's how things work in .NET Core 3.1:

using System;

using System.Diagnostics;
using System.IO;

namespace testdir
{
class Program
{
static void Main(string[] args)
{
Console.WriteLine($"Launched from {Environment.CurrentDirectory}");
Console.WriteLine($"Physical location {AppDomain.CurrentDomain.BaseDirectory}");
Console.WriteLine($"AppContext.BaseDir {AppContext.BaseDirectory}");
Console.WriteLine($"Runtime Call {Path.GetDirectoryName(Process.GetCurrentProcess().MainModule.FileName)}");
}
}
}

And here's the output of this app when started from elsewhere. Look carefully at the paths:

~\Desktop> .\testdir\bin\Debug\netcoreapp3.1\win-x64\publish\testdir.exe

Launched from C:\Users\scott\Desktop
Physical location C:\Users\scott\AppData\Local\Temp\.net\testdir\30gxvy1b.yq3\
AppContext.BaseDir C:\Users\scott\AppData\Local\Temp\.net\testdir\30gxvy1b.yq3\
Runtime Call C:\Users\scott\Desktop\testdir\bin\Debug\netcoreapp3.1\win-x64\publish

You'll note that when on .NET 3.1 if you want to get your "original birth location" you have to do a little runtime dance. Starting with your current process, then digging into the MainModules's filename, then getting that file's Directory. You'll want to catch that at startup as it's not a super cheap call you want to make all the time.

How does it work in .NET Core 5 (> preview 7)? Well, because the assemblies are embedded and loaded from memory in 5, so like any other in-memory assembly, they don't have a location. Any use of Assembly.Location is going to be suspect.

NOTE: There is some work happening on an analyzer that would flag weird usage when you're using Single File publish, so you won't have to remember any of this. Additionally, if you are on .NET 5 and you want to have the .NET 3.1 temp file behavior, you can use a compatibility property called IncludeAllContentInSingleFile.

Here's the same app, running in .NET 5 as a single EXE and unfolding directly into memory (no temp files):

Launched from C:\Users\scott\Desktop

Physical location C:\Users\scott\Desktop\testdir\bin\Debug\net5.0\win-x64\publish\
AppContext.BaseDir C:\Users\scott\Desktop\testdir\bin\Debug\net5.0\win-x64\publish\
Runtime Call C:\Users\scott\Desktop\testdir\bin\Debug\net5.0\win-x64\publish

You'll note here that you get the behavior you expect with each call.

Here's the answer then:

    • You should use AppContext.BaseDirectory on .NET 5 to get the truth
    • You can use the runtime calls (and cache them) with MainModule (the last line in the example) for .NET 3.1.

Hope this helps!


Sponsor: Never miss a bug — send alerts to Slack or email, and find problems before your customers do, using Seq 2020.1.


© 2020 Scott Hanselman. All rights reserved.
     

How to SSH into WSL2 on Windows 10 from an external machine

$
0
0

LinuxCool blog post eh? Good title, right?

DO NOT DO THE INSTRUCTIONS IN THIS POST

until you have read the FOLLOW UP THE EASY WAY how to SSH into Bash and WSL2 on Windows 10 from an external machine and made the right decision for YOU!

OpenSSH has shipped in Windows for 5 years now, so that's cool. You can do lots of things!

But often folks want to SSH not into their Windows 10 machine, but rather, into WSL2 running within/behind their Windows 10 machine. While WSL2 can forward ports from the inside out (for example, localhost:8000 within a WSL2 instance being made available from the local Windows 10 machine) if you want to build a path to a WSL2 port from completely outside a machine, you'll need to be a lot more explicit.

Install OpenSSH-Server in WSL

First, install OpenSSH server inside your Linux Distro:

scott@IRONHEART:~$ sudo apt install openssh-server

[sudo] password for scott:
Reading package lists... Done
Building dependency tree
Reading state information... Done
openssh-server is already the newest version (1:7.6p1-4ubuntu0.3).
0 upgraded, 0 newly installed, 0 to remove and 0 not upgraded.

Decide on your SSH port number

Next, in WSL2, edit /etc/ssh/sshd_config and uncomment out the Port line.

I edited it with sudo nano /etc/ssh/sshd_config, no shame!

SSH is usually 22, but I like to use something like 2222 so it's less obvious but still easy to remember AND is different from your Window's machine's 22. Note that I told it to listen on 0.0.0.0, so, any adapter. You can also set PasswordAuthentication to "no" if you want to use SSH keys rather than passwords for authentication. Set it to "yes" if you know what you're doing and don't know how to use ssh keys.

/etc/ssh/sshd_config


...STUFF ABOVE THIS...
Port 2222
#AddressFamily any
ListenAddress 0.0.0.0
#ListenAddress ::

...STUFF BELOW THIS...

From within WSL2 get your IP address using "ifconfig." Mine is 172.23.129.80, yours will likely be 172.SOMETHINGELSE and it will change when WSL2 starts up cold.

You may want to ensure it's running, considering WSL2 has no systemd.

service ssh start

Forward Ports into WSL2

Now, from an Administrator Windows prompt - that can be cmd.exe or powershell.exe, it doesn't matter, use the net shell "netsh" to add a portproxy rule. Again, change connectaddress to YOUR WSL2 ipaddress, which is an internal address to your machine.

netsh interface portproxy add v4tov4 listenaddress=0.0.0.0 listenport=2222 connectaddress=172.23.129.80 connectport=2222

Open the Firewall

Next, from the same Administrator Windows prompt, open an incoming Firewall Port. You can do it from the Advanced Firewall Settings, but even easier you can use netsh again!

netsh advfirewall firewall add rule name=”Open Port 2222 for WSL2” dir=in action=allow protocol=TCP localport=2222

You can list all your portproxy rules like this if you're concerned:

netsh interface portproxy show v4tov4

You can remove them all if you want with

netsh int portproxy reset all

A scripted solution?

GitHub user and community member Daehahn is working on a PowerShell Script to automate this process. The comment thread starts here and the gist for the PowerShell script for wsl2-network.ps1 is here. It resets firewall and portproxies, finds your default distro's new IP, and sets you up again. Save this .ps1 somewhere, read it, and run "unblock-file wsl2-network.ps1" on it so you can set up your system quickly for Shushing into your WSL2 instance!

Note the $Ports variable that likely opens up more than you want or need, remembering that WSL and VS Code will automatically forward ports to localhost when needed for development.

Hope this helps! It would be nice if WSL2 didn't change it's internal IP address every time it starts up so that this could be made even easier and more automated.

To conclude and sum up:

  • This blog post - the one you are reading now, has Windows only forwarding ports, and uses WSL2's Linux OpenSSH and authenticates against Linux. Windows is only involved peripherally. The WSL2 IP address changes on reboot and you'll need to maintain your portproxy rules and firewall rules with the script listened at the end of that post.
  • This other blog post - over here - uses Windows' OpenSSH and authenticates with Windows and then runs WSL2. WSL2 starts up, uses bash, and Windows handles the TCP traffic.

Understand what you want and use the right one for you.

Other cool links:

Hope this helps! Also, please do subscribe to my YouTube channel!


Sponsor: Never miss a bug — send alerts to Slack or email, and find problems before your customers do, using Seq 2020.1.


© 2020 Scott Hanselman. All rights reserved.
     

THE EASY WAY how to SSH into Bash and WSL2 on Windows 10 from an external machine

$
0
0

Some folks always trying to ice skate up hillThis is an interesting blog post on How to SSH into WSL2 on Windows 10 from an external machine. Read it. Know how it works. Learn it. AND DO NOT DO IT BECAUSE IT'S TOO COMPLEX.

DO NOT DO THIS. It's fine. It works. But it's baroque. You're forwarding ports into a little VM'ed local subnet, you're dealing with WSL2 IP addresses changing, you'll have to keep your VM running, and you're generally trying to ice skate up hill.

Here's the thing. In that post - which you should not do - you're turning off the Windows Firewall for your port, forwarding to an internal subnet, and then letting WSL take over.

BUT! Windows 10 already knows how to accept SSH connections. In fact, it's shipped OpenSSH as a "Feature on Demand" for years. The issue is that you (Mac and Linux switchers) don't like the default shell - PowerShell.

So why not change the default Windows shell for SSH to WSL2's Bash?

Boom. Now you have no port forwarding, firewalls are only opening for one process, and your WSL2 instance starts up on entry. Literally the best of all worlds.

How do you set up SSH'ing into WSL2 on your Windows 10 machine

First, open an admin PowerShell prompt (Start menu, type PowerShell, hold ctrl+shift, and hit enter) type this:

> Get-WindowsCapability -Online | ? Name -like 'OpenSSH*'


Name : OpenSSH.Client~~~~0.0.1.0
State : Installed

Name : OpenSSH.Server~~~~0.0.1.0
State : NotPresent

See how I have the Client and not the OpenSSH Server? Add it:

Add-WindowsCapability -Online -Name OpenSSH.Server~~~~0.0.1.0

Now either start the SSHD service, or set it to start automatically:

Start-Service sshd

Get-Service sshd

or automatic:

Set-Service -Name sshd -StartupType 'Automatic'

Configuring the Default Shell for OpenSSH in Windows 10

On my server (the Windows machine I'm SSHing into) I will set a registry key to set the default shell. In this case, I'll use open source cross platform PowerShell Core. You can use whatever makes you happy and WSL2's bash makes me happy.

New-ItemProperty -Path "HKLM:\SOFTWARE\OpenSSH" -Name DefaultShell -Value "C:\WINDOWS\System32\bash.exe" -PropertyType String -Force

Note that bash.exe in this context starts up "wsl -d YOURDEFAULTDISTRO" so you'll want to know what your Default is, and if you don't like it, change it with wsl --set-default DISTRO.

HEADS UP: You need the FULL AND CORRECT PATH in that command above. It works for any shell. Since I'm using bash.exe, I get WSL2 starting up for free but SSH with this solution is using Windows's SSH keys and Windows auth. Note that when you're entering your password for authentication!

Even better if I wanted to add a menu item (profile) to one local Windows Terminal with an entry to ssh into my WSL on my remote Windows Machine that would automatically log me into it from elsewhere using public keys, I could do that also!

To conclude and sum up:

  • This blog post - the one you are reading uses Windows' OpenSSH and authenticates with Windows and then runs WSL2. WSL2 starts up, uses bash, and Windows handles the TCP traffic.
  • This other blog post - over here - has Windows only forwarding ports, and uses WSL2's Linux OpenSSH and authenticates against Linux. Windows is only involved peripherally. The WSL2 IP address changes on reboot and you'll need to maintain your portproxy rules and firewall rules with the script listened at the end of that post.

Understand what you want and use the right one for you.

Enjoy!


Sponsor: Bug in prod? Get to the bottom of it, fast, with live production log search in Seq 2020.1.


© 2020 Scott Hanselman. All rights reserved.
     

Reviewing the Elecrow CrowPi2 Raspberry Pi Laptop and STEM Education Platform

$
0
0

11540c45729eb73fd9676faf6b05914c_originalI love the Raspberry Pi and I am a fan of the CrowPi from Elecrow. I have two of their first CrowPi device and I use them in demonstrations and talks all the time, especially when talking to students.

They have a Kickstarter ending this week for the new CrowPi2. It's an update of the original CrowPi which was basically a Raspberry Pi in a tiny suitcase...instead the CrowPi2 looks like a laptop! The magical part is that the full exploration and sensor board is hidden underneath a wireless keyboard with trackpad, held on with magnets!

The CrowPi folks sent me an early CrowPi2 because I was a vocal supporter of the previous version, so I did a LIVE video unboxing on twitter as well as a follow up software video on the CrowPi2. I am not being paid for this review and I always am honest with y'all about the stuff I like. I plan on buying a few for my kids' public school science class.

This blog post in Chromium on a Raspberry Pi CrowPi2

It's more than "just a laptop shaped case" for the Raspberry Pi, the CrowPi2 has an integrated 1080p screen, 22 onboard sensors (that can be connected and disconnected with a switch), a microphone and 2MP webcam, speaker, as well as support for both 5v battery and 12v external power.

The keyboard is also quiet clever and very thin. It's held on with magnets and is charged with any micro-USB connector. Hidden underneath is an upgrade of the original CrowPi sensor board!

Sensors hidden under the keyboard

Here's a close up of the sensor board:

20+ Sensors on the CrowPi2

The part I was the most surprised with was that there's 20+ projects already setup out of the box. I usually get a device like this and maybe there's some sample code on the desktop that you can run with Python. The CrowPi2 is more polished in that it has a whole front-end introductory UI that lets you run the samples right away - and they are cool samples! I show a few of the LIVE samples in my Video on Twitter.

The plastic in the early version I got is a little soft, and I might have preferred it in black versus silver, but it's light and drops in a backpack easily. It's somewhat thick (remember this is a Raspberry PI, not an iPad or a millimeter thin laptop) so to be conscious if you think you're getting an Ultrabook. This is a Raspberry Pi-based laptop and learning platform. Would be a great starter for any kid as the Pi4 is pretty legit and it'll even run Chromium!

NOTE: I did try to join a Zoom web-based meeting over Chromium and while the speaker and mic were detected, I wasn't able to get Chromium to see the webcam. I'll report back on this as clearly all the parts are there to allow this little laptop to join at least a web Zoom meeting! That would be even cooler.

UPDATE! I was able to enter a web-based Zoom meeting! There's a little USB cable underneath that snakes out then in again to allow access to the webcam. Very clever! I don't think this is a reliable option for Zoom meetings, but I can confirm that the webcam works!

IMG_5022

Here's a side view of the CrowPi2, as well as how the Raspberry Pi mounts inside.

CrowPi2 from the Side

Raspberry Pi mounted inside

There is even a cool little retractable tray in the back of the CrowPi2 that you can use for a battery (with a micro-USB cable you can run the entire device) or for holding wires, LEDs, and resisters for projects.

Cool tray in the back of the CrowPi2

The real magic is the sample projects - they are quite cool. They've added AI and Machine Learning lessons with Thonny PI, loaded MineCraft Pi. There are games, sensor tests, and they basically exercise the whole main sensor board with Python.

NOTE: I've also installed .NET Core on Raspberry Pi and it works great since it's an ARM Machine. You can even run Docker!

The basic kit is very reasonably priced compared to the much more barebones kits you see on Amazon. While I wouldn't call it a "premium" kit due to the plastic case, it's definitely the best Raspberry Pi kit I've ever used.

Playing Games on the CrowPi

You can go support the new CrowPi2 over on their KickStarter ending this week, it's pretty darn cool.


Sponsor: Bug in prod? Get to the bottom of it, fast, with live production log search in Seq 2020.1.


© 2020 Scott Hanselman. All rights reserved.
     

Free Books for Learning and Getting Started with Cloud-Native .NET Apps

$
0
0

What is Docker? Can I use it with .NET?If you haven't been over to the Architecture section of the .NET site lately, I'd encourage you to go check it out. There is a TON of free learning content, books, code, and more!

Containers for Beginners

We've just put up a new Hello World tutorial for making your first microservice, and there's a video series on Docker and Containers as well. There are step-by-step instructions for installing .NET and building your first microservice using Docker. When you're done, follow how to deploy your microservice easily to Azure and Azure Kubernetes Service (AKS).

Intermediate - Cloud-native microservices

If you have about an hour, you can try out this new Learn Module for free - Create and deploy a cloud-native ASP.NET Core microservice. you can do it ALL in the browser with no software installation!

Imagine you're a software developer for an online retailer named eShopOnContainers. The retailer uses a cloud-native, microservices-based architecture developed using .NET Core for its online storefront. A new project is underway to add support for accepting coupon codes at checkout. Your assignment on the project is to finish writing a containerized ASP.NET Core web API to manage coupon codes—a web API that will be referred to as the coupon service.

This module explores completing the coupon service, adding it to the existing solution, and deploying it to the multi-container Kubernetes cluster.

Learning objectives

  • Examine existing ASP.NET Core microservices running in Azure Kubernetes Service (AKS).
  • Implement a new ASP.NET Core microservice and containerize it.
  • Publish the Docker image to Azure Container Registry (ACR).
  • Deploy the Docker container to the existing AKS cluster.

Free Books

Everyone loves free books. There are a number of free Cloud-Native Free Resources to download.

Cloud-native e-book - Formats: PDF | Online

 cloud-native-azure

This free e-book defines cloud native, introduces a sample app built using cloud-native principles, and covers topics common to most cloud-native applications. The audience for this guide is developers, development leads, and architects who are interested in learning how to build applications designed for the cloud. A secondary audience is technical decision-makers who plan to choose whether to build their applications using a cloud-native approach.

gRPC for WCF Developers e-Book - Formats: PDF | Online

 grpc-for-wcf-devs

This free e-book explains gRPC, relating each concept to the equivalent features of WCF, and offers guidance for migrating an existing WCF app to gRPC. This guide was written for developers working in .NET Framework or .NET Core who have previously used WCF, and who are seeking to migrate their applications to a modern RPC environment for .NET Core 3.0 and later versions. More generally, if you are upgrading, or considering upgrading, to .NET Core 3.0, and you want to use the built-in gRPC tools, this guide is also useful.

Serverless apps e-book - Formats: PDF | Online

 serverless-apps-cover-v3

Updated to Azure Functions 3.0! This guide focuses on cloud native development of applications that use serverless. The book highlights the benefits and exposes the potential drawbacks of developing serverless apps and provides a survey of serverless architectures. This guide was written for developers and solution architects who want to build enterprise applications with .NET that may use serverless components either on premises or in the cloud. It's useful to developers, architects, and technical decision makers interested in:

  • Understanding the pros and cons of serverless development
  • Learning how to approach serverless architecture
  • Example implementations of serverless apps

.NET Microservices e-book - Formats: PDF | Online

 cover-small

Updated to .NET Core 3.1! This guide is an introduction to developing microservices-based applications and managing them using containers. It discusses architectural design and implementation approaches using .NET Core and Docker containers.

We wrote this guide for developers and solution architects who are new to Docker-based application development and to microservices-based architecture. This guide is for you if you want to learn how to architect, design, and implement proof-of-concept applications with Microsoft development technologies (with special focus on .NET Core) and with Docker containers.

You will also find this guide useful if you are a technical decision maker, such as an enterprise architect, who wants an architecture and technology overview before you decide on what approach to select for new and modern distributed applications.

ASP.NET Core e-book - Formats: PDF | Online

aspnet

Updated to .NET Core 3.1! This guide provides end-to-end guidance on building web applications using ASP.NET Core and Azure.

The audience for this guide is developers, development leads, and architects who are interested in building modern web applications using Microsoft technologies and services in the cloud.

A secondary audience is technical decision makers who are already familiar ASP.NET or Azure and are looking for information on whether it makes sense to upgrade to ASP.NET Core for new or existing projects.

We have even more free Books and Guides coming , I'll share them very soon! Check out https://dotnet.microsoft.com/learn/dotnet/architecture-guides for more.


Sponsor: Have you tried developing in Rider yet? This fast and feature-rich cross-platform IDE improves your code for .NET, ASP.NET, .NET Core, Xamarin, and Unity applications on Windows, Mac, and Linux.


© 2020 Scott Hanselman. All rights reserved.
     

What is .NET? How does it work? Is it a language or a Platform?

$
0
0

If you want to learn about .NET, I worked with my friends to make a whole series of videos at https://dot.net/videos that go into lots of details about C# the language, .NET the platform, ASP.NET the Web Platform and all the cool stuff you can make with it. There are a ton of free .NET videos and tutorials for you to explore (like 100, and they are easy, short, and binge worthy!)

But if you just have a few minutes and you're learning about .NET and just want to know WTF is .NET?!? Check out my YouTube. I'll explain the whole thing is a tight 20 min, from C# to F#, NuGet, and more. I'll show code, draw on the screen, and by the end you'll have a good sense of where .NET fits into the world versus things like Java, Node, Rust, Go, and more.

I hope you enjoy it! Please subscribe to my YouTube and explore my playlists and recent videos!


Sponsor: Have you tried developing in Rider yet? This fast and feature-rich cross-platform IDE improves your code for .NET, ASP.NET, .NET Core, Xamarin, and Unity applications on Windows, Mac, and Linux.


© 2020 Scott Hanselman. All rights reserved.
     

Connect to a device over Serial COM Port on Windows 10 with WSL1 TTY devices with Windows Terminal and minicom

$
0
0

imageI hope that this blog post is found and helps someone. I wasn't sure what to title it. Hope Google Juice got you here!

Read this whole post, there's a lot initially but there's really just two or three small pieces. It'll be worth it because you'll be able to have a nice one click menu and drop directly into a serial port terminal on Windows in the Windows Terminal

Often when you're doing embedded systems development you'll want to monitor or talk to the COM/Serial Port just like you SSH into remote system. Folks ask questions like "How to connect to a serial port as simple as using SSH?"

On Linux you'll use things like "screen /dev/ttyS0" for COM0. With Windows, however, the historical guidance has always been to use Putty. It'll work but it's somewhat old, quirky, and it doesn't integrate well with the Windows Terminal and a more modern workflow.

Say I have a small embedded microcontroller device that talks over a COM Port (usually via a USB->COM bridge) like an Arduino.

Let's assume this device talks to the COM port as if it were a terminal and it's outputting stuff I want to see. I'll use this great little CLI example app for Arduino from Mads Aasvik to simulate such a device.

Here's what it looks like under Arduino's Serial Monitor, for example. This is a Windows app doing serial communication with its own interface wrapping around it. I want to do this at a command line, and bonus points if it's in Windows Terminal.

Serial port monitor in Arduino talking to a Command Line Interface

Setup WSL1

If you have Windows 10 you can the Windows Subsystem for Linux quickly with this command at a Admin prompt:

dism.exe /online /enable-feature /featurename:Microsoft-Windows-Subsystem-Linux /all /norestart

Then go to the Windows Store and get any small Linux. Ubuntu or Kali will do for our purposes. Run it and set your user and password.  (I tried Alpine but it still has issues with screen and /dev/null/utmp)

NOTE: If you are using WSL2 and have set it as default, run wsl --list -v and ensure that your new distro is using WSL1 as only WSL1 will let us talk to the COM Ports. You can change it to WSL1 with "wsl --set-version DISTRONAME 1" from any command prompt.

To test this out now, run your new distro from any command line prompt like this. Add the "screen" app with sudo apt update" and "sudo app install screen".

You can see here that my Arduino serial device is on COM4. On Linux that device is /dev/ttyS4

Arduino is on COM4

That means that I should be able to talk it from any WSL1 Linux Distro on Windows like "screen /dev/ttyS4 9600" where 9600 is the speed/baud rate.

> wsl --list -v

NAME STATE VERSION
* Ubuntu-18.04 Stopped 2
kali-linux Stopped 1
Ubuntu-20.04 Stopped 2
WLinux Stopped 2

Get Minicom on your WSL1 distro

Screen is somewhat persnickety for Serial Port work so try Minicom. Minicom is a nice little text com program. Install with apt install minicom and run for the first time with "sudo minicom -s" to set your default. Note I've change the default port from /dev/modem to /dev/ttyS4 and the speed, in my case, to 9600.

Setting up Minicom on WSL

Then I hit enter and save settings as the dft (default) in minicom. You can also turn on Local Echo with "Ctrl-A E" and toggle it if needed. Now I can talk to my Arudino with minicom.

Ensure dialout permissions to talk to the COM port

NOTE: If you get "cannon open /dev/ttyS4: Permission denied, you may need to add your user to the dialout group. This way we don't need to sudo and get no prompt when running minicom!

> wsl -d kali-linux minicom

minicom: cannot open /dev/ttyS4: Permission denied
> wsl -d kali-linux
$ groups scott
scott : scott adm cdrom sudo dip plugdev
$ sudo gpasswd --add scott dialout
[sudo] password for scott:
Adding user scott to group dialout

I can now run minicom on my configured COM port 4 (/dev/ttyS4) with wsl -d DISTRONAME minicom without sudo.

Here I'm talking to that Arduino program. This embedded app doesn't need to me hit enter after I type, so remember your own embedded devices will vary.

Serial port shell with WSL and Minicom

Make a nice menu

Bonus points, now I'll add a menu item for Minicom by changing my Windows Terminal settings AND I'll get more points for adding a nice serial port icon!

Cool icon in Windows Terminal for Serial Ports

I hit settings and add a new profile like this at the top under profiles in the "list." Again, your distro name will be different.

{

"guid": "{61c54bbd-a2c6-5271-96e7-009a87fa45cf}",
"name": "Minicom on Serial COM4",
"hidden": false,
"commandline": "wsl -d kali-linux minicom",
"startingDirectory": "%USERPROFILE%",
"icon": "C:/Users/scott/Desktop/serial_port_icon_138204.png"
},

To review:

  • Use a WSL1 distro
  • Install minicom, run with minicom -s once to make settings
    • Make sure you are using the right /dev/ttyS0 device for your situation
    • Ensure your flow control, baud, etc are all correct in minicom
    • Add your user to the dialout group so you don't have to sudo minicom
  • Make a menu item in Windows Terminal
    • or run minicom manually in your WSL1 instance whenever you like

Hope this helps!


© 2020 Scott Hanselman. All rights reserved.
     

Docker 101 and How do containers work?

$
0
0

Everyone is using containers and talking about containers. Except those for whom it hasn't "clicked." Obvious to some and unendingly frustrating to others, containers are changing how we build and deploy software. As part of my ongoing 'Computer Stuff They Didn't Teach You' Series on YouTube, I explain Containers and Docker in about 30 min, with lots of demos and slow, deliberate examples.

Please do check it out and subscribe as I'll be doing Kubernetes next.

I hope you enjoy it! Please subscribe to my YouTube and explore my playlists and recent videos!


Sponsor: Suffering from a lack of clarity around software bugs? Give your customers the experience they deserve and expect with error monitoring from Raygun.com. Installs in minutes, try it today!


© 2020 Scott Hanselman. All rights reserved.
     

Exploring the .NET Core library Coravel for Task Scheduling, Caching, Mailing and more

$
0
0

Coravel claims it is a "Near-zero config .NET Core library that makes Task Scheduling, Caching, Queuing, Mailing, Event Broadcasting (and more) a breeze!" A lovely claim, that is, in fact, true! It's open source and on Github at https://github.com/jamesmh/coravel so give Coravel a star!

Coravel is available on NuGet as a package - as are all things  - or you can also install it's helper CLI with a simple dotnet tool install --global coravel-cli. After this, using coravel easy, early, and often is as simple as:

coravel install

A nice teach that makes it easy, the coravel CLI adds the package reference, restores your project, and reminds you to set it up in ConfigureServices() in Startup.cs. A nice example of a thoughtful library that is trying to make onboarding simpler.

The Coravel CLI is also a nice scaffolder to get you started with item templates:

> coravel

Usage: coravel [options] [command]

Options:
-?|-h|--help Show help information

Commands:
event
install
invocable
mail

But what is it?

CoravelWith a somewhat vague name and a list of cool features that may not seem related, you may find yourself wondering WHAT is this and WHY do I need it?

When you start thinking about layering and responsibilities of real production software, you'll note that there are arguably some gaps in the BCL (Base Class Libraries) that .NET makes available, particularly as you move up into the Application Development space.

Scheduled jobs and tasks, simple emailing with Razor Templates, a lightweight event dispatcher, easily queueable background tasks are just some of the higher level primitives you'll find yourself wanting when creating business apps. Coravel collects those buildable elements and allows you to string them together very quickly.

For example, I'll create an "Invocable." Basically just a method that is more 'job-like.' It has business scope and I need to have it invoked later by some schedule or process within my app.

Here I'll register one in my Startup.cs.

services.AddScoped<SendNightlyReportsEmailJob>();

So I need to send a nightly report. That's an invocable thing, and it's also an IMailer because it mails things. Note the injected IMailer in the constructor. All very natural in ASP.NET Core, using Dependency Injection.

public class SendNightlyReportsEmailJob : IInvocable

{
private IMailer _mailer;
public SendNightlyReportsEmailJob(IMailer mailer)
{
this._mailer = mailer;
}

public async Task Invoke()
{
Console.WriteLine("NightlyReportMailable Started....");
await Task.Delay(10000);

// You could grab multiple users from a DB query ;)
var mailable = new NightlyReportMailable(new UserModel
{
Name = "Coravel is lovely!",
Email = "test@test.com"
});
await this._mailer.SendAsync(mailable);
Console.WriteLine($"NightlyReportMailable was sent at {DateTime.UtcNow}.");
}
}

Then I can have this mailed every evening with the Coravel Scheduler:

scheduler.Schedule<SendNightlyReportsEmailJob>().Daily();

But when, right? Easy:

scheduler

.Schedule<SendNightlyReportsEmailJob>()
.DailyAt(1, 30)
.Zoned(TimeZoneInfo.Local);

What if you have a task that needs to happen, but maybe it's either long-running or happening often. You don't want two tasks going at the same time, so PreventOverlapping! Clever.

scheduler

.Schedule<DoAThingOften>()
.EveryMinute()
.PreventOverlapping("DoAThingOften");

And that's just the scheduler. That mail you have to send? You can use Razor Pages to create reach HTML emails! That makes New User Sign Up, or Completed Order very easy to create. All self-contained in your app. I dig it.

Finally note that there's Pro paid version of Coravel that gives you a very professional UI for Jobs and Invocables, and allows you to visually configure your back-end job schedules. A nice way to support open source - especially when you start using it and really depending on it - is to explore very reasonable Pro licenses like those that Pro Coravel has. Impressive stuff, truly.

*I have no relationship with Coravel the project or the Pro licenses, I'm just a fan.


Sponsor: Suffering from a lack of clarity around software bugs? Give your customers the experience they deserve and expect with error monitoring from Raygun.com. Installs in minutes, try it today!


© 2020 Scott Hanselman. All rights reserved.
     

It's 2020 and it is time for text mode with Gui.cs

$
0
0

Nearly 16 years ago I complained that Windows is completely missing the TextMode boat. It's 2020 and it's TIME FOR TEXT MODE BABY.

I keep bumping into cool utilities made with Gui.cs. Miguel de Icaza made Midnight Commander (not Norton Commander, but evocative of it) and it's a joy.

Head out to an admin command prompt on your Windows 10 machine now and install it (assuming a recent Windows 10 build, you'll have winget):

winget install GNU.MidnightCommander

You run it with "mc" and even better if you've got Windows Terminal blinged out you'll be able bask in the ASCII COATED GLORY:

Midnight Commander is lovely

It works in WSL as well, since there's a Linux version with "apt install mc" so check that out, too!

Do YOU want to make apps like this? While Midnight Commander wasn't made with Gui.cs, it could have been. I spent YEARS making awesome text mode apps with TurboVision. Now we can make text mode apps with C#! There is even a complete Xterm/Vt100 emulator as well in the form of TerminalView.cs.

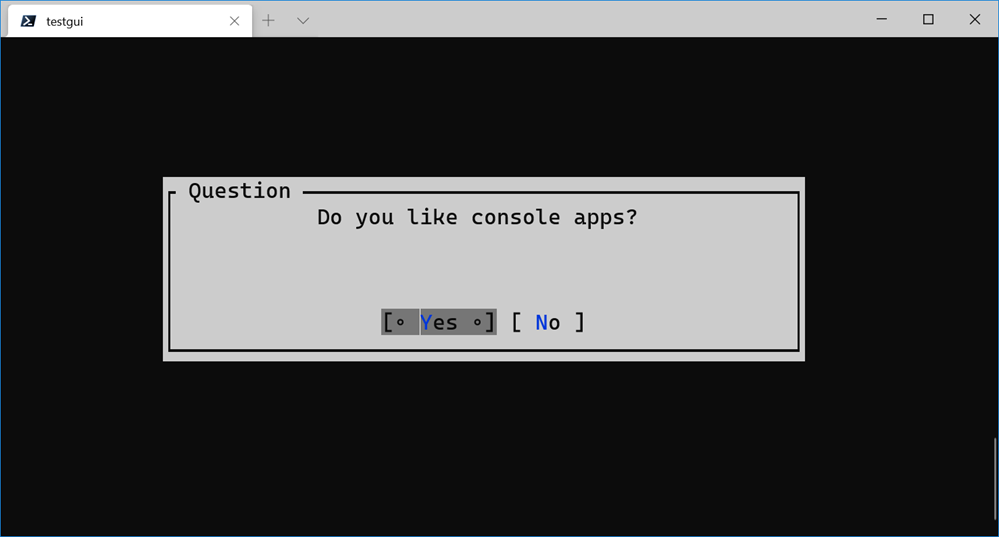
Is it hard? Nah! Go "dotnet new console" then "dotnet add package Terminal.Gui" and then copy these lines over the ones that are given you in Program.cs, then "dotnet run". Boom.

using Terminal.Gui;


class Demo {
static int Main ()
{
Application.Init ();

var n = MessageBox.Query (50, 7,
"Question", "Do you like console apps?", "Yes", "No");

return n;
}
}

There you go! You should go read about it now!

Do you like Console Apps?

If you want to see all the cool text controls you can use, check out the Terminal.Gui UI Catalog app and its source code.

Sure, it's not that new-fangled HTML, but let me tell you, you see these apps every day. The airport, the DMV, the mechanic, the doctor's office. Apps like these are FAST. It's useful to know that these kinds of apps exist...you'll never know when you might need to get back in to TEXT MODE!


Sponsor: Suffering from a lack of clarity around software bugs? Give your customers the experience they deserve and expect with error monitoring from Raygun.com. Installs in minutes, try it today!


© 2020 Scott Hanselman. All rights reserved.
     

Synology DS1520+ is the sweet spot for a home NAS and a private cloud

$
0
0

61fje6GaYKLMy long love of Synology products is well-documented. I checked my Amazon history, and I bought my Synology DS1511+ NAS in May of 2011! I have blogged about the joy of having a home server over these last nearly 10 years in a number of posts.

It's great to have a home server - it's a little slice of the cloud, in your home. I like home servers because while I trust the cloud, I trust a computer I can touch about 1% more than someone else's computer.

NOTE: When I review gadgets and products, I often use Amazon Affiliate Links. I donate the small amount I make from you using these links, Dear Reader, to my kids' charter school. Thanks for using and clicking these links to support!

Anyway, my Synology DS1511+ is about ten years old and it's working great but I am using it more and more and throwing more and more at it. It did have some challenges running a Minecraft Server recently, on top of all its other responsibilities.

I use Seagate 2TB disks and I run 4 of them in the 5 bay device, with a fifth drive as a hot spare. If a drive goes bad - which happens about every 2 to 3 years - the Synology will rebuild with the spare, then I pull the dead drive. I have two additional 2TB unopened Seagate Drives ready to go, so when this happens it's as close to a non-event as possible.

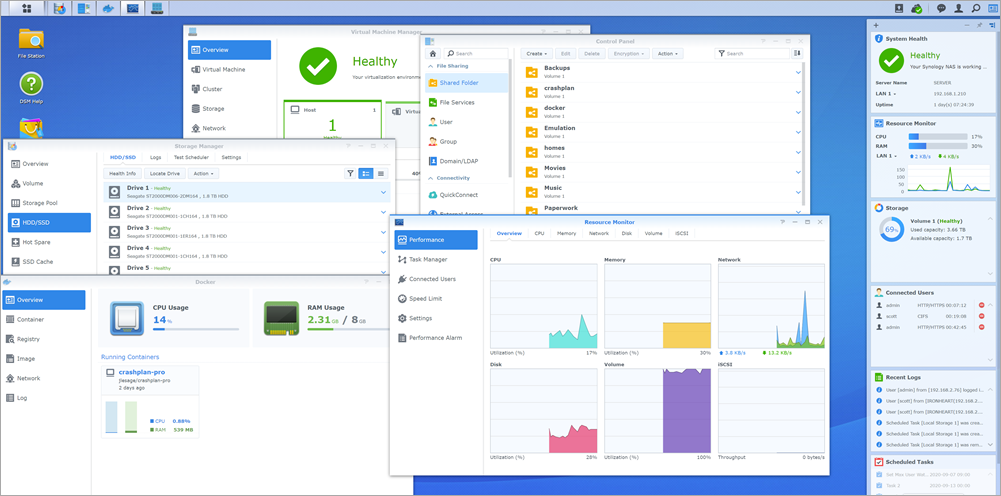
Synology is amazing

I have every digital photo and digital video and family document we've created since 1998. I've also got local backups of my Gmail from hanselman.com which goes back to before Gmail started when I was running my own POP3 mail server. It's all easily less than 5TB. Remember also that Google Takeout can get you Zips of all your data! Back. It. All. Up!

Twenty years of photographs

Fast forward to today and Synology came out with the Synology 5 Bay NAS DiskStation DS1520+. It's basically a ten year's newer clone of my 1511+ workhorse, updated and refreshed! It's WAY faster. It was immediately noticeable on startup. File access is faster, indexing is faster, my Docker images start faster.

Now, a little more money would get you a 6 bay NAS and just $150 will get you a 2 bay, but I love the size and power of a 5 bay for our home and my office. Four disks are for my array and 1 is that hot swap drive. I think that for small businesses or home offices five bays is the perfect size and price - about $600-700 USD.

The Synology 1520+ has 4 GbE network ports (which is nice with Link Aggregation in a busy house), supports two eSATA externals (I use one to backup the backup to a single disk, as I believe in the Backup Rule of Three and you should, too!) and works with any SATA drives, 2.5" or 3.5". One of the big reasons that attracted me to this update is that there's slots for 2 x M.2 2280 NVMe SSDs for caching. I put a 512G M.2 drive in there to accelerate file system access.

5 Drives in a Synology

If you want, you can have up to 15 drives using two DX517 drive expanders up to 240TB, but with just 4 slots and large drives like Seagate Ironwolf drives in the 10TB to 18TB range, storage is really a non-issue. I use Seagate 2TB drives because they're plentiful and like $50. We treat it like a massive infinite local disk in the house that everyone can talk to. We named it SERVER, so it's just \\SERVsynoER for everyone.

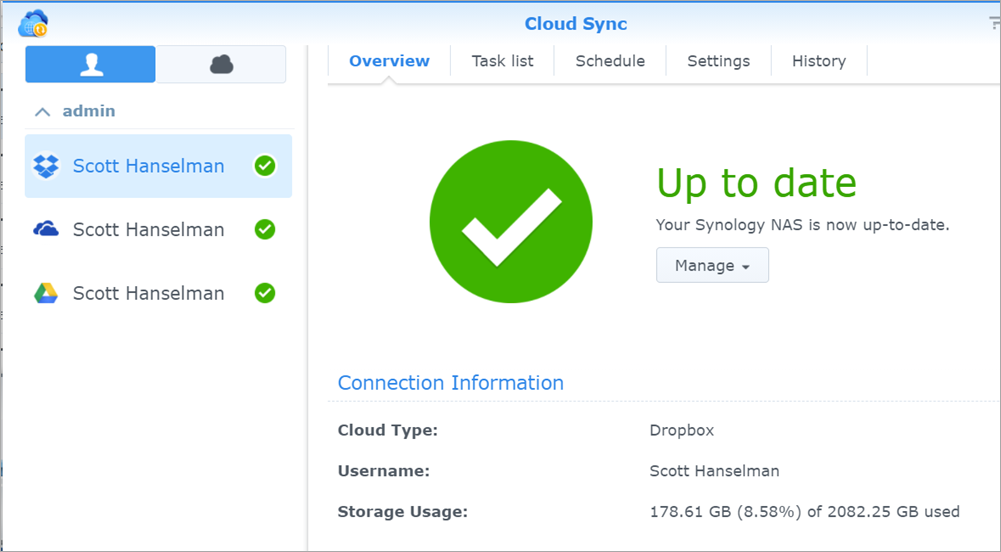
The Synology OS software is deep and broad and runs entirely in your browser. You'll figure it out very quickly as it's all windows and wizards. I am a fan of the Cloud Sync feature that I use to backup my Google Drive, Dropbox, and One Drive. Again, this is a level of paranoia, but damned if I'm gonna get locked out of my own data.

Synology Cloud Sync

The Synology HyperBackup goes in any direction using whatever cloud and whatever tools you are familiar with. You want Rsync? Cool. Want to backup to Azure or AWS? Cool.

Backup to Azure from a Synology

I was concerned that migrating would be hard or involved basically starting over from scratch, but since I was moving between two models in the same family (I was moving from a 1511+ to a 1520+, even 10 years later) It was literally just move the drives in order and boot up. Took 10 minutes. For movement between device families or to new drives there's at least three good options.

It was actually scarily simple, given there's ten years of history here. I moved the drives (maintaining order) and booted up the new 1520+ and was greeted with this screen:

Migrate your Synology

I clicked Migrate twice and was all set.

image

If you are migrating and upgrading, I'd be sure to read the section on HDD Migration and look closely at the table, considering your Source and Destination NAS models.

So far this new Synology is WAY snappier, runs Docker faster, can run Virtual Machines now (although in 8 gigs, only small utility ones), and the SSD cache has made browsing family photos whip fast. All in all, it feels like a 10 year refresh BUT it's the same size.

SSD Cache in a Synology

My home NAS is sitting quietly on a shelf in my office. The kids and spouse are having their PCs backed up in the background, family photos and DVD backups are all available easily (and there are Synology iPhone apps as well to view the files).

Synology devices specifically - and home NAS devices generally - are a great addition to techie homes. There's a bunch of 1st and 3rd party packages you can run on it to make it as much or little a part of your Home IT setup as you like. It can run DHCP and DNS, iTunes Servers, Mail, Chat Servers, or even their own web-based Office clients. Take a look at the Synology 1520+ if you're in the market for a home or business NAS. I'm looking forward to another 10 years with this NAS.


Sponsor: Suffering from a lack of clarity around software bugs? Give your customers the experience they deserve and expect with error monitoring from Raygun.com. Installs in minutes, try it today!


© 2020 Scott Hanselman. All rights reserved.
     

How to use a Raspberry Pi 4 as a Minecraft Java Server

$
0
0

imageMy 14 year old got tired of paying $7.99 for Minecraft Realm so he could host his friends in their world. He was just hosting on his laptop and then forwarding a port but that means his friends can't connect unless he's actively running. I was running a Minecraft Server in a Docker container on my Synology NAS but I thought teaching him how to run Minecraft Server on a Raspberry Pi 4 we had lying around would be a good learning moment.

First, set up your Raspberry Pi. I like NOOBS as it's super easy to setup. If you want to make things faster for setup and possibly set up your Pi without having to connect a monitor, mouse, or keyboard, mount your SSD card and create a new empty file named ssh, without any extension, inside the boot directory to enable ssh on boot. Remember the default user name is pi and the password is raspberry.

SSH over to your Raspberry Pi. You can use Putty, but I like using Windows 10's built-in SSH. Do your standard update stuff, and also install a JDK:

sudo apt update

sudo apt upgrade
sudo apt install default-jdk

There are other Minecraft 3rd party Java Servers you can use, the most popular being Spigot, but the easiest server you can run is the one from Minecraft themselves.

Go to https://www.minecraft.net/en-us/download/server in a browser. It'll say something like "Download minecraft_server.1.16.2.jar and run it with the following command." That version number and URL will change in the future. Right-click and copy link into your clipboard We are going to PASTE it (right click with your mouse) after the "wget" below. So we'll make a folder, download the server.jar, then run it.

cd ~

mkdir MinecraftServer
cd MinecraftServer
wget https://launcher.mojang.com/v1/objects/c5f6fb23c3876461d46ec380421e42b289789530/server.jar
java -Xmx2500M -Xms2500M -jar server.jar nogui

You'll get a warning that you didn't accept the EULA, so now open "pico eula.txt" and set eula=true, then hit Ctrl-X and Yes to save the new file. Press the up key and run your command again.

java -Xmx2500M -Xms2500M -jar server.jar nogui

You could also make a start.sh text file with pico then chmod +x to make it an easier single command way to start your server. Since I have a Raspberry Pi 4 with 4g gigs of RAM and it'll be doing just this one server, I felt 2500 megs of RAM was a sweet spot. Java ran out of memory at 3 gigs.

You can then run ifconfig at and command line and get your Pi's IP address, or type hostname to get its name. Then you can connect to your world with that name or ip.

Running Minecraft Servers

Performance Issues with Complex Worlds

With very large Minecraft worlds or worlds like my son's with 500+ Iron Golems and Chickens, you may get an error like

[Server Watchdog/FATAL]: A single server tick took 60.00 seconds (should be max 0.05)

You can workaround this in a few ways. You can gently overclock your Pi4 if it has a fan by adding this to the end of your /boot/config.txt (read articles on overclocking a Pi to be safe)

over_voltage=3

arm_freq=1850

And/or you can disable the Minecraft internal watchdog for ticks by setting max-tick-time to -1 in your server's server.properties file.

We solved our issue by killing about 480+ Iron Golems with

/kill @e[type=minecraft:iron_golem]

but that's up to you. Just be aware that the Pi is fast but not thousands of moving entities in Minecraft fast. For us this works great though and is teaching my kids about the command line, editing text files, and ssh'ing into things.


Sponsor: Never miss a beat with Seq. Live application logs and health checks. Download the Windows installer or pull the Docker image now.


© 2020 Scott Hanselman. All rights reserved.
     

What is the cloud? Explained

$
0
0

I'm continuing my "Computer Stuff They Didn't Teach You" series on YouTube. Please subscribe! I've set a personal goal to get to 100k subs by Christmas.

This episode is very special as it features a Surface Duo *AND* a 1U Rack-Mounted Azure Stack Edge! It's a gentle and clear explanation of cloud computing.

This 20 min video talks about the components of a computer, starting with a Raspberry Pi, Laptops, Phones, Desktops, then moving up to a massively powerful Azure Stack Edge rack mounted device, until finally talking about the Cloud itself. It consists of millions and millions of computers all working together to make the world turn.

You may know all these things BUT you may also enjoy some of the analogies to explain to non-technical partner how the cloud works as well as "what exactly it is you do!?"

I hope you enjoy watching it as much as I enjoyed making it! Go subscribe now!


Sponsor: Never miss a beat with Seq. Live application logs and health checks. Download the Windows installer or pull the Docker image now.


© 2020 Scott Hanselman. All rights reserved.
     

Cross platform diagnostic tools for .NET Core

$
0
0

.NET Core is cross platform and open source. Tell someone, maybe your boss.

A good reminder. It's been this way for a half decade but I'm still bumping into folks who have never heard this. Moving forward, .NET 5 will be a unification of the .NET Framework you may have heard for years, and the new .NET Core I like talking about, PLUS great goodness, tools and libraries from Mono and Xamarin. It's one cross-platform .NET with a number greater than 4. Because 5 > 4, natch.

NOTE: If you like, you can learn all about What is .NET? over on my YouTube.

Now you've made some software, maybe for Windows, maybe Mac, maybe Linux. There's a lot of ways to diagnose your apps in .NET Core, from the Docs:

  • Logging and tracing are related techniques. They refer to instrumenting code to create log files. The files record the details of what a program does. These details can be used to diagnose the most complex problems. When combined with time stamps, these techniques are also valuable in performance investigations.
  • Unit testing is a key component of continuous integration and deployment of high-quality software. Unit tests are designed to give you an early warning when you break something.
  • Debug Linux dumps explains how to collect and analyze dumps on Linux.

But I want to talk about the...

.NET Core Diagnostic Global Tools

First, let's start with...

dotnet-counters

dotnet tool install --global dotnet-counters

Now that I've installed it, I can see what .NET Core apps I'm running, like a local version of my Hanselminutes podcast site.

dotnet counters ps

18996 hanselminutes.core D:\github\hanselminutes-core\hanselminutes.core\bin\Debug\netcoreapp3.1\hanselminutes.core.exe
14376 PowerLauncher C:\Program Files\PowerToys\modules\launcher\PowerLauncher.exe
24276 pwsh C:\Program Files\PowerShell\7\pwsh.exe

I also see PowerShell 7 in there that I'm running in Windows Terminal. Pwsh is also written in cross platform .NET Core.

I'll run it again with a process id, in this case that of my podcast site:

dotnet counters monitor --process-id 18996

Here I'll get a nice constantly refreshing taskman/processmonitor of sorts in the form of dotnet-countersperformance counters:

dotnet-monitor

Again this works outside Visual Studio and it works everywhere. You can watch them and react, or collect them to a file.

dotnet-dump

The dotnet-dump tool is a way to collect and analyze Windows and Linux core dumps without a native debugger. Although it's not yet supported on macOS, it works on Windows and Linux.

With a similar syntax, I'll dump the process:

dotnet dump collect -p 18996

Writing full to D:\github\hanselminutes-core\hanselminutes.core\dump_20200918_224648.dmp
Complete

Then I'll start an interactive analysis shell session. You can run SOS (Son of Strike) commands to analyze crashes and the garbage collector (GC), but it isn't a native debugger so things like displaying native stack frames aren't supported.

dotnet dump analyze .\dump_20200918_224648.dmp

Loading core dump: .\dump_20200918_224648.dmp ...
Ready to process analysis commands. Type 'help' to list available commands or 'help [command]' to get detailed help on a command.
Type 'quit' or 'exit' to exit the session.
>

There's tons to explore. Debugging production dumps like this is a lost art.

Exploring in dotnet dump

You can also do live Garbage Collector dumps with

dotnet-gcdump

GCDump is:

"a way to collect GC (Garbage Collector) dumps of live .NET processes. It uses the EventPipe technology, which is a cross-platform alternative to ETW on Windows. GC dumps are created by triggering a GC in the target process, turning on special events, and regenerating the graph of object roots from the event stream. This process allows for GC dumps to be collected while the process is running and with minimal overhead."

Once you have a dump you can analyze it in Visual Studio or PerfView on GitHub.

PerfView

Sometimes you may capture a dump from one machine and analyze it on another. For that you may want to download the right symbols to debug your core dumps or minidumps. For that you'll use

dotnet-symbol

This is great for Linux debugging with lldb.

"Running dotnet-symbol against a dump file will, by default, download all the modules, symbols, and DAC/DBI files needed to debug the dump including the managed assemblies. Because SOS can now download symbols when needed, most Linux core dumps can be analyzed using lldb with only the host (dotnet) and debugging modules."

Interesting in some real tutorials on how to use these tools? Why not learn:

In the next blog post I'll look at dotnet trace and flame graphs!


Sponsor: Have you tried developing in Rider yet? This fast and feature-rich cross-platform IDE improves your code for .NET, ASP.NET, .NET Core, Xamarin, and Unity applications on Windows, Mac, and Linux.


© 2020 Scott Hanselman. All rights reserved.
     

dotnet-trace for .NET Core tracing in PerfView, SpeedScope, Chromium Event Trace Profiling, Flame graphs and more!

$
0
0

Speedscope.app is an online "flamegraph visualizer" that you can also install offline. It's open source and on GitHub. It will allow you to view flamegraphs that have been generated by diagnostic tools, but Speedscope is good at dealing with large files without issues or crashing. There's lots of choices in viewers of flamegraphs, but this is a good one.

Adam Sitnik has a great blog about how he implemented flamegraphs for .NET.

Speedscope has a simple file format in JSON, and PerfView already exists is free and open source. PerfView is something you should download now and throw in your PATH. You'll need it someday.

We saw in the last blog post that I did a GC Dump of my running podcast site, free command line tools. Now I'll do a live running trace with

dotnet-trace

So I'll just dotnet trace ps and then

dotnet trace collect -p 18996

Which gives me this live running trace until I stop it:

Provider Name                           Keywords            Level               Enabled By

Microsoft-DotNETCore-SampleProfiler 0x0000000000000000 Informational(4) --profile
Microsoft-Windows-DotNETRuntime 0x00000014C14FCCBD Informational(4) --profile

Process : D:\github\hanselminutes-core\hanselminutes.core\bin\Debug\netcoreapp3.1\hanselminutes.core.exe
Output File : C:\Users\scott\trace.nettrace

[00:00:00:15] Recording trace 866.708 (KB)
Stopping the trace. This may take up to minutes depending on the application being traced.

Trace completed.

Even though this ran for just 15 seconds I collected many thousands of traces. If I need to, I can now find out EXACTLY what's happening in even short timeframes OR I can visualize what's happening over longer timeframes.

Ah, but check out this switch for dotnet trace!

 --format <Chromium|NetTrace|Speedscope>

That's a useful game changer! Let's try a few, maybe Speedcope and that interestingly named Chromium format. ;)

NOTE: If you have any errors with Speedscope format, make sure to "dotnet tool update -g dotnet-trace"

Now you'll get a something.speedscope.json that you can open and view in SpeedScope. You'll see a WEALTH of info. Remember that these formats aren't .NET specific. They aren't language specific at all. If you have a stack trace and can sample what's going on then you can make a trace that can be presented as a number of visualizations, most notably a flamegraph. This is 'how computers work' stuff, not '.NET stuff." It's great that these tools can interoperate so nicely.

There is so much info that you'll want to make you own with dotnet trace and explore. Be sure to scroll and CTRL-scroll to zoom around. Also be sure to look at the thread picker at the top center in the black title area of SpeedScope.

Speedscope.app

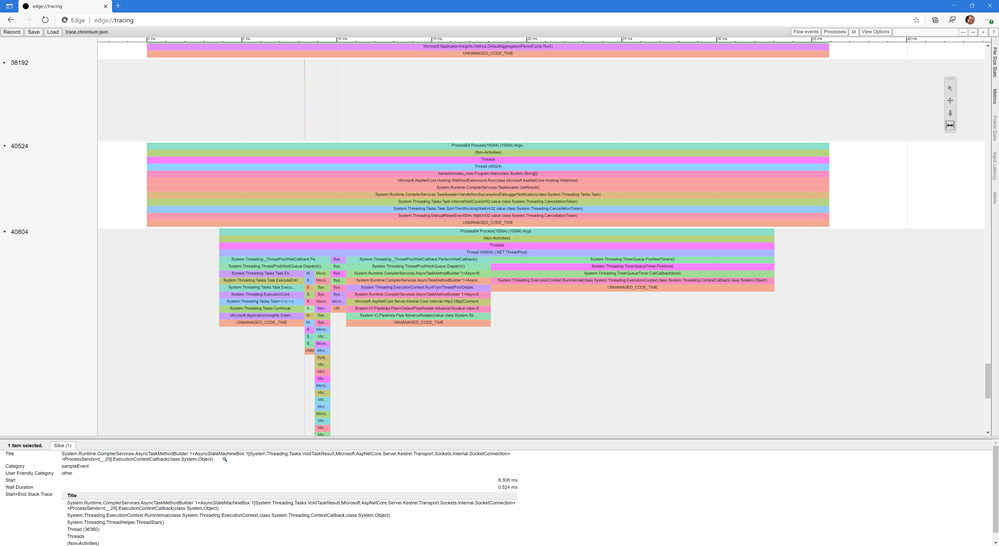
Remember how I pushed that this isn't language specific? Try going to edge://tracing/ in new Edge or in chrome://tracing in Chrome and load up a dotnet trace created with --format Chromium! Now you can use the Trace Event Profiling Tool!

Same data, different perspective! But this time you're using the tracing format that Chromium uses to analyze your .NET Core traces! The dotnet-trace tool is very very powerful.

image

Be sure to go read about Analysing .NET start-up time with Flamegraphs at Matt Warren's lovely blog.


Sponsor: Have you tried developing in Rider yet? This fast and feature-rich cross-platform IDE improves your code for .NET, ASP.NET, .NET Core, Xamarin, and Unity applications on Windows, Mac, and Linux.


© 2020 Scott Hanselman. All rights reserved.
     

Blazor WebAssembly on Azure Static Web Apps

$
0
0

Blazing Pizza Blazor AppMany apps today are just static files on the front end - HTML and JavaScript - with something powerful on the server side. They aren't "static apps" as they have very dynamic front end experiences, but they are static in that their HTML isn't dynamically generated.

As such, you don't need to spend the money on an Azure Web App when an Azure Static Web App will do! These apps get free SSL certs, custom domains, web hosting for static content, and fit into a natural git-based workflow for publishing. You can build modern web applications with JavaScript frameworks and libraries like Angular, React, Svelte, Vue, or using Blazor to create WebAssembly applications, with an Azure Functions back-end or publish static sites with frameworks like Gatsby, Hugo, VuePress.

But there's big news out of Ignite this week, with Azure Static Web Apps now supporting Blazor applications. You can develop and deploy a frontend and a serverless API written entirely in .NET.

To get started "hello world style" there is a GitHub repository template that's a starting point. It's a basic web app with a client that uses Blazor and .NET that is run on the client-side in your browser using WebAssembly.

Called it! It's almost a decade later and yes, JavaScript (and WebAssembly) is the assembly language for the web!

So the client runs in the browser written in C#, the server runs as a serverless Azure Function (meaning no identifiable VM, and it just scales as needed) also written in C#, and this client and server share a data model between Blazor and Functions also written in...wait for it...C#.

An app like this can basically scale forever, cheaply. It can put the browser to work (which was basically hanging out waiting for anglebrackets anyway) and when it needs data, it can call back to Functions, or even Azure CosmosDB.

Be sure to check out this complete Tutorial: Building a static web app with Blazor in Azure Static Web Apps! All you need is a GitHub account and any free Azure Account.

If you want more guided learning, check out the 12 unit module on Microsoft Learn. It shouldn't take more than an hour and you'll learn how to Publish a Blazor WebAssembly app and .NET API with Azure Static Web Apps.

Resources

Also be sure to check out the Day 2 Microsoft Ignite Keynote by yours truly! The app I made and demo in the keynote? Made with Blazor and Azure Static Web Apps, natch! The keynote is happening in three time zones so you can see it at a time that works for you...or on-demand!


Sponsor: Upgrade from file systems and SQLite to Actian Zen Edge Data Management. Higher Performance, Scalable, Secure, Embeddable in most any programming language, OS, on 64-bit ARM/Intel Platform.


© 2020 Scott Hanselman. All rights reserved.
     
Viewing all 1148 articles
Browse latest View live


<script src="https://jsc.adskeeper.com/r/s/rssing.com.1596347.js" async> </script>