Quantcast
Channel: Scott Hanselman's Blog
Viewing all 1148 articles
Browse latest View live

Piper Command Center BETA - Build a game controller from scratch with Arduino

$
0
0

Piper Command CenterBack in 2018 I posted my annual Christmas List of STEM Toys and the Piper Computer Kit 2 was on the list. My kids love this little wooden "laptop" comprised of a Raspberry Pi and an LCD screen. You spend time going through curated episodes of custom content and build and wire the computer LIVE while it's on!

The Piper folks saw my post and asked me to take a look at the BETA of their Piper Command Center, so my sons and I jumped at the chance. They are actively looking for feedback. It's a chance to build our own game controller!

The Piper Command Center BETA already has a ton of online content and things to try. Their "firmware" is an Arduino sketch and it's all up on GitHub. You'll want to get the Arduino IDE from the Windows Store.

Today the Command Center can look like a Keyboard or a Mouse.

  1. In Mouse Mode (default), the joystick controls cursor movement and the left and right buttons mimic left and right mouse clicks.
  2. In Keyboard Mode, the joystick mimics the arrow keys on a keyboard, and the buttons mimic Space Bar (Up), Z (Left), X (Down), and C (Right) keys on a keyboard.

Once it's built you can use the controller to play games in your browser, or soon, with new content on the Piper itself, which runs Minecraft usually. However, you DO NOT need the Piper to get the Piper Command Center. They are separate but complementary devices.

Assemble a real working game controller, understand the basics of an Arduino, and discover physical computing by configuring a joystick, buttons, and more. Ideal for ages 13+.

My son is looking at how he can modify the "firmware" on the Command Center to allow him to play emulators in the browser.

The parts ot the Piper Command Center Parts and Wires for the Piper Command Center

The Piper Command Center comes unassembled, of course, and you get to put it together with a cool blueprint instruction sheet. We had some fun with the wiring and a were off by one a few times, but they've got a troubleshooting video that helped us through it.

Blueprints for the Piper Command Center

It's a nice little bit of kit and I love that it's made of wood. I'd like to see one with a second joystick that could literally emulate an XInput control pad, although that might be more complex than just emulating a mouse or keyboard.

Go check it out. We're happy with it and we're looking forward to whatever direction it goes. The original Piper has updated itself many times in a few years we've had it, and we upgraded it to a 16gig SD Card to support the latest content and OS update.

Piper Command Center is in BETA and will be updated and actively developed as they explore this space and what they can do with the device. As of the time of this writing there were five sketches for this controller.


Sponsor: Manage GitHub Pull Requests right from the IDE with the latest JetBrains Rider. An integrated performance profiler on Windows comes to the rescue as well.


© 2018 Scott Hanselman. All rights reserved.
     

Bringing the SpaceOrb game controller forward with an Arduino Bridge via The Orbotron 9001

$
0
0

Thingotron brings your SpaceOrb back to lifeAlmost ten years ago I posted abut the SpaceTec SpaceOrb 360 Controller and that was 15 years after it came out. We are now 25 years into the legend of the SpaceOrb and I will continue to tell the tale. The SpaceOrb is one of a series of innovative "Spacemice" that offer more than just two degress of input freedom. In fact, they offer SIX.

"The puck or ball of a spacemouse can be moved along X, Y and Z axis as well as being twisted rotationally on each of those axis. (Roll, Pitch and Yaw)"

Vic Putz continues to carry a torch for the SpaceOrb, as do I, except he's actually doing something about it. A decade ago I bought an Arduino and an "OrbSheild" from Vic that sat on top and provided a realtime bridge between the RS-232 Serial Port and the modern USB "HID" (Hardware Input Devices) that are used today. The goal is to move behind unsigned device drivers and create a system-agnostic solution that would present an old device in a new driver-free way.

Vic has been working on a new version called the Orbotron 9000/9001 for the last few years and it's currently sold out at his little store. It acts as an interface for the SpaceOrb 360 and comes configured for that device, but should also work with the SpaceBall 5000, SpaceBall 4000FLX, and Magellan SpaceMouse. Code and plans on are GitHub, natch.

SpaceOrb

When you plug the SpaceOrb into the Orbotron 9001 then into your PC it shows up as a Game Controller!

The SpaceOrb as it presents inside Windows as a controller

There's several innovative "six degrees of freedom" games out there , like the "Overload" sequel to Decent on Steam, as well as Retrovirus, and NeonXSZ, as well as open source reimplementations of Descent like DXX Rebirth (give them some love!) and Forsaken.

Modern Xinput games are trickier, but you may have success with https://www.x360ce.com by mapping the orb buttons and axes to a gamepad.

Descent - DXX Re-birth

I'm still exploring this space, but I love that The Internet - with the help of the enterprising and patient - refused to let the good parts of history die, by making innovative and clean bridges between the past and the future.


Sponsor: Manage GitHub Pull Requests right from the IDE with the latest JetBrains Rider. An integrated performance profiler on Windows comes to the rescue as well.


© 2018 Scott Hanselman. All rights reserved.
     

What's better than ILDasm? ILSpy and dnSpy are tools to Decompile .NET Code

$
0
0

.NET code (C#, VB, F#, etc) compiles (for the most part) into Intermediate Language (IL) and then makes it way to native code usually by Just-in-time (JIT) compilation on the target machine. When you get a DLL/Assembly, it's pre-chewed but not full juiced, to mix my metaphors.

Often you'll come along a DLL that you want to learn more about. Sometimes you'll want to just see the structure of classes, methods, etc, and other times you want to see the IL - or a close representation of the original C#/VB/F#, etc. You're not looking at the source, you're seeing a backwards projection of the IL as whatever language you want. You're basically taking this pre-chewed food and taking it out of your mouth and getting a decent idea of what it was originally.

I've used ILDasm for years, but it's old and lame and people tease you for using it because they are cruel. ;)

Seriously, though, I use ILDasm - the IL Disassembler - simply because it's already installed. Those tweets got me thinking though that I need to update my options, so I'm trying out ILSpy and dnSpy.

ILSpy

ILSpy has been around for a while and has multiple front-ends, including ones for Linux/Mac/Windows based on Avalonia in the form of AvaloniaSpy. You can also integrate ILSpy into Visual Studio 2017 or 2019 with this extension. There is also a console decompiler and, interestingly, cross-platform PowerShell cmdlets.

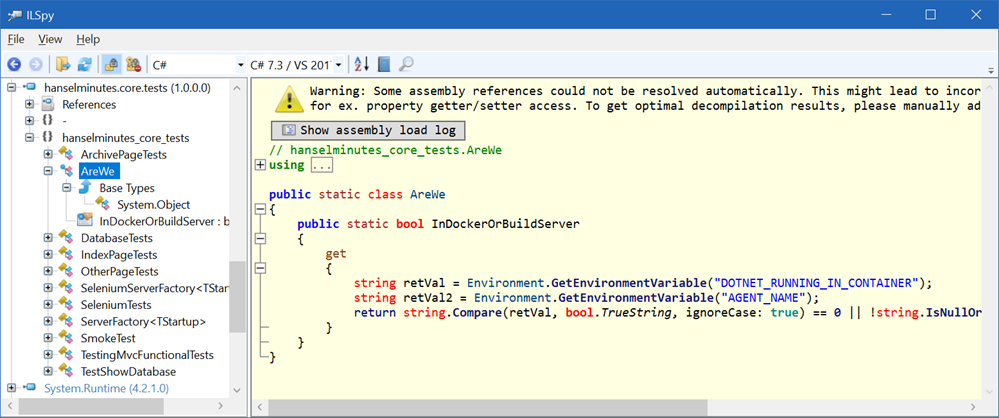
ILSpy is a solid .NET decompiler

I've always liked the "Open List" feature of ILSpy where you can open a preconfigured list of assemblies you want to browse, like ASP.NET MVC, .NET 4, etc. A fun open source contribution for you might be to update the included lists with newer defaults. There's so many folks doing great work in open source out there, why not jump in and help them out?

dnSpy

dnSpy has a lovely UI AND a great Console app using the same engine. It's amazingly polished and VERY complete. I was surprised that it also has a full hex editor as well as property pages for common EXE file headers. From their GitHub, dnSpy features

  • Debug .NET Framework, .NET Core and Unity game assemblies, no source code required
  • Edit assemblies in C# or Visual Basic or IL, and edit all metadata
  • Light and dark themes
  • Extensible, write your own extension
  • High DPI support (per-monitor DPI aware)

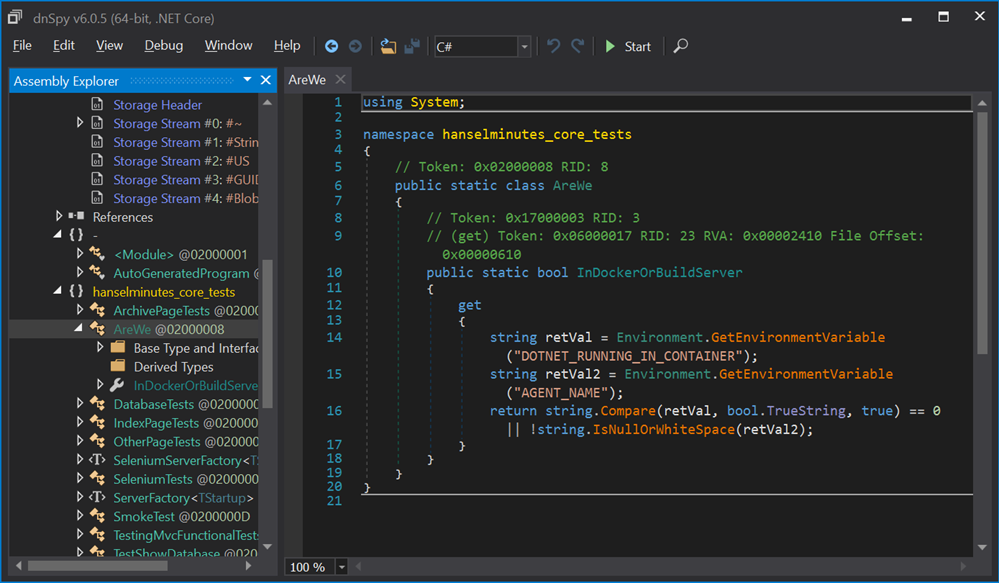
dnSpy takes it to the next level with an integrated Debugger, meaning you can attach to a running process and debug it without source code - but it feels like source code because it's decompiling for you. Note where it says C#, I can choose C#, VB, or IL as a "view" on my decompiled code.

dnSpy is amazing for looking inside .NET apps

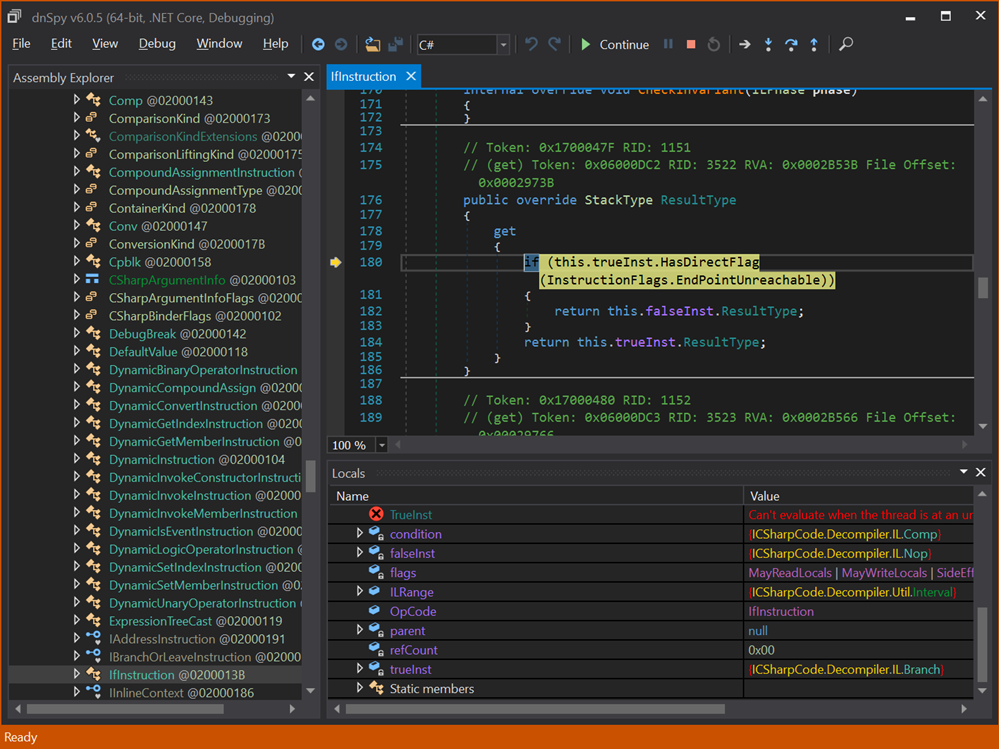
Here is dnSpy actually debugging ILSpy and stopped at a decompiled breakpoint.

image

There's a lot of great low-level stuff in this space. Another cool tool is Reflexil, a .NET Assembly Editor as well as de4dot by the same mysterious author as dnSpy. Commercial Tools include Reflector and JustDecompile.

What's your favorite?


Sponsor: Manage GitHub Pull Requests right from the IDE with the latest JetBrains Rider. An integrated performance profiler on Windows comes to the rescue as well.


© 2018 Scott Hanselman. All rights reserved.
     

Clever little C# and ASP.NET Core features that make me happy

$
0
0

Visual StudioI recently needed to refactor my podcast site which is written in ASP.NET Core 2.2 and running in Azure. The Simplecast backed API changed in a few major ways from their v1 to a new redesigned v2, so there was a big backend change and that was a chance to tighten up the whole site.

As I was refactoring I made a few small notes of things that I liked about the site. A few were C# features that I'd forgotten about! C# is on version 8 but there were little happinesses in 6.0 and 7.0 that I hadn't incorporated into my own idiomatic view of the language.

This post is collecting a few things for myself, and you, if you like.

I've got a mapping between two collections of objects. There's a list of all Sponsors, ever. Then there's a mapping of shows where a show might have n sponsors.

Out Var

I have to "TryGetValue" because I can't be sure if there's a value for a show's ID. I wish there was a more compact way to do this (a language shortcut for TryGetValue, but that's another post).

Shows2Sponsor map = null;

shows2Sponsors.TryGetValue(showId, out map); if (map != null) { var retVal = sponsors.Where(o => map.Sponsors.Contains(o.Id)).ToList(); return retVal; } return null;

I forgot that in C# 7.0 they added "out var" parameters, so I don't need to declare the map or its type. Tighten it up a little and I've got this. The LINQ query there returns a List of sponsor details from the main list, using the IDs returned from the TryGetValue.

if (shows2Sponsors.TryGetValue(showId, out var map))
    return sponsors.Where(o => map.Sponsors.Contains(o.Id)).ToList();
return null;

Type aliases

I found myself building JSON types in C# that were using the "Newtonsoft.Json.JsonPropertyAttribute" but the name is too long. So I can do this:

using J = Newtonsoft.Json.JsonPropertyAttribute;

Which means I can do this:

[J("description")] 

public string Description { get; set; }

[J("long_description")] public string LongDescription { get; set; }

LazyCache

I blogged about LazyCache before, and its challenges but I'm loving it. Here I have a GetShows() method that returns a List of Shows. It checks a cache first, and if it's empty, then it will call the Func that returns a List of Shows, and that Func is the thing that does the work of populating the cache. The cache lasts for about 8 hours. Works great.

public async Task<List<Show>> GetShows()

{
Func<Task<List<Show>>> showObjectFactory = () => PopulateShowsCache();
return await _cache.GetOrAddAsync("shows", showObjectFactory, DateTimeOffset.Now.AddHours(8));
}
private async Task<List<Show>> PopulateShowsCache()
{
List<Show> shows = shows = await _simpleCastClient.GetShows();
_logger.LogInformation($"Loaded {shows.Count} shows");
return shows.Where(c => c.Published == true && c.PublishedAt < DateTime.UtcNow).ToList();
}

What are some little things you're enjoying?


Sponsor: Manage GitHub Pull Requests right from the IDE with the latest JetBrains Rider. An integrated performance profiler on Windows comes to the rescue as well.


© 2018 Scott Hanselman. All rights reserved.
     

This changes everything for the DIY Diabetes Community - TidePool partners with Medtronic and Dexcom

$
0
0

D8f8EEYVsAAqN-DI don’t speak in hyperbole very often, and I want to make sure that you all understand what a big deal this is for the diabetes DIY community. Everything that we’ve worked for for the last 20 years, it all changes now. #WeAreNotWaiting

"You probably didn’t see this coming, [Tidepool] announced an agreement to partner with our friends at Medtronic Diabetes to support a future Bluetooth-enabled MiniMed pump with Tidepool Loop. Read more here: https://www.tidepool.org/blog/tidepool-loop-medtronic-collaboration"

Translation? This means that diabetics will be able to choose their own supported equipment and build their own supported FDA Approved Closed Loop Artificial Pancreases.

Open Source Artificial Pancreases will become the new standard of care for Diabetes in 2019

Every diabetic engineer every, the day after they were diagnosed, tries to solve their (or their loved one's) diabetes with open software and open hardware. Every one. I did it in the early 90s. Someone diagnosed today will do this tomorrow. Every time.

I tried to send my blood sugar to the cloud from a PalmPilot. Every person diagnosed with diabetes ever, does this. Has done this. We try to make our own systems. Then @NightscoutProj happened and #WeAreNotWaiting happened and we shared code and now we sit on the shoulders of people who GAVE THEIR IDEAS TO USE FOR FREE.

D8gKqkqW4AEsK32

Here's the first insulin pump. Imagine a disease this miserable that you'd choose this. Type 1 Diabetes IS NOT FUN. Now we have Bluetooth and Wifi and the Cloud but I still have an insulin pump I bought off of Craigslist.

D8gK05ZXYAAzSLc

Imagine a watch that gives you an electrical shock so you can check your blood sugar. We are all just giant bags of meat and water under pressure and poking the meatbag 10 times a day with needles and #diabetes testing strips SUUUUCKS.

D8gLNCgWkAAbLLi

The work of early #diabetes pioneers is being now leveraged by @Tidepool_org to encourage large diabetes hardware and sensor manufacturers to - wait for it - INTEROPERATE on standards we can talk to.

D8gLi6kW4AMndv2

D8gL61PWwAA3Tz2Just hours after I got off stage speaking on this very topic at @RefactrTech, it turns out that @howardlook and the wonderful friends at @Tidepool_org like @kdisimone and @ps2 and pioneer @bewestisdoing and others announced there are now partnerships with MULTIPLE insulin pump manufacturers AND multiple sensors!

We the DIY #diabetes community declared #WeAreNotWaiting and, dammit, we'd do this ourselves. And now TidePool expressing the intent to put an Artificial Pancreas in the damn App Store - along with Angry Birds - WITH SUPPORT FOR WARRANTIED NEW BLE PUMPS. I could cry.

You see this #diabetes insulin pump? It’s mine. See those cracks? THOSE ARE CRACKS IN MY INSULIN PUMP. This pump does not have a warranty, but it’s the only one that I have if I want an open source artificial pancreas. Now I’m going to have real choices, multiple manufacturers.

D8gMv8OXoAA4V9oIt absolutely cannot be overstated how many people keep this community alive, from early python libraries that talked to insulin pumps, to man in the middle attacks to gain access to our own data, to custom hardware boards created to bridge the new and the old.

To the known in the unknown, the song in the unsung, we in the Diabetes Community appreciate you all. We are standing on the shoulders of giants - I want to continue to encourage open software and open hardware whenever possible. Get involved. 

Also, if you're diabetic, consider buying a Nightscout Xbox Avatar accessory so you can see yourself represented while you game!

Oh, and one other thing, journalists who cover the Diabetes DIY community, please let us read your articles before you write them. They all have mistakes and over-generalizations and inaccuracies and it's awkward to read them. That is all.


Sponsor: Manage GitHub Pull Requests right from the IDE with the latest JetBrains Rider. An integrated performance profiler on Windows comes to the rescue as well.


© 2018 Scott Hanselman. All rights reserved.
     

Visual Studio Code Remote Development over SSH to a Raspberry Pi is butter

$
0
0

There's been a lot of folks, myself included, who have tried to install VS Code on the Raspberry Pi. In fact, there's a lovely process for this now. However, we have to ask ourselves is a Raspberry Pi really powerful enough to be running a full development environment and the app being debugged? Perhaps, but maybe this is a job for remote debugging. That means installing Visual Studio Code locally on my Windows or Mac machine, then having Visual Studio code install its headless server component (for ARM7) on the Pi.

In January I blogged about Remote Debugging with VS Code on a Raspberry Pi using .NET Core on ARM. It was, and is, a little hacked together with SSH and wishes. Let's set up a proper VS Code Remote environment so I can be productive on a Pi while still enjoying my main laptop's abilities.

  • First, can you ssh into your Raspberry Pi without a password prompt?
    • If not, be sure to set that up with OpenSSH, which is now installed on Windows 10 by default.
    • You know you've got it down when you can "ssh pi@mypi" and it just drops you into a remote prompt.
  • Next, get Visual Studio Code Insiders plus

From within VS Code Insiders, hit Ctrl/CMD+P and type "Remote-SSH" for some of the choices.

Remote-SSH options in VS Code

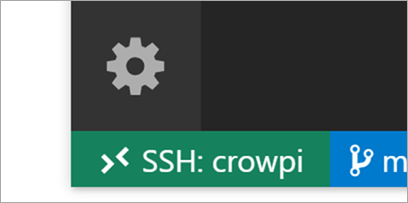
I can connect to Host and VS Code will SSH into the PI and install the VS Code server components in ~./vscode-server-insiders and then connect to them. It will take a minute as its downloading a 25 meg GZip and unzipping it into this temp folder. You'll know you're connected when you see this green badge as seen below that says "SSH: hostname."

Green badge in VS Code - SSH: crowpi

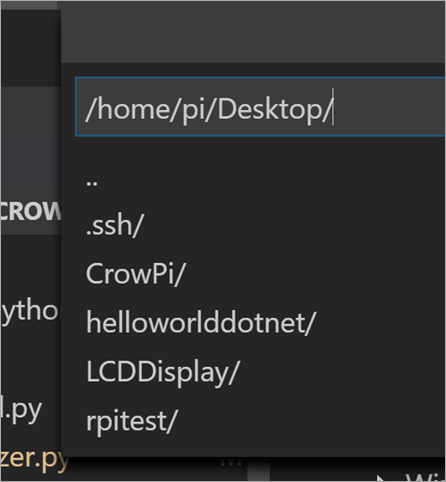
Then when you go "File | Open Folder" from the main menu, you'll get the remote system's files! You are working and editing locally on remote files.

My Raspberry Pi's desktop, remotely

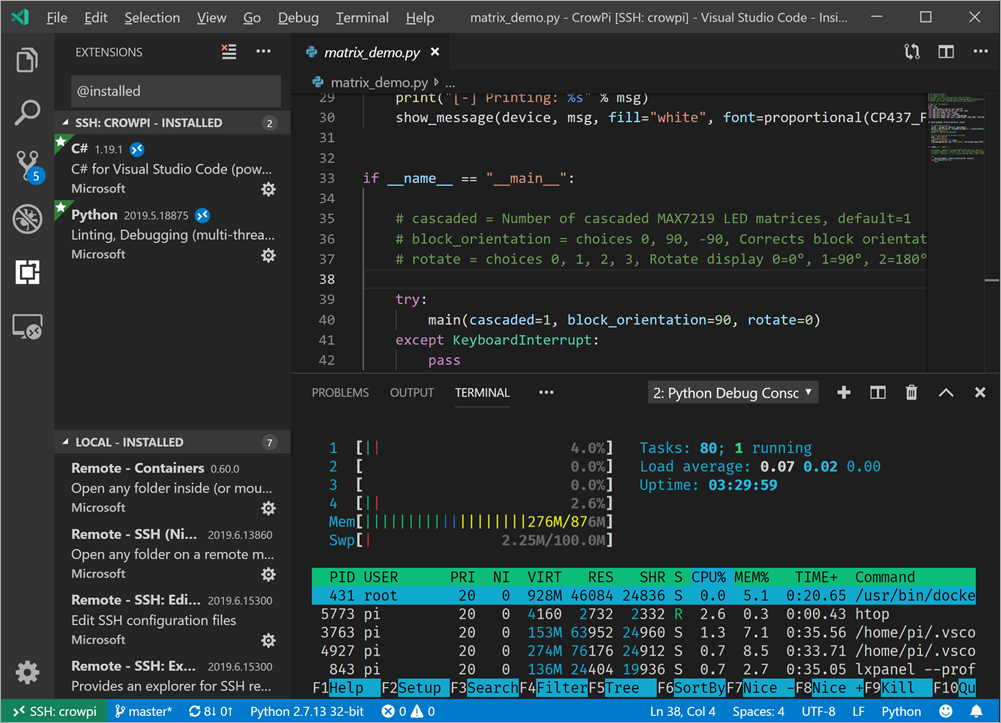
Note here that some of the extensions are NOT installed locally! The Python language services (using Jedi) are running remotely on the Raspberry Pi, so when I get intellisense, I'm getting it remoted from the actual machine I'm developing on, not a guess from my local box.

Some extentions are local and others are remote

When I open a Terminal with Ctrl+~, see that I'm automatically getting a remote terminal and I've even running htop in it!

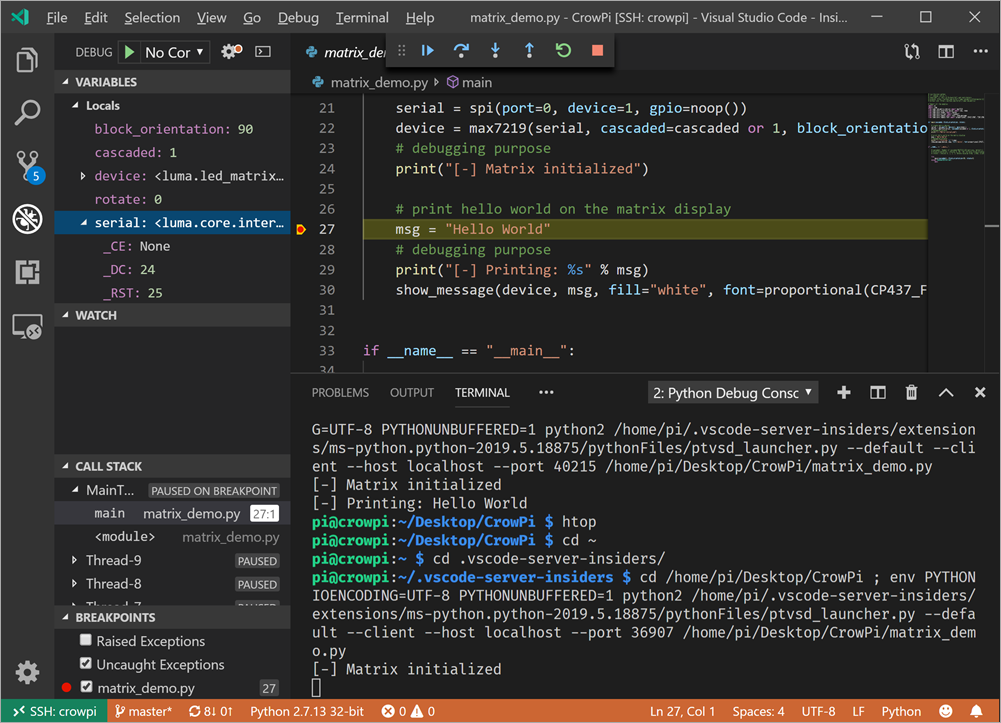
Check this out, I'm doing a remote interactive debugging session against CrowPi samples running on the Raspberry Pi (in Python 2) remotely from VS Code on my Windows 10 machine! I did need to make one change to the remote settings as it was defaulting to Python3 and I wanted to use Python2 for these samples.

Remote Debugging a Raspberry Pi

This has been a very smooth process and I remain super impressed with the VS Remote Development experience. I'll be looking at containers, and remote WSL debugging soon as well. Next step is to try C#, remotely, which will mean making sure the C# OmniSharp Extension works on ARM and remotely.


Sponsor: Suffering from a lack of clarity around software bugs? Give your customers the experience they deserve and expect with error monitoring from Raygun.com. Installs in minutes, try it today!


© 2018 Scott Hanselman. All rights reserved.
     

Making a tiny .NET Core 3.0 entirely self-contained single executable

$
0
0

I've always been fascinated by making apps as small as possible, especially in the .NET space. No need to ship any files - or methods - that you don't need, right? I've blogged about optimizations you can make in your Dockerfiles to make your .NET containerized apps small, as well as using the ILLInk.Tasks linker from Mono to "tree trim" your apps to be as small as they can be.

Work is on going, but with .NET Core 3.0 preview 6, ILLink.Tasks is no longer supported and instead the Tree Trimming feature is built into .NET Core directly.

Here is a .NET Core 3.0 Hello World app.

225 files, 69 megs

Now I'll open the csproj and add PublishTrimmed = true.

<Project Sdk="Microsoft.NET.Sdk">

<PropertyGroup>
<OutputType>Exe</OutputType>
<TargetFramework>netcoreapp3.0</TargetFramework>
<PublishTrimmed>true</PublishTrimmed>
</PropertyGroup>
</Project>

And I will compile and publish it for Win-x64, my chosen target.

dotnet publish -r win-x64 -c release

Now it's just 64 files and 28 megs!

64 files, 28 megs

If your app uses reflection you can let the Tree Trimmer know by telling the project system about your Assembly, or even specific Types or Methods you don't want trimmed away.

<ItemGroup>

<TrimmerRootAssembly Include="System.IO.FileSystem" />
</ItemGroup>

The intent in the future is to have .NET be able to create a single small executable that includes everything you need. In my case I'd get "supersmallapp.exe" with no dependencies. That's done using PublishSingleFile along with the RuntimeIdentifier in the csproj like this:

<Project Sdk="Microsoft.NET.Sdk">

<PropertyGroup>
<OutputType>Exe</OutputType>
<TargetFramework>netcoreapp3.0</TargetFramework>
<PublishTrimmed>true</PublishTrimmed>
<PublishReadyToRun>true</PublishReadyToRun>
<PublishSingleFile>true</PublishSingleFile>
<RuntimeIdentifier>win-x64</RuntimeIdentifier>
</PropertyGroup>
</Project>

At this point you've got everything expressed in the project file and a simple "dotnet publish -c Release" makes you a single exe!

There's also a cool global utility called Warp that makes things even smaller. This utility, combined with the .NET Core 3.0 SDK's now-built-in Tree Trimmer creates a 13 meg single executable that includes everything it needs to run.

C:\Users\scott\Desktop\SuperSmallApp>dotnet warp

Running Publish...
Running Pack...
Saved binary to "SuperSmallApp.exe"

And the result is just a 13 meg single EXE ready to go on Windows.

A tiny 13 meg .NET Core 3 application

If you want, you can combine this "PublishedTrimmed" object with "PublishReadyToRun" as well and get a small AND fast app.

<Project Sdk="Microsoft.NET.Sdk">

<PropertyGroup>
<OutputType>Exe</OutputType>
<TargetFramework>netcoreapp3.0</TargetFramework>
<PublishTrimmed>true</PublishTrimmed>
<PublishReadyToRun>true</PublishReadyToRun>
</PropertyGroup>
</Project>

These are not just IL (Intermediate Language) assemblies that are JITted (Just in time compiled) on the target machine. These are more "pre-chewed" AOT (Ahead of Time) compiled assemblies with as much native code as possible to speed up your app's startup time. From the blog post:

In terms of compatibility, ReadyToRun images are similar to IL assemblies, with some key differences.

  • IL assemblies contain just IL code. They can run on any runtime that supports the given target framework for that assembly. For example a netstandard2.0 assembly can run on .NET Framework 4.6+ and .NET Core 2.0+, on any supported operating system (Windows, macOS, Linux) and architecture (Intel, ARM, 32-bit, 64-bit).
  • R2R assemblies contain IL and native code. They are compiled for a specific minimum .NET Core runtime version and runtime environment (RID). For example, a netstandard2.0 assembly might be R2R compiled for .NET Core 3.0 and Linux x64. It will only be usable in that or a compatible configuration (like .NET Core 3.1 or .NET Core 5.0, on Linux x64), because it contains native code that is only usable in that runtime environment.

I'll keep exploring .NET Core 3.0, and you can install the SDK here in minutes. It won't mess up any of your existing stuff.


Sponsor: Suffering from a lack of clarity around software bugs? Give your customers the experience they deserve and expect with error monitoring from Raygun.com. Installs in minutes, try it today!


© 2018 Scott Hanselman. All rights reserved.
     

Dynamically generating robots.txt for ASP.NET Core sites based on environment

$
0
0

I'm putting part of older WebForms portions of my site that still run on bare metal to ASP.NET Core and Azure App Services, and while I'm doing that I realized that I want to make sure my staging sites don't get indexed by Google/Bing.

I already have a robots.txt, but I want one that's specific to production and others that are specific to development or staging. I thought about a number of ways to solve this. I could have a static robots.txt and another robots-staging.txt and conditionally copy one over the other during my Azure DevOps CI/CD pipeline.

Then I realized the simplest possible thing would be to just make robots.txt be dynamic. I thought about writing custom middleware but that sounded like a hassle and more code that needed. I wanted to see just how simple this could be.

  • You could do this as a single inline middleware, and just lambda and func and linq the heck out out it all on one line
  • You could write your own middleware and do lots of options, then activate it bested on env.IsStaging(), etc.
  • You could make a single Razor Page with environment taghelpers.

The last one seemed easiest and would also mean I could change the cshtml without a full recompile, so I made a RobotsTxt.cshtml single razor page. No page model, no code behind. Then I used the built-in environment tag helper to conditionally generate parts of the file. Note also that I forced the mime type to text/plain and I don't use a Layout page, as this needs to stand alone.

@page

@{
Layout = null;
this.Response.ContentType = "text/plain";
}
# /robots.txt file for http://www.hanselman.com/
User-agent: *
<environment include="Development,Staging">Disallow: /</environment>
<environment include="Production">Disallow: /blog/private
Disallow: /blog/secret
Disallow: /blog/somethingelse</environment>

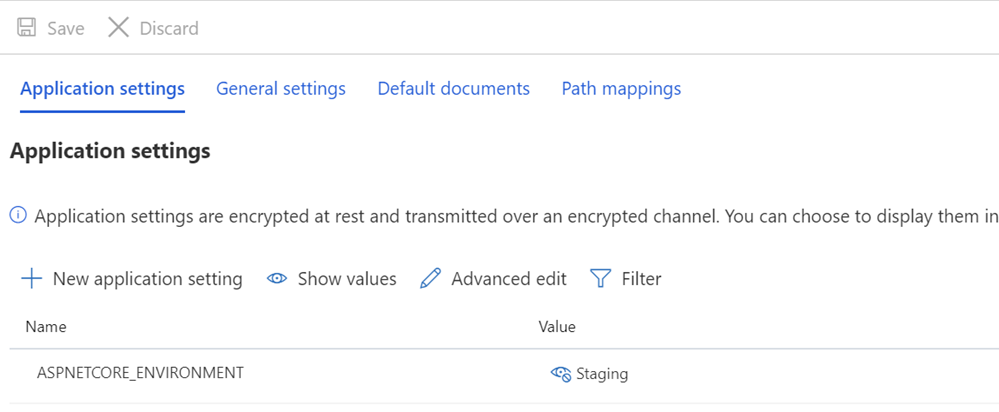
I then make sure that my Staging and/or Production systems have ASPNETCORE_ENVIRONMENT variables set appropriately.

ASPNETCORE_ENVIRONMENT=Staging

I also want to point out what may look like odd spacing and how some text is butted up against the TagHelpers. Remember that a TagHelper's tag sometimes "disappears" (is elided) when it's done its thing, but the whitespace around it remains. So I want User-agent: * to have a line, and then Disallow to show up immediately on the next line. While it might be prettier source code to have that start on another line, it's not a correct file then. I want the result to be tight and above all, correct. This is for staging:

User-agent: *

Disallow: /

This now gives me a robots.txt at /robotstxt but not at /robots.txt. See the issue? Robots.txt is a file (or a fake one) so I need to map a route from the request for /robots.txt to the Razor page called RobotsTxt.cshtml.

Here I add a RazorPagesOptions in my Startup.cs with a custom PageRoute that maps /robots.txt to /robotstxt. (I've always found this API annoying as the parameters should, IMHO, be reversed like ("from","to") so watch out for that, lest you waste ten minutes like I just did.

public void ConfigureServices(IServiceCollection services)

{
services.AddMvc()
.AddRazorPagesOptions(options =>
{
options.Conventions.AddPageRoute("/robotstxt", "/Robots.Txt");
});
}

And that's it! Simple and clean.

You could also add caching if you wanted, either as a larger middleware, or even in the cshtml Page, like

context.Response.Headers.Add("Cache-Control", $"max-age=SOMELARGENUMBEROFSECONDS");
but I'll leave that small optimization as an exercise to the reader.

UPDATE: After I was done I found this robots.txt middleware and NuGet up on GitHub. I'm still happy with my code and I don't mind not having an external dependency, but it's nice to file this one away for future more sophisticated needs and projects.

How do you handle your robots.txt needs? Do you even have one?


Sponsor: Get the latest JetBrains Rider with WinForms designer, Edit & Continue, and an IL (Intermediate Language) viewer. Preliminary C# 8.0 support, rename refactoring for F#-defined symbols across your entire solution, and Custom Themes are all included.


© 2018 Scott Hanselman. All rights reserved.
     

You can now download the new Open Source Windows Terminal

$
0
0

Last month Microsoft announced a new open source Windows Terminal! It's up at https://github.com/microsoft/Terminal and it's great, but for the last several weeks you've had to build it yourself as a Developer. It's been very v0.1 if you know what I mean.

Today you can download the Windows Terminal from the Microsoft Store! This is a preview release (think v0.2) but it'll automatically update, often, from the Windows Store if you have Windows 10 version 18362.0 or higher. Run "winver" to make sure.

Windows Terminal

If you don't see any tabs, hit Ctrl-T and note the + and the pull down menu at the top there. Under the menu go to Settings to open profiles.json. Here's mine on one machine.

Here's some Hot Windows Terminal Tips

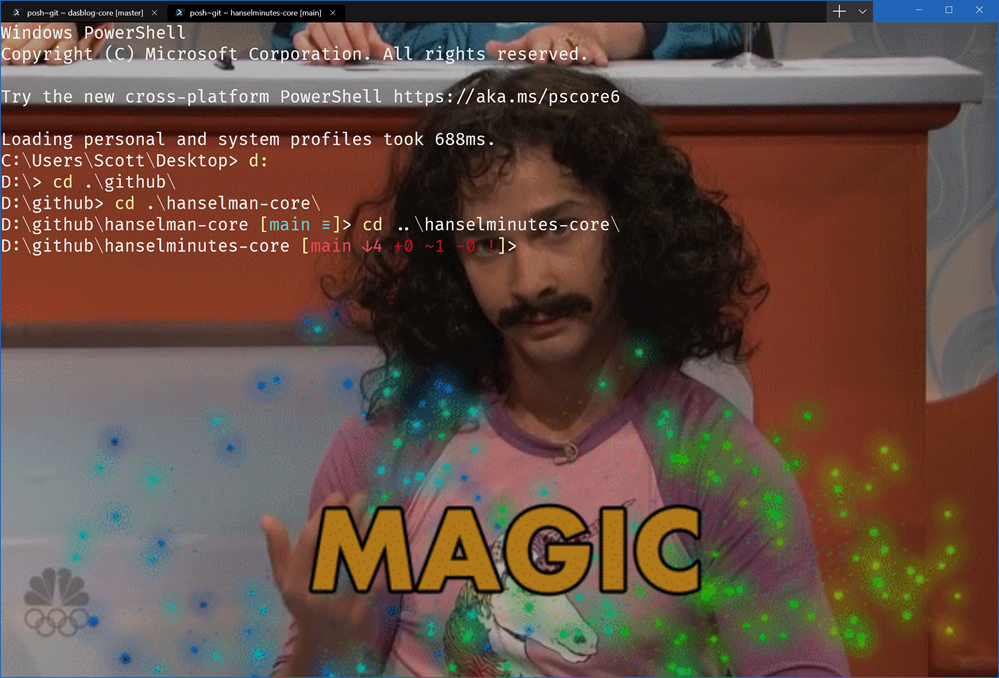
You can do background images, even animated, with opacity (with useAcrylic off):

"backgroundImage": "c:/users/scott/desktop/doug.gif",

"backgroundImageOpacity": 0.7,
"backgroundImageStretchMode": "uniformToFill

You can edit the key bindings to your taste in the "key bindings" section. For now, be specific, so the * might be expressed as Ctrl+Shift+8, for example.

Try other things like cursor shape and color, history size, as well as different fonts for each tab.

 "cursorShape": "vintage"

If you're using WSL or WSL2, use the distro name like this in your new profile:

"wsl.exe -d Ubuntu-18.04"

If you like Font Ligatures or use Powerline, consider Fira Code as a potential new font.

I'd recommend you PIN terminal to your taskbar and start menu, but you can run windows terminal from the command "wt" from Windows R or from anotherc console. That's just "wt" and enter!

Try not just "Ctrl+Mouse Scroll" but also "Ctrl+Shift+Mouse Scroll" and get your your whole life!

Remember that the definition of a shell is someone fluid, so check out Azure Cloud Shell, in your terminal!

Windows Terminal menus

Also, let's start sharing nice color profiles! Share your new ones as a Gist in this format. Note the name.

{

"background" : "#2C001E",
"black" : "#4E9A06",
"blue" : "#3465A4",
"brightBlack" : "#555753",
"brightBlue" : "#729FCF",
"brightCyan" : "#34E2E2",
"brightGreen" : "#8AE234",
"brightPurple" : "#AD7FA8",
"brightRed" : "#EF2929",
"brightWhite" : "#EEEEEE",
"brightYellow" : "#FCE94F",
"cyan" : "#06989A",
"foreground" : "#EEEEEE",
"green" : "#300A24",
"name" : "UbuntuLegit",
"purple" : "#75507B",
"red" : "#CC0000",
"white" : "#D3D7CF",
"yellow" : "#C4A000"
}

Note also that this should be the beginning of a wonderful Windows Console ecosystem. This isn't the one terminal to end them all, it's the one to start them all. I've loved alternative consoles for YEARS, whether it be ConEmu or Console2 many years ago, I've long declared that Text Mode is a missed opportunity.

Remember also that Terminal !== Shell and that you can bring your shell of choice into your Terminal of choice! If you want the deep architectural dive, be sure to watch the BUILD 2019 technical talk with some of the developers or read about ConPTY and how to integrate with it!


Sponsor: Get the latest JetBrains Rider with WinForms designer, Edit & Continue, and an IL (Intermediate Language) viewer. Preliminary C# 8.0 support, rename refactoring for F#-defined symbols across your entire solution, and Custom Themes are all included.


© 2018 Scott Hanselman. All rights reserved.
     

Adding Reaction Gifs for your Build System and the Windows Terminal

$
0
0

So, first, I'm having entirely too much fun with the new open source Windows Terminal. If you've got the latest version of Windows (go run Windows Update and do whatever it takes) then you can download the Windows Terminal from the Microsoft Store! This is a preview release (think v0.2) but it'll automatically update, often, from the Windows Store if you have Windows 10 version 18362.0 or higher.

One of the most fun things is that you can have background images. Even animated gifs! You can add those images in your Settings/profile.json like this.

"backgroundImage": "c:/users/scott/desktop/doug.gif",

"backgroundImageOpacity": 0.7,
"backgroundImageStretchMode": "uniformToFill

The profile.json is just JSON and you can update it. I could even update it programmatically if I wanted to parse it and mess about.

BUT. Enterprising developer Chris Duck created a lovely PowerShell Module called MSTerminalSettings that lets you very easily make Profile changes with script.

For example, Mac developers who use iTerm often go to https://iterm2colorschemes.com/ and get new color schemes for their consoles. Now Windows folks can as well!

From his docs, this example downloads the Pandora color scheme from https://iterm2colorschemes.com/ and sets it as the color scheme for the PowerShell Core terminal profile.

Invoke-RestMethod -Uri 'https://raw.githubusercontent.com/mbadolato/iTerm2-Color-Schemes/master/schemes/Pandora.itermcolors' -OutFile .\Pandora.itermcolors

Import-Iterm2ColorScheme -Path .\Pandora.itermcolors -Name Pandora
Get-MSTerminalProfile -Name "PowerShell Core" | Set-MSTerminalProfile -ColorScheme Pandora

That's easy! Then I was talking to Tyler Leonhardt and suggested that we programmatically change the background using a folder full of Animated Gifs. I happen to have such a folder (with 2000 categorized gif classics) so we started coding and streamed the whole debacle on Tyler's Twitch!

The result is Windows Terminal Attract Mode and it's a hot mess and it is up on GitHub and all set up for PowerShell Core.

Remember that "Attract mode" is the mode an idle arcade cabinet goes into in order to attract passersby to play, so clearly the Terminal needs this also.

./AttractMode.ps1 -name "profile name" -path "c:\temp\trouble" -secs 5

It's a proof of concept for now, and it's missing background/runspace support, being wrapped up in a proper module, etc but the idea is solid, building on a solid base, with improvements to idiomatic PowerShell Core already incoming. Right now it'll run forever. Wrap it in Start-Job if you like as well and can stand it.

The next idea was to have reactions gifs to different developer situations. Break the build? Reaction Gif. Passing tests? Reaction Gif.

Here's a silly proof (not refactored) that aliases "dotnet build" to "db" with reactions.

#messing around with build reaction gifs


Function DotNetAlias {
dotnet build
if ($?) {
Start-job -ScriptBlock {
d:\github\TerminalAttractMode\SetMoodGif.ps1 "PowerShell Core" "D:\Dropbox\Reference\Animated Gifs\chrispratt.gif"
Start-Sleep 1.5
d:\github\TerminalAttractMode\SetMoodGif.ps1 "PowerShell Core" "D:\Dropbox\Reference\Animated Gifs\4003cn5.gif"
} | Out-Null
}
else {
Start-job -ScriptBlock {
d:\github\TerminalAttractMode\SetMoodGif.ps1 "PowerShell Core" "D:\Dropbox\Reference\Animated Gifs\idk-girl.gif"
Start-Sleep 1.5
d:\github\TerminalAttractMode\SetMoodGif.ps1 "PowerShell Core" "D:\Dropbox\Reference\Animated Gifs\4003cn5.gif"
} | Out-Null

}
}

Set-Alias -Name db -value DotNetAlias

I added the Start-job stuff so that the build finishes and the Terminal returns control to you while the gifs still are updating. Runspace support would be smart as well.

Some other ideas? Giphy support. Random mood gifs. Pick me ups. You get the idea.

Later, Brandon Olin jumped in with this gem. Why not get a reaction gif if anything goes wrong in your last command? ERRORLEVEL 1? Explode.

Why are we doing this? Because it sparks joy, y'all.


Sponsor: Looking for a tool for performance profiling, unit test coverage, and continuous testing that works cross-platform on Windows, macOS, and Linux? Check out the latest JetBrains Rider!


© 2019 Scott Hanselman. All rights reserved.
     

Git is case-sensitive and your filesystem may not be - Weird folder merging on Windows

$
0
0

I was working on DasBlog Core (an .NET Core cross-platform update of the ASP.NET WebForms-based blogging software that runs this blog) with Mark Downie, the new project manager, and Shayne Boyer. This is part of a larger cloud re-architecture of hanselman.com and the systems that run this whole site.

Shayne was working on getting a DasBlog Core CI/CD (Continuous Integration/Continuous Development) running in Azure DevOps' build system. We wanted individual build pipelines to confirm that DasBlog Core was in fact, cross-platform, so we needed to build, test, and run it on Windows, Linux, and Mac.

The build was working great on Windows and Mac...but failing on Linux. Why?

Well, like all things, it's complex.

  • Windows has a case-insensitive file system.
  • By default, Mac uses a case-insensitive file system.

Since Git 1.5ish there's been a setting

git config --global core.ignorecase true

but you should always be aware of what a setting does before you just set it.

If you're not careful, you or someone on your team can create a case sensitive file path in your git index while you're using a case insensitive operating system like Windows or Mac. If you do this, you'll be able to end up with two separate entries from git's perspective. However Windows will silently merge them and see just one.

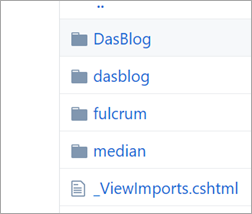
Here's our themes folder structure as seen on GitHub.com.

Case insenstive folder names

But when we clone it on Mac or Windows, we see just one folder.

DasBlog as a single folder in VS Code

Turns out that six months ago one of us introduced another folder with the name dasblog while the original was DasBlog. When we checked them on Mac or Windows the files ended up in merged into one folder, but on Linux they were/are two, so the build fails.

You can fix this in a few ways. You can rename the file in a case-sensitive way and commit the change:

git mv --cached name.txt NAME.TXT

Please take care and back up anything you don't understand.

If you're renaming a directory, you'll do a two stage rename with a temp name.

git mv foo foo2

git mv foo2 FOO
git commit -m "changed case of dir"

Be safe out there!


Sponsor: Looking for a tool for performance profiling, unit test coverage, and continuous testing that works cross-platform on Windows, macOS, and Linux? Check out the latest JetBrains Rider!


© 2019 Scott Hanselman. All rights reserved.
     

Real World Cloud Migrations: Moving a 17 year old series of sites from bare metal to Azure

$
0
0

Technical Debt has a way of sneaking up on you. While my podcast site and the other 16ish sites I run all live in Azure and have a nice CI/CD pipeline with Azure DevOps, my main "Hanselman.com" series of sites and mini-sites has lagged behind. I'm still happy with its responsive design, but the underlying tech has started to get more difficult to manage and build and I've decided it's time to make some updates.

Moving sites to Azure DevOps

I want to be able to make these updates and have a clean switch over so that you, the reader, don't notice a difference. There's a number of things to think about when doing any migration like this, realizing it'll take some weeks (or months if you're a bigger company that just me).

  • Continuous Deployment/Continuous Integration
    • I host my code on GitHub and Azure DevOps now lets you log in with GitHub and does a fine job of building AND deploying your code (while running tests AND allowing for manual quality gates) so I want to make sure my sites have a nice clean "check in and go live" process.
    • I'll also be using Azure App Services and Deployment Slots, so I'll have a dev/test/staging site and production, like a real professional. No more editing text files in production. Well, at least, I won't tell you when I'm editing text file in production.
  • Technology Update
    • Hanselman.com proper (not the blog) and the mini pages/sites underneath it run on ASP.NET 4.0 and WebForms. I was able to easily move the main site over to ASP.NET Razor Pages. Razor is just so elegant, as it's basically just HTML then you type @ and you're in C# (Razor). More on that below, but the upgrade was a day as the home page and minisites are largely readonly.
    • The Blog, hosted at /blog will be more challenging given I don't want to break two decades years of URLs, along with the fact that it's running DasBlog on a recently upgraded .NET 4.0. DasBlog was originally made in .NET 1, then upgraded to .NET 2, so this is 17 years of technical debt.
    • That said, the .NET Standard along with open source cross-platform .NET Core has allowed us - with the leadership of Mark Downie - to create DasBlog Core. DasBlog Core shares the core reliable (if crusty) engine of DasBlog along with an all new system of URL writing using ASP.NET Core middleware, as well as a complete re-do of the (well ahead of its time) DasBlog Theming Engine, now based on Razor Pages. It's brilliant. This is in active development.
  • Azure Front Door
    • Because I'm moving from a single machine running IIS to Azure, I'll want to split things apart to remove single points of failture. I'll use Azure Front Door to manage my URL structure and act as a front end cache as well as distribute traffic to multiple Azure App Services (Web Apps).
  • URL management
    • Are you changing your URLs and URL structure? Remember that URLs are UI and they matter. I've long wanted to remove the "aspx" extension from my URLs, as well as move the TitleCaseBlogPostThing to a more "modern" title-case-blog-post-thing style. I need to do this in a way that updates my google sitemap, breaks zero URLs, 301 redirects to the new style, and uses rel=canonical in a smart way.
  • Shared Assets/CDNs/Front Door
    • Since I run a family of sites, there's an opportunity to use a CDN as well and some clean CNAME DNS such that images.hanselman.com and images.hanselminutes.com can share assets. Since the Azure CDN is easy to setup and offers free SSL certs and pay-as-you go, I'll set both of those CNAMES up to point to the same Azure Storage where I'll keep images, show pics, CSS, and JS.

I'll be blogging the whole process. What do you want to hear/learn about?


Sponsor: Seq delivers the diagnostics, dashboarding, and alerting capabilities needed by modern development teams - all on your infrastructure. Download now.


© 2019 Scott Hanselman. All rights reserved.
     

Real World Cloud Migrations: CDNs are an easy improvement to legacy apps

$
0
0

I'm doing a quiet backend migration/update to my family of sites. If I do it right, there will be minimal disruption. Even though I'm a one person show (plus Mandy my podcast editor) the Cloud lets me manage digital assets like I'm a whole company with an IT department. Sure, I could FTP files directly into production, but why do that when I've got free/cheap stuff like Azure DevOps.

As I'm one person, I do want to keep costs down whenever possible and I've said so in my "Penny Pinching in the Cloud" series. However, I do pay for value, so I'll try to keep costs down whenever possible, but I will pay for things I feel are useful or provide me with a quality product and/or save me time and hassle. For example, Azure Pipelines gives one free Microsoft-hosted CI/CD pipeline and 1 hosted job with 1800 minutes a month. This should be more than enough for my set up.

Additionally, sometimes I'll shift costs in order to both save money and improve performance as when I moved my Podcast's image hosting over to an Azure CDN in 2013. Fast forward 6 years and since I'm doing this larger migration, I wanted to see how easy it would be to migrate even more of my static assets to a CDN.

Make a Storage Account and ensure that its Access Level is Public if you intend folks to be able to read from it over HTTP GETs.

Public Access Level

With in the Azure Portal you can make a CDN Profile that uses Microsoft, Akamai, or Verizon for the actual Content Distribution Network. I picked Microsoft's because I have experience with Akamai and Verizon (they were solid) and I wanted to see how the new Microsoft one does. It claims to put content within 50ms of 60 countries.

You'll have a CDN endpoint host name that points to an Origin. That Origin is the Origin of your content. The Origin can be an existing place you have stuff so the CDN will basically check there first, cache things, then serve the content. Or it can be an existing WebApp or in my case, Storage.

Azure Storage Accounts for my blog

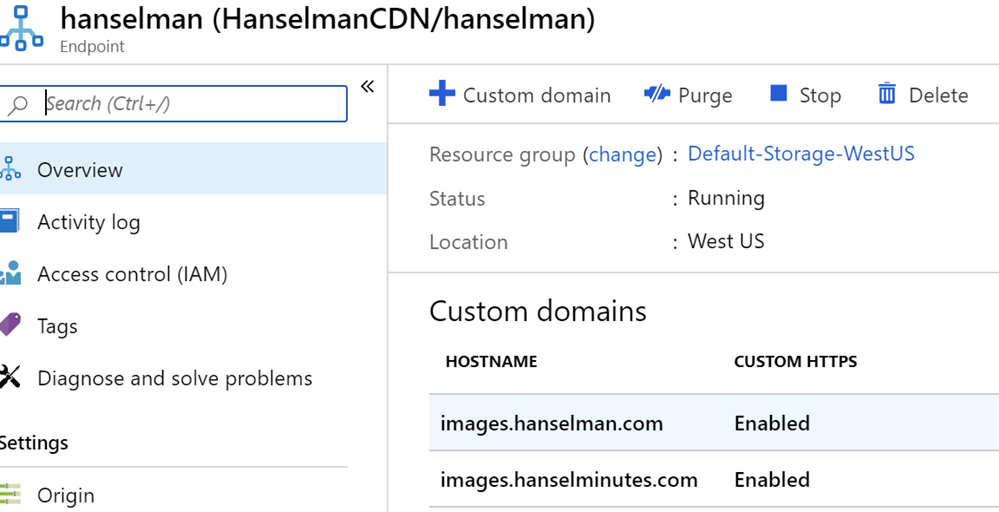
I didn't want to make things too complex, so I have a single Storage Account with a few containers. Then I mapped custom endpoints for both my blog AND my podcast, but they share the same storage. I also took advantage of the free SSL Certs so images.hanselman.com and images.hanselminutes.com are both SSL. Gotta get those "A" grades from https://securityheaders.com right?

Custom domains for my CDN

Then, just grab the Azure Storage Explorer. It's free and cross platform. In fact, you can get Storage Explorer as an app that runs locally, or you can check it out in the Azure  Portal/in-browser as well, here. I've uploaded all my main assets (images used in my CSS, blog, headers, etc).

I've settled on a basic scheme where anything that was "/images/foo.png" is now "https://images.hanselman.com/blog/foo.png" or /main/ or /podcast/ depending on who is using it. This made search and replaces reliable and easy.

It's truly a less-than-an-hour operation to enable a CDN on an existing site. While I've chose to use Azure Storage as my backing store, you can just use your existing site's /images folder and just change your markup to pull from the CDN's URL. I recommend you make a simple cdn.yourdomain.com or images.yourdomain.com. This can also easily be enabled with a CNAME in less than an hour. Having your images at another URL via a subdomain CNAME also allows for even more download parallelism from the browser.

This is all in my Staging so you won't see it quite yet until I flip the switch on the whole migration.

Exploring future possibilities for dynamic image content

I haven't yet moved all my blog content images (a few gigs, but many thousands of images) to a CDN as I don't want to change my existing publishing workflow with Open Live Writer. I'm considering a flow that keeps the images uploading to the Web App but then using the Custom Origin Path options in the Azure CDN that will have images get picked up Web App then get served by the CDN. In order to manage 17 years of images though, I'd need to catch URLs like this:

https://www.hanselman.com/blog/content/binary/Windows-Live-Writer/0409a9d5fae6_F552/image_9.png

and redirect them to

https://images.hanselman.com/blog/content/binary/Windows-Live-Writer/0409a9d5fae6_F552/image_9.png

As I see it, there's a few options to get images from a GET of /blog/content/binary to be served by a CDN:

  • Dynamically Rewrite the URLs on the way OUT (as the HTML is generated)
    • CPU expensive, but ya it's cached in my WebApp
  • Rewriting Middleware to redirect (301?) requests to the new images location
    • Easiest option, but costs everyone a 301 on all image GETs
  • Programmatically change the stored markup (basically forloop over my "database," search and replace, AND ensure future images use this new URL)
    • A hassle, but a one time hassle
    • Not sure about future images, I might have to change my publishing flow AND run the process on new posts occasionally.

What are your thoughts on if I should go all the way and manage EVERY blog image vs the low hanging fruit of shared static assets? Worth it, or overkill?

The learning process continues!


Sponsor: Seq delivers the diagnostics, dashboarding, and alerting capabilities needed by modern development teams - all on your infrastructure. Download now.


© 2019 Scott Hanselman. All rights reserved.
     

Dealing with Application Base URLs and Razor link generation while hosting ASP.NET web apps behind Reverse Proxies

$
0
0

Updating my site to run on AzureI'm quietly moving my Website from a physical machine to a number of Cloud Services hosted in Azure. This is an attempt to not just modernize the system - no reason to change things just to change them - but to take advantage of a number of benefits that a straight web host sometimes doesn't have. I want to have multiple microsites (the main page, the podcast, the blog, etc) with regular backups, CI/CD pipeline (check in code, go straight to staging), production swaps, a global CDN for content, etc.

I'm also moving from an ASP.NET 4 (was ASP.NET 2 until recently) site to ASP.NET Core 2.x LTS and changing my URL structure. I am aiming to save money but I'm not doing this as a "spend basically nothing" project. Yes, I could convert my site to a static HTML generated blog using any number of great static site generators, or even a Headless CMS. Yes I could host it in Azure Storage fronted by a CMS, or even as a series of Azure Functions. But I have 17 years of content in DasBlog, I like DasBlog, and it's being actively updated to .NET Core and it's a fun app. I also have custom Razor sites in the form of my podcast site and they work great with a great workflow. I want to find a balance of cost effectiveness, features, ease of use, and reliability.  What I have now is a sinking feeling like my site is gonna die tomorrow and I'm not ready to deal with it. So, there you go.

Currently my sites live on a real machine with real folders and it's fronted by IIS on a Windows Server. There's an app (an IIS Application, to be clear) leaving at \ so that means hanselman.com/ hits / which is likely c:\inetpub\wwwroot full stop.

For historical reasons, when you hit hanselman.com/blog/ you're hitting the /blog IIS Application which could be at d:\whatever but may be at c:\inetpub\wwwroot\blog or even at c:\blog. Who knows. The Application and ASP.NET within it knows that the site is at hanselman.com/blog.

That's important, since I may write a URL like ~/about when writing code. If I'm in the hanselman.com/blog app, then ~/about means hanselman.com/blog/about. If I write /about, that means hanselman.com/about. So the ~ is a shorthand for "starting at this App's base URL." This is great and useful and makes Link generation super easy, but it only works if your app knows what it's server-side base URL is.

To be clear, we are talking about the reality of the generated URL that's sent to and from the browser, not about any physical reality on the disk or server or app.

I've moved my world to three Azure App Services called hanselminutes, hanselman, and hanselmanblog. They have names like http://hanselman.azurewebsites.net for example.

ASIDE: You'll note that hitting hanselman.azurewebsites.com will hit an app that looks stopped. I don't want that site to serve traffic from there, I want it to be served from http://hanselman.com, right? Specifically only from Azure Front Door which I'll talk about in another post soon. So I'll use the Access Restrictions and Software Based Networking in Azure to deny all traffic to that site, except traffic from Azure - in this case, from the Azure Front Door Reverse Proxy I'll be using.

That looks like this in this Access Restrictions part of the Azure Portal.

Only allowing traffic from Azure

Since the hanselman.com app will point to hanselman.azurewebsites.net (or one of its staging slots) there's no issue with URL generation. If I say / I mean /, the root of the site. If I generate a URL like "~/about" I'll get hanselman.com/about, right?

But with http://hanselmanblog.azurewebsites.net it's different.

I want hanselman.com/blog/ to point to hanselmanblog.azurewebsites.net.

That means that the Azure Front Door will be receiving traffic, then forward it on to the Azure Web App. That means:

  • hanselman.com/blog/foo -> hanselmanblog.azurewebsites.net/foo
  • hanselman.com/blog/bar -> hanselmanblog.azurewebsites.net/foo
  • hanselman.com/blog/foo/bar/baz -> hanselmanblog.azurewebsites.net/foo/bar/baz

There's a few things to consider when dealing with reverse proxies like this.

Is part of the /path being removed or is a path being added?

In the case of DasBlog, we have a configuration setting so that the app knows where it LOOKS like it is, from the Browser URL's perspective.

My blog is at /blog so I add that in some middleware in my Startup.cs. Certainly YOU don't need to have this in config - do whatever works for you as long as context.Request.PathBase is set as the app should see it. I set this very early in my pipeline.

That if statement is there because most folks don't install their blog at /blog, so it doesn't add the middleware.

//if you've configured it at /blog or /whatever, set that pathbase so ~ will generate correctly

Uri rootUri = new Uri(dasBlogSettings.SiteConfiguration.Root);
string path = rootUri.AbsolutePath;

//Deal with path base and proxies that change the request path
if (path != "/")
{
app.Use((context, next) =>
{
context.Request.PathBase = new PathString(path);
return next.Invoke();
});
}

Sometimes you want the OPPOSITE of this. That would mean that I wanted, perhaps hanselman.com to point to hanselman.azurewebsites.net/blog/. In that case I'd do this in my Startup.cs's ConfigureServices:

app.UsePathBase("/blog");

Be aware that If you're hosting ASP.NET Core apps behind Nginx or Apache or really anything, you'll also want ASP.NET Core to respect  X-Forwarded-For and other X-Forwarded standard headers. You'll also likely want the app to refuse to speak to anyone who isn't a certain list of proxies or configured URLs.

I configure these in Startup.cs's ConfigureServices from a semicolon delimited list in my config, but you can do this in a number of ways.

services.Configure<ForwardedHeadersOptions>(options =>

{
options.ForwardedHeaders = ForwardedHeaders.All;
options.AllowedHosts = Configuration.GetValue<string>("AllowedHosts")?.Split(';').ToList<string>();
});

Since Azure Front Door adds these headers as it forwards traffic, from my app's point of view it "just works" once I've added that above and then this in Configure()

app.UseForwardedHeaders();

There seems to be some confusion on hosting behind a reverse proxy in a few GitHub Issues. I'd like to see my scenario ( /foo -> / ) be a single line of code, as we see that the other scenario ( / -> /foo ) is a single line.

Have you had any issues with URL generation when hosting your Apps behind a reverse proxy?


Sponsor: Develop Xamarin applications without difficulty with the latest JetBrains Rider: Xcode integration, JetBrains Xamarin SDK, and manage the required SDKs for Android development, all right from the IDE. Get it today


© 2019 Scott Hanselman. All rights reserved.
     

Real World Cloud Migrations: Azure Front Door for global HTTP and path based load-balancing

$
0
0

As I've mentioned lately, I'm quietly moving my Website from a physical machine to a number of Cloud Services hosted in Azure. This is an attempt to not just modernize the system - no reason to change things just to change them - but to take advantage of a number of benefits that a straight web host sometimes doesn't have. I want to have multiple microsites (the main page, the podcast, the blog, etc) with regular backups, CI/CD pipeline (check in code, go straight to staging), production swaps, a global CDN for content, etc.

I'm breaking a single machine into a series of small sites BUT I want to still maintain ALL my existing URLs (for good or bad) and the most important one is hanselman.com/blog/ that I now want to point to hanselmanblog.azurewebsites.net.

That means that the Azure Front Door will be receiving all the traffic - it's the Front Door! - and then forward it on to the Azure Web App. That means:

  • hanselman.com/blog/foo -> hanselmanblog.azurewebsites.net/foo
  • hanselman.com/blog/bar -> hanselmanblog.azurewebsites.net/foo
  • hanselman.com/blog/foo/bar/baz -> hanselmanblog.azurewebsites.net/foo/bar/baz

There's a few things to consider when dealing with reverse proxies like this and I've written about that in detail in this article on Dealing with Application Base URLs and Razor link generation while hosting ASP.NET web apps behind Reverse Proxies.

You can and should read in detail about Azure Front Door here.

It's worth considering a few things. Front Door MAY be overkill for what I'm doing because I have a small, modest site. Right now I've got several backends, but they aren't yet globally distributed. If I had a system with lots of regions and lots of App Services all over the world AND a lot of static content, Front Door would be a perfect fit. Right now I have just a few App Services (Backends in this context) and I'm using Front Door primarily to manage the hanselman.com top level domain and manage traffic with URL routing.

On the plus side, that might mean Azure Front Door was exactly what I needed, it was super easy to set up Front Door as there's a visual Front Door Designer. It was less than 20 minutes to get it all routed, and SSL certs too just a few hours more. You can see below that I associated staging.hanselman.com with two Backend Pools. This UI in the Azure Portal is (IMHO) far easier than the Azure Application Gateway. Additionally, Front Door is Global while App Gateway is Regional. If you were a massive global site, you might put Azure Front Door in ahem, front, and Azure App Gateway behind it, regionally.

image

Again, a little overkill as my Pools are pools are pools of one, but it gives me room to grow. I could easily balance traffic globally in the future.

CONFUSION: In the past with my little startup I've used Azure Traffic Manager to route traffic to several App Services hosted all over the global. When I heard of Front Door I was confused, but it seems like Traffic Manager is mostly global DNS load balancing for any network traffic, while Front Door is Layer 7 load balancing for HTTP traffic, and uses a variety of reasons to route traffic. Azure Front Door also can act as a CDN and cache all your content as well. There's lots of detail on Front Door's routing architecture details and traffic routing methods. Azure Front Door is definitely the most sophisticated and comprehensive system for fronting all my traffic. I'm still learning what's the right size app for it and I'm not sure a blog is the ideal example app.

Here's how I set up /blog to hit one Backend Pool. I have it accepting both HTTP and HTTPS. Originally I had a few extra Front Door rules, one for HTTP, one for HTTPs, and I set the HTTP one to redirect to HTTPS. However, Front door charges 3 cents an hour for the each of the first 5 routing rules (then about a penny an hour for each after 5) but I don't (personally) think I should pay for what I consider "best practice" rules. That means, forcing HTTPS (an internet standard, these days) as well as URL canonicalization with a trailing slash after paths. That means /blog should 301 to /blog/ etc. These are simple prescriptive things that everyone should be doing. If I was putting a legacy app behind a Front Door, then this power and flexibility in path control would be a boon that I'd be happy to pay for. But in these cases I may be able to have that redirection work done lower down in the app itself and save money every month. I'll update this post if the pricing changes.

/blog hits the Blog App Service

After I set up Azure Front Door I noticed my staging blog was getting hit every few seconds, all day forever. I realized there are some health checks but since there's 80+ Azure Front Door locations and they are all checking the health of my app, it was adding up to a lot of traffic. For a large app, you need these health checks to make sure traffic fails over and you really know if you app is healthy. For my blog, less so.

There's a few ways to tell Front Door to chill. First, I don't need Azure Front Door doing a GET requests on /. I can instead ask it to check something lighter weight. With ASP.NET 2.2 it's as easy as adding HealthChecks. It's much easier, less traffic, and you can make the health check as comprehensive as you want.

app.UseHealthChecks("/healthcheck");

Next I turned the Interval WAY app so it wouldn't bug me every few seconds.

Interval set to 255 seconds

These two small changes made a huge difference in my traffic as I didn't have so much extra "pinging."

After setting up Azure Front Door, I also turned on Custom Domain HTTPs and pointing staging to it. It was very easy to set up and was included in the cost.

Custom Domain HTTPS

I haven't decided if I want to set up Front Door's caching or not, but it might mean an easier, more central way than using a CDN manually and changing the URLs for my sites static content and images. In fact, the POP (Point of Presense) locations for Front Door are the same as those for Azure CDN.

NOTE: I will have to at some point manage the Apex/Naked domain issue where hanselman.com and www.hanselman.com both resolve to my website. It seems this can be handled by either CNAME flattening or DNS chasing and I need to check with my DNS provider to see if this is supported. I suspect I can do it with an ALIAS record. Barring that, Azure also offers a Azure DNS hosting service.

There is another option I haven't explored yet called Azure Application Gateway that I may test out and see if it's cheaper for what I need. I primarily need SSL cert management and URL routing.

I'm continuing to explore as I build out this migration plan. Let me know your thoughts in the comments.


Sponsor: Develop Xamarin applications without difficulty with the latest JetBrains Rider: Xcode integration, JetBrains Xamarin SDK, and manage the required SDKs for Android development, all right from the IDE. Get it today


© 2019 Scott Hanselman. All rights reserved.
     

DragonFruit and System.CommandLine is a new way to think about .NET Console apps

$
0
0

There's some interesting stuff quietly happening in the "Console App" world within open source .NET Core right now. Within the https://github.com/dotnet/command-line-api repository are three packages:

  • System.CommandLine.Experimental
  • System.CommandLine.DragonFruit
  • System.CommandLine.Rendering

These are interesting experiments and directions that are exploring how to make Console apps easier to write, more compelling, and more useful.

The one I am the most infatuated with is DragonFruit.

Historically Console apps in classic C look like this:

#include <stdio.h>


int main(int argc, char *argv[])
{
printf("Hello, World!\n");
return 0;
}

That first argument argc is the count of the number of arguments you've passed in, and argv is an array of pointers to 'strings,' essentially. The actual parsing of the command line arguments and the semantic meaning of the args you've decided on are totally on you.

C# has done it this way, since always.

static void Main(string[] args)

{
Console.WriteLine("Hello World!");
}

It's a pretty straight conceptual port from C to C#, right? It's an array of strings. Argc is gone because you can just args.Length.

If you want to make an app that does a bunch of different stuff, you've got a lot of string parsing before you get to DO the actual stuff you're app is supposed to do. In my experience, a simple console app with real proper command line arg validation can end up with half the code parsing crap and half doing stuff.

myapp.com someCommand --param:value --verbose

The larger question - one that DragonFruit tries to answer - is why doesn't .NET do the boring stuff for you in an easy and idiomatic way?

From their docs, what if you could declare a strongly-typed Main method? This was the question that led to the creation of the experimental app model called "DragonFruit", which allows you to create an entry point with multiple parameters of various types and using default values, like this:

static void Main(int intOption = 42, bool boolOption = false, FileInfo fileOption = null)
{
    Console.WriteLine($"The value of intOption is: {intOption}");
    Console.WriteLine($"The value of boolOption is: {boolOption}");
    Console.WriteLine($"The value of fileOption is: {fileOption?.FullName ?? "null"}");
}

In this concept, the Main method - the entry point - is an interface that can be used to infer options and apply defaults.

using System;


namespace DragonFruit
{
class Program
{
/// <summary>
/// DragonFruit simple example program
/// </summary>
/// <param name="verbose">Show verbose output</param>
/// <param name="flavor">Which flavor to use</param>
/// <param name="count">How many smoothies?</param>
static int Main(
bool verbose,
string flavor = "chocolate",
int count = 1)
{
if (verbose)
{
Console.WriteLine("Running in verbose mode");
}
Console.WriteLine($"Creating {count} banana {(count == 1 ? "smoothie" : "smoothies")} with {flavor}");
return 0;
}
}
}

I can run it like this:

> dotnet run --flavor Vanilla --count 3   

Creating 3 banana smoothies with Vanilla

The way DragonFruit does this is super clever. During the build process, DragonFruit changes this public strongly typed Main to a private (so it's not seen from the outside - .NET won't consider it an entry point. It's then replaced with a Main like this, but you'll never see it as it's in the compiled/generated artifact.

public static async Task<int> Main(string[] args)

{
return await CommandLine.ExecuteAssemblyAsync(typeof(AutoGeneratedProgram).Assembly, args, "");
}

So DragonFruit has swapped your Main for its smarter Main and the magic happens! You'll even get free auto-generated help!

DragonFruit:

DragonFruit simple example program

Usage:
DragonFruit [options]

Options:
--verbose Show verbose output
--flavor <flavor> Which flavor to use
--count <count> How many smoothies?
--version Display version information

If you want less magic and more power, you can use the same APIs DragonFruit uses to make very sophisticated behaviors. Check out the Wiki and Repository for more and perhaps get involved in this open source project!

I really like this idea and I'd love to see it taken further! Have you used DragonFruit on a project? Or are you using another command line argument parser?


Sponsor: Ossum unifies agile planning, version control, and continuous integration into a smart platform that saves 3x the time and effort so your team can focus on building their next great product. Sign up free.


© 2019 Scott Hanselman. All rights reserved.
     

Installing PowerShell with one line as a .NET Core global tool

$
0
0

I'PowerShell Mascotm a huge fan of .NET Core global tools. I've done a podcast on Global Tools. Just like Node and other platform have globally tools that can be easily and quickly installed and then used in build scripts, CI/CD (Continuous Integration/Continuous Deployment) systems, or just general command line utilities, .NET Global Tools are easily made (by you!) and distributed via NuGet.

Some cool examples (and there are hundreds) are the "Try .NET" Workshop runner and creator that can you can use to make interactive documentation, or coverlet for code coverage. There's a great and growing list of .NET Core Global Tools on GitHub.

If you've got the .NET SDK installed you can try out a global tool just like this.

dotnet tool install -g dotnetsay

Then run this example with "dotnetsay," it's fun.

stepping back a moment, you may be familiar with PowerShell. It's a scripting language and a command line shell like Bash or DOS or the Windows Command Prompt. You may think of PowerShell as a tool for maintaining and managing Windows Servers.

However in recent years, PowerShell has gone cross platform and runs most anywhere. It's lightweight and has .NET Core at its, ahem, core. You can use PowerShell for scripting systems on any platform and if you're a .NET developer the team has made installing and immediately using PowerShell in scripts a one liner - which is genius. It's PowerShell as a .NET Global Tool.

Here's an example output from my system running Ubuntu. I just "dotnet tool install --global PowerShell."

$ dotnet --version

2.1.502
$ dotnet tool install --global PowerShell
You can invoke the tool using the following command: pwsh
Tool 'powershell' (version '6.2.2') was successfully installed.
$ pwsh
PowerShell 6.1.1
https://aka.ms/pscore6-docs
Type 'help' to get help.
PS /mnt/c/Users/Scott/Desktop>
exit

Here I've checked that I have .NET 2.x or above, then I install PowerShell. I can run scripts or I can drop into the interactive shell. Note the PS prompt and my current directory above.

In fact, PowerShell is so useful as a scripting language when combined with .NET Core that PowerShell has been included as a global tool within the .NET Core 3.0 Preview Docker images since Preview 4. This means you can use PowerShell lines/scripts inside Docker images.

FROM mcr.microsoft.com/dotnet/core/sdk:3.0

RUN pwsh -c Get-Date
RUN pwsh -c "Get-Module -ListAvailable | Select-Object -Property Name, Path"

Being able to easily install PowerShell as a global tool means you can count on it in your scripts, CI/CDs systems, or docker containers. It's also nice to be able to be able to use existing PowerShell scripts cross platform.

I'm impressed with this idea - installing PowerShell itself as a .NET Global Tool. Very clever and useful.


Sponsor: Ossum unifies agile planning, version control, and continuous integration into a smart platform that saves 3x the time and effort so your team can focus on building their next great product. Sign up free.


© 2019 Scott Hanselman. All rights reserved.
     

System.Text.Json and new built-in JSON support in .NET Core

$
0
0

In a world where JSON (JavaScript Object Notation) is everywhere it's long been somewhat frustrating that .NET didn't have built-in JSON support. JSON.NET is great and has served us well but it's remained a 3rd party dependency for basic stuff like an ASP.NET web site or a simple console app.

Back in 2018 plans were announced to move JSON into .NET Core 3.0 as an intrinsic supported feature, and while they're at it, get double the performance or more with Span<T> support and no memory allocations. ASP.NET in .NET Core 3.0 removes the JSON.NET dependency but still allows you to add it back in a single line if you'd like.

NOTE: This is all automatic and built in with .NET Core 3.0, but if you’re targeting .NET Standard or .NET Framework. Install the System.Text.Json NuGet package (make sure to include previews and install version 4.6.0-preview6.19303.8 or higher). In order to get the integration with ASP.NET Core, you must target .NET Core 3.0.

It's very clean as well. Here's a simple example.

using System;

using System.Text.Json;
using System.Text.Json.Serialization;

namespace verysmall
{
class WeatherForecast
{
public DateTimeOffset Date { get; set; }
public int TemperatureC { get; set; }
public string Summary { get; set; }
}

class Program
{
static void Main(string[] args)
{
var w = new WeatherForecast() { Date = DateTime.Now, TemperatureC = 30, Summary = "Hot" };
Console.WriteLine(JsonSerializer.Serialize<WeatherForecast>(w));
}
}
}

The default options result in minified JSON as well.

{"Date":"2019-07-27T00:58:17.9478427-07:00","TemperatureC":30,"Summary":"Hot"}      

Of course, when you're returning JSON from a Controller in ASP.NET it's all automatic and with .NET Core 3.0 it'll automatically use the new System.Text.Json unless you override it.

Here's an example where we pull out some fake Weather data (5 randomly created reports) and return the array.

[HttpGet]

public IEnumerable<WeatherForecast> Get()
{
var rng = new Random();
return Enumerable.Range(1, 5).Select(index => new WeatherForecast
{
Date = DateTime.Now.AddDays(index),
TemperatureC = rng.Next(-20, 55),
Summary = Summaries[rng.Next(Summaries.Length)]
})
.ToArray();
}

The application/json is used and JSON is returned by default. If the return type was just string, we'd get text/plain. Check out this YouTube video to learn more details about System.Text.Json works and how it was designed. I'm looking forward to working with it more!


Sponsor: Get the latest JetBrains Rider with WinForms designer, Edit & Continue, and an IL (Intermediate Language) viewer. Preliminary C# 8.0 support, rename refactoring for F#-defined symbols across your entire solution, and Custom Themes are all included.


© 2019 Scott Hanselman. All rights reserved.
     

Ruby on Rails on Windows is not just possible, it's fabulous using WSL2 and VS Code

$
0
0

I've been trying on and off to enjoy Ruby on Rails development on Windows for many years. I was doing Ruby on Windows as long as 13 years ago. There's been many valiant efforts to make Rails on Windows a good experience. However, given that Windows 10 can run Linux with WSL (Windows Subsystem for Linux) and now Windows runs Linux at near-native speeds with an actual shipping Linux Kernel using WSL2, Ruby on Rails folks using Windows should do their work in WSL2.

Running Ruby on Rails on Windows

Get a recent Windows 10

WSL2 will be released later this year but for now you can easily get it by signing up for Windows Insiders Fast and making sure your version of Windows is 18945 or greater. Just run "winver" to see your build number. Run Windows Update and get the latest.

Enable WSL2

You'll want the newest Windows Subsystem for Linux. From a PowerShell admin prompt run this:

Enable-WindowsOptionalFeature -Online -FeatureName Microsoft-Windows-Subsystem-Linux

and head over to the Windows Store and search for "Linux" or get Ubuntu 18.04 LTS directly. Download it, run it, make your sudo user.

Make sure your distro is running at max speed with WSL2. That earlier PowerShell prompt run wsl --list -v to see your distros and their WSL versions.

C:\Users\Scott\Desktop> wsl --list -v

NAME STATE VERSION
* Ubuntu-18.04 Running 2
Ubuntu Stopped 1
WLinux Stopped 1

You can upgrade any WSL1 distro like this, and once it's done, it's done.

wsl --set-version "Ubuntu-18.04" 2

And certainly feel free to get cool fonts and styles and make yourself a nice shiny Linux experience...maybe with the Windows Terminal.

Get the Windows Terminal

Bonus points, get the new open source Windows Terminal for a better experience at the command line. Install it AFTER you've set up Ubuntu or a Linux and it'll auto-populate its menu for you. Otherwise, edit your profiles.json and make a profile with a commandLine like this:

"commandline" : "wsl.exe -d Ubuntu-18.04"

See how I'm calling wsl -d (for distro) with the short name of the distro?

Ubuntu in the Terminal Menu

Since I have a real Ubuntu environment on Windows I can just follow these instructions to set up Rails!

Set up Ruby on Rails

Ubuntu instructions work because it is Ubuntu! https://gorails.com/setup/ubuntu/18.04

Additionally, I can install as as many Linuxes as I want, even a Dev vs. Prod environment if I like. WSL2 is much lighter weight than a full Virtual Machine.

Once Rails is set up, I'll try making a new hello world:

rails new myapp

and here's the result!

Ruby on Rails in the new Windows Terminal

I can also run "explorer.exe ." and launch Windows Explorer and see and manage my Linux files. That's allowed now in WSL2 because it's running a Plan9 server for file access.

Ubuntu files inside Explorer on Windows 10

Install VS Code and the VS Code Remote Extension Pack

I'm going to install the VSCode Remote Extension pack so I can develop from Windows on remote machines OR in WSL or  Container directly. I can click the lower level corner of VS Code or check the Command Palette for this list of menu items. Here I can "Reopen Folder in WSL" and pick the distro I want to use.

Remote options in VS Code

Now that I've opened the folder for development WSL look closely at the lower left corner. You can see I'm in a WSL development mode AND Visual Studio Code is recommending I install a Ruby VS Code extension...inside WSL! I don't even have Ruby and Rails on Windows. I'm going to have the Ruby language servers and VS Code headless parts live in WSL - in Linux - where they'll be the most useful.

Ruby inside WSL

This synergy, this balance between Windows (which I enjoy) and Linux (whose command line I enjoy) has turned out to be super productive. I'm able to do all the work I want - Go, Rust, Python, .NET, Ruby - and move smoothly between environments. There's not a clear separation like there is with the "run it in a VM" solution. I can access my Windows files from /mnt/c from within Linux, and I can always get to my Linux files at \\wsl$ from within Windows.

Note that I'm running rails server -b=0.0.0.0 to bind on all available IPs, and this makes Rails available to "localhost" so I can hit the Rails site from Windows! It's my machine, so it's my localhost (the networking complexities are handled by WSL2).

$ rails server -b=0.0.0.0

=> Booting Puma
=> Rails 6.0.0.rc2 application starting in development
=> Run `rails server --help` for more startup options
Puma starting in single mode...
* Version 3.12.1 (ruby 2.6.2-p47), codename: Llamas in Pajamas
* Min threads: 5, max threads: 5
* Environment: development
* Listening on tcp://0.0.0.0:3000
Use Ctrl-C to stop

Here it is in new Edge (chromium). So this is Ruby on Rails running in WSL, as browsed to from Windows, using the new Edge with Chromium at its heart. Cats and dogs, living together, mass hysteria.

Ruby on Rails on Windows from WSL

Even better, I can install the ruby-debug-ide gem inside WSL and now I'm doing interactive debugging from VS Code, but again, note that the "work" is happening inside WSL.

Debugging Rails on Windows

Enjoy!


Sponsor: Get the latest JetBrains Rider with WinForms designer, Edit & Continue, and an IL (Intermediate Language) viewer. Preliminary C# 8.0 support, rename refactoring for F#-defined symbols across your entire solution, and Custom Themes are all included.


© 2019 Scott Hanselman. All rights reserved.
     

Docker Desktop for WSL 2 integrates Windows 10 and Linux even closer

$
0
0

Being able to seamlessly run Linux on Windows is making a bunch of common development tasks easier. When you're running WSL2 (Windows Subsystem for Linux 2) in a version of Windows 10 greater than build 18945, a BUNCH of useful and interesting scenarios light up and stuff just works.

Docker for Windows (download the Docker Desktop for WSL 2 Tech preview here) is great, but it has historically worked on Windows by creating a Hyper-V virtual machine called Moby that is visible within the Hyper-V client. It's a utility VM, but it's one you're aware of.

Docker for Windows using WSL2

However, if WSL2 runs a real Linux kernel in Windows 10 and it's managing a virtual machine platform underneath (and not visible to) Hyper-V client tools, then why not just let WSL2 handle containers for us?

That's exactly what the Docker Desklop WSL 2 Tech Preview aims to do. And just like WSL 2, it's fast.

...the time required to start a Docker daemon after a cold start is significantly faster. It takes less than 2 seconds to start the Docker daemon when compared to tens of seconds in the current version of Docker Desktop.

Once you've got a Linux (Ubuntu or the like) set up in WSL 2, you can right click on Docker Deskop and click "WSL 2 Tech Preview." This is a goofy and not-super-intuitive UI for now but it's a moment in time.

Click WSL 2 Tech Preview

Then you just hit Start.

NOTE: If you've already installed Docker within WSL 2 at the command line, stop it and let Docker Desktop manage its lifecycle.

Here's the beginnings of their UI.

Docker for WSL2

When I drop out to PowerShell/CMD on Windows I can run "docker context ls."

C:\Users\Scott\Desktop> docker context ls    

NAME DESCRIPTION DOCKER ENDPOINT
default Current DOCKER_HOST based configuration npipe:////./pipe/docker_engine
wsl * Docker daemon hosted in WSL 2 npipe:////./pipe/docker_wsl

You can see there's two contexts, and I've run "docker context use wsl" and that's now my default.

Here is docker images from Ubuntu, and again from Windows (in PowerShell Core). They are the same!

Docker images in Ubuntu
Docker images from Powershell

Sweet. Here I am using PowerShell Core (which is open source and cross-platform, natch) to manage my builds which are themselves cross-platform and I can run both a docker build or a metal build on both Windows or Linux, all seamlessly on the same box.

building docker images

Also note, Simon from Docker points out "We are using a non default dataroot in this mode to avoid corrupting a datastore you use without docker desktop in case something goes wrong. Stopping the docker desktop wsl daemon and restarting the one you installed manually should bring everything back." I noticed this because my "Windows Docker" and my original WSL2 docker had a list of images that I naively expected to be available here, but this is a new context and new dataroot so you may need to fetch images again in this new world if you're have been historically an active docker user.

So far I'm super impressed. Linux on the Windows Desktop feels right. It's Peanut Butter and Chocolate.


Sponsor: Looking for a tool for performance profiling, unit test coverage, and continuous testing that works cross-platform on Windows, macOS, and Linux? Check out the latest JetBrains Rider!


© 2019 Scott Hanselman. All rights reserved.
     
Viewing all 1148 articles
Browse latest View live


<script src="https://jsc.adskeeper.com/r/s/rssing.com.1596347.js" async> </script>