Quantcast
Channel: Scott Hanselman's Blog
Viewing all 1148 articles
Browse latest View live

Dotnet Depends is a great text mode development utility made with Gui.cs

$
0
0

I love me some text mode. ASCII, ANSI, VT100. Keep your 3D accelerated ray traced graphics and give me a lovely emoji-based progress bar.

Miguel has a nice thing called Gui.cs and I bumped into it in an unexpected and lovely place. There are hundreds of great .NET Global Tools that you can install to make your development lifecycle smoother, and I was installing Martin Björkström's lovely "dotnet depends" tool (go give him a GitHub star now!)  like this:

dotnet tool install -g dotnet-depends

Then I headed over to my Windows Terminal (get it free in the Store) and ran "dotnet depends" on my main website's code and was greeted by this (don't sweat the line spacing, that's a Terminal bug that'll be fixed soon):
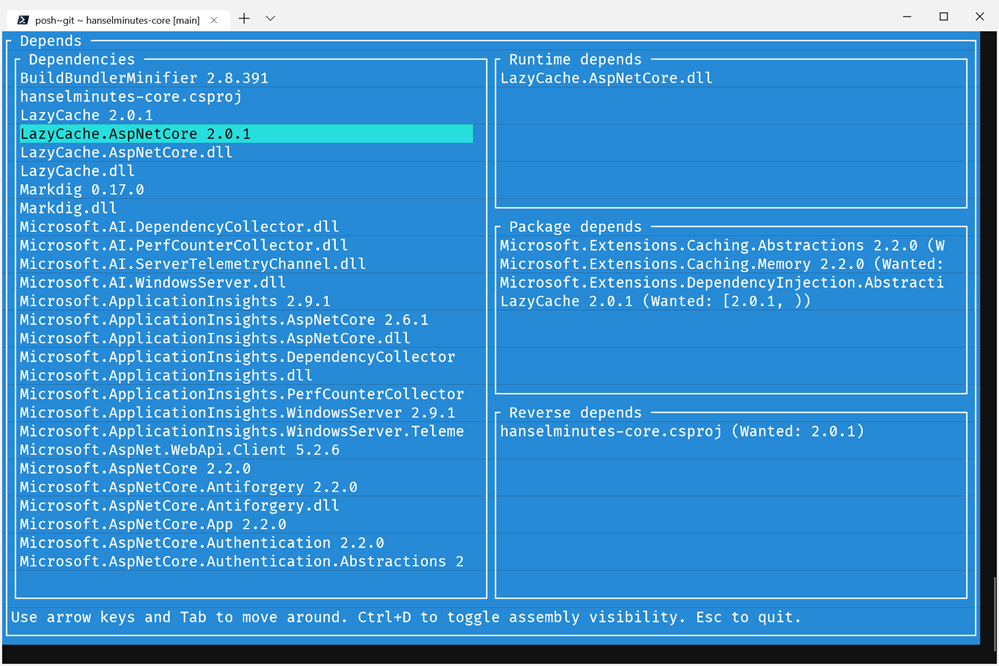
dotnet depends in the Windows Terminal

How nice is this! It's a fully featured dependency explorer but it's all in text mode and doesn't require me to use the mouse and take my hands of the keyboard. If I'm already deep into the terminal/text mode, this is a great example of a solid, useful tool.

But how hard was it to make? Surprisingly little as his code is very simple. This is a testament to how he used the API and how Miguel designed it. He's separated the UI and the Business Logic, of course. He does the analysis work and stores it in a graph variable.

Here they're setting up some panes for the (text mode) Windows:

Application.Init();


var top = new CustomWindow();

var left = new FrameView("Dependencies")
{
Width = Dim.Percent(50),
Height = Dim.Fill(1)
};
var right = new View()
{
X = Pos.Right(left),
Width = Dim.Fill(),
Height = Dim.Fill(1)
};

It's split in half at this point, with the left side staying  at 50%.

var orderedDependencyList = graph.Nodes.OrderBy(x => x.Id).ToImmutableList();

var dependenciesView = new ListView(orderedDependencyList)
{
CanFocus = true,
AllowsMarking = false
};
left.Add(dependenciesView);
var runtimeDependsView = new ListView(Array.Empty<Node>())
{
CanFocus = true,
AllowsMarking = false
};
runtimeDepends.Add(runtimeDependsView);
var packageDependsView = new ListView(Array.Empty<Node>())
{
CanFocus = true,
AllowsMarking = false
};
packageDepends.Add(packageDependsView);
var reverseDependsView = new ListView(Array.Empty<Node>())
{
CanFocus = true,
AllowsMarking = false
};
reverseDepends.Add(reverseDependsView);

right.Add(runtimeDepends, packageDepends, reverseDepends);
top.Add(left, right, helpText);
Application.Top.Add(top)

The right side gets three ListViews added to it and the left side gets the dependencies view. Top it off with some clean data binding to the views and an initial call to UpdateLists. Anytime the dependenciesView gets a SelectedChanged event we'll call UpdateLists again.

top.Dependencies = orderedDependencyList;

top.VisibleDependencies = orderedDependencyList;
top.DependenciesView = dependenciesView;

dependenciesView.SelectedItem = 0;
UpdateLists();

dependenciesView.SelectedChanged += UpdateLists;

Application.Run();

What's in update lists? Filtering code for that graph variable from before.

void UpdateLists()

{
var selectedNode = top.VisibleDependencies[dependenciesView.SelectedItem];

runtimeDependsView.SetSource(graph.Edges.Where(x => x.Start.Equals(selectedNode) && x.End is AssemblyReferenceNode)
.Select(x => x.End).ToImmutableList());
packageDependsView.SetSource(graph.Edges.Where(x => x.Start.Equals(selectedNode) && x.End is PackageReferenceNode)
.Select(x => $"{x.End}{(string.IsNullOrEmpty(x.Label) ? string.Empty : " (Wanted: " + x.Label + ")")}").ToImmutableList());
reverseDependsView.SetSource(graph.Edges.Where(x => x.End.Equals(selectedNode))
.Select(x => $"{x.Start}{(string.IsNullOrEmpty(x.Label) ? string.Empty : " (Wanted: " + x.Label + ")")}").ToImmutableList());
}

That's basically it and it's fast as heck. Probably to be expected from the folks that brought you Midnight Commander.

Are you working on any utilities or cool projects and might want to consider - gasp - text mode over a website?


Sponsor: Looking for a tool for performance profiling, unit test coverage, and continuous testing that works cross-platform on Windows, macOS, and Linux? Check out the latest JetBrains Rider!


© 2019 Scott Hanselman. All rights reserved.
     

Good, Better, Best - creating the ultimate remote worker webcam setup on a budget

$
0
0

I've been a remote worker and an occasional YouTuber for well over a decade. I'm always looking for a better setup because the goal is clear - how can I interact with you and my co-workers in a way that has high-enough fidelity that I don't need to drive to Seattle every week!

I believe if my camera is clear and my audio is clear than I can really have a remote relationship with my team that is effective and true.

Everyone has a webcam these days and can just get on a video call and have a chat - but is it of sufficient quality that you feel like you're really having a good conversation with folks and truly connecting!

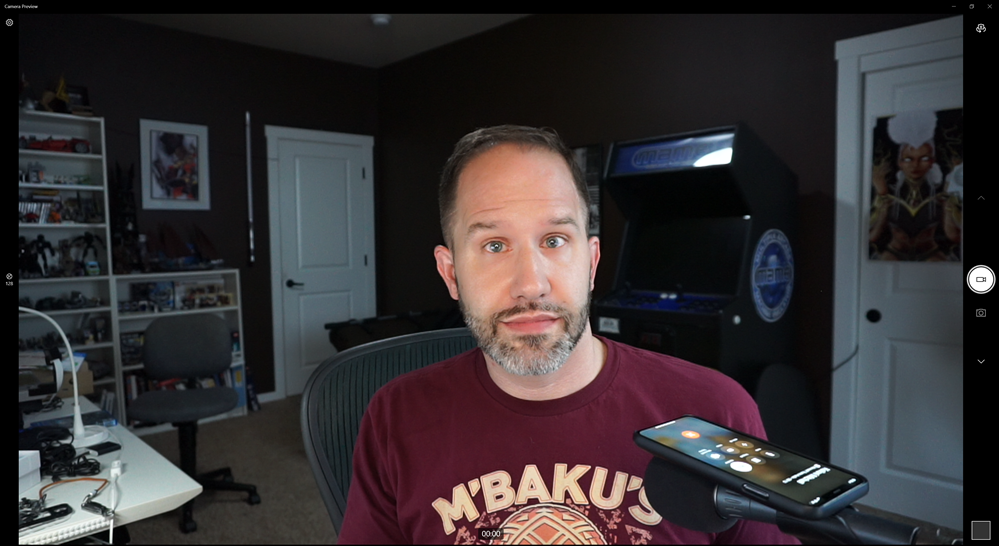
Here's a shot of my setup during a meeting I'm in here at Microsoft:

My setup - webcam and camera

Here's my thoughts on Good, Better, add Best set-ups for remotes and YouTubers without spending thousands.

Good

  • High quality video for Webcams and RemotesThe Logitech C270 Webcam can be gotten for as little as $20 or less! It's wholly adequate with enough light.
    • It only does 720p and it's USB2 so I can't enthusiastically recommend it but it's OK again, if you through light at it. In the dark is just a webcam.
      Logitech C270
  • The Logitech USB Headset H570 is decent, as is the lovely Jabra UC Voice corded headset. I prefer the Jabra because it only covers one ear and doesn't give me the "two covered ears" claustrophobic feeling.
    • To be clear - audio quality matters. Any crappy headset (or quality one as above) will ALWAYS be better than your webcam's default or your laptop's default. Always. Mics need to be closer to your mouth to sound good.
      31kFcFWgIL
  • Small webcam Ringlight.
    • Light light light. Webcams, especially cheap ones NEED LIGHT. It feels weird and I get it but the quality is SO MUCH BETTER with some decent fill light. Get a ring light that's powered by USB and use it on calls. Yes, it looks ridiculous but it WORKS.
      Ringlight

Better

Logitech BrioHow can we improve on the GOOD setup. Clearer videos and better sound/sound feel.

Some folks feel the Logitech Brio is overhyped and I think that's fair. It's a "4k" camera that's not as impressive as it should be. That said, it's a solid camera and arguably the best Logitech has to offer.

If I could suggest a middle of the road solid "BETTER" setup for a remote worker, I'd recommend these

The lights are the magic.

Now, moving beyond USB headsets, I love adding speakerphones - not for the mic, literally for the speaker. I love the Plantronics Portable USB Speakerphone. Requires no drivers, it just shows up as a mic and speaker automatically. I have it front and center in front of my monitor and I use it every day. It makes me feel like my Home Office is a real Office somehow.

Plantronics Calisto 610-M Portable USB Speakerphone

If conversations are private I'll use the headset above for the audio but when I want the sound to "come from the monitor" I'll SPLIT the audio. This is a pro tip. You can set up the Mic input as the headset mic and the Speaker output as a Speakerphone (or your main speakers). I like using the Speakerphone for voice and keeping the computer's output as the main speakers. Having this separate of voice and computer sounds is a small trick I play on myself but it helps to create a sense of location where the remote video person comes out of separate speakers.

Selecting Output Speakers

Best

Let's spend a little bit of money, but not so much that we break the bank.

I'm going to make my own webcam. Rather than a plastic of the shelf single webcam, let's take an actual mirrorless camera - the kind you'd take to a photography class - and make it a HIGH QUALITY webcam.

We need a great camera and it needs to support HDMI out. The camera also needs to be able to stay on all day long, not overheat, and it needs to run on AC power (not on battery).

Here's a list of cameras that have clean HDMI out and can stay on all day. You might have one of these cameras in your closet! I like the Sony A6000 and here's its characteristics.

  • Sony A6000 - I found this on Craigslist for $300.
    • Max resolution: 1080p and a buttery smooth 60fps
    • Clean HDMI: Yes
    • Unlimited runtime: Yes
    • Connection type: Micro HDMI
    • Power: Dummy Battery
    • Verified by: Elgato
    • Notes: Requires dummy battery for power (sold separately) Retains full autofocus with clean HDMI output
      Sony A6000
  • I need a "dummy battery" for this camera. Turns out this is a whole class of thing you can buy. Who knew?
  • This camera has micro-HDMI so I need a micro-HDMI to HDMI cable.
  • Now this is just a loose camera, so how I will mount it on my monitor?
    • I like mounting it INSIDE the Ring Light. If you don't want the light you can just get this clamp mount.
    • Or you can do what I did - get the CLAMP then the LIGHT and then put the CAMERA in that like a sandwic
      Flexible Jaws Clamp Clip Mount Holder
  • This camera and cameras like it output HDMI and I need that HDMI to be inputted into my computer and I want the HDMI output of the camera to look like it's a regular Webcam. The magical device that does this for us is the Elgato CamLink 4k. It's literally a little stick with HDMI input on one end and a USB3 on the other side. It took 5 minutes to install.
    • This device also has the added benefit of being a generic "capture card" if you want to record or broadcast your gaming consoles OR other computers!

      Elgato CamLink 4k

Here's a YouTube video I made that shows you these cameras, before and after - Good, Better, and BEST!

Logitech Brio vs Sony A6000 with Elgato Camlink 4k - No Contest

What do you think? Thanks to John Miller and Jeff Fritz for their help and guidance!

* I use Amazon referral links and donate the little money to my kids' school. You support charter schools when you use these links.


Sponsor: OzCode is a magical debugging extension for C#/.NET devs working in Visual Studio. Get to the root cause of your bugs faster with heads-up display, advanced search inside objects, LINQ query debugging, side-by-side object comparisons & more. Try for free!


© 2019 Scott Hanselman. All rights reserved.
     

The PICO-8 Virtual Fantasy Console is an idealized constrained modern day game maker

$
0
0

Animated GIF of PICO-8I love everything about PICO-8. It's a fantasy gaming console that wants you - and the kids in your life and everyone you know - to make games!

How cool is that?

You know the game Celeste? It's available on every platform, has one every award and is generally considered a modern-day classic. Well the first version was made on PICO-8 in 4 days as a hackathon project and you can play it here online. Here's the link when they launched in 4 years ago on the forums. They pushed the limits, as they call out "We used pretty much all our resources for this. 8186/8192 code, the entire spritemap, the entire map, and 63/64 sounds." How far could one go? Wolf3D even?

"A fantasy console is like a regular console, but without the inconvenience of actual hardware. PICO-8 has everything else that makes a console a console: machine specifications and display format, development tools, design culture, distribution platform, community and playership. It is similar to a retro game emulator, but for a machine that never existed. PICO-8's specifications and ecosystem are instead designed from scratch to produce something that has it's own identity and feels real. Instead of physical cartridges, programs made for PICO-8 are distributed on .png images that look like cartridges, complete with labels and a fixed 32k data capacity."

What a great start and great proof that you can make an amazing game in a small space. If you loved GameBoys and have fond memories of GBA and other small games, you'll love PICO-8.

How to play PICO-8 cartridges

Demon CastleIf you just want to explore, you can go to https://www.lexaloffle.com and just play in your browser! PICO-8 is a "fantasy console" that doesn't exist physically (unless you build one, more on that later). If you want to develop cartridges and play locally, you can buy the whole system (any platform) for $14.99, which I have.

If you have Windows and Chrome or New Edge you can just plug in your Xbox Controller with a micro-USB cable and visit https://www.lexaloffle.com/pico-8.php and start playing now! It's amazing - yes I know how it works but it's still amazing - to me to be able to play a game in a web browser using a game controller. I guess I'm easily impressed.

It wasn't very clear to me how to load and play any cartridge LOCALLY. For example, I can play Demon Castle here on the Forums but how do I play it locally and later, offline?

The easy way is to run PICO-8 and hit ESC to get their command line. Then I type LOAD #cartid where #cartid is literally the id of the cartridge on the forums. In the case of Demon Castle it's #demon_castle-0 so I can just LOAD #demon_castle-0 followed by RUN.

Alternatively - and this is just lovely - if I see the PNG pic of the cartridge on a web page, I can just save that PNG locally and save it in C:\Users\scott\AppData\Roaming\pico-8\carts then run it with LOAD demon_castle-0 (or I can include the full filename with extensions). THAT PNG ABOVE IS THE ACTUAL GAME AS WELL. What a clever thing - a true virtual cartridge.

One of the many genius parts of the PICO-8 is that the "Cartridges" are actually PNG pictures of cartridges. Drink that in for a second. They save a screenshot of the game while the cart is running, then they hide the actual code in a steganographic process - they are hiding the code in two of the bits of the color channels! Since the cart pics are 160*205 there's enough room for 32k.

A p8 file is source code and a p8.png is the compiled cart!

How to make PICO-8 games

The PICO-8 software includes everything you need - consciously constrained - to make AND play games. You hit ESC to move between the game and the game designer. It includes a sprite and music editor as well.

From their site, the specifications are TIGHT on purpose because constraints are fun. When I write for the PalmPilot back in the 90s I had just 4k of heap and it was the most fun I've had in years.

  • Display - 128x128 16 colours
  • Cartridge Size - 32k
  • Sound - 4 channel chip blerps
  • Code - Lua
  • Sprites - 256 8x8 sprites
  • Map - 128x32 cels

"The harsh limitations of PICO-8 are carefully chosen to be fun to work with, to encourage small but expressive designs, and to give cartridges made with PICO-8 their own particular look and feel."

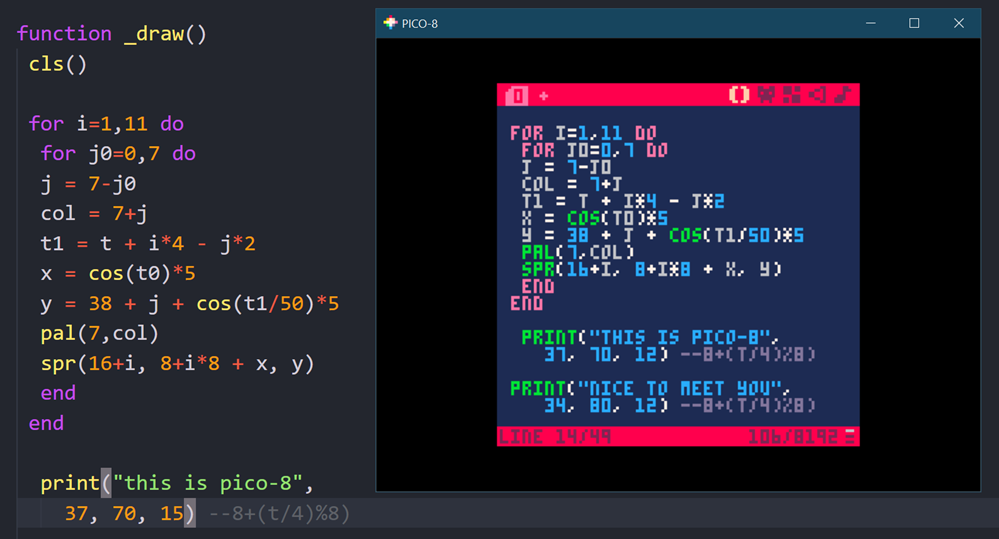
The code you will use is LUA. Here's some demo code of a Hello World that animates 11 sprites and includes two lines of text

t = 0

music(0) -- play music from pattern 0

function _draw()
cls()
for i=1,11 do -- for each letter
for j=0,7 do -- for each rainbow trail part
t1 = t + i*4 - j*2 -- adjusted time
y = 45-j + cos(t1/50)*5 -- vertical position
pal(7, 14-j) -- remap colour from white
spr(16+i, 8+i*8, y) -- draw letter sprite
end
end

print("this is pico-8", 37, 70, 14)
print("nice to meet you", 34, 80, 12)
spr(1, 64-4, 90) -- draw heart sprite
t += 1
end

That's just a simple example, there's a huge forum with thousands of games and lots of folks happy to help you in this new world of game creation with the PICO-8. Here's a wonderful PICO-8 Cheat Sheet to print out with a list of functions and concepts. Maybe set it as your wallpaper while developing? There's a detailed User Manual and a 72 page PICO-8 Zine PDF which is really impressive!

And finally, be sure to bookmark this GitHub hosted amazing curated list of PICO-8 resources! https://github.com/pico-8/awesome-PICO-8

image image

Writing PICO-8 Code in another Editor

There is a 3 year old PICO-8 extension for Visual Studio Code that is a decent start, although it's created assuming a Mac, so if you are a Windows user, you will need to change the Keyboard Shortcuts to something like "Ctrl-Shift-Alt-R" to run cartridges. There's no debugger that I'm seeing. In an ideal world we'd use launch.json and have a registered PICO-8 type and that would make launching after changing code a lot clearer.

There is a more recent "pico8vscodeditor" extension by Steve Robbins that includes snippets for loops and some snippets for the Pico-8 API. I recommend this newer fleshed out extension - kudos Steve! Be sure to include the full path to your PICO-8 executable, and note that the hotkey to run is a chord, starting with "Ctrl-8" then "R."

Telling VS-Code about PICO-8

Editing code directly in the PICO-8 application is totally possible and you can truly develop an entire cart in there, but if you do, you're a better person than I. Here's a directory listing in VSCode on the left and PICO-8 on the right.

Directories in PICO-8

And some code.

Editing Pico-8 code

You can expert to HTML5 as well as binaries for Windows, Mac, and Linux. It's a full game maker! There are also other game systems out there like PicoLove that take PICO-8 in different directions and those are worth knowing about as well.

What about a physical PICO-8 Console

A number of folks have talked about the ultimate portable handheld PICO-8 device. I have done a lot of spelunking and as of this writing it doesn't exist.

  • You could get a Raspberry Pi Zero and put this Waveshare LCD hat on top. The screen is perfect. But the joystick and buttons...just aren't. There's also no sound by default. But $14 is a good start.
  • The Tiny GamePi15, also from Waveshare could be good with decent buttons but it has a 240x240 screen.
  • The full sized Game Hat looks promising and has a large 480x320 screen so you could play PICO-8 at a scaled 256x256.
  • The RetroStone is also close but you're truly on your own, compiling drivers yourself (twitter thread) from what I can gather
  • The ClockworkPI GameShell is SOOOO close but the screen is 320x240 which makes 128x128 an awkward scaled mess with aliasing, and the screen the Clockwork folks chose doesn't have a true grid if pixels. Their pixels are staggered. Hopefully they'll offer an alternative module one day, then this would truly be the perfect device. There are clear instructions on how to get going.
  • The PocketCHIP has a great screen but a nightmare input keyboard.

For now, any PC, Laptop, or Rasberry Pi with a proper setup will do just fine for you to explore the PICO-8 and the world of fantasy consoles!


Sponsor: OzCode is a magical debugging extension for C#/.NET devs working in Visual Studio. Get to the root cause of your bugs faster with heads-up display, advanced search inside objects, LINQ query debugging, side-by-side object comparisons & more. Try for free!


© 2019 Scott Hanselman. All rights reserved.
     

I miss Microsoft Encarta

$
0
0

imageMicrosoft Encarta came out in 1993 and was one of the first CD-ROMs I had. It stopped shipping in 2009 on DVD. I recently found a disk and was impressed that it installed just perfectly on my latest Window 10 machine and runs nicely.

Encarta existed in an interesting place between the rise of the internet and computer's ability to deal with (at the time) massive amounts of data. CD-ROMs could bring us 700 MEGABYTES which was unbelievable when compared to the 1.44MB (or even 120KB) floppy disks we were used to. The idea that Encarta was so large that it was 5 CD-ROMs (!) was staggering, even though that's just a few gigs today. Even a $5 USB stick could hold Encarta - twice!

My kids can't possibly intellectualize the scale that data exists in today. We could barely believe that a whole bookshelf of Encyclopedias was now in our pockets. I spent hours and hours just wandering around random articles in Encarta. The scope of knowledge was overwhelming, but accessible. But it was contained - it was bounded. Today, my kids just assume that the sum of all human knowledge is available with a single search or a "hey Alexa" so the world's mysteries are less mysteries and they become bored by the Paradox of Choice.

image

In a world of 4k streaming video, global wireless, and high-speed everything, there's really no analog to the feeling we got watching the Moon Landing as a video in Encarta - short of watching it live on TV in the 1969! For most of us, this was the first time we'd ever seen full-motion video on-demand on a computer in any sort of fidelity - and these are mostly 320x240 or smaller videos!

First Steps on the Moon

A generation of us grew up hearing MLK's "I have a dream" speech inside Microsoft Encarta!

MLK I have a Dream

Remember the Encarta "So, you wanna play some Basketball" Video?

LeBron James from 2003

Amazed by Google Earth? You never saw the globe in Encarta.

Globe in Encarta

You'll be perhaps surprised to hear that the Encarta Timeline works even today on across THREE 4k monitors at nearly 10,000 pixels across! This was a product that was written over 10 years ago and could never have conceived of that many pixels. It works great!

The Encarta Timeline across 3 4k monitors

Most folks at Microsoft don't realize that Encarta exists and is used TODAY all over the developing world on disconnected or occasionally connected computers. (Perhaps Microsoft could make the final version of Encarta available for a free final download so that we might avoid downloading illegal or malware invested versions?)

What are your fond memories of Encarta? If you're not of the Encarta generation, what's your impression of it? Had you heard or thought of it?


Sponsor: Develop Xamarin applications without difficulty with the latest JetBrains Rider: Xcode integration, JetBrains Xamarin SDK, and manage the required SDKs for Android development, all right from the IDE. Get it today!


© 2019 Scott Hanselman. All rights reserved.
     

SharpScript from ServiceStack lets you run .NET apps directly from a GitHub Gist!

$
0
0

I've blogged about ServiceStack before. It's an extraordinary open source project - an ecosystem of its own even - that is designed to be an alternative to the WCF, ASP.NET MVC, and ASP.NET Web API frameworks. I enjoy it so much I even helped write its tagline "Thoughtfully architected, obscenely fast, thoroughly enjoyable web services for all"

ServiceStack is an easy drop-in that simplifies creating Web Services in any ASP.NET Web App, but also in Self Hosting Console Apps, Windows Services and even Windows and OSX Desktop Apps - supporting both .NET Framework and .NET Core. The easiest way to get started is to create a new project from a ServiceStack VS.NET Template.

ServiceStack has released a new and amazing project that is absolutely audacious in its scope and elegant in its integration with the open source .NET Core ecosystem - #Script (pronounced "sharp script.")

Scripts IN your app!

There are a number of .NET projects that simulate REPL's or allow basic scripting, like "dotnet script" as an example or ScriptCS but I'm deeply impressed with #Script. To start with, #Script is somewhat better suited for scripting than Razor and it doesn't require precompilation. #Script is appropriate for live documents or Email Templates for example.

Here's a basic example of embedding a ScriptContext in your app:

var context = new ScriptContext().Init();

var output = context.EvaluateScript("Time is now: {{ now | dateFormat('HH:mm:ss') }}");

Where ServiceStack's #Script really shines is its use of .NET Core Global Tools. They've nabbed two global tool names - web and app (sassy!) and allow one to create SharpApps. From their site:

Sharp Apps leverages #Script to develop entire content-rich, data-driven websites without needing to write any C#, compile projects or manually refresh pages - resulting in the easiest and fastest way to develop Web Apps in .NET!

The web tool is cross platform and the app global tool is great for Windows as it supports .NET Core Windows Desktop Apps.

Your app IS a script!

You can write interactive SharpScripts or SharpApps that uses Chromium as a host.

You can literally run a "desktop" app self contained from a GitHub Gist!

Sharp Apps can also be published to Gists where they can be run on-the-fly without installation, they're always up-to-date, have tiny footprints are fast to download and launch that can also run locally, off-line and cross-platform across Windows, macOS and Linux OS's.

There's also a "gallery" that maps short names to existing examples. So run "app open" to get a list, then "app open name" to run one. You can just "app open blog" and you're running a quick local blog.

SharpApps

Easy to develop and run

The global tools make SharpApp a complete dev and runtime experience because you can just run "app" in the source folder and as you make code changes the hot-reloader updates the site as you Ctrl-S (save) a file!

If you've got .NET Core SDK installed (it's super quick) then just grab the local tool here (app on Windows and web anywhere else):

dotnet tool install --global app

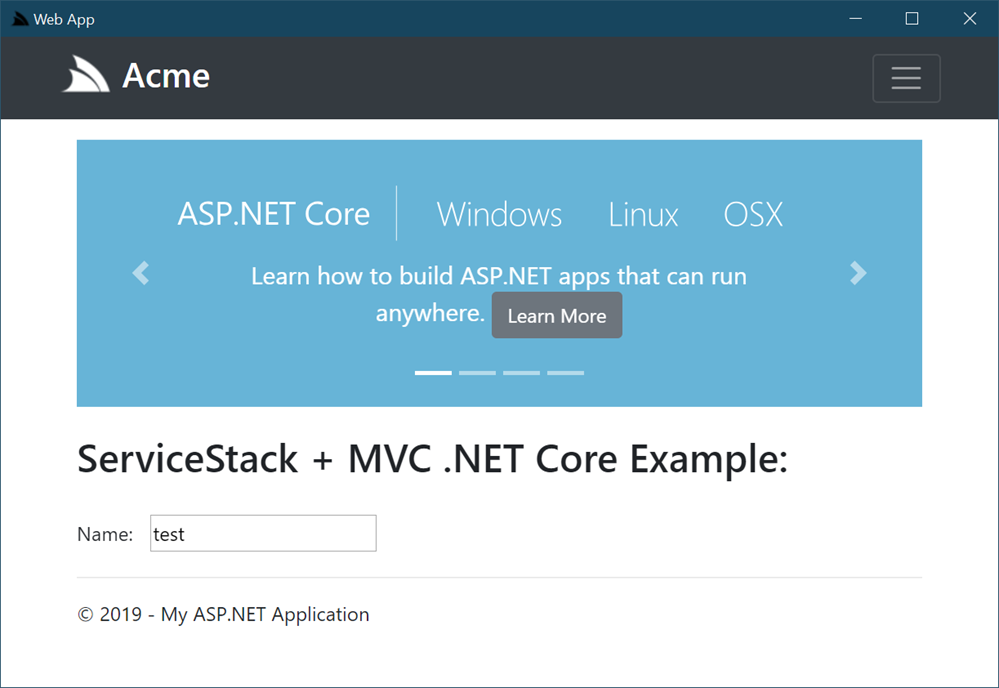
And if you have a existing .NET Core web app you can launch it and run it in a Chromium Embedded Framework (CEF) browser with "app foo.dll" Check out this example on how to make and run a .NET Core app on the Windows Desktop with #Script.

ServiceStack CEF App

Then you can make a shortcut and add it to to the desktop with

app shortcut Acme.dll

Slick!

Code in #Script is done in markdown ```code blocks, while in Razor it's @{ } but it does use mustache template style. Go try out some of their Starter Projects!

#Script and SharpApps is an extraordinary addition to the .NET Core ecosystem and I'm just touching the surface. Do check out their site at https://sharpscript.net.

What do you think?


Sponsor: Develop Xamarin applications without difficulty with the latest JetBrains Rider: Xcode integration, JetBrains Xamarin SDK, and manage the required SDKs for Android development, all right from the IDE. Get it today!


© 2019 Scott Hanselman. All rights reserved.
     

Review: UniFi from Ubiquiti Networking is the ultimate prosumer home networking solution

$
0
0

UniFi mapI LOVE my Amplifi Wi-Fi Mesh Network. I've had it for two years and it's been an absolute star performer. We haven't had a single issue. Rock solid. That's really saying something. From unboxing to installation to running it (working from home for a tech company, so you know I'm pushing this system) it's been totally stable. I recommend Amplifi unreservedly to any consumer or low-key pro-sumer who has been frustrated with their existing centrally located router giving them reliable wi-fi everywhere in their home.

That said...I recently upgraded my home internet service provider. For the last 10 years I've had fiber optic to the house with 35 Mbp/s up/down and it's been great. Then I called them a a few years back and got 100/100. The whole house was presciently wired by me for Gigabit back in 2007 (!) with a nice wiring closet and everything. Lately 100/100 hasn't been really cutting it when I'm updating a dozen laptops for a work event, copying a VM to the cloud while my spouse is watching 4k netflix and two boys are updating App Store apps. You get the idea. Modern bandwidth requirements and life has changed since 2007. We've got over 40 devices on the network now and many are doing real work.

I called an changed providers to a cable provider that offered true gigabit. However, I was rarely getting over 300-400 Mbp/s on my Amplifi. There is a "hardware NAT" option that really helps, but short of running the Amplifi in Bridged Mode and losing a lot of its epic features, it was clear that I was outgrowing this prosumer device.

Give I'm a professional working at home doing stuff that is more than the average Joe or Jane, what's a professional option?

UniFi from Ubiquiti

Amplifi is the consumer/prosumer line from Ubiquiti Networks and UniFi (UBNT) is the professional line.  You'll literally find these installed at business or even sports stadiums. This is serious gear.

Let me be honest. I knew UniFi existed. Knew (I thought) all about it and I resisted. My friends and fellow nerds insisted it was easy but I kept seeing massive complex network diagrams and convinced myself it wasn't worth the hassle.

My friends, I was wrong. It's not hard. If you are doing business at home, have a gigabit network pipe, a wired home network, and/or have a dozen or more network devices, you're a serious internet person and you might want to consider serious internet networking gear.

Everything is GREAT

Now, UniFi is more expensive than Amplifi as it's pro gear. While an Amplifi Mesh WiFi system is just about $300-350 USD, UniFi Pro gear will cost more and you'll need stuff to start out and it won't always feel intuitive as you plan your system. It is worth it and I'm thrilled with the result. The flexibility and customizability its offered has been epic. There are literally no internet issues in our house or property anymore. I've even been able to add wired and wireless non-cloud-based security cameras throughout the property. Additionally, remember how the house is already wired in nearly every room with Cat6 (or Cat5e) cabling? UniFi has reintroduced me to the glorious world of PoE+ (Power over Ethernet) and removed a half dozen AC wall plugs from my system.

Plan your Network

You can test out the web-based software yourself LIVE at https://demo.ui.com and see what managing a large network would be like. Check out their map of the FedEx Forum Stadium and how they get full coverage. You can see a simulated map of my house (not really my house) in the screenshot above. When you set up a controller you can place physical devices (ones you have) and test out virtual devices (ones you are thinking of buying) and see what they would look like on a real map of your home (supplied by you). You can even draw 3D walls and describe their material (brick, glass, steel) and their dB signal loss.

UniFi.beginner.950

When you are moving to UniFi you'll need:

  • USG - UniFi Security Gateway - This has 3 gigabit points and has a WAN port for your external network (plug your router into this) and a LAN port for your internal network (plug your internal switch into this).
    • This is the part that doles out DHCP.
  • UniFi Cloud Key or Cloud Key Gen2 Plus
    • It's not intuitive what the USG does vs the Cloud Key but you need both. I got the Gen2 because it includes a 1TB hard drive that allows me to store my security video locally. It also is itself a PoE client so I don't need to plug it into the wall. I just wired it with a single Ethernet cable to the PoE switch below and left it in the wiring closet. There's a smaller cheaper Cloud Key if you don't need a hard drive.
    • You don't technically need a Cloud Key I believe, as all the UniFi Controller Software is free and you can run it in on any machine you have laying around. Folks have run them on any Linux or Windows machine they have, or even on a Synology or other NAS. I like the idea of having it "just work" so I got the Cloud Key.
  • UniFi Switch (of some kind and number of ports)
    • 8 port 150 watt UniFi Switch
    • 24 port UniFi Switch - 24 ports may be overkill for most but it's only 8 lbs and will handle even the largest home network. And it's under $200 USD right now on Amazon
    • 24 port UniFi Switch with PoE - I got this one because it has 250W of PoE power. If you aren't interested in power over ethernet you can save money with the non-PoE version or a 16 port version but I REALLY REALLY recommend you use PoE because the APs work better with it.
      PoE switch showing usage on many ports

Now once you've got the administrative infrastructure above, you just need to add whatever UniFi APs - access points - and/or optional cameras that you want!

NOTE/TIP - A brilliant product from Ubiquiti that I think is flying under the radar is the Unifi G3 Flex PoE camera. It's just $75 and it's tiny but it's absolutely brilliant. Full 1080p video and night vision. I'll talk about the magic of PoE later on but you can just plug this in anywhere in the house - no AC adapter - and you've got a crystal clear security camera or cameras anywhere in the house. They are all powered from the PoE switch!

I had a basic networking closet I put the USG Gateway into the closet with a patch cable to the cable modem (the DOCSIS 3.1 cable modem that I bought because I got tired of renting it from the service provider) then added the Switch with PoE, and plugged the Cloud Key into it. Admin done.

Here's the lovely part.

Since I have cable throughout the house, I can just plug in the UniFi Access Points in various room and they get power immediately. I can try different configs and test the signal strength. I found the perfect config after about 4 days of moving things around and testing on the interactive map. The first try was fine but I strove for perfect.

There's lots of UniFi Access Points to choose from. The dual radio Pro version can get pretty expensive if you have a lot so I got the Lite PoE AP. You can also get a 5 pack of the nanoHD UniFi Access Points.

These Access Points are often mounted in the ceiling in pro installations, and in a few spots I really wanted something more subtle AND I could use a few extra Ethernet ports. Since I already had an Ethernet port in the wall, I could just wall mount the UniFi Wall Mounted AP. It's both a wireless AP that radiates outward into the room AND it turns your one port into two, or you can get one that becomes a switch with more ports and extends your PoE abilities. So I can add this to a room, plug a few devices in AND a PoE powered Camera with no wall-warts or AC adapters!

NOTE: I did need to add a new ethernet RJ45 connector to plug into the female connector of the UniFi in-wall AP. Just be sure to plan and take inventory. You may already have full cables with connectors pulled to your rooms. Be aware.

There are a TON of great Wireless AP options from UniFi so make sure you explore them all and understand what you want.

In-Wall AP

Here's the resulting setup and choices I made, as viewed in the UniFi Controller Software:

List of Ubnt devices

I have the Gateway, the Switch with PoE, and five APs. Three are the disc APs and two are in-wall APs. They absolutely cover and manage my entire two story house and yards front and back. It's made it super easy for me to work from home and be able to work effectively from any room. My kids and family haven't had any issues with any tablets or phones.

As of the time of these writing I have 27 wireless devices on the system and 11 wired (at least those are the ones that are doing stuff at this hour).

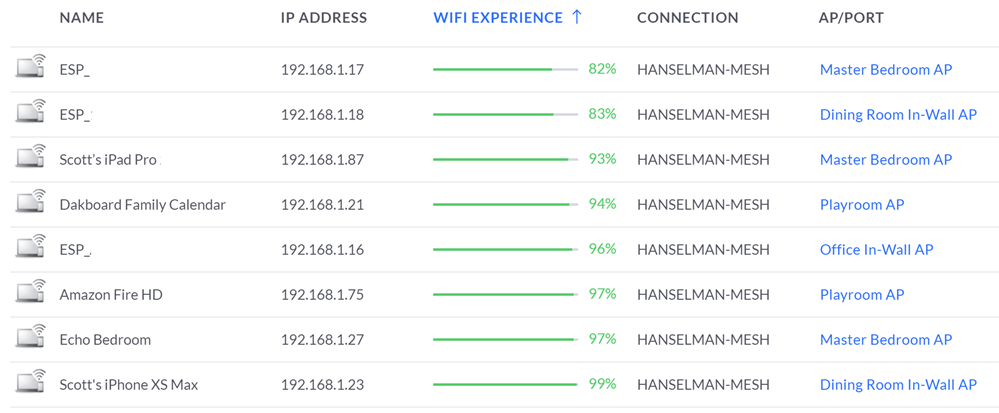
My devices as viewed in the UniFi controller

Note how it will tell you how each device's WiFi experience is. I use this Experience information to help me manage the network and see if the APs are appropriately placed. There is a TON of great statistics and charts and graphics. It's info-rich to say the LEAST.

NOTE: To answer a common question - In an installation like this you've got a single SSID even though there's lots of APs and your devices will quietly and automatically roam between them!
Log showing roaming between APs

The iPhone app is very full-featured as well and when you've got deep packet introspection turn on you can see a ton of statistical information at the price of a smidge of throughput performance.

iPhone StatsiPhone Bandwidth

I have had NO problem hitting 800-950Mbs over wired and I feel like there's no real limit to the perf of this system. I've done game streaming over Steam and Xbox game streaming for hours without a hiccup. Netflix doesn't buffer anymore, even on the back porch.

a lot of bandwidth with no drops

You can auto-optimize, or you can turn off a plethora of feature and manage everything manually. I was able to twitch a few APs to run their 2.4Ghz Wi-Fi radios on less crowded channels in order to get out of the way of the loud neighbors on channel 11.

I have a ton of control over the network now, unlimited expandability and it has been a fantastically stable network. All the APs are wire backed and the wireless bandwidth is rock solid. I've been extremely impressed with the clean roaming from room to room while streaming from Netflix. It's a tweakers (ahem) dream network.

* I use Amazon referral links and donate the little money to my kids' school. You support charter schools when you use these links.


Sponsor: Get the latest JetBrains Rider with WinForms designer, Edit & Continue, and an IL (Intermediate Language) viewer. Preliminary C# 8.0 support, rename refactoring for F#-defined symbols across your entire solution, and Custom Themes are all included.


© 2019 Scott Hanselman. All rights reserved.
     

dotnet new worker - Windows Services or Linux systemd services in .NET Core

$
0
0

dotnet new workerYou've long been able to write Windows Services in .NET and .NET Core, and you could certainly write a vanilla Console App and cobble something together for a long running headless service as well. However, the idea of a Worker Process, especially a long running one is a core part of any operating system - Windows, Linux, or Mac.

Now that open source .NET Core is cross-platform, it's more than reasonable to want to write OS services in .NET Core. You might write a Windows Service with .NET Core or a systemd process for Linux with it as well.

Go grab a copy of .NET Core 3.0 - as of the time of this writing it's very close to release, and Preview 8 is supported in Production.

If you're making a Windows Service, you can use the Microsoft.Extensions.Hosting.WindowsService package and tell your new Worker that its lifetime is based on ServiceBase.

public static IHostBuilder CreateHostBuilder(string[] args) =>

Host.CreateDefaultBuilder(args)
.UseWindowsService()
.ConfigureServices(services =>
{
services.AddHostedService<Worker>();
});

If you're making a Linux worker and using systemd you'd add the Microsoft.Extensions.Hosting.Systemd package and tell your new Worker that its lifetime is managed by systemd!

public static IHostBuilder CreateHostBuilder(string[] args) =>

Host.CreateDefaultBuilder(args)
.UseSystemd()
.ConfigureServices((hostContext, services) =>
{
services.AddHostedService<Worker>();
});

The Worker template in .NET Core makes all this super easy and familiar if you're used to using .NET already. For example, logging is built in and regular .NET log levels like LogLevel.Debug or LogLevel.Critical are automatically mapped to systemd levels like Debug and Crit so I could run something like sudo journalctl -p 3 -u testapp and see my app's logs, just alike any other Linux process because it is!

You'll notice that a Worker doesn't look like a Console App. It has a Main but your work is done in a Worker class. A hosted service or services is added with AddHostedService and then a lot of work is abstracted away from you. The Worker template and BackgroundService base class brings a lot of the useful conveniences you're used to from ASP.NET over to your Worker Service. You get dependency injection, logging, process lifetime management as seen above, etc, for free!

public class Worker : BackgroundService

{
private readonly ILogger<Worker> _logger;

public Worker(ILogger<Worker> logger)
{
_logger = logger;
}

protected override async Task ExecuteAsync(CancellationToken stoppingToken)
{
while (!stoppingToken.IsCancellationRequested)
{
_logger.LogInformation("Worker running at: {time}", DateTimeOffset.Now);
await Task.Delay(1000, stoppingToken);
}
}
}

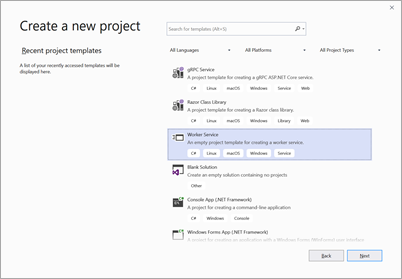
This is a very useful template and it's available from the command line as "dotnet new worker" or from File New Project in Visual Studio 2019 Preview channel.

Also check out Brady Gaster's excellent blog post on running .NET Core workers in containers in Azure Container Instances (ACI). This is super useful if you have some .NET Core and you want to Do A Thing in the cloud but you also want per-second billing for your container.


Sponsor: Get the latest JetBrains Rider with WinForms designer, Edit & Continue, and an IL (Intermediate Language) viewer. Preliminary C# 8.0 support, rename refactoring for F#-defined symbols across your entire solution, and Custom Themes are all included.


© 2019 Scott Hanselman. All rights reserved.
     

Totally unsupported hacks - Add Windows Terminal to the Win+X Shortcut menu

$
0
0

You shouldn't do this and if you choose to do this you may hurt yourself or one of your beloved pets.

You have been warned.

The Windows+X hotkey has been around for many years as is a simple right-click style context list of Developer/Administrator stuff that your techies might need in the course of human events.

There's one obscure setting in Settings | Taskbar where you can set the main option for the Command Prompt to be replaced with PowerShell, although that was flipped to "on" by default many years ago.

Replace Command Prompt with PowerShell

I want Windows Terminal in that Win+X menu.

Fast Forward to a world with lots of alternative console hosts, Linux running on Windows natively, not to mention cross-platform open source PowerShell Core, AND the new open source Windows Terminal (that you can just go download right now in the Windows Store) we find ourselves in a middle place. We want to replace the default console with the Windows Terminal everywhere as the default but that's gonna be a while.

Until then, we can integrate the Windows Terminal into our lives in a few obvious ways.

  • Pin Windows Terminal to your taskbar
  • Train yourself to Win+R and run "wt" rather than "cmd.exe" at wt.exe is a shim that launches the store-based Windows Terminal.
  • Add Windows Terminal to the Win+X menu.

It is that last one that concerns me today.

The Win+X implementation is a totally bonkers thing that I just don't understand with its origins lost to the mist of forgotten time.

You can go check out C:\Users\USERNAME\AppData\Local\Microsoft\Windows\WinX and find it full of LNK files. Just drop yours in there, right? Well, I say nay nay!

They didn't want just anyone dropping stuff in there so to add a new application to Windows+X you need to:

  • Make or find a LNK file for your application.
    • BUT! Your lnk file can't (today?) be a LNK to a Windows Store app - more on that later. They appear to be ignored today.
  • Store a special hash in your LNK file per Rafael's excellent writeup here so that they are considered "Approved Links."
  • Make a new Group 4 folder in the \WinX folder above OR update Group 3 and copy your link in there considering the numbering scheme.
    • Note the ordering in the registry at HKEY_LOCAL_MACHINE\SOFTWARE\Microsoft\Windows\CurrentVersion\ShellCompatibility\InboxApp

OR

Here's my WinX\Group3 folder . Note the shortcut at the top there.

image

I wanted to find a link to the Windows Terminal but it's harder than it looks. I can't find a real LNK file anywhere on my system. BUT I was able to find a synthetic one and make a copy by going "Win+R" and running "shell:AppsFolder" which brings you to a magic not-a-folder folder.

Not a folder folder

That is a folder of lies. I tried making a copy of this LNK, moving it to my deskop, hashing it with Rafael's util but it's ignored, presumably because it's a Windows Store LNK. Instead, I'll head out to cmd.exe and type "where wt.exe" to find the wt.exe shim and make a link to that!

C:\Users\scott>where wt.exe

C:\Users\scott\AppData\Local\Microsoft\WindowsApps\wt.exe

These files are also lies, but lies of a another type. Zero byte lies.

Zero Byte Lies

Right-click wt.exe and Create Shortcut. Then drag that shortcut out of there and into somewhere else like your Desktop. You can then use hashlnk and move it to the WinX folder.

OR, you can use this scary and totally unsupported utility hosted at a questionable website that you have no business visiting. It's called Win+X Menu Editor and it was a chore to download. So much so that I'm going to hide a copy in my DropBox for the day in the near future when this utility and website disappear.

Be careful when you go download this utility, the site is full of scary links that say Download Now but they are all lies. You want the subtle text link that points to a ZIP file, just above the Donate button that says "Download Win+X Menu Editor."

In this utility you can add an item that points to your new WT.LNK file and it will use Rafael's code and copy the LNK file to the right place and re-number stuff if needed. Again, be careful as you never know. You might mess up your whole life with stuff like this. It worked for me.

Win+X Menu Editor

And there you go.

Windows Terminal in the WIN+X menu

Lovely. Now IMHO in some ideal future this should just happen out of the box, but until then it's nice to know I can do it myself.


Sponsor: Looking for a tool for performance profiling, unit test coverage, and continuous testing that works cross-platform on Windows, macOS, and Linux? Check out the latest JetBrains Rider!


© 2019 Scott Hanselman. All rights reserved.
     

Deploying a MSDeploy-packaged Web application to a Linux Azure App Service with Azure DevOps

$
0
0

For bizarre and unknown historical reasons, when using MSDeploy to make a ZIP package to upload a website to a web server you get a massively deep silly path like yada/yada/C_C/Temp/package/WebApplication1/obj/Release/Package/PackageTmp. I use .NET Core so I usually do a "dotnet publish" and get a sane path for my build artifacts in my CI/CD (Continues Integration/Continuous Deployment) pipeline.

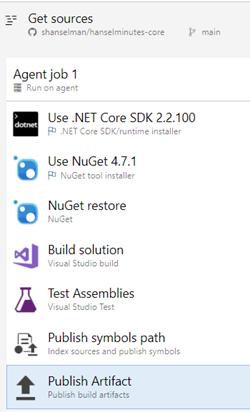
I'm using the original pipeline editor on free Azure DevOps (I'm still learning DevOps YAML for this, and this visual pipeline editor IMHO is more friendly for getting started.

However, I'm using a "Visual Studio Build" task which is using MSDeploy and these MSBuild arguments.

/p:DeployOnBuild=true 

/p:WebPublishMethod=Package
/p:PackageAsSingleFile=true
/p:SkipInvalidConfigurations=true
/p:PackageLocation="$(build.artifactstagingdirectory)\\"

Azure Dev OpsLater on in the process I'm taking this package/artifact - now named "drop.zip" and I'm publishing it to Azure App Service.

I'm using the "Azure App Service Deploy" task in the DevOps release pipeline and it works great when publishing to a Windows Azure App Service Plan. Presumably because it's using, again, MSDeploy and it knows about these folders.

However, I wanted to also deploy to a Linux Azure App Service. Recently there was a massive (near 35%) price drop for Premium App Services. I'm running an S1 and I can move to a P1V2 and get double the memory, move to SSDs, and get double the perf for basically the same money. I may even be able to take TWO of my S1s and pack all my websites (19 at this point) into just one Premium. It'll be faster and way cheaper.

Trick is, I'll need to move my Windows web apps to Linux web app. That's cool, since I'm using .NET Core - in my case 2.1 and 2.2 - then I'll just republish. I decided to take my existing Azure DevOps release pipeline and just add a second task to publish to Linux for testing. If it works I'll just disable the Windows one. No need to rebuild the whole pipeline from scratch.

Unfortunately the Linux Azure App Service has its deployment managed as a straight ZIP deployment; it was ending up with a TON of nested folders from MSDeploy!

NOTE: If I'm giving bad advice or I am missing something obvious, please let me know in the comments! Perhaps there's a "this zip file has a totally bonkers directory structure, fix it for Linux" checkbox that I missed?

I could redo the whole build pipeline and build differently, but I'd be changing two variables and it already works today on Windows.

I could make another build pipeline for Linux and build differently, but that sounds tedious and again, a second variable. I have a build artifact now, it's just in a weird structure.

How did I know the build artifact had a weird folder structure? I remember that I could just download any build artifact and look at it! Seems obvious when you say it but it's a good reminder that all these magical black box processes that move data from folder to folder are not black boxes - you can always check the result of a step. The output of one step becomes the input to the next.

downloading an artifact from Azure DevOps

I should probably have a Windows Build and Linux Build (two separate build agents) but the site isn't complex enough and it doesn't do anything that isn't clearly cross-platform friendly.

Anthony Chu suggested that I just remove the folders by restructuring the zip file (unzipping/zipping it). Could be a simple way to get both Windows and Linux publishing from a single artifact. I can fix it all up with a fresh build and release pipeline another time when I have the energy to learn this YAML format. (Speaking of the Azure DevOps YAML which doesn't have a friendly editor or validator, not speaking of YAML as a generic concept)

Unzipping and zipping up MSDeploy mess

I unzip the weird folder structure, then zip it back up from a new root. It then cleanly deploys to the Linux Azure App Service from the same artifact I made built for the Windows App Service.

Ironically here's a YAML view of the tasks, although I build them with the visual editor.

steps:

- task: ExtractFiles@1
displayName: 'Extract files - MSDeploy Crap'
inputs:
destinationFolder: linuxdrop
steps:
- task: ArchiveFiles@2
displayName: 'Archive linuxdrop/Content/D_C/a/1/s/hanselminutes.core/obj/Release/netcoreapp2.2/PubTmp/Out'
inputs:
rootFolderOrFile: 'linuxdrop/Content/D_C/a/1/s/hanselminutes.core/obj/Release/netcoreapp2.2/PubTmp/Out'
includeRootFolder: false
steps:
- task: AzureRmWebAppDeployment@4
displayName: 'Azure App Service Deploy: hanselminutes-core-linux'
inputs:
azureSubscription: 'Azure MSDN)'
appType: webAppLinux
WebAppName: 'hanselminutes-linux'
packageForLinux: '$(Build.ArtifactStagingDirectory)/$(Build.BuildId).zip'
RuntimeStack: 'DOTNETCORE|2.2'

Just to be clear, this isn't standard and it's a pretty rare edge case and it may not work for everyone but isn't it nice to google for a super rare edge case and instead of feeling all alone you find an answer?


Sponsor: Looking for a tool for performance profiling, unit test coverage, and continuous testing that works cross-platform on Windows, macOS, and Linux? Check out the latest JetBrains Rider!


© 2019 Scott Hanselman. All rights reserved.
     

Introducing open source Windows 10 PowerToys

$
0
0

Microsoft Windows PowerToysYesterday the Windows Team announced the first preview and code release of PowerToys for Windows 10. This first preview includes two utilities:

Many years ago there was PowerToys for Windows 95 and frankly, it's overdue that we have them for Windows 10 – and bonus points for being open source!

These tools are also open source and hosted on GitHub! Maybe you have an open source project that's a "PowerToy?" Let me know in the comments. A great example of a PowerToy is something that takes a Windows Features and turns it up to 11!

EarTrumpet is a favorite example of mine of a community "PowerToy." It takes the volume control and the Windows auto subsystem and tailors it for the pro/advanced user. You should definitely try it out!

As for these new Windows 10 Power Toys, here’s what the Windows key shortcut guide looks like:

PowerToys - Shortcut Guide

And here's Fancy Zones. It's very sophisticated. Be sure to watch the YouTube to see how to use it.

Fancy Zones

To kick the tires on the first two utilities, download the installer here.

The main PowerToys service runs when Windows starts and a user logs in. When the service is running, a PowerToys icon appears in the system tray. Selecting the icon launches the PowerToys settings UI. The settings UI lets you enable and disable individual utilities and provides settings for each utility. There is also a link to the help doc for each utility. You can right click the tray icon to quit the Power Toys service.

We'd love to see YOU make a PowerToy and maybe it'll get bundled with the PowerToys installer!

How to create new PowerToys

See the instructions on how to install the PowerToys Module project template.
Specifications for the PowerToys settings API.

We ask that before you start work on a feature that you would like to contribute, please read our Contributor's Guide. We will be happy to work with you to figure out the best approach, provide guidance and mentorship throughout feature development, and help avoid any wasted or duplicate effort.

Additional utilities in the pipeline are:

If you find bugs or have suggestions, please open an issue in the Power Toys GitHub repo.


Sponsor: Uno Platform is the Open Source platform for building single codebase, native mobile, desktop and web apps using only C# and XAML. Built on top of Xamarin and WebAssembly! Check out the Uno Platform tutorial!


© 2019 Scott Hanselman. All rights reserved.
     

Visual Studio now includes an integrated Terminal

$
0
0

It's early days (preview) but there's now a Terminal integrated into Visual Studio! Taking a nod from the 2017 plugin, the Terminal is now build in as an experimental feature using features from the NEW open source Windows Terminal.

Rather than build everything from scratch, the Visual Studio terminal shares most of its core with the Windows Terminal!

assuming you have Visual Studio 2019 16.3 Preview 3 or above, you’ll want to enable it by visiting the Preview Features page. Go to Tools > Options > Preview Features, enable the Experimental VS Terminal option and restart Visual Studio.

Tools > Options > Preview Features, enable the Experimental VS Terminal option and restart Visual Studio.

Make sure you restart after changing this option.

It's super early days and there's lots of things coming.

You can set up Profiles but you can't use them yet as the default is the only one used. In the future the Integrated Terminal will add a dropdown and + button like the Windows Terminal.

Multiple Profiles for the VS Integrated Terminal

Also note that if you want to integrate WSL (bash) you'll want to select c:\windows\sysnative\wsl.exe and pass in your preferred Distribution. Here you can see me running Ubuntu inside of VS2019. Sweet.

A terminal inside VS!

Grab the Preview of 16.3p3 now or wait a bit and you'll see more and more updates to the new VS Integrated Terminal in the coming months!


Sponsor: Uno Platform is the Open Source platform for building single codebase, native mobile, desktop and web apps using only C# and XAML. Built on top of Xamarin and WebAssembly! Check out the Uno Platform tutorial!


© 2019 Scott Hanselman. All rights reserved.
     

How to fix dfu-util, STM, WinUSB, Zadig, Bootloaders and other Firmware Flashing issues on Windows

$
0
0

Flashing devices wtih dfu-utilI'm pretty happy with Windows 10 as my primary development box. It can do most anything I want, run a half-dozen Linuxes, and has a shiny new open source Terminal, and has great support for Docker now.

However.

For years - YEARS I SAY - Windows has been a huge hassle when you want to flash the firmware of various devices over USB.

The term "dfu" means Device Firmware Update and dfu-util is the Device Firmware Update Utility, natch.

Very often I'll find myself with a device like a Particle Photon, Wilderness Labs Meadow, or some STM32 device that uses the ST Bootloader.

The Mac and Linux instructions usually say something like "plug it in and party on" but folks like myself with Windows have to set up a WinUSB Driver (libusb-win32 or libusbK) as dfu-util uses those libraries to speak to USB devices.

If you plug in a device, the vast majority of Windows users want the device to 'just work.' My non-technical parent doesn't want Generic USB drivers so they can flash the firmware on their mouse. I, however, as an aristocrat, sometimes want to do low-level stuff and flash an OS on a Microcontroller.

Today, the easiest way to swap the "inbox" driver with WinUSB is using a utility called Zadig. Per their docs:

Zadig is a Windows application that installs generic USB drivers,
such as WinUSB, libusb-win32/libusb0.sys or libusbK, to help you access USB devices.

It can be especially useful for cases where:

  • you want to access a device using a libusb-based application
  • you want to upgrade a generic USB driver
  • you want to access a device using WinUSB

If you follow the instructions when flashing a device and don't have the right USB driver installed you'll likely get an error like this:

Cannot open DFU device 0483:df11

That's not a lot to go on. The issue is that the default "inbox" driver that Windows uses for devices like this isn't set up for Generic USB access with libraries like "libusb."

Install a generic USB driver for your device - WinUSB using Zadig

Run Zadig and click Options | List All Devices.

Here you can see me finding the ST device within Zadig and replacing the driver with WinUSB. In my case the device was listened under STM32 Bootloader. Be aware that you can mess up your system if you select something like your WebCam instead of the hardware device you mean to select.

In Zadig, select the STM32 Bootloader

In this state, you can see in the Device Manager that there's an "STM Device in DFU Mode."

STM Device in DFU Mode

Now I run Zadig and replace the driver with WinUSB. Here's the result. Note the SUCCESS and the changed Driver on the left.

Replace it with WinUSB

Here the STM32 Bootloader device now exists in Universal Serial Bus Devices in Device Manager.

STM32 Bootloader

Now I can run dfu-util --list again. Note the before and after in the screenshot below. I run dfu-util --list and it finds nothing. I replace the bootloader with the generic WinUSB driver and run dfu-util again and it finds the devices.

Flashing devices with dfu-util

At this point I can follow along and flash my devices per whatever instructions my manufacturer/project/boardmaker intends.

NOTE: When using dfu-util on Windows, I recommend you either be smart about your PATH and add dfu-util, or better yet, make sure the dfu-util.exe and libusb.dlls are local to your firmware so there's no confusion about what libraries are being used.
Keep dfu-util and libusb together

I'd love to see this extra step in Windows removed, but for now, I hope this write up makes it clearer and helps the lone Googler who finds this post.


Sponsor: Develop Xamarin applications without difficulty with the latest JetBrains Rider: Xcode integration, JetBrains Xamarin SDK, and manage the required SDKs for Android development, all right from the IDE. Get it today


© 2019 Scott Hanselman. All rights reserved.
     

Emulating a PlayStation 1 (PSX) entirely with C# and .NET

$
0
0

I was reading an older post in an emulator forum where someone was asking for a Playstation 1 (PSX) emulator written in C#, and the replies went on and on about how C# and .NET are not suited for emulation, C# is far too slow, negativity, blah blah.

Of course, that's silly. Good C# can run at near-native speed given all the work happening in the runtime/JITter, etc.

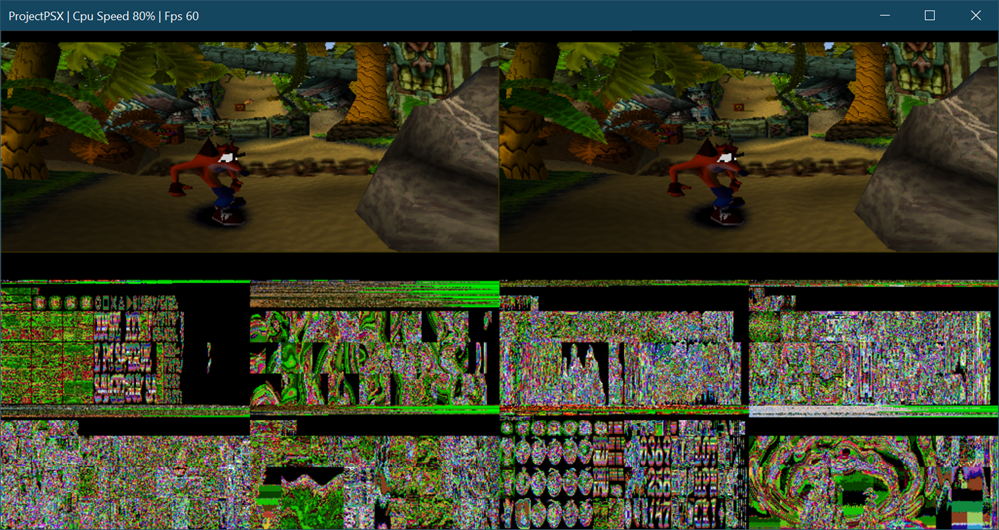
I then stumbled on this very early version of a PSX Emulator in C#. Now, if you were to theoretically have a Playtation SCPH1001.BIN BIOS and then physically owned a Playstation (as I do) and then created a BIN file from your physical copy of Crash Bandicoot, you could happily run it as you can see in the screenshot below.

Crash Bandicoot on a C#-based PSX Emulator

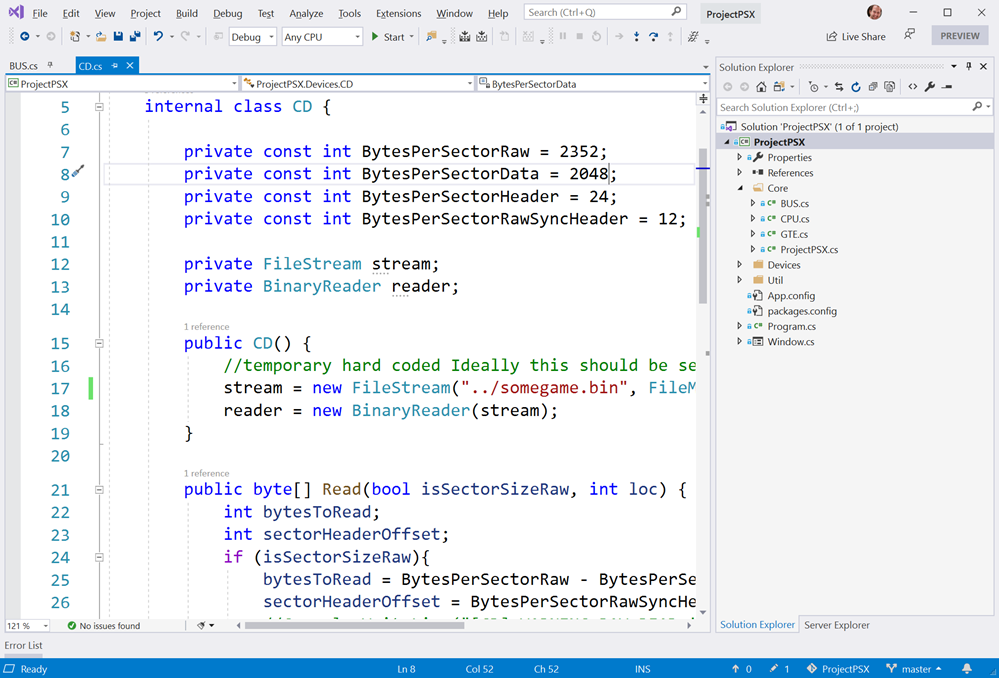
This project is very early days, as the author points out, but I was able to Git Clone and directly open the code in Visual Studio 2019 Community (which is free) and run it immediately. Note that as of the time of this blog post, the BIOS location *and* BIN files are hardcoded in the CD.cs and BUS.cs files. I named the BIN file "somegame.bin."

PSX Emualtor in C# inside Visual Studio

A funny note, since the code is unbounded as it currently sits, while I get about 30fps in Debug mode, in Release mode the ProjectPSX Emulator runs at over 120fps on my system, emulating a PlayStation 1 at over 220% of the usual CPU speed!

Just to make sure there's no confusion, and to support the author I want to repeat this question and answer here:

Can i use this emulator to play?

"Yes you can, but you shouldn't. There are a lot of other more capable emulators out there. This is a work in progress personal project with the aim to learn about emulators and hardware implementation. It can and will break during emulation as there are a lot of unimplemented hardware features."

This is a great codebase to learn from and read - maybe even support with your own Issues and PRs if the author is willing, but as they point out, it's neither complete nor ready for consumption.

Again, from the author who has other interesting emulators you can read:

I started doing a Java Chip8 and a C# Intel 8080 CPU (used on the classic arcade Space Invaders). Some later i did Nintendo Gameboy. I wanted to keep forward to do some 3D so i ended with the PSX as it had a good library of games...

Very cool stuff! Reading emulator code is a great way to not only learn about a specific language but also to learn 'the full stack.' We often hear Full Stack in the context of a complete distributed web application, but for many the stack goes down to the metal. This emulator literally boots up from the real BIOS of a Playstation and emulates the MIPS R3000A, a BUS to connect components, the CPU, the CD-ROM, and display.

An emulator has to lie at every step so that when an instruction is reached it can make everyone involved truly believe they are really running on a Playstation. If it does its job, no one suspects! That's why it's so interesting.

You can also press TAB to see the VRAM visualized as well as textures and color lookup tables which is super interesting!

Visualizing VRAM

One day, some day, there will be no physical hardware in existence for some of these old/classic consoles. Even today, lots of people play games for NES and SNES on a Nintendo Switch and may never see or touch the original hardware. It's important to support emulation development and sites like archive.org with Donations to make sure that history is preserved!

NOTE: It's also worth pointing out that it took me about 15 minutes to port this from .NET Framework 4.7.2 to .NET Core 3.0. More on this, perhaps, in another post. I'll also do a benchmark and see if it's faster.

I encourage you to go give a Github Star to ProjectPSX and enjoy reading this interesting bit of code. You can also read about the PSX Hardware written by Martin Korth for a trove of knowledge.


Sponsor: Develop Xamarin applications without difficulty with the latest JetBrains Rider: Xcode integration, JetBrains Xamarin SDK, and manage the required SDKs for Android development, all right from the IDE. Get it today


© 2019 Scott Hanselman. All rights reserved.
     

Patching the new Cascadia Code to include Powerline Glyphs and other Nerd Fonts for the Windows Terminal

$
0
0

Microsoft released a nice new ligature-friendly open source font this week called Cascadia Code. It'll eventually be shipped with the open source Windows Terminal (you can get it from the store fee) but for now you can just download and install the TTF.

I've blogged about Fira Code and Monospaced Programming Fonts with Ligatures before. Just like keyboards, mice, monitors, text editors, and all the other things that we as developers put in our toolkits, Fonts are a very personal thing. Lots of folks have tweeted me, "why is this better than <font I use>." I dunno. Try it. Coke vs. Pepsi. If it makes you happy, use it.

I use Cascadia Code for my Terminals and I use Fira Code for my code editor. ¯\_(ツ)_/¯

That said, one important thing that you may want to know about is that you have FULL control of your fonts! Lots of folks want certain glyphs, or a fancy bash prompt, or they use posh-git, or PowerLine, or all of the above.

Right now Cascadia Code doesn't include every glyph in the world, but don't let that hold you back. Fix it.

For example, if I go install "Oh my Posh" and spice up my PowerShell Core prompt, it might look like this with Cascadia Code today.

Cascadia Code with no Nerd Fonts

But if I patch Cascadia Code on my own machine to include Nerd Fonts and other glyphs, I'll get this lovely prompt in Windows Terminal:

Cascadia Code with Nerd Fonts and PowerLine

So you have the power to do a lot of things. Don't be satisfied. Nest, and make your prompt your own! There are lots of Nerd Fonts but I want to patch Cascadia Code today (I'm sure they'll do it themselves one day, but I'm impatient) and make it look the way I want. You can to!

Starting with FontForge in Ubuntu under WSL

Using WSL2 and Ubuntu, I installed the Nerd Fonts Patcher and ran it on my downloaded version of Cascadia code like this:

scott@IRONHEART:/mnt/d/github/nerd-fonts$ fontforge -script font-patcher /mnt/c/Users/scott/Downloads/Cascadia.ttf

Copyright (c) 2000-2014 by George Williams. See AUTHORS for Contributors.
License GPLv3+: GNU GPL version 3 or later <http://gnu.org/licenses/gpl.html>
with many parts BSD <http://fontforge.org/license.html>. Please read LICENSE.
Based on sources from 11:21 UTC 24-Sep-2017-ML-D.
Based on source from git with hash:
The following table(s) in the font have been ignored by FontForge
Ignoring 'DSIG' digital signature table
Warning: Mac string is a subset of the Windows string in the 'name' table
for the License string in the English (US) language.
Adding 53 Glyphs from Seti-UI + Custom Set
╢████████████████████████████████████████╟ 100%
Adding 198 Glyphs from Devicons Set
╢████████████████████████████████████████╟ 100%

Done with Patch Sets, generating font...

Generated: Cascadia Code Nerd Font

Cool! I could even go nuts and add -c and add thousands of glyphs. It just depends on what I need. I could just go --powerline and --fontawesome and call it a day. It's up to you! Salt your Fonts to taste!

Now I can install my local modified TTF like any other, then go into my profile.json in Windows Terminal and set the font face to my new personal custom "CascadiaCode Nerd Font!" Boom. All set.

UPDATE:  Alistair has created a forked version with the added glyphs. You may (or may not) be able to download his forked and renamed version from this Github comment. Slick!

Please also check out my YouTube video on blinging out your PowerShell prompt in the Windows Terminal!

Check out my YouTubes


Sponsor: Suffering from a lack of clarity around software bugs? Give your customers the experience they deserve and expect with error monitoring from Raygun.com. Installs in minutes, try it today!


© 2019 Scott Hanselman. All rights reserved.
     

What's the difference between a console, a terminal, and a shell?

$
0
0

I see a lot of questions that are close but the questions themselves show an underlying misunderstanding of some important terms.

  • Why would I use Windows Terminal over PowerShell?
  • I don't need WSL for bash, I use Cygwin.
  • Can I use conemu with PowerShell Core or do I need to use Windows Terminal?

Let's start with a glossary and clarify some words first.

Terminal

The word Terminal comes from terminate, indicating that it's the terminating end or "terminal" end of a communications process. You'll often hear "dumb terminal" when referring to a text-based environment where the computer you are sitting next to is just taking input and showing text while the real work happens at the other end in a mainframe or large computer.

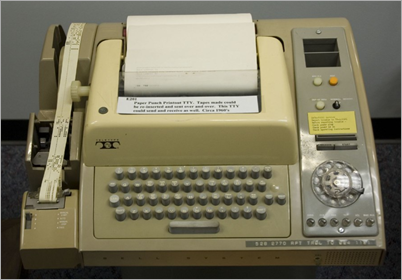
TTY or "teletypewriter" was the first kind of terminal. Rather than a screen you'd have a literal typewriter in front of you. When you type on it, you're seeing the text on a piece of paper AND inputing that text into a computer. When that computer replies, you'll see the typewriter automatically type on the same paper.

Photo by Texas.713 used under CC

When we refer to a Terminal in the software sense, we're referring to a literal software version of a TTY or Terminal. The Windows Terminal is that. It's really good at displaying textual output. It can take input and pass it on. But the Terminal isn't smart. It doesn't actually process your input, it doesn't look at your files or think.

Console

Folks in the mid 20th century would have a piece of furniture in their living room called a console or console cabinet. A Console in the context of computers is a console or cabinet with a screen and keyboard combined inside it. But, it's effectively a Terminal. Technically the Console is the device and the Terminal is now the software program inside the Console.

image

In the software world a Terminal and a Console are, for all intents, synonymous.

Shell

A shell is the program that the terminal sends user input to. The shell generates output and passes it back to the terminal for display. Here's some examples of Shells:

  • bash, fish, zsh, ksh, sh, tsch
  • PowerShell, pwsh
  • cywin
  • cmd, yori, 4dos, command.com

Here's an important point that should make more sense now that you have these terminals - Your choice of shell doesn't and shouldn't dictate your choice of terminal application.

Aside: WSL and WSL2 (the Windows Subsystem for Linux) are a complete local Linux (or many Linuxes) that run on Windows 10. They are full and real. WSL2 ships a real Linux kernel and runs in on Windows. Cygwin is NOT a Linux. Cygwin is a large collection of GNU and Open Source tools which provide functionality similar to Linux on Windows - but it is not Linux. It's a simulacrum. It's GNU utils compiled against Win32. It's great, but it's important for you to know what the difference is. Cygwin may let you run your shell scripts but it will NOT run Apache, Docker, or other real ELF-binaries and Linux apps.

Your Choice of Windows Consoles?

There are a number of shells that ship with Windows. Here's a few I'm running now. Note the "chrome" or the border and title around them? Those shells are all hosted by a the legacy Windows console you have never heard of called conhost.exe. You can go to the command prompt, type powershell, cmd, or ubuntu and any number of shells will run. Conhost does the work of input and output.

Now, forget that conhost exists, because it sucks - it's super old.

Shells that come with Windows

Pseudo Console, Pseudo Terminal, PTY, Pseudo TTY (ConPTY)

Pseudo Terminals are terminal emulators or software interfaces that emulate terminals. They pretend to be terminals like the ones above. *Nix systems have long had a pseudo-terminal (PTY) infrastructure and now Windows as a pseudoconsole (ConPTY) as well.

Window's new ConPTY interface is the future of consoles and terminals on Windows. If you choose a 3rd party (non-built-in) console applications for Windows, make sure it supports ConPTY and it'll be a better experience than some of the older consoles that use screen scraping or other hacks.

image

Back to your choice of Windows Consoles

Remembering there's a lot of shells you can use in Windows, there's a lot of 3rd party consoles you can use if you don't like conhost.exe (and you shouldn't).

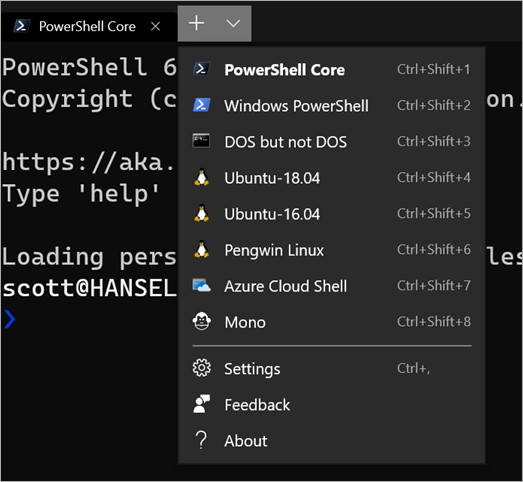
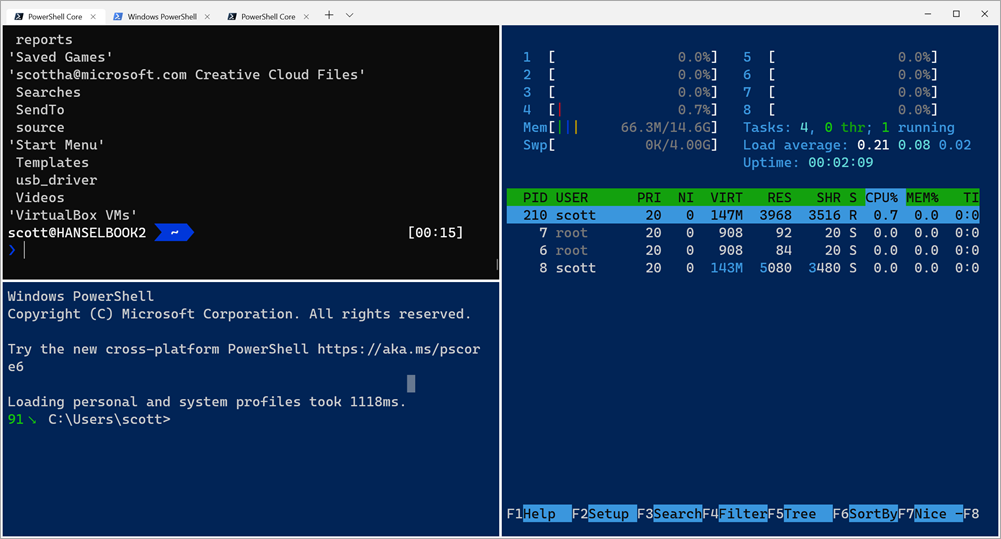
All of these Terminals support ALL the shells above and any shells I've missed. Because a shell isn't a terminal. Pick the one that makes you happy. I use PowerShell Core and Ubuntu in WSL2 in the Windows Terminal.

Windows Terminal

Hope this helps clear things up.


Sponsor: Suffering from a lack of clarity around software bugs? Give your customers the experience they deserve and expect with error monitoring from Raygun.com. Installs in minutes, try it today!


© 2019 Scott Hanselman. All rights reserved.
     

Announcing free C#, .NET, and ASP.NET for beginners video courses and tutorials

$
0
0

If you've been thinking about learning C#, now is the time to jump in! I've been working on this project for months and I'm happy to announce http://dot.net/videos 

There's nearly a hundred short videos (with more to come!) that will teach you topics like C# 101, .NET, making desktop apps, making ASP.NET web apps, learning containers and Dockers, or even starting with Machine Learning. There's a ton of great, slow-paced beginner videos. Most are less than 10 minutes long and all are organized into Playlists on YouTube!

If you are getting started, I'd recommend starting with these three series in this order - C#, .NET, then ASP.NET. After that, pick the topics that make you the happiest.

Lots of .NET learning videos and tutorials up on YouTube, free!

If you don't have access to YouTube where you are, all these videos are also on Channel 9 *and* can be downloaded locally via RSS feed! https://channel9.msdn.com/Browse/Series

Lots of .NET learning videos and tutorials up on YouTube, free!

If you like these, let me know what other topics you'd like us to cover! We are just getting started and already have intermediate and advanced C# classes in the works!


Sponsor: Like C#? We do too! That’s why we've developed a fast, smart, cross-platform .NET IDE which gives you even more coding power. Clever code analysis, rich code completion, instant search and navigation, an advanced debugger... With JetBrains Rider, everything you need is at your fingertips. Code C# at the speed of thought on Linux, Mac, or Windows. Try JetBrains Rider today!


© 2019 Scott Hanselman. All rights reserved.
     

How to download over 80 free 101-level C#, .NET, and ASP.NET for beginners videos for offline viewing

$
0
0

Earlier this week I announced over 80 new free videos in our .NET Core 3.0 launch video series - Announcing free C#, .NET, and ASP.NET for beginners video courses and tutorials

Three questions came up consistently:

  • My work or country blocks YouTube! What about me?
  • How can I download these and watch them offline?
  • I have very low bandwidth. Can I get smaller versions I can download over 3G/4G?

Here's some answers for you!

My work or country blocks YouTube! What about me?

First, we have updated http://dot.net/videos to include links to BOTH YouTube *and* to the same videos hosted on Microsoft's Channel 9, which shouldn't be blocked by you country or company!

How can I download these and watch them offline?

Good question! Here's how to download a whole series with PowerShell! Let's say I want to download "C# 101."

First, head over to https://dot.net/videos.

C# 101 videos

Second, click "Watch on Channel 9" there at the bottom of the series you want, in my case, C# 101.

Note that there's a link there in the corner that says "RSS" - that's Really Simple Syndication!

RSS Videos for Channel 9 Videos

Right click on the one you want, for example MP4 Low for people on low bandwidth connections! (Question #3 gets answered too, two for one!), and say "Copy Link Address." Now that link is in your clipboard!

Next, I made a little PowerShell script and put it here in a Gist. If you want, you can right click on this link here and Save Link As and name it something like DownloadVideos.ps1. Maybe save it in C:\temp or c:\users\YOURNAME\Desktop\DotNetVideos. Whatever makes you happy. Make sure you saved it with a *.ps1 extension.

Finally, open up the PS1 file in a text editor and check lines 2 and 3. Put in a path that's correct for YOUR computer, again, like C:\temp, or your downloads folder.

#CHECK THE PATH ON LINE 2 and the FEED on LINE 3

cd "C:\users\scott\Downloads"
$a = ([xml](new-object net.webclient).downloadstring("https://channel9.msdn.com/Series/CSharp-101/feed/mp4"))
$a.rss.channel.item | foreach{
$url = New-Object System.Uri($_.enclosure.url)
$file = $url.Segments[-1]
$file
if (!(test-path $file)) {
(New-Object System.Net.WebClient).DownloadFile($url, $file)
}
}

Make sure the RSS link that you copied earlier above is correct on line 3. We need a Local Folder and we need our Remote RSS Link.

NOTE: If you're an expert you might think this PowerShell script isn't fancy enough or doesn't do x or y, but it'll do pretty nicely for this project. You're welcome to fork it or improve it here.

And finally, open up PowerShell on your machine from the Start Menu and run your downloadvideos.ps1 script like in this screenshot.

What about getting Low Bandwidth videos I can download on a slow connection!

The low bandwidth videos are super small, some smaller than a JPEG! The largest is just 20 megs, so the full C# course is under 200 megs total.

You can download ALL the videos for EACH playlist by visiting http://dot.net/videos, getting the RSS URL for the video playlist you want, and running the PS1 script again with the changed URL on line 3.

Hope this helps!


Sponsor: Like C#? We do too! That’s why we've developed a fast, smart, cross-platform .NET IDE which gives you even more coding power. Clever code analysis, rich code completion, instant search and navigation, an advanced debugger... With JetBrains Rider, everything you need is at your fingertips. Code C# at the speed of thought on Linux, Mac, or Windows. Try JetBrains Rider today!


© 2019 Scott Hanselman. All rights reserved.
     

A wonderfully unholy alliance - Real Linux commands for PowerShell with WSL function wrappers

$
0
0

Dropdown filled with shells in the Windows TerminalI posted recently about What's the difference between a console, a terminal, and a shell? The world of Windows is interesting - and a little weird and unfamiliar to non-Windows people. You might use Ubuntu or Mac and you've picked your shell like zsh or bash or pwsh, but then you come to Windows and we're hopping between shells (and now operating systems with WSL!) on a tab by tab basis.

If you're using a Windows shell like PowerShell because you like it's .NET Core based engine and powerful scripting language, you might still miss common *nix shell commands like ls, grep, sed and more.

No matter what shell you're using in Windows (powershell, yori, cmd, whatever) you can always call into your default Ubuntu instance with "wsl command" so "wsl ls" or "wsl grep" but it'd be nice to make those more naturally and comfortably integrated.

Now there's a new series of "function wrappers" that make Linux commands available directly in PowerShell so you can easily transition between multiple environments.

This might seem weird but it allows us to create amazing piped commands that move in and out of Windows and Linux, PowerShell and bash. It's actually pretty amazing and very natural if you, like me, are non-denominational in your choice of operating system and preferred shell.

These function wrappers are very neatly designed and even expose TAB completion across operating systems! That means I can type Linux commands in PowerShell and TAB completion comes along!

It's super easy to set up. From Mike Battista's Github

  • Install PowerShell Core
  • Install the Windows Subsystem for Linux (WSL)
  • Install the WslInterop module with Install-Module WslInterop
  • Import commands with Import-WslCommand either from your profile for persistent access or on demand when you need a command (e.g. Import-WslCommand "awk", "emacs", "grep", "head", "less", "ls", "man", "sed", "seq", "ssh", "tail", "vim")

You'll do your Install-Module just one, and then run notepad $profile and add just a that single last line. Make sure you change it to expose the WSL/Linux commands that you want. Once you're done, you can just open PowerShell Core and mix and match your commands!

From the blog, "With these function wrappers in place, we can now call our favorite Linux commands in a more natural way without having to prefix them with wsl or worry about how Windows paths are translated to WSL paths:"

  • man bash
  • less -i $profile.CurrentUserAllHosts
  • ls -Al C:\Windows\ | less
  • grep -Ein error *.log
  • tail -f *.log

It's a really genius thing and kudos to Mike for sharing it with us! Go try it now. https://github.com/mikebattista/PowerShell-WSL-Interop


Sponsor: Like C#? We do too! That’s why we've developed a fast, smart, cross-platform .NET IDE which gives you even more coding power. Clever code analysis, rich code completion, instant search and navigation, an advanced debugger... With JetBrains Rider, everything you need is at your fingertips. Code C# at the speed of thought on Linux, Mac, or Windows. Try JetBrains Rider today!


© 2019 Scott Hanselman. All rights reserved.
     

Now is the time to make a fresh new Windows Terminal profiles.json

$
0
0

I've been talking about it for months, but in case you haven't heard, there's a new Windows Terminal in town. You can download it and start using it now from the Windows Store. It's free and open source.

At the time of this writing, Windows Terminal is around version 0.5. It's not officially released as a 1.0 so things are changing all the time.

Here's your todo - Have you installed the Windows Terminal before? Have you customize your profile.json file? If so, I want you to DELETE your profiles.json!

Your profiles.json is somewhere like C:\Users\USERNAME\AppData\Local\Packages\Microsoft.WindowsTerminal_8wekyb3d8bbwe\LocalState but you can get to it from the drop down in the Windows Terminal like this:

Windows Terminal dropdown

When you hit Settings, Windows Terminal will launch whatever app is registered to handle JSON files. In my case, I'm using Visual Studio Code.

I have done a lot of customization on my profiles.json, so before I delete or "zero out" my profiles.json I will save a copy somewhere. You should to!

You can just "ctrl-a" and delete all of your profiles.json when it's open and Windows Terminal 0.5 or greater will recreate it from scratch by detecting the shells you have. Remember, a Console or Terminal isn't a Shell!

Note the new profiles.json also includes another tip! You can hold ALT- and click settings to see the default settings! This new profiles.json is simpler to read and understand because there's an inherited default.


// To view the default settings, hold "alt" while clicking on the "Settings" button.
// For documentation on these settings, see: https://aka.ms/terminal-documentation

{
"$schema": "https://aka.ms/terminal-profiles-schema",

"defaultProfile": "{61c54bbd-c2c6-5271-96e7-009a87ff44bf}",

"profiles":
[
{
// Make changes here to the powershell.exe profile
"guid": "{61c54bbd-c2c6-5271-96e7-009a87ff44bf}",
"name": "Windows PowerShell",
"commandline": "powershell.exe",
"hidden": false
},
{
// Make changes here to the cmd.exe profile
"guid": "{0caa0dad-35be-5f56-a8ff-afceeeaa6101}",
"name": "cmd",
"commandline": "cmd.exe",
"hidden": false
},
{
"guid": "{574e775e-4f2a-5b96-ac1e-a2962a402336}",
"hidden": false,
"name": "PowerShell Core",
"source": "Windows.Terminal.PowershellCore"
},
...

You'll notice there's a new $schema that gives you dropdown Intellisense so you can autocomplete properties and their values now! Check out the Windows Terminal Documentation here https://aka.ms/terminal-documentation and the complete list of things you can do in your profiles.json is here.

I've made these changes to my Profile.json.

Split panes

I've added "requestedTheme" and changed it to dark, to get a black titleBar with tabs.

requestedTheme = dark

I also wanted to test the new (not even close to done) splitscreen features, that give you a simplistic tmux style of window panes, without any other software.

// Add any keybinding overrides to this array.

// To unbind a default keybinding, set the command to "unbound"
"keybindings": [
{ "command": "closeWindow", "keys": ["alt+f4"] },
{ "command": "splitHorizontal", "keys": ["ctrl+-"]},
{ "command": "splitVertical", "keys": ["ctrl+\\"]}
]

Then I added an Ubuntu specific color scheme, named UbuntuLegit.

// Add custom color schemes to this array

"schemes": [
{
"background" : "#2C001E",
"black" : "#4E9A06",
"blue" : "#3465A4",
"brightBlack" : "#555753",
"brightBlue" : "#729FCF",
"brightCyan" : "#34E2E2",
"brightGreen" : "#8AE234",
"brightPurple" : "#AD7FA8",
"brightRed" : "#EF2929",
"brightWhite" : "#EEEEEE",
"brightYellow" : "#FCE94F",
"cyan" : "#06989A",
"foreground" : "#EEEEEE",
"green" : "#300A24",
"name" : "UbuntuLegit",
"purple" : "#75507B",
"red" : "#CC0000",
"white" : "#D3D7CF",
"yellow" : "#C4A000"
}
],

And finally, I added a custom command prompt that runs Mono's x86 developer prompt.

{

"guid": "{b463ae62-4e3d-5e58-b989-0a998ec441b8}",
"hidden": false,
"name": "Mono",
"fontFace": "DelugiaCode NF",
"fontSize": 16,
"commandline": "C://Windows//SysWOW64//cmd.exe /k \"C://Program Files (x86)//Mono//bin//setmonopath.bat\"",
"icon": "c://Users//scott//Dropbox//mono.png"
}

Note I'm using forward slashes an double escaping them, as well as backslash escaping quotes.

Save your profiles.json away somewhere, make sure your Terminal is updated, then delete it or empty it and you'll likely get some new "free" shells that the Terminal will detect, then you can copy in just the few customizations you want.


Sponsor: Like C#? We do too! That’s why we've developed a fast, smart, cross-platform .NET IDE which gives you even more coding power. Clever code analysis, rich code completion, instant search and navigation, an advanced debugger... With JetBrains Rider, everything you need is at your fingertips. Code C# at the speed of thought on Linux, Mac, or Windows. Try JetBrains Rider today!


© 2019 Scott Hanselman. All rights reserved.
     

Video Interview: Between Two Nerds - Building Careers with Empathy

$
0
0

I was fortunate to be a guest on Steve Carroll's talk show "Careers Behind the Code," but Amanda Silver calls it "Between Two Nerds," so I'm going with that superior title. We also snuck a fern into the shot so that's cool.

In the interview I talk about Empathy and why I think it's an essential skill for developers, designers, and program managers to develop - deeply.

Steve also asked me about how I got my start in tech, and I tell the story about the day I showed up at home and the family van was gone.

I wasn't sure how this interview would turn out, and I don't usually like talking about myself (I'm much more comfortable talking to YOU on my podcast) but folks seem to think the show turned out well.

I also speak a little about "Living your Life by Default" and the importance of mindfulness, which is a partner to Empathy. Please do check out the interview and let me know what you think!


Sponsor: Like C#? We do too! That’s why we've developed a fast, smart, cross-platform .NET IDE which gives you even more coding power. Clever code analysis, rich code completion, instant search and navigation, an advanced debugger...With JetBrains Rider, everything you need is at your fingertips. Code C# at the speed of thought on Linux, Mac, or Windows. Try JetBrains Rider today!


© 2019 Scott Hanselman. All rights reserved.
     
Viewing all 1148 articles
Browse latest View live


<script src="https://jsc.adskeeper.com/r/s/rssing.com.1596347.js" async> </script>