Quantcast
Channel: Scott Hanselman's Blog
Viewing all 1148 articles
Browse latest View live

Using Visual Studio Code to program Circuit Python with an AdaFruit NeoTrellis M4

$
0
0

My son and I were working on an Adafruit NeoTrellis M4 Mainboard over the holidays. This amazing little device puts a NeoPixel + an Audio board + a USB port along with a 120 MHz Cortex M4 Core and a mic amplifier and you can program it with CircuitPython. CircuitPython is open source and on Github at https://github.com/adafruit/circuitpython. "CircuitPython is an education friendly open source derivative of MicroPython." It works with a bunch of boards including this NeoTrellis and it's just lovely for teaching and learning.

This item is just the mainboard! You'll almost certainly want two Silicone Elastomer 4x4 Pads and an enclosure to go along.

Circuit PythonAs with a lot of these small boards, when you plug a NeoTrellis into a your machine via USB you'll get new disk drive that pops up. All you have to do to "deploy" your code is copy it to your drive. Even better, why not just edit the code place?

There's a great Python editor called Mu that works well with Circuit Python. However, my son and I are more familiar with Visual Studio Code so we wanted to see how it worked with Circuit Python.

We installed the Python extension for VS Code as well as the Arduino extension for VS Code and the Arduino IDE directly from the Windows Store.

Fire up VS Code and File | Open Folder and open the Disk Drive of the NeoTrellis and open (or create) a code.py file. Then from the Command Palette (Ctrl-Shift-P) in VS Code select Arduino > Initialize. If you get an error you may need to set up the path to your Arduino IDE. If you installed it from the Windows Store like we did you may find it in a weird path. We set the arduino.path like this:

"arduino.path": "C:\\Program Files\\WindowsApps\\ArduinoLLC.ArduinoIDE_1.8.19.0_x86__mdqgnx93n4wtt"

The NeoTrellis M4 also shows up as a COM port so you can look at its Serial Output for debugging purposes as if it were an Arduino (because it is underneath). You then Arduino > Select a COM Port from the Command Palette and it will create a file called .vscode/arduino.json in your folder that will look like this:

{

"port": "COM3"
}

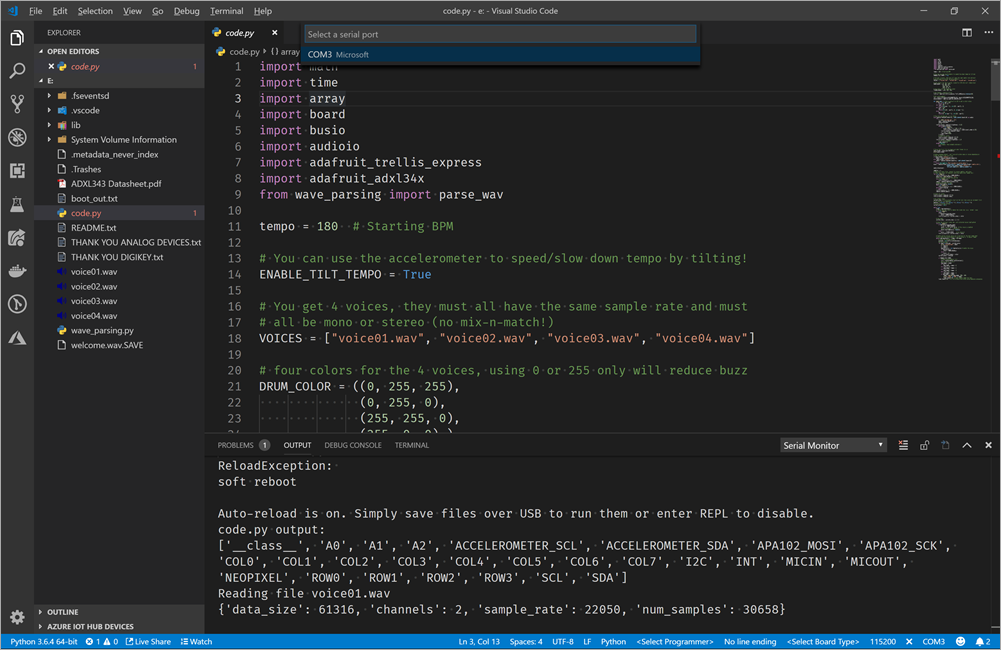
Trellis M4 is awesomeNow, within Visual Studio Code select Arduino > Open Serial Monitor and all of your print("") methods will output to that bottom pane.

Of course, we could putty into the COM Port but since I'm using this as a learning tool with my 11 year old, I find that a single window that shows both the console and the code help them focus, rather than managing multiple windows.

At this point we have a nice Developer Inner Loop going. That inner loop for us (the developers) is that we can write some code, hit save (Ctrl-S) and get immediate feedback. The application restarts when it detects the code.py file has changed and any debug (print) statements appear in the console immediately.

Visual Studio Code doing some Circuit Python

We are really enjoying this Adafruit NeoTrellis M4 Express kit. Next we're going to make a beat sequencer since the Christmas Soundboard was such a hit with mom!


Sponsor: Me! Hey friends, I've got a podcast I'm very proud of where I interview amazing people every week. Check it out at https://www.hanselminutes.com and please not only subscribe in your favorite podcasting app, but also tell your friends! Tweet about it and review it on iTunes/Google Play. Thanks!


© 2018 Scott Hanselman. All rights reserved.
     

Relationship Hacks: Playing video games and having hobbies while avoiding resentment

$
0
0

Super Nintendo Controller from PexelsI'm going to try to finished my Relationship Hacks book in 2019. I've been sitting on it too long. I'm going to try to use blog posts to spur myself into action.

A number of people asked me what projects, what code, what open source I did over the long holiday. ZERO. I did squat. I played video games, in fact. A bunch of them. I felt a little guilty then I got over it.

The Fun of Finishing - Exploring old games with Xbox Backwards Compatibility

I'm not a big gamer but I like a good story. I do single player with a plot. I consider a well-written video game to be up there with a good book or a great movie. I like a narrative and a beginning and end. Since it was the holidays, it did require some thought to play games.

When you're in a mixed relationship (a geek/techie and a non-techie) you need to be respectful of your partner's expectations. The idea of burning 4-6 hours playing games likely doesn't match up with your partner's idea of a good time. That's where communication comes in. We've found this simple system useful. It's non-gendered and should work for all types of relationships.

My spouse and I sat down at the beginning of our holiday vacation and asked each other "What do you hope to get out of this time?" Setting expectations up front avoids quiet resentment building later. She had a list of to-dos and projects, I wanted to veg.

Sitting around all day (staycation) is valid, as is using the time to take care of business (TCB). We set expectations up front to avoid conflict. We effectively scheduled my veg time so it was planned and accepted and it was *ok and guilt-free*

We've all seen the trope of the gamer hyper-focused on their video game while the resentful partner looks on. My spouse and I want to avoid that - so we do. If she knows I want to immerse myself in a game, a simple heads up goes a LONG way. We sit together, she reads, I play.

It's important to not sneak these times up on your partner. "I was planning on playing all night" can butt up against "I was hoping we'd spend time together." Boom, conflict and quiet resentment can start. Instead, a modicum of planning. A simple headsup and balance helps.

I ended up playing about 2-3 days a week, from around 8-9pm to 2am (so a REAL significant amount of time) while we hung out on the other 4-5 days. My time was after the kids were down. My wife was happy to see me get to play (and finish!) games I'd had for years.

Also, the recognition from my spouse that while she doesn't personal value my gaming time - she values that *I* value it. Avoid belittling or diminishing your partner's hobby. If you do, you'll find yourself pushing (or being pushed) away.

One day perhaps I'll get her hooked on a great game and one day I'll enjoy a Hallmark movie. Or not. ;) But for now, we enjoy knowing and respecting that we each enjoy (and sometimes share) our hobbies. End of thread.

If you enjoy my wife's thinking, check her out on my podcast The Return of Mo. My wife and I also did a full podcast with audio over our Cancer Year 

Hope you find this helpful.


Sponsor: Preview the latest JetBrains Rider with its Assembly Explorer, Git Submodules, SQL language injections, integrated performance profiler and more advanced Unity support.


© 2018 Scott Hanselman. All rights reserved.
     

How to update the firmware on your Zune, without Microsoft, dammit.

$
0
0

A glorious little ZuneAs I said on social media today, it's 2019 and I'm updating the Firmware on a Zune, fight me. ;) There's even an article on Vice about the Zune diehards. The Zune is a deeply under-respected piece of history and its UI marked the start of Microsoft's fluent design.

Seriously, though, I got this Zune and it's going to be used by my 11 year old because I don't want him to have a phone yet. He's got a little cheap no-name brand MP3 player and he's filled it up and basically outgrown it. I could get him an iPod Touch or something but he digs retro things (GBC, GBA, etc) so my buddy gave me a Zune in the box. Hasn't been touched...but it has a super old non-metro UI firmware.

Can a Zune be updated in 2019? Surely it can. Isn't Zune dead? I hooked up a 3D0 to my 4k flatscreen last week, so it's dead when I say it's dead.

IMPORTANT UPDATE: After I spent time doing this out I found out on Twitter that there's a small but active Zune community on Reddit! Props for them to doing this in several ways as well. The simplest way to update today is to point resources.zune.net to zuneupdate.com's IP address in your hosts file. The way I did it does use the files directly from Microsoft and gives you full control, but it's overly complex for regular folks for as long as the zuneupdate.com server exists as a mirror. Use the method that works easier for you and that you trust and understand!

  • First, GET ZUNE: the Zune Software version 4.8 is up at the Microsoft Download Center and it installs just fun on Windows 10. I've also made a copy in my Dropbox if this ever disappears. You should too!
  • Second, GET FIRMWARE: the Zune Firmware is still on the Microsoft sites as well. This is an x86 MSI so don't bother trying to install it, we're going to open it up like an archive instead. Save this file forever.
    • There's a half dozen ways to crack open an MSI. Since not everyone who will read this blog is a programmer, the easiest ways is
    • Download lessmsi and use it to to the open and extract the firmware MSI. It's just an MSI specific extractor but it's nicer than 7zip because it extracts the files with the correct names. If you use Chocolatey, it's just "choco install lessmsi" then run "lessmsi-gui." LessMSI will put the files in a deep folder structure. You'll want to move them and have all your files right at the top of c:\users\YOURNAME\downloads\zunestuff. We will make some other small changes a little later on here.
      LessMSI
    • If you really want to, you could install 7zip and extract the contents of the Zune Firmware MSI into a new folder but I don't recommend it as you'll need to rename the files and give them the correct extensions.
    • NERDS: you can also use msiexec from the command line, but I'm trying to keep this super simple.
  • Third, FAKE THE ZUNE UPDATE SERVER: Since the Zune servers are gone, you need to pretend to be the old Zune Server. The Zune Software will "phone home" to Microsoft at resources.zune.net (which is gone) to look for firmware. Since the Zune software was made in a simpler time (a decade ago) it doesn't use SSL or do any checking for the cert to confirm the identity of the Zune server. This would be sad in 2019, but it's super useful to us when bringing this old hardware back to life. Again, there's as half dozen ways to do this. Feel feel to do whatever makes you happy as an HTTP GET is an HTTP GET, isn't it?
    • NERDS: If you use Fiddler or any HTTP sniffer you can launch the Zune software and see it phone home for resources.zune.net/firmware/v4_5/zuneprod.xml and get a 404. It if had found this, it'd look at your Zune model and then figure out which cab (cabinet) archive to get the firmware from. We can easily spoof this HTTP GET.
    • NERDS^2: Why didn't I use the Fiddler Autoresponder to record and replay the HTTP GETS? I tried. However, there's a number of different files that the Zune software could request and I only have the one Zune and I couldn't figure out how to model it in Fiddler. If I could do this, we could just install Fidder and avoid editing the hosts file AND using a tiny web server.
    • From an admin command prompt, run notepad \windows\system32\drivers\etc\hosts and add this line:
      127.0.0.1 resources.zune.net
    • This says "if you ever want stuff from resources.zune.net, I'll handle it myself." Who is "myself?" It's our computer! It'll be a little web server you (or I) will run on our own, on localhost AKA 127.0.0.1.
    • Now download dot.net core, it's small and fast to install programming environment. Don't worry, we aren't coding, we are just using the tools it includes. It won't mess up your machine or install anything at startup.
    • Grab any 2.x .NET SDK from https://dot.net and install it from an MSI. Then go to a command prompt and run these commands. first we'll run dotnet once to warm it up, then get the server and run it from our zunestuff folder. We'll install a tiny static webserver called dotnet serve. See below:
      dotnet
      dotnet tool install --global dotnet-serve
      cd c:\users\YOURNAME\downloads\zunestuff
      dotnet serve -p 80
    • If you get any errors that dotnet serve can't be found, just close the command prompt and open it again to update your PATH. If you get errors that port 80 is open, be sure to stop IIS or Skype Desktop or anything that might be listening on port 80.
    • Now, remember where I said you'd extract all those cabs and files out of the Firmware MSI? BUT when we load the Zune software and watch network traffic, we see it's asking for resources.zune.net/firmware/v4_5/zuneprod.xml. We need to answer (since Zune is gone, it's on us now)
    • You'll want to make folders like this: C:\users\YOURNAME\downloads\zunestuff\firmware\v4_5 copy/rename copy FirmwareUpdate.xml to zuneprod.xml and have it live in that directory. It'll look like this:
      A file heirarchy under zunestuff
    • The zuneprod.xml file has relative URls inside like this, one for each model of the Zune that maps from USB hardware id to cab file. Open zuneprod.xml in a text editor and add http://resources.zune.net/ before each of the firmware file cabinets. For example if you're using notepad, your find and replace will look like this.
      Replace URL=" with URL="http://resources.zune.net/
    • <FirmwareUpdate DeviceClass="1"
      FamilyID="3"
      HardwareID="USB\Vid_045e&amp;Pid_0710&amp;Rev_0300"
      Manufacturer="Microsoft"
      Name="Zune"
      Version="03.30.00039.00-01620"
      URL="DracoBaseline.cab">

    • UPDATE: As mentioned above, I did all this work (about an hour of traffic sniffing) and spoofed the server locally then found out that someone made http://zuneupdate.com as an online static spoof! It also doesn't use HTTPS, and if you'd like, you can skip the local spoof and point your your \windows\system32\drivers\etc\hosts with an entry pointing resources.zune.net to its IP address - which at the time of this writing was 66.115.133.19. Your hosts file would look like this, in that case. If this useful resource ever goes away, use the localhost hack above.
      66.115.133.19 resources.zune.net
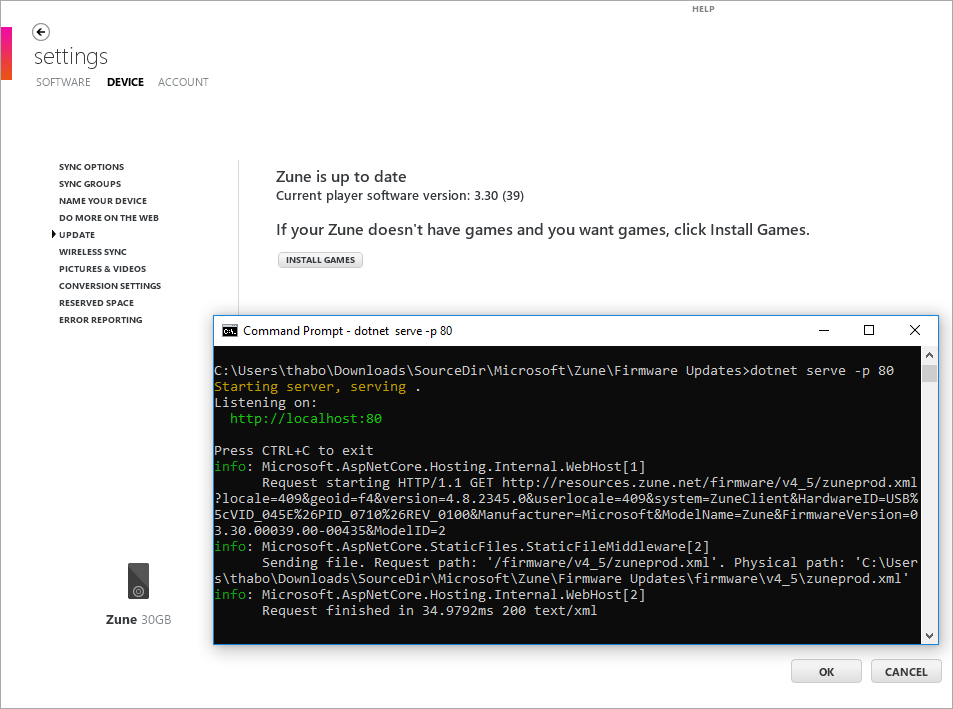
    • Now run the Zune software, connect your Zune. Notice here that I know it's working because I launch the Zune app and go to Settings | Device then Update and I can see dotnet serve in my other window serving the zuneprod.xml in response.

Required Update

It's worth pointing out that the original Zune server was somewhat smart and would only return firmware if we NEEDED a firmware update. Since we are faking it, we always return the same response. You may be prompted to install new firmware if you manually ask for an update. But you only need to get on the latest (3.30 for my brown Zune 30) and then you're good...forever.

image

Enjoy!

Your iPod SucksZune is the way

Guardians 2 Zune


Sponsor: Preview the latest JetBrains Rider with its Assembly Explorer, Git Submodules, SQL language injections, integrated performance profiler and more advanced Unity support.


© 2018 Scott Hanselman. All rights reserved.
     

Installing the .NET Core 2.x SDK on a Raspberry Pi and Blinking an LED with System.Device.Gpio

$
0
0

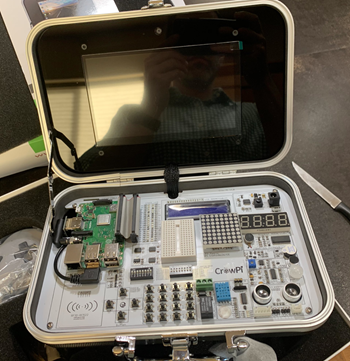
The CrowPi from Elecrow is an amazing STEM KitI've written about running .NET Core on Raspberry Pis before, although support was initially limited. Now that Linux ARM32 is a supported distro, what else can we do?

We can certainly quickly and easily install Docker on a Raspberry Pi and be running C# and .NET Core programs in minutes. We can run .NET Core in a stack of Raspberry Pis as a Kubernetes Cluster, making our own tiny cloud and install a serverless platform in it like OpenFaas!

If you have a Raspberry Pi 3 with Raspbian on it like I do, check out https://dotnet.microsoft.com/download/dotnet-core/2.2 and note that last part of the URL. You can ask for /2.1, /2.0, etc, just in case you're reading this post in the future, like tomorrow. ;) Everything is always at https://dotnet.microsoft.com/download/archives so you can tell what's Current and what's not.

For example, if I end up here https://dotnet.microsoft.com/download/thank-you/dotnet-sdk-2.2.102-linux-arm32-binaries I can grab the exact blob URL from the "try again" link and then wget it on my Raspberry Pi. You'll want to get a few prerequisites first. Note these blob links change when new stuff comes out, so you'll want to double check to get latest.

sudo apt-get install curl libunwind8 gettext

wget https://download.visualstudio.microsoft.com/download/pr/9650e3a6-0399-4330-a363-1add761127f9/14d80726c16d0e3d36db2ee5c11928e4/dotnet-sdk-2.2.102-linux-arm.tar.gz
wget https://download.visualstudio.microsoft.com/download/pr/9d049226-1f28-4d3d-a4ff-314e56b223c5/f67ab05a3d70b2bff46ff25e2b3acd2a/aspnetcore-runtime-2.2.1-linux-arm.tar.gz

I got the Linux ARM 32-bit SDK as well as the ASP.NET Runtime so I have those packages available for any web apps I choose to make.

Then we'll extract. You can set it up as a user off of $HOME or in /opt/dotnet and then link to /usr/local/bin.

mkdir -p $HOME/dotnet && tar zxf dotnet-sdk-2.2.102-linux-arm.tar.gz -C $HOME/dotnet

export DOTNET_ROOT=$HOME/dotnet
export PATH=$PATH:$HOME/dotnet

Don't forget to untar the ASP.NET Runtime as well.

tar zxf aspnetcore-runtime-2.2.1-linux-arm.tar.gz -C $HOME/dotnet

Cool. You will want to add the PATH to your profile if you want it to survive restarts. Then run "dotnet --info" to see if it works.

pi@crowpi:~ $ dotnet --info

.NET Core SDK (reflecting any global.json):
Version: 2.2.102

Runtime Environment:
OS Name: raspbian
OS Version: 9
OS Platform: Linux
RID: linux-arm
Base Path: /home/pi/dotnet/sdk/2.2.102/

Host (useful for support):
Version: 2.2.1

.NET Core SDKs installed:
2.2.102 [/home/pi/dotnet/sdk]

.NET Core runtimes installed:
Microsoft.AspNetCore.All 2.2.1 [/home/pi/dotnet/shared/Microsoft.AspNetCore.All]
Microsoft.AspNetCore.App 2.2.1 [/home/pi/dotnet/shared/Microsoft.AspNetCore.App]
Microsoft.NETCore.App 2.2.1 [/home/pi/dotnet/shared/Microsoft.NETCore.App]

Looks good.

At this point I have BOTH the .NET Core runtime (for running stuff) as well as all the ASP.NET runtime for web apps or little microservices AND the .NET SDK which means I can actually compile code (slowly) on the Pi itself. It's up to me/you. If you aren't ever going to develop (compile code) on the Raspberry Pi, you can just install the runtime, but I think it's nice to be prepared.

I am installing all this on a wonderful Raspberry Pi kit called a "CrowPi." They had a successful KickStarter and are now selling a Raspberry Pi Educational Kit with an attached custom board with dozens of components. Rather than having to connect motion sensors, soud sensors, touch sensors, switches, buttons, and carry around a bunch of wires, you can experiment and play with stuff in a very organized case that also has a 7inch HDMI touch screen. They also have 21 great Python Video Courses on their YouTube Channel on how to get started with hardware. It's a joy of a device. More on that later.

NOTE: I talked to the #CrowPi people and they gave me an Amazon COUPON that's ~$70 off! The coupon is 8EMCVI56 and will work until Jan 31, add it during checkout. The Advanced Kit is at https://amzn.to/2SVtXl2 #ref and includes everything, touchscreen, keyboard, mouse, power, SNES controllers, motors, etc. I will be doing a full review soon. Short review is, it's amazing.

Now that .NET Core is installed, I can start exploring the fun happening over at https://github.com/dotnet/iot. It's filled with lots of new functionality inside of System.Device.Gpio. Remember that GPIO means "General Purpose Input/Output" which, on a Raspberry Pi, is connected to a ribbon cable on the CrowPi with lots of cool sensors ready to go!

I could build my Raspberry Pi apps on my Windows/Mac/Linux machine and I'll find it much faster to compile. Then I can "scp" (secure copy) it over to the Pi. It's nice to point out that Windows 10 includes scp.exe now by default!

In this example, by adding -r linux-arm I'm copying a complete self-contained app over the Pi, so don't actually need to install .NET Core like I did above. If instead, I didn't use -r (to declare a specific runtime) then I would need to make sure I've got the right versions on my dev box vs my RPi, so consider what's best for you.

Here I am in my Windows machine that also has the same version of the .NET Core SDK installed. I'm in .\rpitest with a console app I made with "dotnet new console." Now I want to build and copy it over to the Pi.

dotnet publish -r linux-arm

cd bin\Debug\netcore2.1\linux-arm\publish
scp -r . pi@crowpi:/home/pi/Desktop/rpitest

From the Pi, I'll need to "sudo chmod +x" the rpitest application to make sure it is executable.

There's a brilliant video from Cam Soper that shows you in great detail how to run .NET Core 2.x on a Raspberry Pi and I recommend you check it out as well.

IoT devices expose much more than serial ports. They typically expose multiple kinds of pins that can be programmatically used to read sensors, drive LED/LCD/eInk displays and communicate with our devices. .NET Core now has APIs for GPIO, PWM, SPI, and I²C pin types.

These APIs are available via the System.Device.GPIO NuGet package. It will be supported for .NET Core 2.1 and later releases. There's some basic samples here https://github.com/dotnet/iot/blob/master/samples/README.md to start with.

From Microsoft:

Most of our effort has been spent on supporting these APIs in Raspberry Pi 3. We plan to support other devices, like the Hummingboard. Please tell us which boards are important to you. We are in the process of testing Mono on the Raspberry Pi Zero.

For now System.Device.Gpio is a prelease so you'll want to add a nuget.config to your project with the path to the dailies:

<?xml version="1.0" encoding="utf-8"?>

<configuration>
<packageSources>
<clear />
<add key="myget.org" value="https://dotnet.myget.org/F/dotnet-core/api/v3/index.json" />
<add key="nuget.org" value="https://api.nuget.org/v3/index.json" />
</packageSources>
</configuration>

Add a reference to System.Device.Gpio or (at the time of this writing) version 0.1.0-prerelease.19065.1. Now let's do something!

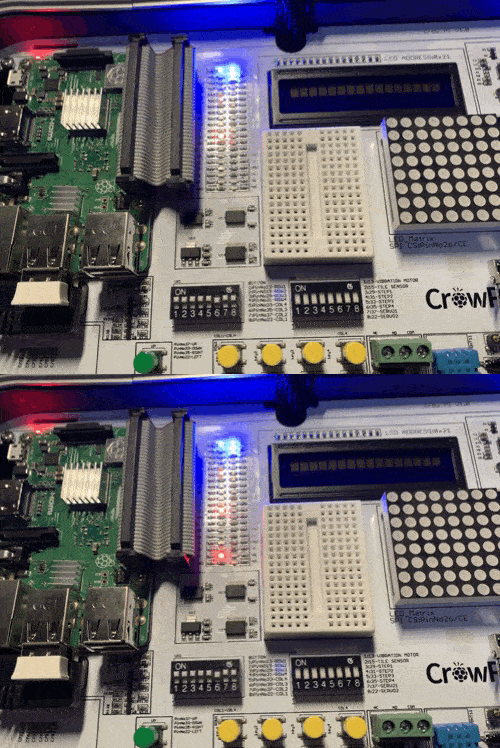
Here I'm just blinking this LED!

Console.WriteLine("Hello World!");

GpioController controller = new GpioController(PinNumberingScheme.Board);
var pin = 37;
var lightTime = 300;

controller.OpenPin(pin, PinMode.Output);
try {
while (true) {
controller.Write(pin, PinValue.High);
Thread.Sleep(lightTime);
controller.Write(pin, PinValue.Low);
Thread.Sleep(lightTime);
}
}
finally {
controller.ClosePin(pin);
}

Yay! Step zero works! Every cool IoT projects starts with a blinking LED!

Blinking LEDs ZOMG

Do be aware that System.Device.Gpio is moving VERY fast and some of this code and the samples may not work if namespaces or class names change. It'll settle down soon.

Great stuff though! Go get involved over at https://github.com/dotnet/iot as they are actively working on drivers/abstractions for Windows, Linux, etc and you could even submit a PR for a device like an LCD or simple sensor! I've only been playing for an hour but I will report back as I try new experiments with my kids.


Sponsor: Preview the latest JetBrains Rider with its Assembly Explorer, Git Submodules, SQL language injections, integrated performance profiler and more advanced Unity support.


© 2018 Scott Hanselman. All rights reserved.
     

Remote debugging with VS Code on Windows to a Raspberry Pi using .NET Core on ARM

$
0
0

I've been playing with my new "CrowPi" from Elecrow. It's a great Raspberrry Pi STEM kit that is entirely self-contained in a small case. It includes a touch screen and a TON of sensors, LCDs, matrix display, sensors, buzzers, breadboard, etc.

NOTE: I talked to the #CrowPi people and they gave me an Amazon COUPON that's ~$70 off! The coupon is 8EMCVI56 and will work until Jan 31, add it during checkout. The Advanced Kit is at https://amzn.to/2SVtXl2 #ref and includes everything, touchscreen, keyboard, mouse, power, SNES controllers, motors, etc. I will be doing a full review soon. Short review is, it's amazing.

I was checking out daily builds of the new open source .NET Core System.Device.Gpio that lets me use C# to talk to the General Purpose Input/Output pins (GPIO) on the Raspberry Pi. However, my "developer's inner loop" was somewhat manual. The developer's inner loop is that "write code, run code, change code" loop that we all do. If you find yourself typing repetitive commands that deploy or test your code but don't write new code, you'll want to try to optimize that inner loop and get it down to one keystroke (or zero in the case of automatic test).

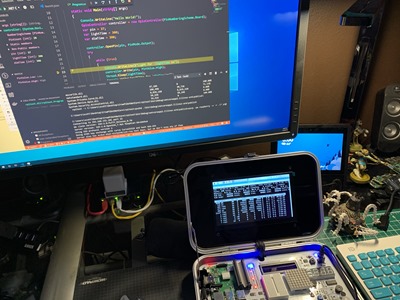
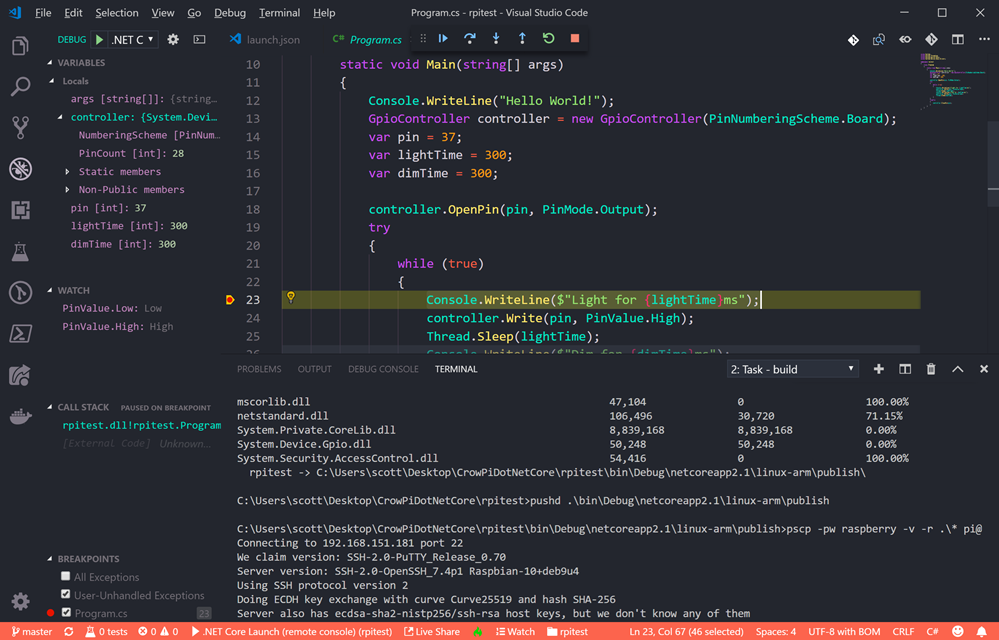
Rasbperry Pi Debugging with VS CodeIn my example, I was writing my code in Visual Studio Code on my Windows machine, building the code locally, then running a "publish.bat" that would scp (secure copy) the resulting binaries over to the Raspberry Pi. Then in another command prompt that was ssh'ed into the Pi, I would chmod the resulting binary and run it. This was tedious and annoying, however as programmers sometimes we stop noticing it and just put up with the repetitive motion.

A good (kind of a joke, but not really) programmer rule of thumb is - if you do something twice, automate it.

I wanted to be able not only to make the deployment automatic, but also ideally I'd be able to interactively debug my C#/.NET Core code remotely. That means I'm writing C# in Visual Studio Code on my Windows machine, I hit "F5" to start a debug session and my app is compiled, published, run, and I attached to a remote debugger running on the Raspberry Pi, AND I'm dropped into a debugging session with a breakpoint set. All with one keystroke. This is common practice with local apps, but for remote apps - and ones that span two CPU architectures - it can take a smidge of setup.

Starting with instructions here: https://github.com/OmniSharp/omnisharp-vscode/wiki/Attaching-to-remote-processes and here: https://github.com/OmniSharp/omnisharp-vscode/wiki/Remote-Debugging-On-Linux-Arm and a little help from Jose Perez Rodriguez at work, here's what I came up with.

Setting up Remote Debugging from Visual Code on Windows to a Raspberry Pi running C# and .NET Core

First, I'm assuming you've got .NET Core on both your Windows machine and Raspberry Pi. You've also installed Visual Studio Code on you Windows machine and you've installed the C# extension.

On the Raspberry Pi

I'm ssh'ing into my Pi from Windows 10. Windows 10 includes ssh out of the box now, but you can also ssh from WSL (Windows Subsystem for Linux).

  1. Install the VS remote debugger on your Pi by running this command:
    curl -sSL https://aka.ms/getvsdbgsh | /bin/sh /dev/stdin -v latest -l ~/vsdbg
  2. ​To debug you will need to run the program as root, so we'll need to be able to remote launch the program as root as well. For this, we need to first set a password for the root user in your pi, which you can do by running:
    sudo passwd root
  3. Then we need to enable ssh connections using root, by running :
    sudo nano /etc/ssh/sshd_config        
    and adding a line that reads:
    PermitRootLogin yes
  4. reboot the pi: sudo reboot

VSDbg looks like this getting installed:

pi@crowpi:~/Desktop/rpitest$ curl -sSL https://aka.ms/getvsdbgsh | /bin/sh /dev/stdin -v latest -l ~/vsdbg

Info: Creating install directory
Using arguments
Version : 'latest'
Location : '/home/pi/vsdbg'
SkipDownloads : 'false'
LaunchVsDbgAfter : 'false'
RemoveExistingOnUpgrade : 'false'
Info: Using vsdbg version '16.0.11220.2'
Info: Previous installation at '/home/pi/vsdbg' not found
Info: Using Runtime ID 'linux-arm'
Downloading https://vsdebugger.azureedge.net/vsdbg-16-0-11220-2/vsdbg-linux-arm.zip
Info: Successfully installed vsdbg at '/home/pi/vsdbg'

At this point I've got vsdbg installed. You can go read about the MI Debug Engine here. "The Visual Studio MI Debug Engine ("MIEngine") provides an open-source Visual Studio Debugger extension that works with MI-enabled debuggers such as gdb, lldb, and clrdbg."

On the Windows Machine

Note that there are a half dozen ways to do this. Since I had a publish.bat already that looked like this, after installing putty with "choco install putty" on my Windows machine. I'm a big fan of pushd and popd and I'll tell you this, they aren't used or known enough.

dotnet publish -r linux-arm /p:ShowLinkerSizeComparison=true 

pushd .\bin\Debug\netcoreapp2.1\linux-arm\publish
pscp -pw raspberry -v -r .\* pi@crowpi.lan:/home/pi/Desktop/rpitest
popd

On Windows, I want to add two things to my .vscode folder. I'll need a launch.json that has my "Launch target" and I'll need some tasks in my tasks.json to support that. I added the "publish" task myself. My publish task calls out to publish.bat. It could also do the stuff above if I wanted. Note that I made publish "dependsOn" build, and I removed/cleared problemMatcher. If you wanted, you could write a regEx that would detect if the publish failed.

{

"version": "2.0.0",
"tasks": [
{
"label": "build",
"command": "dotnet",
"type": "process",
"args": [
"build",
"${workspaceFolder}/rpitest.csproj"
],
"problemMatcher": "$msCompile"
},
{
"label": "publish",
"type": "shell",
"dependsOn": "build",
"presentation": {
"reveal": "always",
"panel": "new"
},
"options": {
"cwd": "${workspaceFolder}"
},
"windows": {
"command": "${cwd}\\publish.bat"
},
"problemMatcher": []
}
]
}

Then in my launch.json, I have this to launch the remote console. This can be a little confusing because it's mixing paths that are local to Windows with paths that are local to the Raspberry Pi. For example, pipeProgram is using the Chocolatey installation of Putty's Plink. But program and args and cwd are all remote (or local to) the Raspberry Pi.

"configurations": [

{
"name": ".NET Core Launch (remote console)",
"type": "coreclr",
"request": "launch",
"preLaunchTask": "build",
"program": "/home/pi/dotnet/dotnet",
"args": ["/home/pi/Desktop/rpitest/rpitest.dll"],
"cwd": "/home/pi/Desktop/rpitest",
"stopAtEntry": false,
"console": "internalConsole",
"pipeTransport": {
"pipeCwd": "${workspaceFolder}",
"pipeProgram": "${env:ChocolateyInstall}\\bin\\PLINK.EXE",
"pipeArgs": [
"-pw",
"raspberry",
"root@crowpi.lan"
],
"debuggerPath": "/home/pi/vsdbg/vsdbg"
}
}

Note the debugger path lines up with the location above that we installed vsdbg.

Remote debugging with VS Code on Windows to a Raspberry Pi using .NET Core

It's worth pointing out that while I'm doing this for C# it's not C# specific. You could setup remote debugging with VS Code using these building blocks with any environment.

The result here is that my developer's inner loop is now just pressing F5! What improvements would YOU make?


Sponsor: Preview the latest JetBrains Rider with its Assembly Explorer, Git Submodules, SQL language injections, integrated performance profiler and more advanced Unity support.


© 2018 Scott Hanselman. All rights reserved.
     

How to use Windows 10's built-in OpenSSH to automatically SSH into a remote Linux machine

$
0
0

In working on getting Remote debugging with VS Code on Windows to a Raspberry Pi using .NET Core on ARM in my last post, I was looking for optimizations and realized that I was using plink/putty for my SSH tunnel. Putty is one of those tools that we (as developers) often take for granted, but ideally I could do stuff like this without installing yet another tool. Being able to use out of the box tools has a lot of value.

A friend pointed out this part where I'm using plink.exe to ssh into the remote Linux machine to launch the VS Debugger:

"pipeTransport": {

"pipeCwd": "${workspaceFolder}",
"pipeProgram": "${env:ChocolateyInstall}\\bin\\PLINK.EXE",
"pipeArgs": [
"-pw",
"raspberry",
"root@crowpi.lan"
],
"debuggerPath": "/home/pi/vsdbg/vsdbg"
}

I could use Linux/bash that's built into Windows 10 for years now. As you may know, Windows 10 can run many Linuxes out of the box. If I have a Linux distro configured, I can call Linux commands locally from CMD or PowerShell. For example, here you see I have three Linuxes and one is the default. I can call "wsl" and any command line is passed in.

C:\Users\scott> wslconfig /l

Windows Subsystem for Linux Distributions:
Ubuntu-18.04 (Default)
WLinux
Debian
C:\Users\scott> wsl ls ~/
forablog forablog.2 forablog.2.save forablog.pub myopenaps notreal notreal.pub test.txt

So theoretically I could "wsl ssh" and use that Linux's ssh, but again, requires setup and it's a little silly. Windows 10 now supports OpenSSL already!

Open an admin PowerShell to see if you have it installed. Here I have the client software installed but not the server.

C:\> Get-WindowsCapability -Online | ? Name -like 'OpenSSH*'


Name : OpenSSH.Client~~~~0.0.1.0
State : Installed

Name : OpenSSH.Server~~~~0.0.1.0
State : NotPresent

You can then add the client (or server) with this one-time command:

Add-WindowsCapability -Online -Name OpenSSH.Client~~~~0.0.1.0

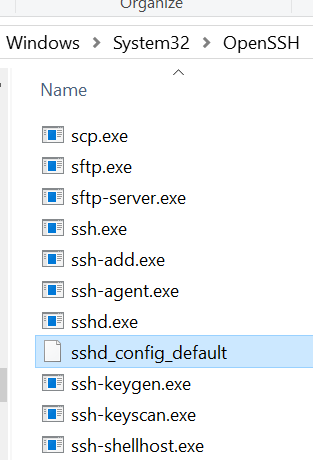
You'll get all the standard OpenSSH stuff that one would want.

OpenSSL tools on Windows

Let's say now that I want to be able to ssh (shoosh!) into a remote Linux machine using PGP keys rather than with a password. It's much more convenient and secure. I'll be ssh'ing with my Windows SSH into a remote Linux machine. You can see where ssh is installed:

C:\Users\scott>where ssh

C:\Windows\System32\OpenSSH\ssh.exe

Level set - What are we doing and what are we trying to accomplish?

I want to be able to type "ssh pi@crowpi" from my Windows machine and automatically be logged in.

I will

  • Make a key on my Window machine. The FROM. I want to ssh FROM here TO the Linux machine.
  • Tell the Linux machine (by transferring it over) about the public piece of my key and add it to a specific user's allowed_keys.
  • PROFIT

Here's what I did. Note you can do this is several ways. You can gen the key on the Linux side and scp it over, you can use a custom key and give it a filename, you can use a password as you like. Just get the essence right.

Below, note that when the command line is C:\ I'm on Windows and when it's $ I'm on the remote Linux machine/Raspberry Pi.

  • gen the key on Windows with ssh-keygen
  • I ssh'ed over to Linux and note I'm prompted for a password, as expected.
  • I "ls" to see that I have a .ssh/ folder. Cool. You can see authorized_keys is in there, you may or may no have this file or folder. Make the ~/.ssh folder if you don't.
  • Exit out. I'm in Windows now.
  • Look closely here. I'm "scott" on Windows so my public key is in c:\users\scott\.ssh\id_rsa.pub. Yours could be in a file you named earlier, be conscious.
    • I'm type'ing (cat on Linux is type on Windows) that text file out and piping it into SSH where I login that remote machine with the user pi and I then cat (on the Linux side now) and append >> that text to the .ssh/authorized_keys folder. The ~ folder is implied but could be added if you like.
  • Now when I ssh pi@crowpi I should NOT be prompted for a password.

Here's the whole thing.

C:\Users\scott\Desktop> ssh-keygen

Generating public/private rsa key pair.
Enter file in which to save the key (C:\Users\scott/.ssh/id_rsa):
Enter passphrase (empty for no passphrase):
Enter same passphrase again:
Your identification has been saved in C:\Users\scott/.ssh/id_rsa.
Your public key has been saved in C:\Users\scott/.ssh/id_rsa.pub.
The key fingerprint is:
SHA256:x2vJHHXwosSSzLHQWziyx4II+scott@IRONHEART
The key's randomart image is:
+---[RSA 2048]----+
| . .... . |
|..+. .=+=. o |
| .. |
+----[SHA256]-----+
C:\Users\scott\Desktop> ssh pi@crowpi
pi@crowpi's password:
Linux crowpi 2018 armv7l

pi@crowpi:~ $ ls .ssh/
authorized_keys id_rsa id_rsa.pub known_hosts
pi@crowpi:~ $ exit
logout
Connection to crowpi closed.
C:\Users\scott\Desktop> type C:\Users\scott\.ssh\id_rsa.pub | ssh pi@crowpi 'cat >> .ssh/authorized_keys'
pi@crowpi's password:
C:\Users\scott\Desktop> ssh pi@crowpi
pi@crowpi: ~ $

Fab. At this point I could go BACK to my Windows' Visual Studio Code launch.json and simplify it to NOT use Plink/Putty and just use ssh and the ssh key management that's included with Windows.

"pipeTransport": {

"pipeCwd": "${workspaceFolder}",
"pipeProgram": "ssh",
"pipeArgs": [
"pi@crowpi.lan"
],
"debuggerPath": "/home/pi/vsdbg/vsdbg"
}

Cool!

NOTE: In my previous blog post some folks noted I am logging in as "root." That's an artifact of the way that .NET Core is accessing the GPIO pins. That won't be like that forever.

Thoughts? I hope this helps someone.


Sponsor: Your code is bad, but that’s ok thanks to Sentry’s full stack error monitoring that enables you to track and fix application errors in real time. Stop garbage code from becoming garbage fires.


© 2018 Scott Hanselman. All rights reserved.
     

NuGet's fancy older sibling FuGet gives you a whole new view of the .NET packaging ecosystem

$
0
0

FuGet diffsI remember when we announced NuGet (almost 10 years ago). Today you can get your NuGet packages (that contain .NET libraries) from Nuget.exe, from within Visual Studio, from the .NET CLI (command line interface), and from Paket. Choice is good!

Most folks are familiar with NuGet.org but have you used FuGet?

FuGet is "pro nuget package browsing!" Creating by the amazing Frank A. Krueger - of whom I am an immense fan - FuGet offers a different view on the NuGet package library. NuGet is a repository of nearly 150,000 open source libraries and the NuGet Gallery does a decent job of letting one browse around. However, https://github.com/praeclarum/FuGetGallery is an alternative web UI with a lot more depth.

FuGet is "advanced mode" for NuGet. It's a package browser combined with an API browser that helps you explore the XML documentation and metadata of a package's assemblies to help you explore and learn. And it's a JOY.

For example, if I look at https://www.fuget.org/packages/Newtonsoft.Json I can also see who depends on the package! https://www.fuget.org/packages/Newtonsoft.Json/dependents Who has taken a public dependency on your package? I can see supported frameworks, namepsaces, as well as internal types. For example, I can explore JToken within Newtonsoft.Json and its embedded docs!

You can even do API diffs across versions! Check out https://www.fuget.org/packages/Serilog/2.8.0-dev-01042/lib/netstandard2.0/diff/2.6.0/ for example. This is an API Diff between 2.8.0-dev-01042 and 2.6.0 for Serilog. This could be useful for users or package maintainers when deciding how big a version bumb is required depending on how much of the API has changed. It also gives you a view (as the downstream consumer) of what's coming at you in pre-release versions!

From Frank's blog:

Have you ever wondered if the library your using has been customized for a certain platform? Have you wondered if it will work on your platform at all?

This doubt is removed by displaying - in full technicolor - all the frameworks that the library supports.

 Supported Frameworks

They’re color coded so you can see at a glance:

  • Green libraries are .NET Standard and will work everywhere
  • Dark blue libraries are platform specific
  • Light blue libraries are for full .NET and Mono only
  • Yellow libraries are old PCLs that we’re all trying to forget

FuGet.org is a fanstatic addition to the .NET ecosystem and I"d encourage you to bookmark it, use it, support it, and get involved!

If you're interesting in stuff like this (and the code that runs stuff like this) also check out Stephen Cleary's useful http://dotnetapis.com/ and it's associated code on GitHub https://github.com/StephenClearyApps/DotNetApis.


Sponsor: Your code is bad, but that’s ok thanks to Sentry’s full stack error monitoring that enables you to track and fix application errors in real time. Stop garbage code from becoming garbage fires.


© 2018 Scott Hanselman. All rights reserved.
     

Visiting The National Museum of Computing inside Bletchley Park - Can we crack Engima with Raspberry Pis?

$
0
0

image"The National Museum of Computing is a museum in the United Kingdom dedicated to collecting and restoring historic computer systems. The museum is based in rented premises at Bletchley Park in Milton Keynes, Buckinghamshire and opened in 2007" and I was able to visit it today with my buddies Damian and David. It was absolutely brilliant.

I'd encourage you to have a listen to my 2015 podcast with Dr. Sue Black who used social media to raise awareness of the state of Bletchley Park and help return the site to solvency.

The National Museum of Computing is a must-see if you are ever in the UK. It was a short 30ish minute train ride up from London. We spent the whole afternoon there.

There is a rebuild of the Colossus, the the world's first electronic computer. It had a single purpose: to help decipher the Lorenz-encrypted (Tunny) messages between Hitler and his generals during World War II. The Colossus Gallery housing the rebuild of Colossus tells that remarkable story.

A working Bombe machine

The backside of the Bombe

National Computing Museum

Cipher Machine

We saw the Turing-Welchman Bombe machine, an electro-mechanical device used to break Enigma-enciphered messages about enemy military operations during the Second World War. They offer guided tours (recommended as the volunteers have encyclopedic knowledge) and we were able to encrypt a message with the German Enigma (there's a 90 second video I made, here) and decrypt it with the Bombe, which is effectively 12 Engimas working in parallel, backwards.

Inside the top lid of a working EngimaA working Engima

It's worth noting - this from their website - that the first Bombe, named Victory, started code-breaking on Bletchley Park on 14 March 1940 and by the end of the war almost 1676 female WRNS and 263 male RAF personnel were involved in the deployment of 211 Bombe machines. The museum has a working reconstructed Bombe.


I wanted to understand the computing power these systems had then, and now. Check out the website where you can learn about the OctaPi - a Raspberry Pi array of eight Pis working together to brute-force Engima. You can make your own here!

I hope you enjoy these pics and videos and I hope you one day get to enjoy the history and technology in and around Bletchley Park.


Sponsor: Check out Seq 5 for real-time diagnostics from ASP.NET Core and Serilog, now with faster queries, support for Docker on Linux, and beautiful new dark and light themes.


© 2018 Scott Hanselman. All rights reserved.
     

Brainstorming - Creating a small single self-contained executable out of a .NET Core application

$
0
0

I've been using ILMerge and various hacks to merge/squish executables together for well over 12 years. The .NET community has long toyed with the idea of a single self-contained EXE that would "just work." No need to copy a folder, no need to install anything. Just a single EXE.

While work and thought continues on a CoreCLR Single File EXE solution, there's a nice Rust tool called Warp that creates self-contained single executables. Warp is cross-platform, works on any tech, and is very clever

The Warp Packer app has a slightly complex command line, like this:

.\warp-packer --arch windows-x64 --input_dir bin/Release/netcoreapp2.1/win10-x64/publish --exec myapp.exe --output myapp.exe

Fortunately Hubert Rybak has created a very nice "dotnet-pack" global tool that wraps this all up into a single command, dotnet-pack.

NOTE: There is already a "dotnet pack" command so this dotnet-pack global tool is unfortunately named. Just be aware they are NOT the same thing.

All you have to do is this:

C:\supertestweb> dotnet tool install -g dotnet-pack

C:\supertestweb> dotnet-pack
O Running Publish...
O Running Pack...

In this example, I just took a Razor web app with "dotnet new razor" and then packed it up with this tool using Warp packer. Now I've got a 40 meg self-contained app. I don't need to install anything, it just works.

C:\supertestweb> dir

Directory: C:\supertestweb

Mode LastWriteTime Length Name
---- ------------- ------ ----
d----- 2/6/2019 9:14 AM bin
d----- 2/6/2019 9:14 AM obj
d----- 2/6/2019 9:13 AM Pages
d----- 2/6/2019 9:13 AM Properties
d----- 2/6/2019 9:13 AM wwwroot
-a---- 2/6/2019 9:13 AM 146 appsettings.Development.json
-a---- 2/6/2019 9:13 AM 157 appsettings.json
-a---- 2/6/2019 9:13 AM 767 Program.cs
-a---- 2/6/2019 9:13 AM 2115 Startup.cs
-a---- 2/6/2019 9:13 AM 294 supertestweb.csproj
-a---- 2/6/2019 9:15 AM 40982879 supertestweb.exe

Now here's what it gets interesting. Let's say I have a console app. Hello World, packed with Warp, ends up being about 35 megs. But if I use the "dotnet-pack -l aggressive" the tool will add the Mono ILLinker (tree shaker/trimmer) and shake off all the methods that aren't needed. The resulting single executable? Just 9 megs compressed (20 uncompressed).

C:\squishedapp> dotnet-pack -l aggressive

O Running AddLinkerPackage...
O Running Publish...
O Running Pack...
O Running RemoveLinkerPackage...
C:\squishedapp> dir
Mode LastWriteTime Length Name
---- ------------- ------ ----
d----- 2/6/2019 9:32 AM bin
d----- 2/6/2019 9:32 AM obj
-a---- 2/6/2019 9:31 AM 47 global.json
-a---- 2/6/2019 9:31 AM 193 Program.cs
-a---- 2/6/2019 9:32 AM 178 squishedapp.csproj
-a---- 2/6/2019 9:32 AM 9116643 squishedapp.exe

Here is where you come in!

NOTE: The .NET team has planned to have a "single EXE" supported packing solution built into .NET 3.0. There's a lot of ways to do this. Do you zip it all up with a header/unzipper? Well, that would hit the disk a lot and be messy. Do you "unzip" into memory? Do you merge into a single assembly? Or do you try to AoT (Ahead of Time) compile and do as much work as possible before you merge things? Is a small size more important than speed?

What do you think? How should a built-in feature like this work and what would YOU focus on?


Sponsor: Check out Seq 5 for real-time diagnostics from ASP.NET Core and Serilog, now with faster queries, support for Docker on Linux, and beautiful new dark and light themes.


© 2018 Scott Hanselman. All rights reserved.
     

Teaching Kids to Code with Minecraft Mods made easy using MakeCode and Code Connection

$
0
0

Back in the day, making a Minecraft mod was...challenging. It was a series of JAR files and Java hacks and deep folder structures. It was possible, but it wasn't fun and it surely wasn't easy. I wanted to revisit things now that Minecraft is easily installed from the Windows Store.

Today, it couldn't be easier to make a Minecraft Mod, so I know what my kids and I are doing tonight!

I headed over to https://minecraft.makecode.com/setup/minecraft-windows10 and followed the instructions. I already have Minecraft installed, so I just had to install the Minecraft Code Connection app. The architecture here is very clean and clever. Basically you turn on cheats in Minecraft and use a local websockets connection between the Code Connection app and Minecraft - you're automating Minecraft from an external application!

Here I'm turning on cheats in a new Miencraft world:

Minecraft Allow Cheats

Then from the Code Connection app, I get a URL for the automation server, then go back to Minecraft, hit "t" and paste it in the URL. Now the two apps are talking to each other.

Connecting Minecraft to MakeCode

I can automate with MakeCode, Scratch, or other editors. I'll do MakeCode.

Make Code is amazing

Then an editor opens. This is the same base open source Make Code editor I used when I was coding for an Adafruit Circuit Playground Express earlier this year.

Now, I'll setup a chat command in Make Code that makes it rain chickens when I type the chat command "chicken." It runs a loop and spawns 100 chickens 10 blocks above my character's head.

Chicken rain

I was really surprised how easy this was. It was maybe 10 mins end to end, which is WAY easier than the Java add-ins I learned about just a few years ago.

Minecraft Chicken Rain

There are a ton of tutorials here, including Chicken Rain. https://minecraft.makecode.com/tutorials

The one I'm most excited to show my kids is the Agent. Your connection to the remote Code Connection app includes an avatar or "agent." Just like Logo (remember that, robot turtles?) you can control your agent and make him build stuff. No more tedious house building for us! Let's for-loop our way to glory and teach dude how to make us a castle!


Sponsor: Get the latest JetBrains Rider with Code Vision, Rename Project refactoring, and the Assembly Explorer. Improved support for C#, VB.NET, F#, TypeScript, and Angular is all included.


© 2018 Scott Hanselman. All rights reserved.
     

Lighting up my DasKeyboard with Blood Sugar changes using my body's REST API

$
0
0

imageI've long blogged about the intersection of diabetes and technology. From the sad state of diabetes tech in 2012 to its recent promising resurgence, it's clear that we are not waiting.

If you're a Type 1 Diabetic using a CGM - a continuous glucose meter - you'll want to set up Nightscout so you can have a REST API for your sugar. The CGM checks my blood sugar every 5 minutes, it hops via BLE over to my phone and then to the cloud. You'll want your sugars stored in cloud storage that YOU control. CGM vendors have their own cloud, but we can easily bridge over to a MongoDB database.

I run Nightscout in Azure and my body has a REST API. I can do an HTTP GET like this:

/api/v1/entries.json?count=3

and get this

[

{
_id: "5c6066d477b2a69a0a7810e5",
sgv: 143,
date: 1549821626000,
dateString: "2019-02-10T18:00:26.000Z",
trend: 4,
direction: "Flat",
device: "share2",
type: "sgv"
},
{
_id: "5c6065a877b2a69a0a7801ce",
sgv: 134,
date: 1549821326000,
dateString: "2019-02-10T17:55:26.000Z",
trend: 4,
direction: "Flat",
device: "share2",
type: "sgv"
},
{
_id: "5c60647b77b2a69a0a77f381",
sgv: 130,
date: 1549821026000,
dateString: "2019-02-10T17:50:26.000Z",
trend: 4,
direction: "Flat",
device: "share2",
type: "sgv"
}
]

I can change the URL from a .json to a .txt and get this

2019-02-10T18:00:26.000Z    1549821626000    143    Flat    

2019-02-10T17:55:26.000Z 1549821326000 134 Flat
2019-02-10T17:50:26.000Z 1549821026000 130 Flat

The "flat" value at the end is part of an enum that can give me a generalized trend value. Diabetics need to manage our sugars at the least hour by house and sometimes minute by minute. As such it's super important that we have "glanceable displays." That means anything at all that gives me a sense (a sixth sense, if you will) of how I'm doing.

That might be:

I got a Das Keyboard 5Q recently - I first blogged about Das Keyboard in 2006! and noted that it's got it's own local REST API. I'm working on using their Das Keyboard Q software's Applet API to light up just the top row of keys in response to my blood sugar changing. It'll use their Node packages and JavaScript and run in the context of their software.

However, since the keyboard has a localhost REST API and so does my blood sugar, I busted out this silly little shell script. Add a cron job and my keyboard can turn from orange (low), to green, yellow, red (high) as my sugar changes. That provides a nice ambient notifier of how my sugars are doing. Someone on Twitter said "who looks at their keyboard?" I mean, OK, that's just silly. If my entire keyboard turns run I will notice it. Again, ambient. I could certainly add an alert and make a klaxon go off if you'd like.

#!/bin/sh

# This script colorize all LEDs of a 5Q keyboard
# by sending JSON signals to the Q desktop public API.
# based on Blood Sugar values from Nightscout
set -e # quit on first error.
PORT=27301

# Colorize the 5Q keyboard
PID="DK5QPID" # product ID

# Zone are LED groups. There are less than 166 zones on a 5Q.
# This should cover the whole device.
MAX_ZONE_ID=166

# Get blood sugar from Nightscout as TEXT
red=#f00
green=#0f0
yellow=#ff0
#deep orange is LOW sugar
COLOR=#f50
bgvalue=$(curl -s https://MYSITE/api/v1/entries.txt?count=1 | grep -Eo '000\s([0-9]{1,3})+\s' | cut -f 2)
if [ $bgvalue -gt 80 ]
then
COLOR=$green
if [ $bgvalue -gt 140 ]
then
COLOR=$yellow
if [ $bgvalue -gt 200 ]
then
COLOR=$red
fi
fi
fi

echo "Sugar is $bgvalue and color is $COLOR!"

for i in `seq $MAX_ZONE_ID`
do
#echo "Sending signal to zoneId: $i"
# important NOTE: if field "name" and "message" are empty then the signal is
# only displayed on the devices LEDs, not in the signal center
curl -s -S --output /dev/null -X POST --header 'Content-Type: application/json' --header 'Accept: application/json' -d '{
"name": "Nightscout",
"id": "'$i'",
"message": "Blood sugar is '$bgvalue'",
"pid": "'$PID'",
"zoneId": "'"$i"'",
"color": "'$COLOR'",
"effect": "SET_COLOR"

}' "http://localhost:$PORT/api/1.0/signals"

done
echo "\nDone.\n\"

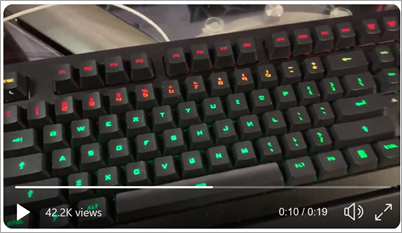
This local keyboard API is meant to send a signal to a single zone or key, so it's hacky of me (and them, really) to make 100+ REST calls to color the whole keyboard. But, it's a localhost call and it's not that spendy. This will go away when I move to their new API. Here's a video of it working.

You can also hit the volume button on the keyboard an any "signaled" (lit up) key and get a popup with the actual blood sugar value (that's 'message' in the second curl command above). Again, this is a hack but I'm going to make it a formal applet you can just install from the store. If you want to help (I'm slow) head to the code here https://github.com/shanselman/DasKeyboard-Q-NightScout

What are some other good ideas for ambient sugar alerts? An LCD strip around the monitor (bias lighting)? A Phillips Hue smart light?

Consider also that you could use the glanceable display idea for pulse, anxiety, blood pressure - anything in your body you could hook up to in real- or near-realtime.


Sponsor: Get the latest JetBrains Rider with Code Vision, Rename Project refactoring, and the Assembly Explorer. Improved support for C#, VB.NET, F#, TypeScript, and Angular is all included.


© 2018 Scott Hanselman. All rights reserved.
     

How to convert an IMG file to an standard ISO easily with Linux on Windows 10

$
0
0

Modded Goldstar 3DO for USBThe optical disc drive is giving out on my GoldStar 3DO machine. It's nearly 30 years old. I want to make sure that the kids and I can still play our 3DO discs. I ordered this fantastic USB mod for the 3DO from a fellow out of Belarus. It came and it's great. It includes a game/file selector app that you boot off of if you put it in the root of a FAT32 formatted USB drive.

However, when I cloned my collection of CD-ROMS I ended up with a bunch of IMG files, and this mod wants ISO files. I thought my cloner was going to give me ISOs. I did the obvious thing and googled for "how to convert an img file to an iso."

This plunged me into the hellscape that is CNET and Major Geeks download wrappers. Every useful application or utility out there is hidden on a page filled with Download Now buttons that aren't the button you want OR if you get the app you want, it's actually a Chrome Search hijacker. I just want to convert a damn IMG to an ISO. If you want to do this on Windows you're going to be installing a bunch of virus-laden trial ISO cracking crap.

Fortunately, Windows 10 can run Linux very nicely, thank you very much. Go install Ubuntu from the Windows Store and get set up ASAP.

I just installed ccd2iso inside Ubuntu on my Windows 10 machine.

scott@IRONHEART:~$ sudo apt install ccd2iso

Reading package lists... Done
Building dependency tree
Reading state information... Done
The following NEW packages will be installed:
ccd2iso
0 upgraded, 1 newly installed, 0 to remove and 27 not upgraded.
Need to get 7406 B of archives.
After this operation, 26.6 kB of additional disk space will be used.
Get:1 http://archive.ubuntu.com/ubuntu bionic/universe amd64 ccd2iso amd64 0.3-7 [7406 B]
Fetched 7406 B in 0s (21.0 kB/s)
Selecting previously unselected package ccd2iso.
(Reading database ... 61432 files and directories currently installed.)
Preparing to unpack .../ccd2iso_0.3-7_amd64.deb ...
Unpacking ccd2iso (0.3-7) ...
Processing triggers for man-db (2.8.3-2ubuntu0.1) ...
Setting up ccd2iso (0.3-7) ...
scott@IRONHEART:~$ cd /mnt/c/Users/scott/Desktop/3do/

Then I cd (change directory) into my file system where my IMG backups are. Note that my C:\ drive on Windows is at /mnt/c so you can see me in a folder on my Desktop here. Then just run ccd2iso.

scott@IRONHEART:/mnt/c/Users/scott/Desktop/3do$ ccd2iso AloneInTheDark.img AloneInTheDark.iso

179500 sector written
Done.

Boom. Super fast and does the job and now I'm up and running! Regardless of why you got to this blog post and needed to convert an IMG to an ISO, I hope this helps and saves you some time!


Sponsor: The next generation of Jira has arrived, with new roadmaps, more flexible boards, overhauled configuration, and dozens of new integrations. Whatever new awaits you, begin it here. In a new Jira. 


© 2018 Scott Hanselman. All rights reserved.
     

Exploring nopCommerce - open source e-commerce shopping cart platform in .NET Core

$
0
0

nopCommerce demo siteI've been exploring nopCommerce. It's an open source e-commerce shopping cart. I spoke at their conference in New York a few years ago and they were considering moving to open source and cross-platform .NET Core from the Windows-only .NET Framework, so I figured it was time for me to check in on their progress.

I headed over to https://github.com/nopSolutions/nopCommerce and cloned the repo. I have .NET Core 2.2 installed that I grabbed here. You can check out their official site and their live demo store.

It was a simple git clone and a "dotnet build" and it build and ran quite immediately. It's always nice to have a site "just work" after a clone (it's kind of a low bar, but no matter what the language it's always a joy when it works.)

I have SQL Express installed but I could just as easily use SQL Server for Linux running under Docker. I used the standard SQL Server Express connection string: "Server=localhost\SQLEXPRESS;Database=master;Trusted_Connection=True;" and was off and running.

nopCommerce is easy to setup

It's got a very complete /admin page with lots of Commerce-specific reports, the ability to edit the catalog, have sales, manage customers, deal with product reviews, set promotions, and more. It's like WordPress for Stores. Everything you'd need to put up a store in a few hours.

Very nice admin site in nopCommerce

nopCommerce has a very rich plugin marketplace. Basically anything you'd need is there but you could always write your own in .NET Core. For example, if I want to add Paypal as a payment option, there's 30 plugins to choose from!

NOTE: If you have any theming issues (css not showing up) with just using "dotnet build," you can try "msbuild" or opening the SLN in Visual Studio Community 2017 or newer. You may be seeing folders for plugins and themes not being copied over with dotnet build. Or you can "dotnet publish" and run from the publish folder.

Now, to be clear, I just literally cloned the HEAD of the actively developed version and had no problems, but you might want to use the most stable version from 2018 depending on your needs. Either way, nopCommerce is a clean code base that's working great on .NET Core. The community is VERY active, and there's a company behind the open source version that can do the work for you, customize, service, and support.


Sponsor: The next generation of Jira has arrived, with new roadmaps, more flexible boards, overhauled configuration, and dozens of new integrations. Whatever new awaits you, begin it here. In a new Jira.


© 2018 Scott Hanselman. All rights reserved.
     

Right click publish quickly to Azure App Services with VS Code extensions and zipdeploy

$
0
0

I wanted to see what was the fastest way to get an ASP.NET Core web site up (for free) on Azure. First, I could use Visual Studio Community (which is free), and just right click Publish, sign into Azure, and make a free Web App and I'm cool. But I also wanted to see what it was like on Visual Studio Code (which would work on Linux, etc)

I downloaded these things. This is 10-15 min tops for download AND install. Likely less on a fast connection.

This also assumes you have a free Azure account https://azure.microsoft.com/free/

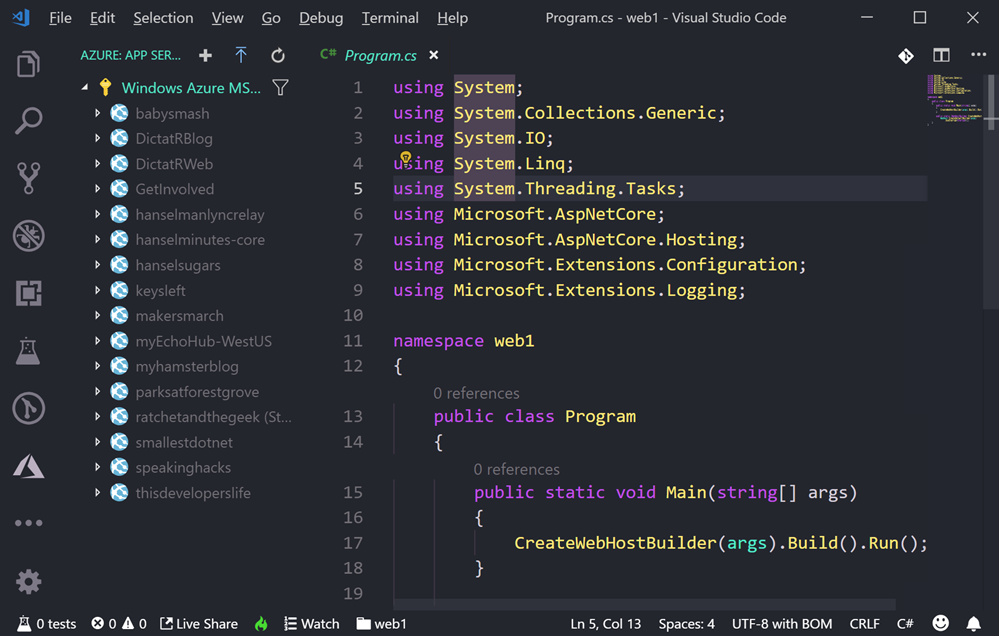
I made a new ASP.NET web site with "dotnet new razor" at the command line. The Azure App Service extension makes a new Azure icon appear on the left of VS Code. I can see my subscription(s) and any sites I've made before. I can right-click the top of the tree or just click the + plus sign.

image

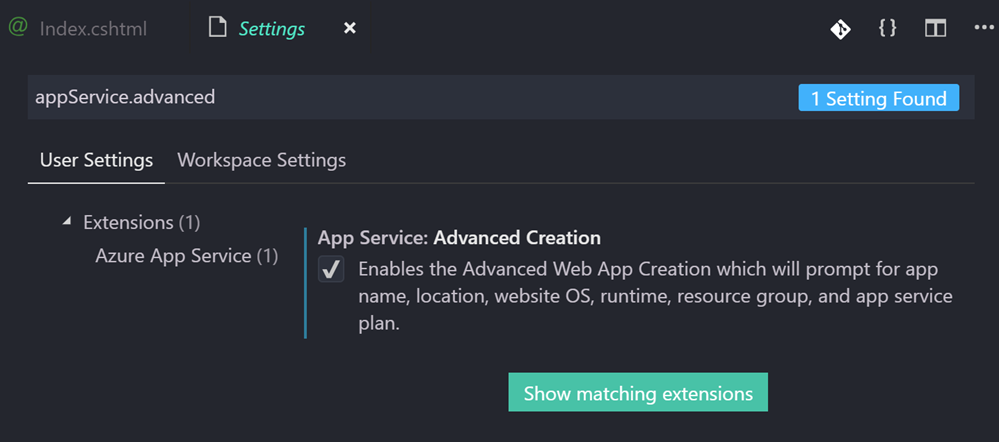
TRICK: The default mode of the Azure App Service extension is "basic" mode. This is fine for messing around, but it will assume a bunch of things. You don't have control over the location (it'll pick a nearby one) or really anything. Again, it's fine. However, if you DO want explicit prompts for name, location, OS, runtime, etc you can turn on "appService.advanced" in File | Preferences | Settings (or Ctrl+,). Don't feel you need to, but know it's possible.

appService.advanced

Now, in my opinion, deploying apps (.NET Core, Node, or otherwise) directly from source can be a little confusing, and it doesn't really scale for anything other than proofs of concept. There's usually a "build" step, and ideally you'll have a CI/CD (Continuous Integration/Continuous Deployment) pipeline for anything of any real size. It's easier than you think - you can likely get a basic DevOps pipeline up in a hour or so. I commit to GitHub and it just deploys to Azure.

That said, a quickie deploy has value so I wanted to do it. You can do a "git deploy" to Azure where Azure is a git remote and you just "git push azure master" but...you're pushing source and Azure "builds" it in Azure App Service using a thing called Kudu. That means it'll run npm install, dotnet restore, etc, it'll take some time. You could deploy a container to Azure and just push it to a Container Registry, then spin up the container.

However, Azure also has a little known but rather clever "zipdeploy" feature. Once you've configured your Azure App Service for zipdeployment as a source, you can just POST a new ZIP deployment with Curl!

curl -X POST -u <deployment_user> --data-binary @"<zip_file_path>" https://<app_name>.scm.azurewebsites.net/api/zipdeploy

You might find that weird, or you might find it elegant. If it's the latter, use it. If it's the former, don't. You can even do it with minimal or no downtime by deploying to a staging slot and use Auto Swap.

I'm going to use the Azure App Service extension in VS Code and it's going to hide all of this and it'll just publish in one click.

Here's the important part if you want it to just work and work easily. You'll want to deploy from a folder that represents your published app. That means your app in a state that it's ready to go.

With .NET Core, the easiest way is to dotnet publish. Then I'm right clicking on that publish folder as seen in this screenshot. Given that the extension is zipping up the target folder and deploying it, I want publish the publish folder, not the root of my source folder.

image

That will actually make a file .vscode/settings.json that will tell VS Code's Azure App Service extension what folder to deploy from in the future, thereby simplifying things.

{

"appService.defaultWebAppToDeploy": "/subscriptions/GUID/resourceGroups/appsvc_rg_Windows_CentralUS/providers/Microsoft.Web/sites/fancyweb1",
"appService.deploySubpath": "bin\\Debug\\netcoreapp2.2\\publish"
}

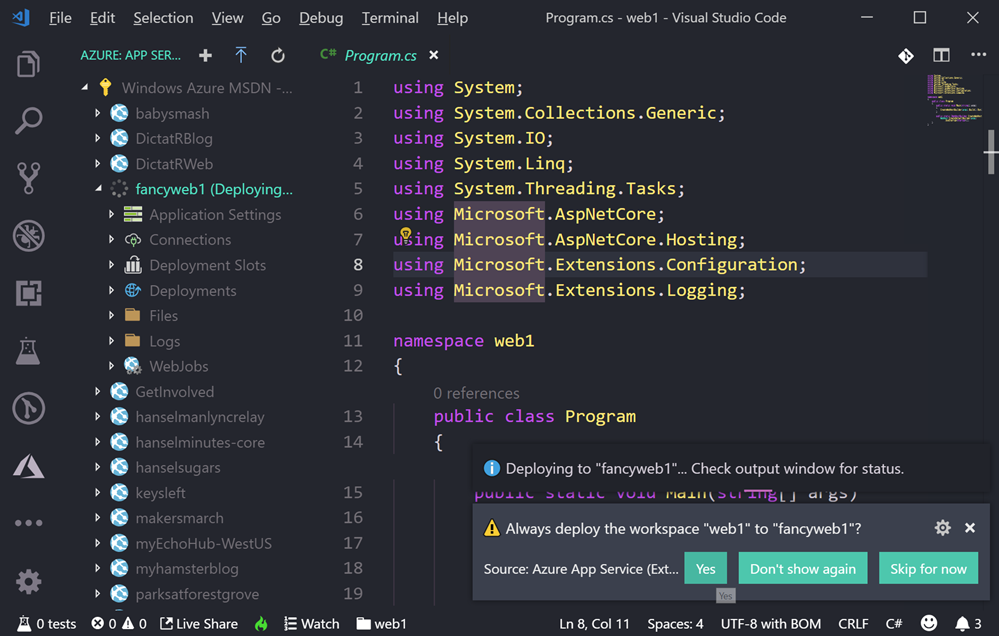
Below you can see the dialog that pops up "Always deploy the workspace ___ to ___" if you click Yes that will create the setting above specific to your application.

Always deploy the workspace web1 to fancyweb1

Now when I deploy, I can right click from anyway and it will zipdeploy right to my site. Note the log below.

image

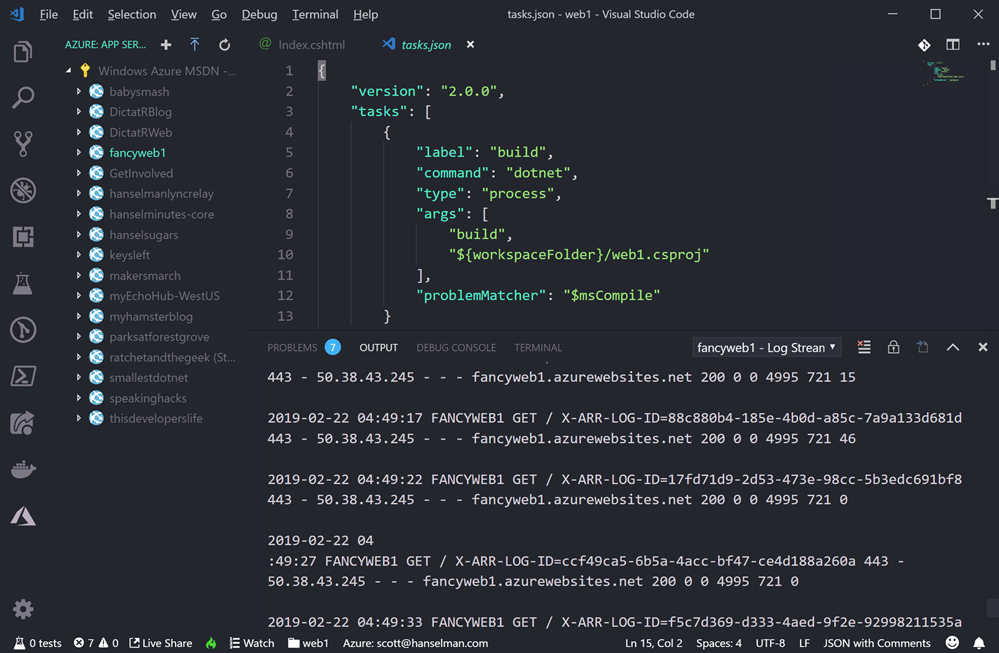
With this extension I can even right click and "Start Streaming Logs" and get output of the logs of your Azure App Service as it runs, right in the output pane of VS Code.

Start Streaming Logs

This will make things pretty easy for my simplest sites and proofs of concept. Give it a try!


Sponsor: Get the latest JetBrains Rider for remote debugging via SSH, SQL injections, a new Search Everywhere popup, and improved Unity support.


© 2018 Scott Hanselman. All rights reserved.
     

Learning about .NET Core futures by poking around at David Fowler's GitHub

$
0
0

A picture of David silently judging my code, but with loveDavid Fowler is the ASP.NET Core Architect (and an amazing highly technical public speaker) and I've learned a lot from watching him code. However, what's the best way for YOU to learn from folks like David if you can't sit on their shoulder? Why, look at their GitHub!

Since .NET Core (and most of Microsoft) is not only open source but also developed in the open now on GitHub, we can actually watch folks in their day to day work as they commit code to projects like the C# compiler, .NET Core, and ASP.NET Core.

Even more interestingly, we can look at David's github here https://github.com/davidfowl and then under Repositories see what he's up to, filter by language and type, and explore! Sometimes I just explore the Pull Requests on projects like ASP.NET Core.

You can have Private repositories on GitHub, as I do, and as I'm sure David does. But GitHub is a social network for code and it's more fun and a better learning experience when we can see each others code and read it. Read with a critical eye, but without judgment as you may not have all the context that the author does. If you went to my GitHub, https://github.com/shanselman you might be disappointed but you also may be missing the big picture. Just consider that as you Follow people and explore their code.

David is an advanced .NET developer, while, for example, I am comparatively intermediate. So I realize that not all of David's code is FOR me. It's a scratchpad, it's not educational how-to workshops. However, I can get pick up cool idioms, interesting directions the tech may be going, and more importantly - prototypes and spikes. Spikes are folks testing out technical ideas. They may not be complete. In fact, they may never be complete. But some my be harbingers of things to come.

Here's a few things I learned today.

gRPC for .NET Core

For example, at https://github.com/davidfowl/grpc-dotnet I can see David has forked (copied) gRPC for dotnet and his game is working with the gRPC folks to make a fully supported version of gRPC for production workloads with .NET Core! Here are the stated goals:

  • We plan to implement a fully-managed version of gRPC for .NET that will be built on top of ASP.NET Core HTTP/2 server.
  • Good integration with the rest of ASP.NET Core ecosystem
  • High-performance (we plan to utilize some of the cutting edge performance features from ASP.NET Core and in .NET plaform itself)

That sounds cool! I can go learn that gRPC is a modern (google sponsored) Remote Procedure Call framework that can run anywhere. It's used by Netflix and Square and supports basically any languaige and any environment. Nice for this microservice world we are entering and hopefully has learned from the sins of DCOM and CORBA and RMI, because I was there and it sucked.

Nothing to see here but moving to a new JSON serializer

This Web.Framework sounds fun, and I'll be sure to take the description to heart.

says "Lame name, just a prototype, nothing to see here (move along)"

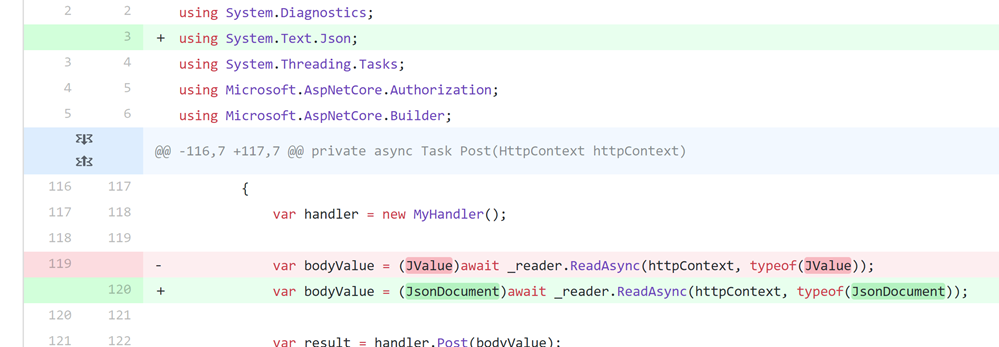
You can see David and James Newton-King kicking ideas around as you explore the commit log. However, the most interesting commit IMHO is when David moves this little spike from using JSON.NET (the ubiquitous 3rd party JSON serializer) to the new emerging official System.Text.Json. Here is the commit with unified differences.

It's a small change but it also makes me feel good about the API underneath this new JSON API that's coming. My takeway is that it's not as scary as I'd assumed. Looks like a Good Thing(tm).

A diff of code shows that just one line is changed to move JSON serializers


Cool!

Multi-Protocol ASP.NET Core

This looks interesting.

"The following sample shows how you can host a TCP server and HTTP server in the same ASP.NET Core application. Under the covers, it's the same server (Kestrel) running different protocols on different ports. The ConnectionHandler is a new primitive introduced in ASP.NET Core 2.1 to support non-HTTP protocols."

I didn't know you could do that! Looks like this sample hasn't changed much since it was conceived of in 2018, but then in the last month it's been updated twice and it appears to be part of a larger, slow-moving architectural issue called Bedrock that's moving forward.

I learned that Kestral (the ASP.NET Core web server) has a "ListenLocalhost" option on its options object!

WebHost.CreateDefaultBuilder(args)

.ConfigureServices(services =>
{
// This shows how a custom framework could plug in an experience without using Kestrel APIs directly
services.AddFramework(new IPEndPoint(IPAddress.Loopback, 8009));
})
.UseKestrel(options =>
{
// TCP 8007
options.ListenLocalhost(8007, builder =>
{
builder.UseConnectionHandler<MyEchoConnectionHandler>();
});

// HTTP 5000
options.ListenLocalhost(5000);

// HTTPS 5001
options.ListenLocalhost(5001, builder =>
{
builder.UseHttps();
});
})
.UseStartup<Startup>();

I can see here that TCP port 8007 is customer and uses a custom ConnectionHandler which I also didn't know existed! I can then look at the implementation of that handler and it's cool how clean the API is. You can get the result cleanly off the Transport buffer. You're doing low-level TCP but it doesn't feel low level.

using System.Threading.Tasks;

using Microsoft.AspNetCore.Connections;
using Microsoft.Extensions.Logging;

namespace KestrelTcpDemo
{
public class MyEchoConnectionHandler : ConnectionHandler
{
private readonly ILogger<MyEchoConnectionHandler> _logger;

public MyEchoConnectionHandler(ILogger<MyEchoConnectionHandler> logger)
{
_logger = logger;
}

public override async Task OnConnectedAsync(ConnectionContext connection)
{
_logger.LogInformation(connection.ConnectionId + " connected");

while (true)
{
var result = await connection.Transport.Input.ReadAsync();
var buffer = result.Buffer;

foreach (var segment in buffer)
{
await connection.Transport.Output.WriteAsync(segment);
}

if (result.IsCompleted)
{
break;
}

connection.Transport.Input.AdvanceTo(buffer.End);
}

_logger.LogInformation(connection.ConnectionId + " disconnected");
}
}
}

Pretty slick. This just echos what is sent to that port but not only has it educated me about a thing I didn't know about, it's something I can mentally file away until I need it!

All of these things I learned in just 30 minutes of exploring someone's public repository.

What kinds of code do you like to read and what have you learned from just poking around?


Sponsor: Get the latest JetBrains Rider for remote debugging via SSH, SQL injections, a new Search Everywhere popup, and improved Unity support.


© 2018 Scott Hanselman. All rights reserved.
     

Hey Siri, what's my blood sugar? Learning to Code with Apple's iPhone Shortcuts

$
0
0

BA library of dozens of shortcuts on iOSear with me here. Apple Shortcuts (free on the App Store) is extraordinary and you shouldn't sleep on it. In fact, you should use it and explore it as it's amazing. I would go even further and say it could be a great place to learn to code!

Apple Shortcuts on iPhone is a lot like Microsoft Flow, except for your phone. Shortcuts let you string together Actions (ahem, functions) into multi-step tasks (ahem, functions that call functions). There's a rich and growing gallery of shortcuts that you can copy into your local (to your phone) library. You can then name them and invoke your Shortcuts with Siri.

Here's a few links to Shortcuts that (assuming you are reading this from your iPhone) you can add to your library with a click!

Once you have a shortcut you can invoke it as an item/icon on your springboard/home screen, you can have Siri run it with your voice, or invoke it via a "share sheet" that is available in all apps.

It would be reasonable to think this was a simple macro system with a few basic building blocks, but I don't think Apple's team gets enough credit. This is a complete development environment on your phone.

For example, here's a incredibly intricate and powerful Shortcut if one is pulled over by the police.

It pauses any music that may be playing, turns down your brightness and volume, turns on Do Not Disturb, and sends a message to the contact of your choosing letting them know you’re being pulled over and what your current location is. It then opens your front camera and starts a video recording so you have a video record of being pulled over.

Once you stop the recording it sends a copy of the video to a contact you specify, puts volume and brightness back to where they were, turns off Do Not Disturb, and gives you the option to send to iCloud Drive or Dropbox!

You could then record a Siri shortcut and just say "Hey Siri, I'm being pulled over" and all this happens automatically, hands free.

Take a look at the Laundry Timer app here. It's a very classic "take input and do a thing" program. You can build and extend workflows like this and the data from one flows through to the next one.

A multiple step shortcut with many actions that flow data into the next, organized in a pipeline

Note the Shortcut above. The "Adjust Date" action pops up a Date and is used as a Diff(erence) against the "Current Date" action, then used again in the Add New Reminder as an input to "Add New Reminder." These contextual variables flow through and are easily accessible in this genius UI. It really is near-perfect. Try it.

At this point you may be thinking, um, OK, that's cute, but where's the learn to code revolution here? It's not that open-ended of a system, what can I really do?

Like many connected cars, my car has a kind of REST API that its app uses to do things like heat up the climate system. Here I can literally POST (like Curl, but on your iPhone!) to an endpoint and pass in a FORM and parse the resulting JSON. Wow! Drink that in. You can write complex functions with iOS Shortcuts. Really.

calling a REST API with an iOS shortcut

Hang on. My body has a REST API. I use the open source Nightscout project to create a REST API on top of my Diabetes Continuous Glucose Meter then surface it in places like my lighted keyboard or even my Git Prompt.

How hard would it be to - right now as I make this blog post - write a method to have Siri retrieve my blood sugar and announce it to me when I say "Siri what's my blood sugar?" Let's see!

I make a URL object with my REST API that returns my sugar as JSON, it gets passed into Get Contents of URL. That makes a Dictionary from the Input, then gets the value of "sgv" (serum glucose value) and then the result of that is used to make a string with the Text action.

Preparing to make a shortcut

Now I have Siri SAY it. I can "debug" by running the Shortcut with the play button.

Building a shortcut

Then I can Add it to Siri and record my phrase. Here's me saying "what's my blood sugar" and she's telling me. Yes, I know. I had a cookie. I deserved it.

Running your shortcut

This is just the start. It could also tell me my trend lines, text someone if it's high, make a chart, I figure can do anything! I'm going to continue to explore Shortcuts but this little NightScout one can be downloaded to YOUR phone here. You'll only need to put in YOUR own URL for your Nightscout instance.


Sponsor: Manage GitHub Pull Requests right from the IDE with the latest JetBrains Rider. An integrated performance profiler on Windows comes to the rescue as well.


© 2018 Scott Hanselman. All rights reserved.
     

EditorConfig code formatting from the command line with .NET Core's dotnet format global tool

$
0
0

"EditorConfig helps maintain consistent coding styles for multiple developers working on the same project across various editors and IDEs." Rather than you having to keep your code in whatever format the team has agreed on, you can check in an .editorconfig file and your editor of choice will keep things in line.

If you're a .NET developer like myself, there's a ton of great .NET EditorConfig options you can set to ensure the team uses consistent Language Conventions, Naming Conventions, and Formatting Rules.

  • Language Conventions are rules pertaining to the C# or Visual Basic language, for example, var/explicit type, use expression-bodied member.
  • Formatting Rules are rules regarding the layout and structure of your code in order to make it easier to read, for example, Allman braces, spaces in control blocks.
  • Naming Conventions are rules respecting the way objects are named, for example, async methods must end in "Async".

If you're using Visual Studios 2010, 2012, 2013, or 2015, fear not. There's at least a basic EditorConfig free extension for you that enforces the basic rules. There is also an extension for Visual Studio Code to support EditorConfig files that takes just seconds to install.

ASIDE: If you are looking for a decent default for C#, take a look at the .editorconfig that the C# Roslyn compiler team uses. I don't know about you, but my brain exploded when I saw that they used spaces vs tabs.

But! What if you want this coding formatting goodness at the dotnet command line? You can use "dotnet format" as a global tool! It's one line to install, then it's available everywhere for all your .NET Core apps.

D:\github\hanselminutes-core> dotnet tool install -g dotnet-format

You can invoke the tool using the following command: dotnet-format
Tool 'dotnet-format' (version '3.0.2') was successfully installed.
D:\github\hanselminutes-core> dotnet format
Formatting code files in workspace 'D:\github\hanselminutes-core\hanselminutes-core.sln'.
Found project reference without a matching metadata reference: D:\github\hanselminutes-core\hanselminutes.core\hanselminutes-core.csproj
Formatting code files in project 'hanselminutes-core'.
Formatting code files in project 'hanselminutes.core.tests'.
Format complete.

You can see in the screenshot below where dotnet format used its scandalous defaults to move my end of line { to its own line! Well, if that's what the team wants! ;)

My code is automatically formatted by the dotnet format tool

Of course, dotnet format is all open source and up at https://github.com/dotnet/format. You can install the stable build OR a development build from myGet.


Sponsor: Manage GitHub Pull Requests right from the IDE with the latest JetBrains Rider. An integrated performance profiler on Windows comes to the rescue as well.


© 2018 Scott Hanselman. All rights reserved.
     

Converting an Excel Worksheet into a JSON document with C# and .NET Core and ExcelDataReader

$
0
0

Excel isn't a database, except when it isI've been working on a little idea where I'd have an app (maybe a mobile app with Xamarin or maybe a SPA, I haven't decided yet) for the easily accessing and searching across the 500+ videos from http://friday.azure.com.
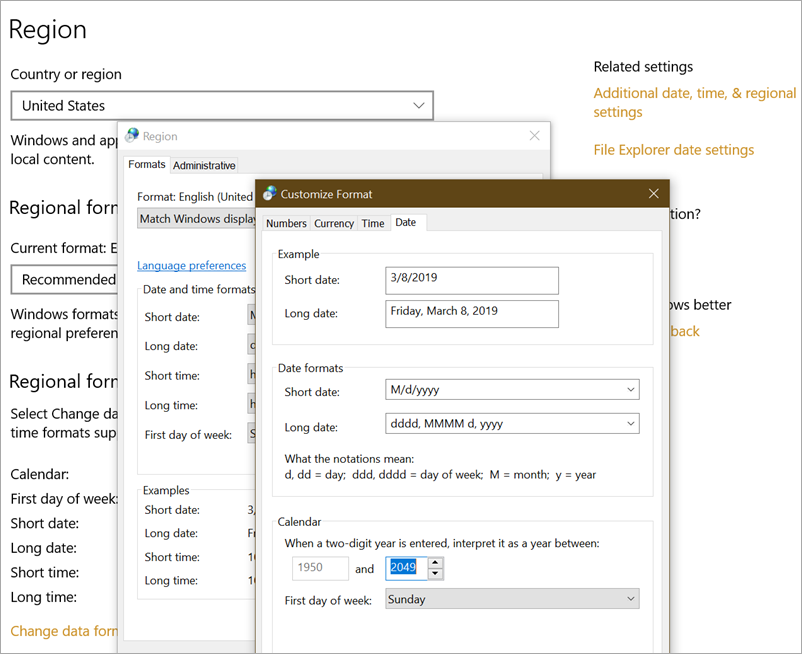
HOWEVER. I don't have access to the database that hosts the metadata and while I'm trying to get at least read-only access to it (long story) the best I can do is a giant Excel spreadsheet dump that I was given that has all the video details.

This, of course, is sub-optimal, but regardless of how you feel about it, it's a database. Or, a data source at the very least! Additionally, since it was always going to end up as JSON in a cached in-memory database regardless, it doesn't matter much to me.

In real-world business scenarios, sometimes the authoritative source is an Excel sheet, sometimes it's a SQL database, and sometimes it's a flat file. Who knows?

What's most important (after clean data) is that the process one builds around that authoritative source is reliable and repeatable. For example, if I want to build a little app or one page website, yes, ideally I'd have a direct connection to the SQL back end. Other alternative sources could be a JSON file sitting on a simple storage endpoint accessible with a single HTTP GET. If the Excel sheet is on OneDrive/SharePoint/DropBox/whatever, I could have a small serverless function run when the files changes (or on a daily schedule) that would convert the Excel sheet into a JSON file and drop that file onto storage. Hopefully you get the idea. The goal here is clean, reliable pragmatism. I'll deal with the larger business process issue and/or system architecture and/or permissions issue later. For now the "interface" for my app is JSON.

So I need some JSON and I have this Excel sheet.

Turns out there's a lovely open source project and NuGet package called ExcelDataReader. There's been ways to get data out of Excel for decades. Literally decades. One of my first jobs was automating Microsoft Excel with Visual Basic 3.0 with COM Automation. I even blogged about getting data out of Excel into ASP.NET 16 years ago!

Today I'll use ExcelDataReader. It's really nice and it took less than an hour to get exactly what I wanted. I haven't gone and made it super clean and generic, refactored out a bunch of helper functions, so I'm interested in your thoughts. After I get this tight and reliable I'll drop it into an Azure Function and then focus on getting the JSON directly from the source.

A few gotchas that surprised me. I got a "System.NotSupportedException: No data is available for encoding 1252." Windows-1252 or CP-1252 (code page) is an old school text encoding (it's effectively ISO 8859-1). Turns out newer .NETs like .NET Core need the System.Text.Encoding.CodePages package as well as a call to System.Text.Encoding.RegisterProvider(System.Text.CodePagesEncodingProvider.Instance); to set it up for success. Also, that extra call to reader.Read at the start to skip over the Title row had me pause a moment.

using System;

using System.IO;
using ExcelDataReader;
using System.Text;
using Newtonsoft.Json;

namespace AzureFridayToJson
{
class Program
{
static void Main(string[] args)
{
Encoding.RegisterProvider(CodePagesEncodingProvider.Instance);

var inFilePath = args[0];
var outFilePath = args[1];

using (var inFile = File.Open(inFilePath, FileMode.Open, FileAccess.Read))
using (var outFile = File.CreateText(outFilePath))
{
using (var reader = ExcelReaderFactory.CreateReader(inFile, new ExcelReaderConfiguration()
{ FallbackEncoding = Encoding.GetEncoding(1252) }))
using (var writer = new JsonTextWriter(outFile))
{
writer.Formatting = Formatting.Indented; //I likes it tidy
writer.WriteStartArray();
reader.Read(); //SKIP FIRST ROW, it's TITLES.
do
{
while (reader.Read())
{
//peek ahead? Bail before we start anything so we don't get an empty object
var status = reader.GetString(0);
if (string.IsNullOrEmpty(status)) break;

writer.WriteStartObject();
writer.WritePropertyName("Status");
writer.WriteValue(status);

writer.WritePropertyName("Title");
writer.WriteValue(reader.GetString(1));

writer.WritePropertyName("Host");
writer.WriteValue(reader.GetString(6));

writer.WritePropertyName("Guest");
writer.WriteValue(reader.GetString(7));

writer.WritePropertyName("Episode");
writer.WriteValue(Convert.ToInt32(reader.GetDouble(2)));

writer.WritePropertyName("Live");
writer.WriteValue(reader.GetDateTime(5));

writer.WritePropertyName("Url");
writer.WriteValue(reader.GetString(11));

writer.WritePropertyName("EmbedUrl");
writer.WriteValue($"{reader.GetString(11)}player");
/*
<iframe src="https://channel9.msdn.com/Shows/Azure-Friday/Erich-Gamma-introduces-us-to-Visual-Studio-Online-integrated-with-the-Windows-Azure-Portal-Part-1/player" width="960" height="540" allowFullScreen frameBorder="0"></iframe>
*/

writer.WriteEndObject();
}
} while (reader.NextResult());
writer.WriteEndArray();
}
}
}
}
}

The first pass is on GitHub at https://github.com/shanselman/AzureFridayToJson and the resulting JSON looks like this:

[

{
"Status": "Live",
"Title": "Introduction to Azure Integration Service Environment for Logic Apps",
"Host": "Scott Hanselman",
"Guest": "Kevin Lam",
"Episode": 528,
"Live": "2019-02-26T00:00:00",
"Url": "https://azure.microsoft.com/en-us/resources/videos/azure-friday-introduction-to-azure-integration-service-environment-for-logic-apps",
"embedUrl": "https://azure.microsoft.com/en-us/resources/videos/azure-friday-introduction-to-azure-integration-service-environment-for-logic-appsplayer"
},
{
"Status": "Live",
"Title": "An overview of Azure Integration Services",
"Host": "Lara Rubbelke",
"Guest": "Matthew Farmer",
"Episode": 527,
"Live": "2019-02-22T00:00:00",
"Url": "https://azure.microsoft.com/en-us/resources/videos/azure-friday-an-overview-of-azure-integration-services",
"embedUrl": "https://azure.microsoft.com/en-us/resources/videos/azure-friday-an-overview-of-azure-integration-servicesplayer"
},
...SNIP...

Thoughts? There's a dozen ways to have done this. How would you do this? Dump it into a DataSet and serialize objects to JSON, make an array and do the same, automate Excel itself (please don't do this), and on and on.

Certainly this would be easier if I could get a CSV file or something from the business person, but the issue is that I'm regularly getting new drops of this same sheet with new records added. Getting the suit to Save As | CSV reliably and regularly isn't sustainable.


Sponsor: Stop wasting time trying to track down the cause of bugs. Sentry.io provides full stack error tracking that lets you monitor and fix problems in real time. If you can program it, we can make it far easier to fix any errors you encounter with it.


© 2018 Scott Hanselman. All rights reserved.
     

How to parse string dates with a two digit year and split on the right century in C#

$
0
0

So you've been asked to parse some dates, except the years are two digit years. For example, dates like "12 Jun 30" are ambiguous...or are they?

If "12 Jun 30" is intended to express a birthday, given it's 2019 as the of writing of this post, we can assume it means 1930. But if the input is "12 Jun 18" is that last year, or is that a 101 year old person's birthday?

Enter the Calendar.TwoDigitYearMax property.

For example, if this property is set to 2029, the 100-year range is from 1930 to 2029. Therefore, a 2-digit value of 30 is interpreted as 1930, while a 2-digit value of 29 is interpreted as 2029.

The initial value for this property comes out of the DEPTHS of the region and languages portion of the Control Panel. Note way down there in "additional date, time, & regional settings" in the "more settings" and "date" tab, there's a setting that (currently) splits on 1950 and 2049.

Two Digit Year regional settings

If you're writing a server-side app that parses two digit dates you'll want to be conscious and explicit about what behavior you WANT so that you're not surprised.

Setting TwoDigitYearMax sets a 100 year RANGE that your two digit years will be interpreted to be within. You can also just change it on the current thread's current culture's calendar. It's up to you.

For example, this little app:

string dateString = "12 Jun 30"; //from user input

DateTime result;
CultureInfo culture = new CultureInfo("en-US");
DateTime.TryParse(dateString, culture, DateTimeStyles.None, out result);
Console.WriteLine(result.ToLongDateString());

culture.Calendar.TwoDigitYearMax = 2099;

DateTime.TryParse(dateString, culture, DateTimeStyles.None, out result);
Console.WriteLine(result.ToLongDateString());

gives this output:

Thursday, June 12, 1930

Wednesday, June 12, 2030

Note that I've changed TwoDigitYearMax from and moved it up to the 1999-2099 range so "30" is assumed to be 2030, within that 100 year range.

Hope this helps!


Sponsor: Stop wasting time trying to track down the cause of bugs. Sentry.io provides full stack error tracking that lets you monitor and fix problems in real time. If you can program it, we can make it far easier to fix any errors you encounter with it.


© 2018 Scott Hanselman. All rights reserved.
     

How to stream PC games from Windows 10 to your Xbox One for free

$
0
0

Xbox is ready for you to connect to wirelesslyI've been really enjoying my Xbox lately (when the family is asleep) as well as some fun Retrogaming on original consoles. Back in 2015 I showed how you can stream from your Xbox to any PC using the Xbox app from the Windows Store. You can pair your Xbox controller with any PC you've got around (either with the $20 Xbox Wireless Adapter or just with a micro-USB cable you likely have already). In fact, I often walk on the treadmill while streaming games from the Xbox to my little Surface Pro 3.

Then, a year later I did the inverse. I played PC games on my big screen using a SteamLink! Although they've been discontinued, they are out there and they work great. This little box lets you play PC games remotely on your large screens. I have a big PC in my office and I wanted to use the big TV in the living room. The game still runs on the PC but the video/audio and controls are all remoted to the Xbox. Plus, SteamLink only works with the Steam app running and is optimized for Steam games. It's a single task box and one more thing to plug into HDMI but it works well.

Fast-forward to today and I learned that Windows 10 can project its screen to an Xbox One AND you can use your Xbox One controller to control it (it's paired on the Xbox side) and play games or run apps. No extra equipment needed.

I installed the Xbox Wireless Display App on my Xbox One. Then on my PC, here's what I see upon pressing Win+P and clicking "Connect to Wireless Display."

Connected to Xbox One

Once I've duplicated, you can see here I'm writing this blog post wirelessly projected to the Xbox. It just worked. Took 5 min to do this.

If you're tech savvy, you may say, isn't this "just Miracast" and "hasn't this always been possible?" Yes and no. What's been updated is the Xbox Wireless Display App that you'll want to install and run on your Xbox. You may have been able to project your PC screen to various sticks and Miracast adapters, but this free app makes your Xbox a receiver for Miracast broadcasts (over wifi or LAN) and most importantly - now you can use your Xbox controller already paired to the Xbox to control the remote PC. You can use that control to play games or switch to mouse control mode with Start+Select and mouse around with your Xbox thumbsticks!

20190315_050720572_iOS

If I hit the menu button I can see how the controllers map to PC controls. No remote keyboard and mouse connected from the Xbox...yet. (and to be clear, no word if that will ever be supported but it'd be cool!)

Controller Mapping for PC to Xbox

To make sure you can do this, run DxDiag and save all information into "DxDiag.txt." Here's part of mine. There's nothing special about my machine. It's worth pointing out I have no Wifi adapter on this machine and it has an NVidia 1080 video card. Miracast is happening over the Wired LAN (local area network) in my house. This is Miracast over Infrastructure and it's in Windows 10 since version 1703 (March 2017).

------------------

System Information
------------------
Machine name: IRONHEART
Operating System: Windows 10 Pro 64-bit
Processor: Intel(R) Core(TM) i9-7900X CPU @ 3.30GHz (20 CPUs), ~3.3GHz
Memory: 32768MB RAM
DirectX Version: DirectX 12
User DPI Setting: 144 DPI (150 percent)
System DPI Setting: 144 DPI (150 percent)
Miracast: Available, with HDCP

When you've connected your PC to my Xbox and are streaming FROM my PC to your Xbox, you'll see this bar at the top of the PC side. There's three optimization settings for Gaming, Working, and Watching Videos. I assume these are balancing crispness/quality with framerate and latency changes.

Gaming, Working, Watching Videos

Now let's take it to the next level. I can run Steam Big Picture and here I am running Batman: Arkham Origins on my PC, but played on and controlled from my Xbox in the other room!

I like that I don't need the SteamLink. I find that this runs more reliably and more easily than my original set up. I like that I can switch the Xbox controller from controller mode to mouse mode. And most of all I like that this doesn't require any custom setup, extra work, or drivers. It just worked out of the box for me.

Your mileage may vary and I'm trying to figuire out why some people's video card drivers don't allow this and then end up with no "Connect to a Wireless Display" option in their Win+P menu. If you figure it out, please sound of in the comments.

Give it a try! I hope you enjoy it. I'm having a blast.


Sponsor: Manage GitHub Pull Requests right from the IDE with the latest JetBrains Rider. An integrated performance profiler on Windows comes to the rescue as well.


© 2018 Scott Hanselman. All rights reserved.
     
Viewing all 1148 articles
Browse latest View live