Quantcast
Channel: Scott Hanselman's Blog
Viewing all 1148 articles
Browse latest View live

11 essential characteristics for being a good technical advocate or interviewer

$
0
0

14265784357_5b2773e123_oI was talking to my friend Rob Caron today. He produces Azure Friday with me - it's our weekly video podcast on Azure and the Cloud. We were talking about the magic for a successful episode, but then realized the ingredients that Rob came up with were generic enough that they were the essential for anyone who is teaching or advocating for a technology.

Personally I don't believe in "evangelism" in a technical context and I dislike the term "Technology Evangelism." Not only does it evoke unnecessary zealotry but it also implies that your religion technology is not only what's best for someone, but that it's the only solution. Java people shouldn't try to convert PHP people. That's all nonsense, of course. I like the word "advocate" because you're (hopefully) advocating for the right solution regardless of technology.

Here's the 11 herbs and spices that are needed for a great technical talk, a good episode of a podcast or show, or a decent career talking and teaching about tech.

  1. Empathy for the guest – When talking to another person, never let someone flounder and fail – compensate when necessary so they are successful.
  2. Empathy for the audience – Stay conscious that you're delivering an talk/episode/post that people want to watch/read.
  3. Improvisation – Learn how to think on your feet and keep the conversation going (“Yes, and…”) Consider ComedySportz or other mind exercises.
  4. Listening – Don't just wait to for your turn to speak, just to say something, and never interrupt to say it. Be present and conscious and respond to what you’re hearing
  5. Speaking experience – Do the work. Hundreds of talks. Hundreds of interviews. Hundreds of shows. This ain’t your first rodeo. Being good means hard work and putting in the hours, over years, whether it's 10 people in a lunch presentation or 2000 people in a keynote, you know what to articulate.
  6. Technical experience – You have to know the technology. Strive to have context and personal experiences to reference. If you've never built/shipped/deployed something real (multiple times) you're just talking.
  7. Be a customer – You use the product, every day, and more than just to demo stuff. Run real sites, ship real apps, multiple times. Maintain sites, have sites go down and wake up to fix them. Carry the proverbial pager.
  8. Physical mannerisms – Avoid having odd personal ticks and/or be conscious of your performance on video. I know what my ticks are and I'm always trying to correct them. It's not self-critical, it's self-aware.
  9. Personal brand – I'm not a fan of "personal branding" but here's how I think of it. Show up. (So important.) You’re a known quantity in the community. You're reliable and kind. This lends credibility to your projects. Lend your voice and amplify others. Be yourself consistently and advocate for others, always.
  10. Confidence – Don't be timid in what you have to say BUT be perfectly fine with saying something that the guest later corrects. You're NOT the smartest person in the room. It's OK just to be a person in the room.
  11. Production awareness – Know how to ensure everything is set to produce a good presentation/blog/talk/video/sample (font size, mic, physical blocking, etc.) Always do tech checks. Always.

These are just a few tips but they've always served me well. We've done 450 episodes of Azure Friday and I've done nearly 650 episodes of the Hanselminutes Tech Podcast. Please Subscribe!

Related Links

* pic from stevebustin used under CC.


Sponsor: Preview the latest JetBrains Rider with its built-in spell checking, initial Blazor support, partial C# 7.3 support, enhanced debugger, C# Interactive, and a redesigned Solution Explorer.


© 2018 Scott Hanselman. All rights reserved.
     

Building the Ultimate Developer PC 3.0 - The Parts List for my new computer, IronHeart

$
0
0

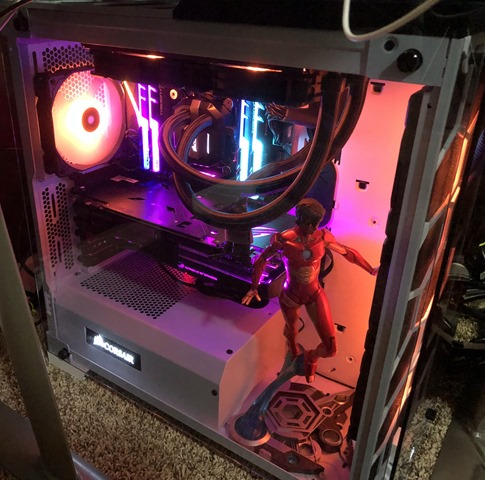
Ironheart is my new i9 PCIt's been 7 years since the last time I built "The Ultimate Developer PC 2.0," and over 11 since the original Ultimate Developer PC that Jeff Atwood built with for me. That last PC was $3000 and well, frankly, that's a heck of a lot of money. Now, I see a lot of you dropping $2k and $3k on MacBook Pros and Surfaces without apparently sweating it too much but I expect that much money to last a LONG TIME.

Do note that while my job does give me a laptop for work purposes every 3 years, my desktop is my own, paid for with my own money and not subsidized by my employer in any way. This PC is mine.

I wrote about money and The Programmer's Priorities in my post on Brain, Bytes, Back, and Buns. As Developer we spend a lot of time looking at monitors, sitting in chairs, using computers, and sleeping. It stands to reason we should should invest in good chairs, good monitors and PCs, and good beds. That also means good mice and keyboards, of course.

Was that US$3000 investment worth it? Absolutely. I worked on my PC2.0 nearly every day for 7 years. That's ~2500 days at about $1.25 a day if you consider upgradability.

Continuous PC Improvement via reasonably priced upgrades

How could I use the same PC for 7 years? Because it's modular.

  • Hard Drive - I upgraded 3 years back to a 512 gig Samsung 850 SSD and it's still a fantastic drive at only about $270 today. This kept my machine going and going FAST.
  • Video Card - I found a used NVidia 1070 on Craigslist for $250, but they are $380 new. A fantastic card that can do VR quite nicely, but for me, it ran three large monitors for years.
  • Monitors - I ran a 30" Dell as my main monitor that I bought used nearly 10 years ago. It does require a DisplayPort to Dual-Link DVI active adapter but it's still an amazing 2560x1600 monitor even today.
  • Memory - I started at 16 gigs and upgraded to 24 gigs when memory got cheaper.

All this adds up to me running the same first generation i7 processor up until 2018. And frankly, I probably could have gone another 3-5 years happily.

So why upgrade? I was gaming more and more as well as using my HTC Vive Pro and while the 1070 was great (although always room for improvement) I was pushing the original Processor pretty hard. On the development side, I have been running somewhat large distributed systems with Docker for Windows and Kubernetes, again, pushing memory and CPU pretty hard.

Ultimately however, price/performance for build-your-own PCs got to a reasonable place plus the ubiquity of 4k displays at reasonable costs made me think I could build a machine that would last me a minimum of 5 years, if not another 7.

Specifications

I bought my monitors from Dell directly and the PC parts from NewEgg.com. I named my machine IRONHEART after Marvel's Riri Williams.

  • Intel Core i9-7900X 10-Core 3.3 Ghz Desktop Processor - I like this processor for a few reasons. Yes, I'm an Intel fan, but I like that it has 44 PCI Express lanes (that's a lot) which means given I'm not running SLI with my video card, I'll have MORE than enough bandwidth for any peripherals I can throw at this machine. Additionally, it's caching situation is nuts. There's 640k L1, 10 MEGS L2, and 13.8 MEGS L3. 640 ought to be enough for anyone, right? ;) It's also got 20 logical processors plus Intel Turbo Boost Max that will move specific cores to 4.5GHz as needed, up from the base 3.3Ghz freq. It can also support up to 128 GB of RAM, although I'll start with 32gigs it's nice to have the room to grow.
  • 288-pin DDR4 3200Mhz (PC4 25600) Memory  4 x 8G - These also have a fun lighting effect, and since my case is clear why not bling it out a little?
  • ASUS ROG STRIX LGA2066 X299 ATX Motherboard - Good solid board with built in BT and Wifi, an M.2 heatsink included, 3x PCIe 3.0 x16 SafeSlots (supports triple @ x16/x16/x8), 1x PCIe 3.0 x4, 2x PCIe 3.0 x1 and a Max of 128 gigs of RAM. It also has 8x USB 3.1s and a USB C which is nice.
  • Corsair Hydro Series H100i V2 Extreme Performance Water/Liquid CPU Cooler - My last PC had a heat sink you could see from space. It was massive and unruly. This Cooler/Fan combo mounts cleanly and then sits at the top of the case. It opens up a TON of room and looks fantastic. I really like everything Corsair does.
  • WD Black 512GB Performance SSD - M.2 2280 PCIe NVMe Solid State Drive - It's amazing how cheap great SSDs are and I felt it was time to take it to the next level and try M.2 drives. M.2 is the "next generation form factor" for drives and replaces mSATA. M.2 SSDs are tiny and fast. This drive can do as much as 2gigs a second as much as 3x the speed of a SATA SSD. And it's cheap.
  • CORSAIR Crystal 570X RGB Tempered Glass, Premium ATX Mid Tower Case, White - I flipping love this case. It's white and clear, but mostly clear. The side is just a piece of tempered glass. There's three RGB LED fans in the front (along with the two I added on the top from the cooler, and one more in the back) and they all are software controllable. The case also has USB ports on top which is great since it's sitting under my clear glass desk. It is very well thought out and includes many cable routing channels so your cables can be effectively invisible. Highly recommended.
    Clear white case The backside of the clear white corsair case
  • Corsair 120mm RGB LED Fans - Speaking of fans, I got this three pack bringing the total 120mm fan count to 6 (7 if you count the GPU fan that's usually off)
  • TWO Anker 10 Port 60W USB hubs. I have a Logitech Brio 4k camera, a Peavey PV6 USB Mixer, and a bunch of other USB3 devices like external hard drives, Xbox Wireless Adapter and the like so I got two of these fantastic Hubs and double-taped them to the desk above the case.
  • ASUS ROG GeForce GTX 1080 Ti 11 gig Video Card - This was arguably over the top but in this case I treated myself. First, I didn't want to ever (remember my 5 year goal) sweat video perf. I am/was very happy with my 1070 which is less than half the price, but as I've been getting more into VR, the NVidia 1070 can struggle a little. Additionally, I set the goal to drive 3 4k monitors at 60hz with zero issues, and I felt that the 1080 was the a solid choice.
  • THREE Dell Ultra HD 4k Monitors P2715Q 27" - My colleague Damian LOVES these monitors. They are an excellent balance in size and cost and are well-calibrated from the factory. They are a full 4k and support DisplayPort and HDMI 2.0.
    • Remember that my NVidia card has 2 DisplayPorts and 2 HDMI ports but I want to drive 3 monitors and 1 Vive Pro? I run the center Monitor off DisplayPort and the left and right off HDMI 2.0.
    • NOTE: The P2415Q and P2715Q both support HDMI 2.0 but it's not enabled from the factory. You'll need to enable HDMI 2.0 in the menus (read the support docs) and use a high-speed HDMI cable. Otherwise you'll get 4k at 30hz and that's really a horrible experience. You want 60hz for work at least.
    • NOTE: When running the P2715Q off DisplayPort from an NVidia card you might initially get an output color format of YCbCr 4:2:2 which will make the anti-aliased text have a colored haze while the HDMI 2.0 displays look great with RGB color output. You'll need to go into the menus of the display itself and set the Input Color Format to RGB *and* also into the NVidia display settings after turning the monitor and and off to get it to stick. Otherwise you'll find the NVidia Control Panel will reset to the less desirable YCbCr422 format causing one of your monitors to look different than the others.
    • Last note, sometimes Windows will say that a DisplayPort monitor is running at 59Hz. That's almost assuredly a lie. Believe your video card.
      Three monitors all running 4k 60hz

What about perf?

Developers develop, right? A nice .NET benchmark is to compile Orchard Core both "cold" and "warm." I use .NET Core 2.1 downloaded from http://www.dot.net

Orchard is a fully-featured CMS with 143 projects loaded into Visual Studio. MSBUILD and .NET Core in 2.1 support both parallel and incremental builds.

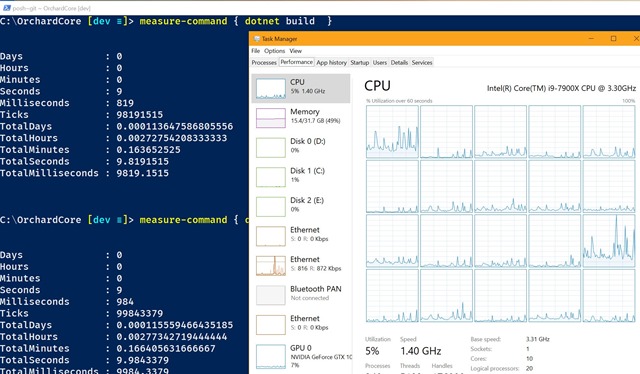
  • A warm build of Orchard Core on IRONHEART takes just under 10 seconds.
    • My Surface Pro 3 builds it warm in 62 seconds.
  • A totally cold build (after a dotnet clean) on IRONHEART takes 33.3 seconds.
    • My Surface Pro 3 builds it cold in 2.4 minutes.

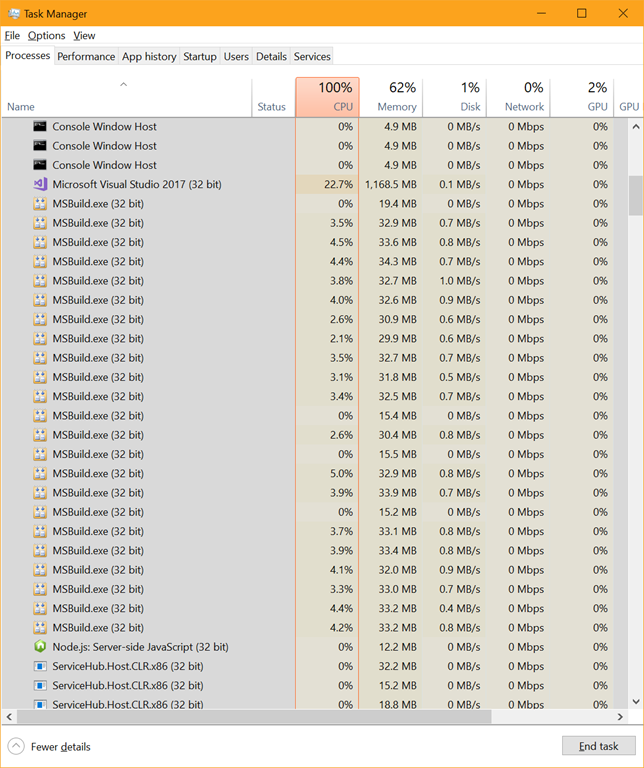
Additionally, the CPUs in this case weren't working at full speed very long. This may be as fast as these 143 projects can be built. Note also that Visual Studio/MSBuild will use as many processors as it your system can handle. In this case it's using 20 procs.
MSBuild building Orchard Core across 20 logical processors

I can choose to constrain things if I think the parallelism is working against me, for example here I can try just with 4 processors. In my testing it doesn't appear that spreading the build across 20 processors is a problem. I tried just 10 (physical processors) and it builds in 12 seconds. With 20 processors (10 with hyperthreading, so 20 logical) it builds in 9.6 seconds so there's clearly a law of diminishing returns here.

dotnet build /maxcpucount:4

Building Orchard Core in 10 seconds

Regardless, My podcast site builds in less than 2 seconds on my new machine which makes me happy. I'm thrilled with this new machine and I hope it lasts me for many years.

PassMark

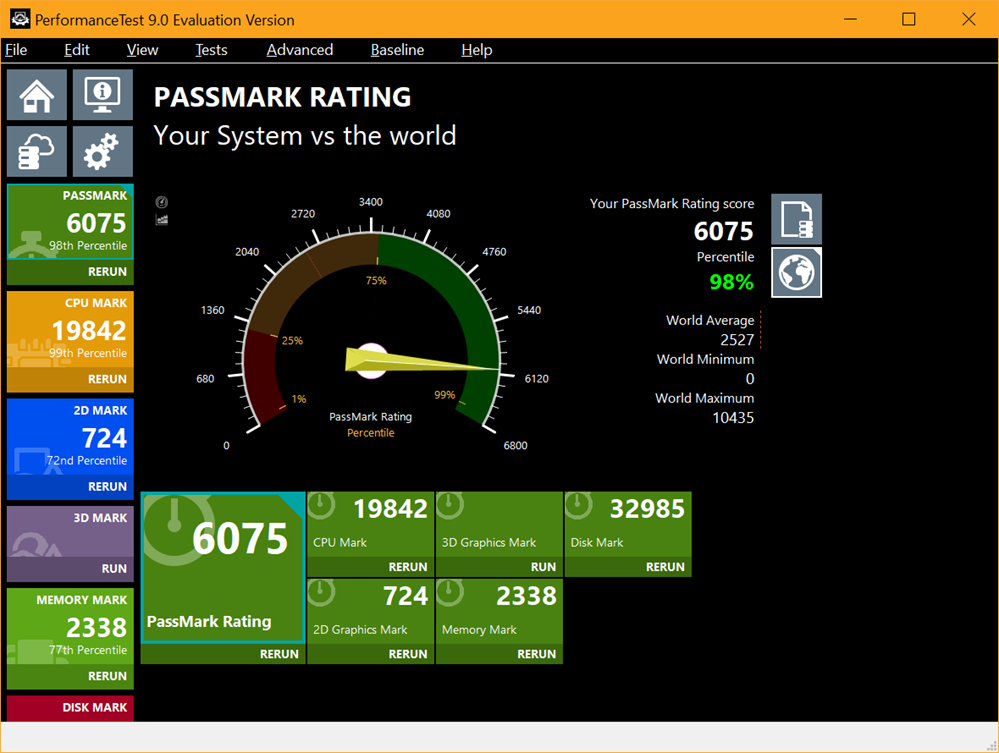
I like real world benchmarks, like building massive codebases and reading The Verge with an AdBlocker off, but I did run PassMark.

Passmark 98% percentile

Now you!

Why don't you go get .NET Core 2.1 and clone Orchard Core from https://github.com/OrchardCMS/OrchardCore and run this in PowerShell

measure-command { dotnet build } 

and let me know in the comments how fast your PC is with both cold and warm builds!

NOTE: I  have an affiliate relationship with NewEgg and Amazon so if you use my links to buy something I'll make a small percentage and you're supporting this blog! Thanks!


Sponsor: Preview the latest JetBrains Rider with its built-in spell checking, initial Blazor support, partial C# 7.3 support, enhanced debugger, C# Interactive, and a redesigned Solution Explorer.


© 2018 Scott Hanselman. All rights reserved.
     

Azure Application Insights warned me of failed dependent requests on my site

$
0
0

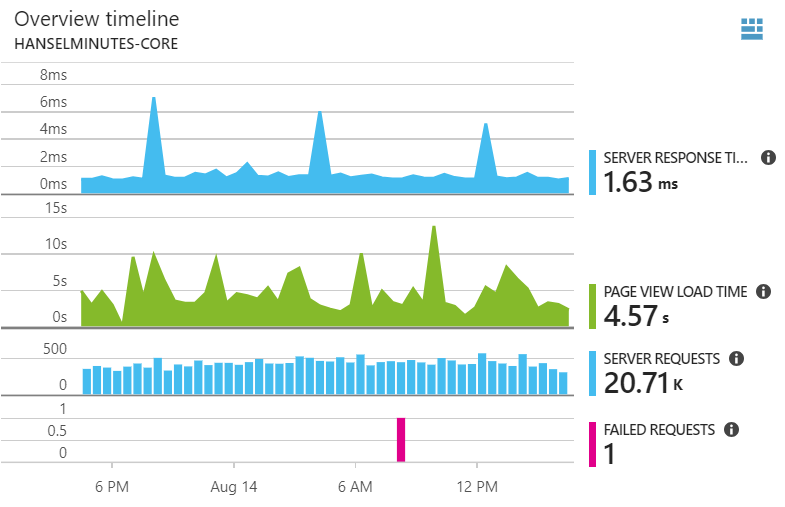
I've been loving Application Insights ever since I hooked it up to my Podcast Site. Application Insights is stupid cheap and provides an unreal number of insights into what's going on in your site. I hooked it up and now I have a nice dashboard showing what's up. It's pretty healthy.

Lovely graphics showing HEALTHY websites

Here's an interesting view that shows the Availability Test that's checking my site as well as outbound calls (there isn't a lot as I cache aggressively) to SimpleCast where I host my shows.

A chart showing 100% availability

Availability is important, of course, so I set up some tests from a number of locations. I don't want the site to be down in Brazil but up in France, for example.

However, I got an email a week ago that said my site had a sudden rise in failures. Here's the thing, though. When I set up a web test I naively thought I was setting up a "ping." You know, a knock on the door. I figured if the WHOLE SITE was down, they'd tell me.

Here's my availability for today, along with timing from a bunch of locations world wide.

A nice green availability chart

Check out this email. The site is fine; that is, the primary requests didn't fail. But dependent request did fail! Application Insights noticed that an image referenced on the home page was suddenly a 404! Why suddenly? Because I put the wrong date and time for an episode and it auto-published before I had the guest's headshot!

I wouldn't have noticed this missing image until a user emailed me, so I was impressed that Application Insights gave me the heads up.

1 dependant request failed

Here is the chart for that afternoon when I published a bad show. Note that the site is technically up (it was) but a dependent request (a request after the main GET) failed.

Some red shows my site isn't very available

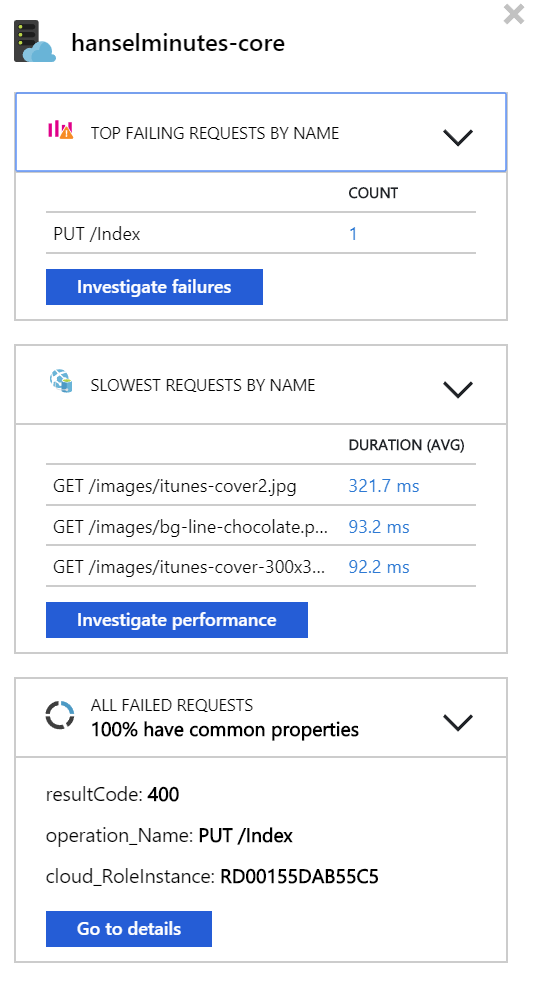
This is a client side failure, right? An image didn't load and it notified me. Cool. I can (and do) also instrument the back end code. Here you can see someone keeps sending me a PUT request, perhaps trying to poke at my site. By the way, random PUT person has been doing this for months.

I can also see slowest requests and dig as deep as I want. In fact I did a whole video on digging into Azure Application Insights that's up on YouTube.

A rogue PUT request

I've been using Application Insights for maybe a year or two now. Its depth continues to astound me. I KNOW I'm not using it to its fullest and I love that I'm still surprised by it.


Friend of the Blog: Want to learn more about .NET for free? Join us at DotNetConf! It's a free virtual online community conference September 12-14, 2018. Head over to https://www.dotnetconf.net to learn more and for a Save The Date Calendar Link.


© 2018 Scott Hanselman. All rights reserved.
     

Upgrading an existing .NET project files to the lean new CSPROJ format from .NET Core

$
0
0

Evocative random source code photoIf you've looked at csproj (C# (csharp) projects) in the past in a text editor you probably looked away quickly. They are effectively MSBuild files that orchestrate the build process. Phrased differently, a csproj file is an instance of an MSBuild file.

In Visual Studio 2017 and .NET Core 2 (and beyond) the csproj format is MUCH MUCH leaner. There's a lot of smart defaults, support for "globbing" like **/*.cs, etc and you don't need to state a bunch of obvious stuff. Truly you can take earlier msbuild/csproj files and get them down to a dozen lines of XML, plus package references. PackageReferences (references to NuGet packages) should be moved out of packages.config and into the csproj.  This lets you manage all project dependencies in one place and gives you and uncluttered view of top-level dependencies.

However, upgrading isn't as simple as "open the old project file and have VS automatically migrate you."

You have some options when migrating to .NET Core and the .NET Standard.

First, and above all, run the .NET Portability Analyzer and find out how much of your code is portable. Then you have two choices.

  • Great a new project file with something like "dotnet new classlib" and then manually get your projects building from the top (most common ancestor) project down
  • Try to use an open source 3rd party migration tool

Damian on my team recommends option one - a fresh project - as you'll learn more and avoid bringing cruft over. I agree, until there's dozens of projects, then I recommend trying a migration tool AND then comparing it to a fresh project file to avoid adding cruft. Every project/solution is different, so expect to spend some time on this.

The best way to learn this might be by watching it happen for real. Wade from Salesforce was tasked with upgrading his 4+ year old .NET Framework (Windows) based SDK to portable and open source .NET Core. He had some experience building for older versions of Mono and was thoughtful about not calling Windows-specific APIs so he knows the code is portable. However he needs to migrate the project files and structure AND get the Unit Tests running with "dotnet test" and the command line.

I figured I'd give him a head start by actually doing part of the work. It's useful to do this because, frankly, things go wrong and it's not pretty!

I started with Hans van Bakel's excellent CsProjToVS2017 global tool. It does an excellent job of getting your project 85% of the way there. To be clear, don't assume anything and not every warning will apply to you. You WILL need to go over every line of your project files, but it is an extraordinarily useful tool. If you have .NET Core 2.1, install it globally like this:

dotnet tool install Project2015To2017.Cli --global

Then its called (unfortunately) with another command "csproj-to-2017" and you can pass in a solution or an individual csproj.

After you've done the administrivia of the actual project conversion, you'll also want to make educated decisions about the 3rd party libraries you pull in. For example, if you want to make your project cross-platform BUT you depend on some library that is Windows only, why bother trying to port? Well, many of your favorite libraries DO have "netstandard" or ".NET Standard" versions. You'll see in the video below how I pull Wade's project's reference forward with a new version of JSON.NET and a new NuUnit. By the end we are building and the command line and running tests as well with code coverage.

Please head over to my YouTube and check it out. Note this happened live and spontaneously plus I had a YouTube audience giving me helpful comments, so I'll address them occasionally.

LIVE: Upgrading an older .NET SDK to .NET Core and .NET Standard

If you find things like this useful, let me know in the comments and maybe I'll do more of them. Also, do you think things like this belong on the Visual Studio Twitch Channel? Go follow my favs on Twitch CSharpFritz and Noopkat for more live coding fun!


Friend of the Blog: Want to learn more about .NET for free? Join us at DotNetConf! It's a free virtual online community conference September 12-14, 2018. Head over to https://www.dotnetconf.net to learn more and for a Save The Date Calendar Link.


© 2018 Scott Hanselman. All rights reserved.
     

How do you even know this crap?

$
0
0

Imposter's HandbookThis post won't be well organized so lower your expectations first. When Rob Conery first wrote "The Imposter's Handbook" I was LOVING IT. It's a fantastic book written for imposters by an imposter. Remember, I'm the original phony.

Now he's working on The Imposter's Handbook: Season 2 and I'm helping. The book is currently in Presale and we're releasing PDFs every 2 to 3 weeks. Some of the ideas from the book will come from blog posts like or similar to this one. Since we are using Continuous Delivery and an Iterative Process to ship the book, some of the blog posts (like this one) won't be fully baked until they show up in the book (or not). See how I equivocated there? ;)

The next "Season" of The Imposter's Handbook is all about the flow of information. Information flowing through encoding, encryption, and transmission over a network. I'm also interested in the flow of information through one's brain as they move through the various phases of being a developer. Bear with me (and help me in the comments!).

I was recently on a call with two other developers, and it would be fair that we were of varied skill levels. We were doing some HTML and CSS work that I would say I'm competent at, but by no means an expert. Since our skill levels didn't fall on a single axis, we'd really we'd need some Dungeons & Dragon's Cards to express our competencies.

D&D Cards from Battle Grip

I might be HTML 8, CSS 6, Computer Science 9, Obscure Trivia 11, for example.

We were asked to make a little banner with some text that could be later closed with some iconography that would represent close/dismiss/go away.

  • One engineer suggested "Here's some text + ICON.PNG"
  • The next offered a more scalable option with "Here's some text + ICON.SVG"

Both are fine ideas that would work, while perhaps later having DPI or maintenance issues, but truly, perfectly cromulent ideas.

I have never been given this task, I am not a designer, and I am a mediocre front-end person. I asked what they wanted it to look like and they said "maybe a square with an X or a circle with an X or a circle with a line."

I offered, you know, there MUST be a Unicode Glyph for that. I mean, there's one for poop." Apparently I say poop in business meetings more than any other middle manager at the company, but that's fodder for another blog post.

We searched and lo and behold we found ☒ and ⊝ and simply added them to the end of the string. They scale visibly, require no downloads or extra dependencies, and can be colored and styled nicely because they are text.

One of the engineers said "how do you even know this crap?" I smiled and shrugged and we moved on to the doing.

To be clear, this post isn't self-congratulatory. Perhaps you had the same idea. This interaction was all of 10 minutes long. But I'm interested in the HOW did I know this? Note that I didn't actually KNOW that these glyphs existed. I knew only that they SHOULD exist. They MUST.

How many times have you been coding and said "You know, there really must be a function/site/tool that does x/y/z?" All the time, right? You don't know the answers but you know someone must have AND must have solved it in a specific way such that you could find it. A new developer doesn't have this intuition - this sense of technical smell - yet.

How is technical gut and intuition and smell developed? Certainly by doing, by osmosis, by time, by sleeping, and waking, and doing it again.

I think it's exposure. It's exposure to a diverse set of technical problems that all build on a solid base of fundamentals.

Rob and I are going to try to expand on how this technical confidence gets developed in The Imposter's Handbook: Season 2 as topics like Logic, Binary and Logical Circuits, Compression and Encoding, Encryption and Cryptanalysis, and Networking and Protocols are discussed. But I want to also understand how/if/when these topics and examples excite the reader...and most importantly do they provide the reader with that missing Tetris Piece of Knowledge that moves you from a journeyperson developer to someone who can more confidently wear the label Computer Science 9, Obscure Trivia 11.

via GIPHY

What do you think? Sound off in the comments and help me and Rob understand!


Sponsor: Preview the latest JetBrains Rider with its built-in spell checking, initial Blazor support, partial C# 7.3 support, enhanced debugger, C# Interactive, and a redesigned Solution Explorer.


© 2018 Scott Hanselman. All rights reserved.
     

Decoding an SSH Key from PEM to BASE64 to HEX to ASN.1 to prime decimal numbers

$
0
0

I'm reading a new chapter of The Imposter's Handbook: Season 2 that Rob and I are working on. He's digging into the internals of what's exactly in your SSH Key.

Decoding a certificate

I generated a key with no password:

ssh-keygen -t rsa -C scott@myemail.com

Inside the generated file is this text, that we've all seen before but few have cracked open.

-----BEGIN RSA PRIVATE KEY-----

MIIEpAIBAAKCAQEAtd8As85sOUjjkjV12ujMIZmhyegXkcmGaTWk319vQB3+cpIh
Wu0mBke8R28jRym9kLQj2RjaO1AdSxsLy4hR2HynY7l6BSbIUrAam/aC/eVzJmg7
qjVijPKRTj7bdG5dYNZYSEiL98t/+XVxoJcXXOEY83c5WcCnyoFv58MG4TGeHi/0
coXKpdGlAqtQUqbp2sG7WCrXIGJJdBvUDIQDQQ0Isn6MK4nKBA10ucJmV+ok7DEP
kyGk03KgAx+Vien9ELvo7P0AN75Nm1W9FiP6gfoNvUXDApKF7du1FTn4r3peLzzj
50y5GcifWYfoRYi7OPhxI4cFYOWleFm1pIS4PwIDAQABAoIBAQCBleuCMkqaZnz/
6GeZGtaX+kd0/ZINpnHG9RoMrosuPDDYoZZymxbE0sgsfdu9ENipCjGgtjyIloTI
xvSYiQEIJ4l9XOK8WO3TPPc4uWSMU7jAXPRmSrN1ikBOaCslwp12KkOs/UP9w1nj
/PKBYiabXyfQEdsjQEpN1/xMPoHgYa5bWHm5tw7aFn6bnUSm1ZPzMquvZEkdXoZx
c5h5P20BvcVz+OJkCLH3SRR6AF7TZYmBEsBB0XvVysOkrIvdudccVqUDrpjzUBc3
L8ktW3FzE+teP7vxi6x/nFuFh6kiCDyoLBhRlBJI/c/PzgTYwWhD/RRxkLuevzH7
TU8JFQ9BAoGBAOIrQKwiAHNw4wnmiinGTu8IW2k32LgI900oYu3ty8jLGL6q1IhE
qjVMjlbJhae58mAMx1Qr8IuHTPSmwedNjPCaVyvjs5QbrZyCVVjx2BAT+wd8pl10
NBXSFQTMbg6rVggKI3tHSE1NSdO8kLjITUiAAjxnnJwIEgPK+ljgmGETAoGBAM3c
ANd/1unn7oOtlfGAUHb642kNgXxH7U+gW3hytWMcYXTeqnZ56a3kNxTMjdVyThlO
qGXmBR845q5j3VlFJc4EubpkXEGDTTPBSmv21YyU0zf5xlSp6fYe+Ru5+hqlRO4n
rsluyMvztDXOiYO/VgVEUEnLGydBb1LwLB+MVR2lAoGAdH7s7/0PmGbUOzxJfF0O
OWdnllnSwnCz2UVtN7rd1c5vL37UvGAKACwvwRpKQuuvobPTVFLRszz88aOXiynR
5/jH3+6IiEh9c3lattbTgOyZx/B3zPlW/spYU0FtixbL2JZIUm6UGmUuGucs8FEU
Jbzx6eVAsMojZVq++tqtAosCgYB0KWHcOIoYQUTozuneda5yBQ6P+AwKCjhSB0W2
SNwryhcAMKl140NGWZHvTaH3QOHrC+SgY1Sekqgw3a9IsWkswKPhFsKsQSAuRTLu
i0Fja5NocaxFl/+qXz3oNGB56qpjzManabkqxSD6f8o/KpeqryqzCUYQN69O2LG9
N53L9QKBgQCZd0K6RFhhdJW+Eh7/aIk8m8Cho4Im5vFOFrn99e4HKYF5BJnoQp4p
1QTLMs2C3hQXdJ49LTLp0xr77zPxNWUpoN4XBwqDWL0t0MYkRZFoCAG7Jy2Pgegv
uOuIr6NHfdgGBgOTeucG+mPtADsLYurEQuUlfkl5hR7LgwF+3q8bHQ==
-----END RSA PRIVATE KEY-----

The private key is an ASN.1 (Abstract Syntax Notation One) encoded data structure. It's a funky format but it's basically a packed format with the ability for nested trees that can hold booleans, integers, etc.

However, ASN.1 is just the binary packed "payload." It's not the "container." For example, there are envelopes and there are letters inside them. The envelope is the PEM (Privacy Enhanced Mail) format. Such things start with ----- BEGIN SOMETHING ----- and end with ----- END SOMETHING ------. If you're familiar with BASE64, your spidey sense may tell you that this is a BASE64 encoded file. Not everything that's BASE64 turns into a friendly ASCII string. This turns into a bunch of bytes you can view in HEX.

We can first decode the PEM file into HEX. Yes, I know there's lots of ways to do this stuff at the command line, but I like showing and teaching using some of the many encoding/decoding websites and utilities there are out there. I also love using https://cryptii.com/ for these things as you can build a visual pipeline.

308204A40201000282010100B5DF00B3CE6C3948E3923575DAE8

CC2199A1C9E81791C9866935A4DF5F6F401DFE7292215AED2606
47BC476F234729BD90B423D918DA3B501D4B1B0BCB8851D87CA7
63B97A0526C852B01A9BF682FDE57326683BAA35628CF2914E3E
DB746E5D60D65848488BF7CB7FF97571A097175CE118F3773959
C0A7CA816FE7C306E1319E1E2FF47285CAA5D1A502AB5052A6E9
DAC1BB582AD7206249741BD40C8403410D08B27E8C2B89CA040D
74B9C26657EA24EC310F9321A4D372A0031F9589E9FD10BBE8EC
FD0037BE4D9B55BD1623FA81FA0DBD45C3029285EDDBB51539F8
AF7A5E2F3CE3E74CB919C89F5987E84588BB38F87123870560E5
snip

This ASN.1 JavaScript decoder can take the HEX and parse it for you. Or you can that ASN.1 packed format at the *nix command line and see that there's nine big integers inside (I trimmed them for this blog).

openssl asn1parse -in notreal

0:d=0 hl=4 l=1188 cons: SEQUENCE
4:d=1 hl=2 l= 1 prim: INTEGER :00
7:d=1 hl=4 l= 257 prim: INTEGER :B5DF00B3CE6C3948E3923575DAE8CC2199A1C9E81791C9866935A4DF5F6F401DFE7292215
268:d=1 hl=2 l= 3 prim: INTEGER :010001
273:d=1 hl=4 l= 257 prim: INTEGER :8195EB82324A9A667CFFE867991AD697FA4774FD920DA671C6F51A0CAE8B2E3C30D8A1967
534:d=1 hl=3 l= 129 prim: INTEGER :E22B40AC22007370E309E68A29C64EEF085B6937D8B808F74D2862EDEDCBC8CB18BEAAD48
666:d=1 hl=3 l= 129 prim: INTEGER :CDDC00D77FD6E9E7EE83AD95F1805076FAE3690D817C47ED4FA05B7872B5631C6174DEAA7
798:d=1 hl=3 l= 128 prim: INTEGER :747EECEFFD0F9866D43B3C497C5D0E3967679659D2C270B3D9456D37BADDD5CE6F2F7ED4B
929:d=1 hl=3 l= 128 prim: INTEGER :742961DC388A184144E8CEE9DE75AE72050E8FF80C0A0A38520745B648DC2BCA170030A97
1060:d=1 hl=3 l= 129 prim: INTEGER :997742BA4458617495BE121EFF68893C9BC0A1A38226E6F14E16B9FDF5EE072981790499E

Per the spec the format is this:

   An RSA private key shall have ASN.1 type RSAPrivateKey:


RSAPrivateKey ::= SEQUENCE {
version Version,
modulus INTEGER, -- n
publicExponent INTEGER, -- e
privateExponent INTEGER, -- d
prime1 INTEGER, -- p
prime2 INTEGER, -- q
exponent1 INTEGER, -- d mod (p-1)
exponent2 INTEGER, -- d mod (q-1)
coefficient INTEGER -- (inverse of q) mod p }

I found the description for how RSA works in this blog post very helpful as it uses small numbers as examples. The variable names here like p, q, and n are agreed upon and standard.

The fields of type RSAPrivateKey have the following meanings:

o version is the version number, for compatibility
with future revisions of this document. It shall
be 0 for this version of the document.
o modulus is the modulus n.
o publicExponent is the public exponent e.
o privateExponent is the private exponent d.
o prime1 is the prime factor p of n.
o prime2 is the prime factor q of n.
o exponent1 is d mod (p-1).
o exponent2 is d mod (q-1).
o coefficient is the Chinese Remainder Theorem
coefficient q-1 mod p.

Let's look at that first number q, the prime factor p of n. It's super long in Hexadecimal.

747EECEFFD0F9866D43B3C497C5D0E3967679659D2C270B3D945

6D37BADDD5CE6F2F7ED4BC600A002C2FC11A4A42EBAFA1B3D354
52D1B33CFCF1A3978B29D1E7F8C7DFEE8888487D73795AB6D6D3
80EC99C7F077CCF956FECA5853416D8B16CBD89648526E941A65
2E1AE72CF0511425BCF1E9E540B0CA23655ABEFADAAD028B

That hexadecimal number converted to decimal is this long ass number. It's 308 digits long!

22959099950256034890559187556292927784453557983859951626187028542267181746291385208056952622270636003785108992159340113537813968453561739504619062411001131648757071588488220532539782545200321908111599592636973146194058056564924259042296638315976224316360033845852318938823607436658351875086984433074463158236223344828240703648004620467488645622229309082546037826549150096614213390716798147672946512459617730148266423496997160777227482475009932013242738610000405747911162773880928277363924192388244705316312909258695267385559719781821111399096063487484121831441128099512811105145553708218511125708027791532622990325823

It's hard work to prove this number is prime but there's a great Integer Factorization Calculator that actually uses WebAssembly and your own local CPU to check such things. Expect to way a long time, sometimes until the sun death of the universe. ;)

Rob and I are finding it really cool to dig just below the surface of common things we look at all the time. I have often opened a key file in a text file but never drawn a straight and complete line through decoding, unpacking, decoding, all the way to a math mathematical formula. I feel I'm filling up some major gaps in my knowledge!


Sponsor: Preview the latest JetBrains Rider with its built-in spell checking, initial Blazor support, partial C# 7.3 support, enhanced debugger, C# Interactive, and a redesigned Solution Explorer.


© 2018 Scott Hanselman. All rights reserved.
     

Improvements on ASP.NET Core deployments on Zeit's now.sh and making small container images

$
0
0

Back in March of 2017 I blogged about Zeit and their cool deployment system "now." Zeit will take any folder and deploy it to the web easily. Better yet if you have a Dockerfile in that folder as Zeit will just use that for the deployment.

image

Zeit's free Open Source account has a limit of 100 megs for the resulting image, and with the right Dockerfile started ASP.NET Core apps are less than 77 megs. You just need to be smart about a few things. Additionally, it's running in a somewhat constrained environment so ASP.NET's assumptions around FileWatchers can occasionally cause you to see errors like

at System.IO.FileSystemWatcher.StartRaisingEvents()

Unhandled Exception: System.IO.IOException:
The configured user limit (8192) on the number of inotify instances has been reached.
at System.IO.FileSystemWatcher.StartRaisingEventsIfNotDisposed(

While this environment variable is set by default for the "FROM microsoft/dotnet:2.1-sdk" Dockerfile, it's not set at runtime. That's dependent on your environment.

Here's my Dockerfile for a simple project called SuperZeit. Note that the project is structured with a SLN file, which I recommend.

Let me call our a few things.

  • First, we're doing a Multi-stage build here.
    • The SDK is large. You don't want to deploy the compiler to your runtime image!
  • Second, the first copy commands just copy the sln and the csproj.
    • You don't need the source code to do a dotnet restore! (Did you know that?)
    • Not deploying source means that your docker builds will be MUCH faster as Docker will cache the steps and only regenerate things that change. Docker will only run dotnet restore again if the solution or project files change. Not the source.
  • Third, we are using the aspnetcore-runtime image here. Not the dotnetcore one.
    • That means this image includes the binaries for .NET Core and ASP.NET Core. We don't need or want to include them again.
    • If you were doing a publish with a the -r switch, you'd be doing a self-contained build/publish. You'd end up copying TWO .NET Core runtimes into a container! That'll cost you another 50-60 megs and it's just wasteful. If you want to do that
    • Go explore the very good examples on the .NET Docker Repro on GitHub https://github.com/dotnet/dotnet-docker/tree/master/samples
    • Optimizing Container Size
  • Finally, since some container systems like Zeit have modest settings for inotify instances (to avoid abuse, plus most folks don't use them as often as .NET Core does) you'll want to set ENV DOTNET_USE_POLLING_FILE_WATCHER=true which I do in the runtime image.

So starting from this Dockerfile:

FROM microsoft/dotnet:2.1-sdk-alpine AS build

WORKDIR /app

# copy csproj and restore as distinct layers
COPY *.sln .
COPY superzeit/*.csproj ./superzeit/
RUN dotnet restore

# copy everything else and build app
COPY . .
WORKDIR /app/superzeit
RUN dotnet build

FROM build AS publish
WORKDIR /app/superzeit
RUN dotnet publish -c Release -o out

FROM microsoft/dotnet:2.1-aspnetcore-runtime-alpine AS runtime
ENV DOTNET_USE_POLLING_FILE_WATCHER=true
WORKDIR /app
COPY --from=publish /app/superzeit/out ./
ENTRYPOINT ["dotnet", "superzeit.dll"]

Remember the layers of the Docker images, as if they were a call stack:

  • Your app's files
  • ASP.NET Core Runtime
  • .NET Core Runtime
  • .NET Core native dependencies (OS specific)
  • OS image (Alpine, Ubuntu, etc)

For my little app I end up with a 76.8 meg image. If want I can add the experimental .NET IL Trimmer. It won't make a difference with this app as it's already pretty simple but it could with a larger one.

BUT! What if we changed the layering to this?

  • Your app's files along with a self-contained copy of ASP.NET Core and .NET Core
  • .NET Core native dependencies (OS specific)
  • OS image (Alpine, Ubuntu, etc)

Then we could do a self-Contained deployment and then trim the result! Richard Lander has a great dockerfile example.

See how he's doing the package addition with the dotnet CLI with "dotnet add package" and subsequent trim within the Dockerfile (as opposed to you adding it to your local development copy's csproj).

FROM microsoft/dotnet:2.1-sdk-alpine AS build

WORKDIR /app

# copy csproj and restore as distinct layers
COPY *.sln .
COPY nuget.config .
COPY superzeit/*.csproj ./superzeit/
RUN dotnet restore

# copy everything else and build app
COPY . .
WORKDIR /app/superzeit
RUN dotnet build

FROM build AS publish
WORKDIR /app/superzeit
# add IL Linker package
RUN dotnet add package ILLink.Tasks -v 0.1.5-preview-1841731 -s https://dotnet.myget.org/F/dotnet-core/api/v3/index.json
RUN dotnet publish -c Release -o out -r linux-musl-x64 /p:ShowLinkerSizeComparison=true

FROM microsoft/dotnet:2.1-runtime-deps-alpine AS runtime
ENV DOTNET_USE_POLLING_FILE_WATCHER=true
WORKDIR /app
COPY --from=publish /app/superzeit/out ./
ENTRYPOINT ["dotnet", "superzeit.dll"]

Now at this point, I'd want to see how small the IL Linker made my ultimate project. The goal is to be less than 75 megs. However, I think I've hit this bug so I will have to head to bed and check on it in the morning.

The project is at https://github.com/shanselman/superzeit and you can just clone and "docker build" and see the bug.

However, if you check the comments in the Docker file and just use the a "FROM microsoft/dotnet:2.1-aspnetcore-runtime-alpine AS runtime" it works fine. I just think I can get it even smaller than 75 megs.

Talk so you soon, Dear Reader! (I'll update this post when I find out about that bug...or perhaps my bug!)

UPDATE1 : The linker works with this Workaround. I need to set the property CrossGenDuringPublish to false in the project file.

  • A standard ASP.NET Core "hello world" image ends up at around 75 megs on Zeit.
  • A self-contained deployment with the runtime-deps images is about 52 megs.
  • If you add trimming to that self-contained Alpine image the result is just 35 megs!

35 meg ASP.NET Core image

I'm making some headway but still hitting an inotify issue with FileSystemWatchers. More soon!


Sponsor: Preview the latest JetBrains Rider with its built-in spell checking, initial Blazor support, partial C# 7.3 support, enhanced debugger, C# Interactive, and a redesigned Solution Explorer.


© 2018 Scott Hanselman. All rights reserved.
     

Interesting bugs - MSB3246: Resolved file has a bad image, no metadata, or is otherwise inaccessible. Image is too small.

$
0
0

I got a very strange warning recently when building a .NET Core app with "dotnet build."

MSB3246: Resolved file has a bad image, no metadata, or is otherwise inaccessible. 

Image is too small.

Interesting Bug used under CC https://flic.kr/p/4SpmL6Eek! It's clear, in that something is "too small" but what? A file I guess? Maybe it's the wrong size?

The error code is MSB3246 which is nice and googleable/searchable but it was confusing because I couldn't figure our what file specifically. It just felt vague.

BUT!

I had recently been overclocking my machine (overly aggressively, gulp, about 40%) and had a very nasty hard reboot. As a result I had a few dozen files get orphaned - specifically the files were zero'ed out! Zero is small, right?

Turns out you can pass parameters over to MSBuild from "dotnet build" and see what MSBuild is doing internally. For example, you could

/fileLoggerParameters:verbosity=diagnostic

but that's long. So how about:

dotnet build /flp:v=diag

Cool. What deep logging do I see now?

Primary reference "deliberately.zero.bytes.dll". (TaskId:41)

13:36:52.397 1:7>C:\Program Files\dotnet\sdk\2.1.400\Microsoft.Common.CurrentVersion.targets(2110,5): warning MSB3246: Resolved file has a bad image, no metadata, or is otherwise inaccessible. Image is too small. [S:\work\zero-byte-ref\zero-byte-ref.csproj]
Resolved file path is "S:\work\zero-byte-ref\deliberately.zero.bytes.dll". (TaskId:41)
Reference found at search path location "{RawFileName}". (TaskId:41)

Now with "verbose" turned on I can see that one of the references is zero'ed out/corrupted/bad. I reinstalled .NET Core in my case and doubled checked all the DLLs/Assemblies that I was bringing in - I also ran chkdsk /f - and I was back in business!

I hope this helps someone who might stumble on error MSB3246 and wonder what's up.

Even better, thanks to Rainer Sigwald who filed a bug against MSBuild to update the error message to be more clear. In the future I'll be able to debug this without changing verbosity!


Sponsor: Preview the latest JetBrains Rider with its built-in spell checking, initial Blazor support, partial C# 7.3 support, enhanced debugger, C# Interactive, and a redesigned Solution Explorer.


© 2018 Scott Hanselman. All rights reserved.
     

Always Be Closing...Pull Requests

$
0
0

Always be closingI was looking at a Well Known Open Source Project on GitHub today. It had like 978 Pull Requests. A "PR" means "hey here's some code I did for your project, you can PULL it from here and merge it into your code!"

But these were Open Pull Requests. Pending. Limbo Pull Requests. Dating back to 2015.

Why do Pull Requests stay open?

Why do projects keep Pull Requests open? What's a reasonable amount of time? Here's a few thoughts.

  • PR as Call to Action
    • PRs are a shout. They are HERE IS SOME CODE and they create work for the maintainer. They are needy things and require review and merging, but even worse, sometimes manual merging. Plus for folks new to Git and Open Source, asking them to "rebase on top of latest" may be enough for them to just give up.
  • Fear of Closing
    • If you close a PR without merging it, it's a rejection. It's a statement that this work isn't going to be used, and there's always a chance that the person who did the work will feel pretty bad about it.
  • Abandoned
    • Sometimes the originator of the PR disappears. The PR is effectively abandoned. These should be closed after a time.
  • Opened so long they can't be merged
    • The problem with PRs that are open for long is that they become impossible to merge. The cost of understanding whether they are still relevant plus resolving the merge conflicts might be higher than the value of the PR itself.
  • Incorrectly created
    • A PR originator may intent to change a single word (misspelling) but their PR changes CRs to LFs or Tabs to Spaces, it's a hassle.
  • Formatting
    • It's generally considered poor form to send a PR out of the blue where one just ran a linter or formatter. If the project wanted that done they'd ask for it.
  • Totally not aligned with Roadmap
    • If a PR shows up without context or communication, it may not be aligned with the direction of the project.
  • Surprise PR
    • Unfortunately some PRs show up out of the blue with major changes, file moves, or no context. If a PR wasn't asked for, or if a PR wasn't requested, or borne of an Issue, you'll likely have trouble pushing it through.

Thanks to Jon and Immo for their thoughts on this (likely incomplete) list. Jess Frazelle has a great post on "The Art of Closing" that I just found, and it includes a glorious gif from Glengarry Glen Ross where Always Be Closing comes from (warning, clip has dated and offensive language).

Jess suggests a few ways to Always Be Closing.

Two things that can help make your open source project successful AND stay tidy!

What do you think? Why do PRs stay open?


Sponsor: Get home early, eat supper on time and coach your kids in soccer. Moving workloads to Azure just got easy with Azure NetApp Files. Sign up to Preview Azure NetApp Files!


© 2018 Scott Hanselman. All rights reserved.
     

The Extremely Promising State of Diabetes Technology in 2018

$
0
0

This blog post is an update to these two Diabetes Technology blog posts:

You might also enjoy this video of the talk I gave at WebStock 2018 on Solving Diabetes with an Open Source Artificial Pancreas*.

First, let me tell you that insulin is too expensive in the US.

Between 2002 and 2013, the price of insulin jumped, with the typical cost for patients increasing from about $40 a vial to $130.

Open Source Artificial Pancreas on iPhoneFor some of the newer insulins like the ones I use, I pay as much as $296 a bottle. I have a Health Savings Plan so this is often out of pocket until I hit the limit for the year.
People in America are rationing insulin. This is demonstrable fact. I've personally mailed extra insulin to folks in need. I've meet young people who lost their insurance at age 26 and have had to skip shots to save vials of insulin.

This is a problem, but on the technology side there's some extremely promising work happening, and it's we have really hit our stride in the last ten years.

I wrote the first Glucose Management system for the PalmPilot in 1998 called GlucoPilot and provided on the go in-depth analysis for the first time. The first thing that struck me was that the PalmPilot and the Blood Sugar Meter were the same size. Why did I need two devices with batteries, screens, buttons and a CPU? Why so many devices?

I've been told every year the a Diabetes Breakthrough is coming "in five years." It's been 25 years.

In 2001 I went on a trip across the country with my wife, an insulin pump and 8 PDAs (personal digital assistants, the "iPhones" of the time) and tried to manage my diabetes using all the latest wireless technology...this was the latest stuff 17 years ago. I had just moved from injections to an insulin pump. Even now in 2018 Insulin Pumps are expensive, mostly proprietary, and super expensive. In fact, many folks use insulin pumps in the states use out of warranty pumps purchased on Craigslist.

Fast forward to 2018 and I've been using an Open Source Artificial Pancreas for two years.

The results speak for themselves. While I do have bad sugars sometimes, and I do struggle, if you look at my blood work my HA1c (the long term measurement of "how I'm doing" shows non-diabetic levels. To be clear - I'm fully and completely Type 1 diabetic, I produce zero insulin of my own. I take between 40 and 50 Units of insulin every day, and have for the last 25 years...but I will likely die of old age.

This is significant. Why? Because historically diabetics die of diabetes. While we wait (or more accurately, #WeAreNotWaiting) for a biological/medical solution to Type 1 diabetes, the DIY (Do It Yourself) community is just doing it ourselves.

Building on open hardware, open software, and reverse-engineered protocols for proprietary hardware, the online diabetes community literally has their choice of open source pancreases in 2018! Who would have imagined it. You can choose your algorithms, your phone, your pump, your continuous glucose meter.

Today, in 2018, you can literally change the code and recompile a personal branch of your own pancreas.

Watch my 2010 YouTube video "I am Diabetic" as I walk you through the medical hardware (pumps, needles, tubes, wires) in managing diabetes day to day. Then watch my 2018 talk on Solving Diabetes with an Open Source Artificial Pancreas*.

I believe that every diabetic should be offered a pump, a continuous glucose meter, and trained on some kind of artificial pancreas. A cloud based reporting system has also been a joy. My wife and family can see my sugar in real time when I'm away. My wife has even called me overseas to wake me up when I was in a bad sugar situation.

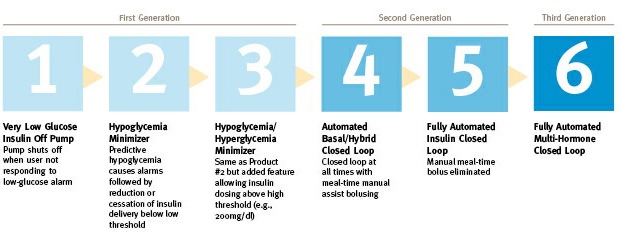
Artificial Pancreas generations

As the closed-hardware and closed-software medical companies work towards their own artificial pancreases, the open source community feel those companies would better serve us by opening up their protocols, using standard Bluetooth ISO profiles and use security best practices.

Looking at the table above, the open source community is squarely in #4 and moving quickly into #5. But why did we have to do this ourselves? We got tired of waiting.

All in all, through open software and hardware, I can tell you that my life is SO MUCH BETTER than it was when I was first diagnosed. I figure we'll have this all figured out in about five years, right? ;)

THANK YOU!

MORE DIABETES READING

* Yes there are some analogies, stretched metaphors, and oversimplifications in this talk. This talk is an introduction to the space to the normally-sugared. If you are a diabetes expert you might watch and say...eh...ya, I mean, it kind of works like that. Please take the talk in in the thoughtful spirit it was intended.


Sponsor: Get home early, eat supper on time and coach your kids in soccer. Moving workloads to Azure just got easy with Azure NetApp Files. Sign up to Preview Azure NetApp Files!


© 2018 Scott Hanselman. All rights reserved.
     

How do you use System.Drawing in .NET Core?

$
0
0

I've been doing .NET image processing since the beginning. In fact I wrote about it over 13 years ago on this blog when I talked about Compositing two images into one from the ASP.NET Server Side and in it I used System.Drawing to do the work. For over a decade folks using System.Drawing were just using it as a thin wrapper over GDI (Graphics Device Interface) which were very old Win32 (Windows) unmanaged drawing APIs. We use them because they work fine.

.NET Conf: Join us this week! September 12-14, 2018 for .NET Conf! It's a FREE, 3 day virtual developer event co-organized by the .NET Community and Microsoft. Watch all the sessions here. Join a virtual attendee party after the last session ends on Day 1 where you can win prizes! Check out the schedule here and attend a local event in your area organized by .NET community influencers all over the world.

DotNetBotFor a while there was a package called CoreCompat.System.Drawing that was a .NET Core port of a Mono version of System.Drawing.

However, since then Microsoft has released System.Drawing.Common to provide access to GDI+ graphics functionality cross-platform.

There is a lot of existing code - mine included - that makes assumptions that .NET would only ever run on Windows. Using System.Drawing was one of those things. The "Windows Compatibility Pack" is a package meant for developers that need to port existing .NET Framework code to .NET Core. Some of the APIs remain Windows only but others will allow you to take existing code and make it cross-platform with a minimum of trouble.

Here's a super simple app that resizes a PNG to 128x128. However, it's a .NET Core app and it runs in both Windows and Linux (Ubuntu!)

using System;

using System.Drawing;
using System.Drawing.Drawing2D;
using System.Drawing.Imaging;
using System.IO;

namespace imageresize
{
class Program
{
static void Main(string[] args)
{
int width = 128;
int height = 128;
var file = args[0];
Console.WriteLine($"Loading {file}");
using(FileStream pngStream = new FileStream(args[0],FileMode.Open, FileAccess.Read))
using(var image = new Bitmap(pngStream))
{
var resized = new Bitmap(width, height);
using (var graphics = Graphics.FromImage(resized))
{
graphics.CompositingQuality = CompositingQuality.HighSpeed;
graphics.InterpolationMode = InterpolationMode.HighQualityBicubic;
graphics.CompositingMode = CompositingMode.SourceCopy;
graphics.DrawImage(image, 0, 0, width, height);
resized.Save($"resized-{file}", ImageFormat.Png);
Console.WriteLine($"Saving resized-{file} thumbnail");
}
}
}
}
}

Here it is running on Ubuntu:

Resizing Images on Ubuntu

NOTE that on Ubuntu (and other Linuxes) you may need to install some native dependencies as System.Drawing sits on top of native libraries

sudo apt install libc6-dev 

sudo apt install libgdiplus

There's lots of great options for image processing on .NET Core now! It's important to understand that this System.Drawing layer is great for existing System.Drawing code, but you probably shouldn't write NEW image management code with it. Instead, consider one of the great other open source options.

  • ImageSharp - A cross-platform library for the processing of image files; written in C#
    • Compared to System.Drawing ImageSharp has been able to develop something much more flexible, easier to code against, and much, much less prone to memory leaks. Gone are system-wide process-locks; ImageSharp images are thread-safe and fully supported in web environments.

Here's how you'd resize something with ImageSharp:

using (Image<Rgba32> image = Image.Load("foo.jpg"))

{
image.Mutate(x => x
.Resize(image.Width / 2, image.Height / 2)
.Grayscale());
image.Save("bar.jpg"); // Automatic encoder selected based on extension.
}
  • Magick.NET -A .NET library on top of ImageMagick
  • SkiaSharp - A .NET wrapper on top of Google's cross-platform Skia library

It's awesome that there are so many choices with .NET Core now!


Sponsor: Rider 2018.2 is here! Publishing to IIS, Docker support in the debugger, built-in spell checking, MacBook Touch Bar support, full C# 7.3 support, advanced Unity support, and more.


© 2018 Scott Hanselman. All rights reserved.
     

A complete containerized .NET Core Application microservice that is as small as possible

$
0
0

OK, maybe not technically a microservice, but that's a hot buzzword these days, right? A few weeks ago I blogged about Improvements on ASP.NET Core deployments on Zeit's now.sh and making small container images. By the end I was able to cut my container size in half.

The trimming I was using is experimental and very aggressive. If you app loads things at runtime - like ASP.NET Razor Pages sometimes does - you may end up getting weird errors at runtime when a Type is missing. Some types may have been trimmed away!

For example:

fail: Microsoft.AspNetCore.Server.Kestrel[13]

Connection id "0HLGQ1DIEF1KV", Request id "0HLGQ1DIEF1KV:00000001": An unhandled exception was thrown by the application.
System.TypeLoadException: Could not load type 'Microsoft.AspNetCore.Diagnostics.IExceptionHandlerPathFeature' from assembly 'Microsoft.Extensions.Primitives, Version=2.1.1.0, Culture=neutral, PublicKeyToken=adb9793829ddae60'.
at Microsoft.AspNetCore.Diagnostics.ExceptionHandlerMiddleware.Invoke(HttpContext context)
at System.Runtime.CompilerServices.AsyncMethodBuilderCore.Start[TStateMachine](TStateMachine& stateMachine)
at Microsoft.AspNetCore.Diagnostics.ExceptionHandlerMiddleware.Invoke(HttpContext context)
at Microsoft.AspNetCore.HostFiltering.HostFilteringMiddleware.Invoke(HttpContext context)
at Microsoft.AspNetCore.Hosting.Internal.HostingApplication.ProcessRequestAsync(Context context)
at Microsoft.AspNetCore.Server.Kestrel.Core.Internal.Http.HttpProtocol.ProcessRequests[TContext](IHttpApplication`1 application)

Yikes!

I'm doing a self-Contained deployment and then trim the result! Richard Lander has a great dockerfile example. Note how he's doing the package addition with the dotnet CLI with "dotnet add package" and subsequent trim within the Dockerfile (as opposed to you adding it to your local development copy's csproj).

I'm adding the Tree Trimming Linker in the Dockerfile, so the trimming happens when the container image is built. I'm using the dotnet command to "dotnet add package ILLink.Tasks. This means I don't need to reference the linker package at development time - it's all at container build time.

FROM microsoft/dotnet:2.1-sdk-alpine AS build

WORKDIR /app

# copy csproj and restore as distinct layers
COPY *.sln .
COPY nuget.config .
COPY superzeit/*.csproj ./superzeit/
RUN dotnet restore

# copy everything else and build app
COPY . .
WORKDIR /app/superzeit
RUN dotnet build

FROM build AS publish
WORKDIR /app/superzeit
# add IL Linker package
RUN dotnet add package ILLink.Tasks -v 0.1.5-preview-1841731 -s https://dotnet.myget.org/F/dotnet-core/api/v3/index.json
RUN dotnet publish -c Release -o out -r linux-musl-x64 /p:ShowLinkerSizeComparison=true

FROM microsoft/dotnet:2.1-runtime-deps-alpine AS runtime
ENV DOTNET_USE_POLLING_FILE_WATCHER=true
WORKDIR /app
COPY --from=publish /app/superzeit/out ./
ENTRYPOINT ["dotnet", "superzeit.dll"]

I did end up hitting this bug in the Linker (it's not Released) but there's an easy workaround. I just need to set the property CrossGenDuringPublish to false in the project file.

If you look at the Advanced Instructions for the Linker you can see that you can "root" types or assemblies. Root means "don't mess with these or stuff that hangs off them." So I just need to exercise my app at runtime and make sure that all the types that my app needs are available, but no unnecessary ones.

I added the Assemblies I wanted to keep (not remove) while trimming/linking to my project file:

<Project Sdk="Microsoft.NET.Sdk.Web">


<PropertyGroup>
<TargetFramework>netcoreapp2.1</TargetFramework>
<CrossGenDuringPublish>false</CrossGenDuringPublish>
</PropertyGroup>

<ItemGroup>
<LinkerRootAssemblies Include="Microsoft.AspNetCore.Mvc.Razor.Extensions;Microsoft.Extensions.FileProviders.Composite;Microsoft.Extensions.Primitives;Microsoft.AspNetCore.Diagnostics.Abstractions" />
</ItemGroup>

<ItemGroup>
<!-- this can be here, or can be done all at runtime in the Dockerfile -->
<!-- <PackageReference Include="ILLink.Tasks" Version="0.1.5-preview-1841731" /> -->
<PackageReference Include="Microsoft.AspNetCore.App" />
</ItemGroup>

</Project>

My strategy for figuring out which assemblies to "root" and exclude from trimming was literally to just iterate. Build, trim, test, add an assembly by reading the error message, and repeat.

This sample ASP.NET Core app will deploy cleanly on Zeit with the smallest image footprint as possible. https://github.com/shanselman/superzeit

Next I'll try an actual Microservice (as opposed to a complete website, which is what this is) and see how small I can get that. Such fun!

UPDATE: This technique works with "dotnet new webapi" as well and is about 73 megs per "docker images" and it's 34 megs when sent and squished through Zeit's "now" CLI.

Small services!


Sponsor: Rider 2018.2 is here! Publishing to IIS, Docker support in the debugger, built-in spell checking, MacBook Touch Bar support, full C# 7.3 support, advanced Unity support, and more.


© 2018 Scott Hanselman. All rights reserved.
     

Azure DevOps Continuous Build/Deploy/Test with ASP.NET Core 2.2 Preview in One Hour

$
0
0

Hanselminutes WebsiteI've been doing Continuous Integration and Deployment for well over 13 years. We used a lot of custom scripts and a lovely tool called CruiseControl.NET to check out, build, test, and deploy our code.

However, it's easy to get lulled into complacency. To get lazy. I don't set up Automated Continuous Integration and Deployment for all my little projects. But I should.

I was manually deploying a change to my podcast website this evening via a git deploy to Azure App Service. Pushing to Azure this way via Git uses "Kudu" to actually build the site. However, earlier this week I was also trying to update my site to .NET Core 2.2 which is in preview. Plus I have Unit Tests that aren't getting run during deploy.

So look at it this way. My simple little podcast website with a few tests and the desire to use a preview .NET Core SDK means I've outgrown a basic "git push to prod" for deploy.

I remembered that Azure DevOps (formerly VSTS) is out and offers free unlimited minutes for open source projects. I have no excuse for my sloppy builds and manual deploys. It also has unlimited free private repos, although I'm happy at GitHub and have no reason to move.

It usually takes me 5-10 minutes for a manual build/test/deploy, so I gave myself an hour to see if I could get this same process automated in Azure DevOps. I've never used this before and I wanted to see if I could do it quickly, and if it was intuitive.

Let's review my goals.

  • My source is in GitHub
  • Build my ASP.NET Core 2.2 Web Site
    • I want to build with .NET Core 2.2 which is currently in Preview.
  • Run my xUnit Unit Tests
    • I have some Selenium Unit Tests that can't run in the cloud (at least, I haven't figured it out yet) so I need them skipped.
  • Deploy the resulting site to product in my Azure App Service

Cool. So I make a project and point Azure DevOps at my GitHub.

Azure DevOps: Source code in GitHub

They have a number of starter templates, so I was pleasantly surprised I didn't need manually build my Build Configuration myself. I'll pick ASP.NET app. I could pick Azure Web App for ASP.NET but I wanted a little more control.

Select a template

Now I've got a basic build pipeline. You can see it will use NuGet, get the packages, build the app, test the assemblies (if there are tests...more on that later) and the publish (zip) the build artifacts.

Build Pipeline

I then clicked Save & Queue...and it failed. Why? It says that I'm targeting .NET Core 2.2 and it doesn't support anything over 2.1. Shoot.

Agent says it doesn't support .NET Core 2.2

Fortunately there's a pipeline element that I can add called ".NET Core Tool Installer" that will get specific versions of the .NET Core SDK.

NOTE: I've emailed the team that ".NET Tool Installer" is the wrong name. A .NET Tool is a totally different thing. This task should be called the ".NET Core SDK Installer." Because it wasn't, it took me a minute to find it and figure out what it does.

I'm using the SDK Agent version 2.22.2.100-preview2-009404 so I put that string into the properties.

Install the .NET Core SDK custom version

At this point it builds, but I get a test error.

There's two problems with the tests. When I look at the logs I can see that the "testadapter.dll" that comes with xunit is mistakenly being pulled into the test runner! Why? Because the "Test Files" spec includes a VERY greedy glob in the form of **\*test*.dll. Perhaps testadapter shouldn't include the word test, but then it wouldn't be well-named.

**\$(BuildConfiguration)\**\*test*.dll

!**\obj\**

My test DLLs are all named with "tests" in the filename so I'll change the glob to "**\$(BuildConfiguration)\**\*tests*.dll" to cast a less-wide net.

Screenshot (45)

I have four Selenium Tests for my ASP.NET Core site but I don't want them to run when the tests are run in a Docker Container or, in this case, in the Cloud. (Until I figure out how)

I use SkippableFacts from XUnit and do this:

public static class AreWe

{
public static bool InDockerOrBuildServer {
get {
string retVal = Environment.GetEnvironmentVariable("DOTNET_RUNNING_IN_CONTAINER");
string retVal2 = Environment.GetEnvironmentVariable("AGENT_NAME");
return (
(String.Compare(retVal, Boolean.TrueString, ignoreCase: true) == 0)
||
(String.IsNullOrWhiteSpace(retVal2) == false));
}
}
}

Don't tease me. I like it. Now I can skip tests that I don't want running.

if (AreWe.InDockerOrBuildServer) return;

Now my tests run and I get a nice series of charts to show that fact.

22 tests, 4 skipped

I have it building and tests running.

I could add the Deployment Step to the Build but Azure DevOps Pipelines includes a better way. I make a Release Pipeline that is separate. It takes Artifacts as input and runs n number of Stages.

Creating a new Release Pipeline

I take the Artifact from the Build (the zipped up binaries) and pass them through the pipeline into the Azure App Service Deploy step.

Screenshot (49)

Here's the deployment in progress.

Manually Triggered Release

Cool! Now that it works and deploys, I can turn on Continuous Integration Build Triggers (via an automatic GitHub webhook) as well as Continuous Deployment triggers.

Continuous Deployment

Azure DevOps even includes badges that I can add to my readme.md so I always know by looking at GitHub if my site builds AND if it has successfully deployed.

4 releases, the final one succeeded

Now I can see each release as it happens and if it's successful or not.

Build Succeeded, Never Deployed

To top it all off, now that I have all this data and these pipelines, I even put together a nice little dashboard in about a minute to show Deployment Status and Test Trends.

My build and deployment dashboard

When I combine the DevOps Dashboard with my main Azure Dashboard I'm amazed at how much information I can get in so little effort. Consider that my podcast (my little business) is a one-person shop.

Azure Dashboard

And now I have a CI/CD pipeline with integrated testing gates that deploys worldwide. Many years ago this would have required a team and a lot of custom code.

Today it took an hour. Awesome.

I check into GitHub, kicks off a build, tests, emails me the results, and deploys the website if everything is cool. Of course, if I had another team member I could put in deployment gates or reviews, etc.


Sponsor: Copy: Rider 2018.2 is here! Publishing to IIS, Docker support in the debugger, built-in spell checking, MacBook Touch Bar support, full C# 7.3 support, advanced Unity support, and more.


© 2018 Scott Hanselman. All rights reserved.
     

Scripts to remove old .NET Core SDKs

$
0
0

That's a lot of .NET Core installations.NET Core is lovely. It's usage is skyrocketing, it's open source, and .NET Core 2.1 has some amazing performance improvements. Just upgrading from 2.0 to 2.1 gave Bing a 34% performance boost.

However, for those of us who are installing multiple .NET Core SDKs side by side have noticed that they add-up if you are installing daily builds or very often. As of 2.x, .NET Core doesn't yet have an "uninstall all" or "uninstall all previews" option. There will be work done in .NET Core 3.0 that will mitigate this cumulative effect when you have lots of installers.

If you're taking dailies and it's time to tidy up, the short answer per Damian Edwards is "Delete them all, then nuke the dotnet folder in program files, then install the latest version."

Here's a PowerShell Script you can run on Windows as admin that will aggressively uninstall .NET Core SDKs.

Note the match at the top. Depending on your goals, you might want to change it to "Microsoft .NET Core SDK 2.1" or just "Microsoft .NET Core SDK 2."

Once it's all removed, then add the latest from https://www.microsoft.com/net/download/archives

A list of .NET Core SDKs

Here's the script, which is an improvement on Andrew's comment here. You can improve it as it's on GitHub here https://github.com/shanselman/RemoveDotNetCoreSDKInstallers. This scripts currently requires you to hit YES as the MSIs elevate. It doesn't work right then you try /passive as a switch. I'm interesting if you can get a "torch all Core SDK installers and install LTS and Current" script working.

$app = Get-WmiObject -Class Win32_Product | Where-Object { 
    $_.Name -match "Microsoft .NET Core SDK" 
}
Write-Host $app.Name 
Write-Host $app.IdentifyingNumber
pushd $env:SYSTEMROOT\System32
$app.identifyingnumber |% { Start-Process msiexec -wait -ArgumentList "/x $_" }
popd

This PowerShell is Windows-only, of course.

If you're on RHEL, Ubuntu/Debian, there are scripts here to try out https://github.com/dotnet/cli/tree/master/scripts/obtain/uninstall

Let me know if this script works for you.


Sponsor: Copy: Rider 2018.2 is here! Publishing to IIS, Docker support in the debugger, built-in spell checking, MacBook Touch Bar support, full C# 7.3 support, advanced Unity support, and more.


© 2018 Scott Hanselman. All rights reserved.
     

A command-line REPL for RESTful HTTP Services

$
0
0

HTTP REPLMy that's a lot of acronyms. REPL means "Read Evaluate Print Loop." You know how you can run "python" and then just type 2+2 and get answer? That's a type of REPL.
The ASP.NET Core team is building a REPL that lets you explore and interact with your RESTful services. Ideally your services will have Swagger/OpenAPI available that describes the service. Right now this Http-REPL is just being developed and they're aiming to release it as a .NET Core Global Tool in .NET Core 2.2.

You can install global tools like this:

dotnet tool install -g nyancat

Then you can run "nyancat." Get a list of installed tools like this:

C:\Users\scott> dotnet tool list -g
Package Id                 Version                   Commands
--------------------------------------------------------------------
altcover.global            3.5.560                   altcover
dotnet-depends             0.1.0                     dotnet-depends
dotnet-httprepl            2.2.0-preview3-35304      dotnet-httprepl
dotnet-outdated            2.0.0                     dotnet-outdated
dotnet-search              1.0.0                     dotnet-search
dotnet-serve               1.0.0                     dotnet-serve
git-status-cli             1.0.0                     git-status
github-issues-cli          1.0.0                     ghi
nukeeper                   0.7.2                     NuKeeper
nyancat                    1.0.0                     nyancat
project2015to2017.cli      1.8.1                     csproj-to-2017

For the HTTP-REPL, since it's not yet released you have to point the Tool Feed to a daily build location, so do this:

dotnet tool install -g --version 2.2.0-* --add-source https://dotnet.myget.org/F/dotnet-core/api/v3/index.json dotnet-httprepl

Then run it with "dotnet httprepl." I'd like another name? What do you think? RESTy? POSTr? API Test? API View?

Here's an example run where I start up a Web API.

C:\SwaggerApp> dotnet httprepl
(Disconnected)~ set base http://localhost:65369
Using swagger metadata from http://localhost:65369/swagger/v1/swagger.json
http://localhost:65369/~ dir
.        []
People   [get|post]
Values   [get|post]
http://localhost:65369/~ cd People
/People    [get|post]
http://localhost:65369/People~ dir
.      [get|post]
..     []
{id}   [get]
http://localhost:65369/People~ get
HTTP/1.1 200 OK
Content-Type: application/json; charset=utf-8
Date: Wed, 26 Sep 2018 20:25:37 GMT
Server: Kestrel
Transfer-Encoding: chunked
[
  {
    "id": 1,
    "name": "Scott Hunter"
  },
  {
    "id": 0,
    "name": "Scott Hanselman"
  },
  {
    "id": 2,
    "name": "Scott Guthrie"
  }
]

Take a moment and read that. It can be a little confusing. It's not HTTPie, it's not Curl, but it's also not PostMan. it's something that you run and stay running if you're a command line person and enjoy that space. It's as if you "cd (change directory)" and "mount" a disk into your Web API.

You can use all the HTTP Verbs, and when POSTing you can set a default text editor and it will launch the editor with the JSON written for you! Give it a try!

A few gotchas/known issues:

  • You'll want to set a default Content-Type Header for your session. I think this should be default.
    • set header Content-Type application/json
  • If the HTTP REPL doesn't automatically detect your Swagger/OpenAPI endpoint, you'll need to set it manually:
    • set base https://yourapi/api/v1/
    • set swagger https://yourapi/swagger.json
  • I haven't figure out how to get it to use VS Code as its default editor. Likely because "code.exe" isn't a thing. (It uses a batch .cmd file, which the HTTP REPL would need to special case). For now, use an editor that's an EXE and point the HTTP REPL like this:
    • pref set editor.command.default 'c:\notepad2.exe'

I'm really enjoy this idea. I'm curious how you find it and how you'd see it being used. Sound off in the comments.


Sponsor: Rider 2018.2 is here! Publishing to IIS, Docker support in the debugger, built-in spell checking, MacBook Touch Bar support, full C# 7.3 support, advanced Unity support, and more.


© 2018 Scott Hanselman. All rights reserved.
     

Exploring .NET Core's SourceLink - Stepping into the Source Code of NuGet packages you don't own

$
0
0

According to https://github.com/dotnet/sourcelink, SourceLink "enables a great source debugging experience for your users, by adding source control metadata to your built assets."

Sound fantastic. I download a NuGet to use something like Json.NET or whatever all the time, I'd love to be able to "Step Into" the source even if I don't have laying around. Per the GitHub, it's both language and source control agnostic. I read that to mean "not just C# and not just GitHub."

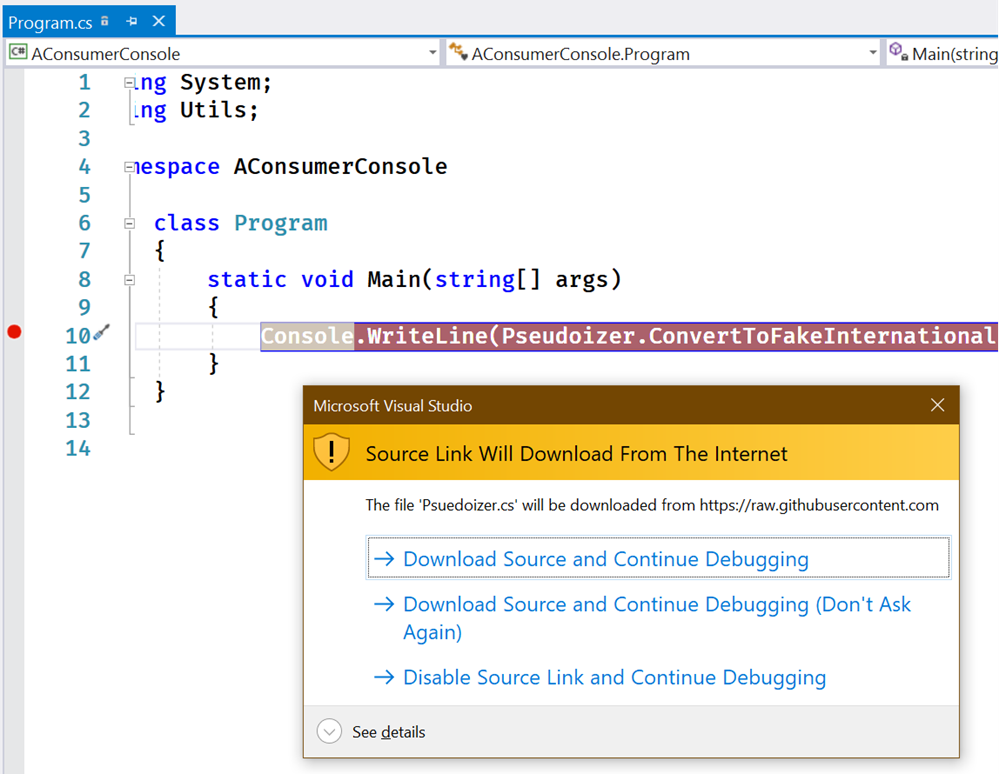
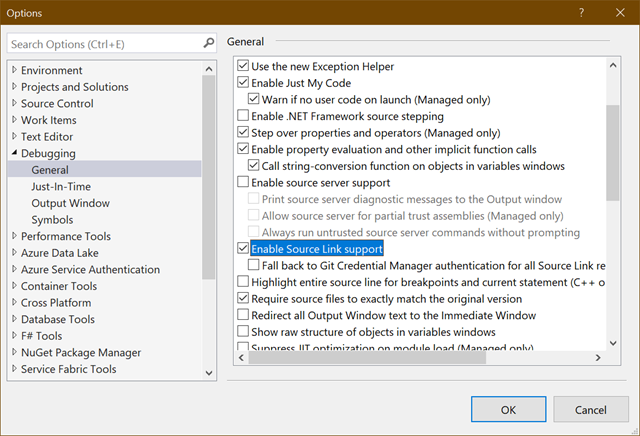
Visual Studio 15.3+ supports reading SourceLink information from symbols while debugging. It downloads and displays the appropriate commit-specific source for users, such as from raw.githubusercontent, enabling breakpoints and all other sources debugging experience on arbitrary NuGet dependencies. Visual Studio 15.7+ supports downloading source files from private GitHub and Azure DevOps (former VSTS) repositories that require authentication.

Looks like Cameron Taggart did the original implementation and then the .NET team worked with Cameron and the .NET Foundation to make the current version. Also cool.

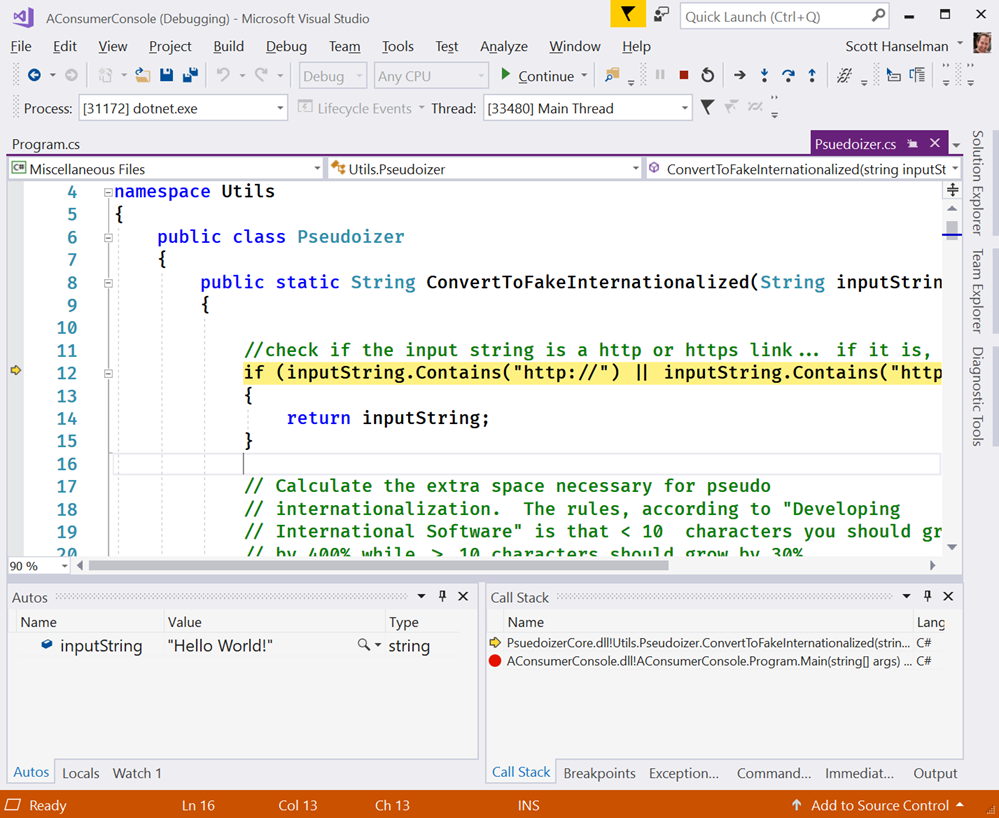
Download Source and Continue Debugging

Let me see if this really works and how easy (or not) it is.

I'm going to make a little library using the 5 year old Pseudointernationalizer from here. Fortunately the main function is pretty pure and drops into a .NET Standard library neatly.

I'll put this on GitHub, so I will include "PublishRepositoryUrl" and "EmbedUntrackedSources" as well as including the PDBs. So far my CSPROJ looks like this:

<Project Sdk="Microsoft.NET.Sdk">

<PropertyGroup>
<TargetFramework>netstandard2.0</TargetFramework>
<PublishRepositoryUrl>true</PublishRepositoryUrl>
<EmbedUntrackedSources>true</EmbedUntrackedSources>
<AllowedOutputExtensionsInPackageBuildOutputFolder>$(AllowedOutputExtensionsInPackageBuildOutputFolder);.pdb</AllowedOutputExtensionsInPackageBuildOutputFolder>
</PropertyGroup>
</Project>

Pretty straightforward so far. As I am using GitHub I added this reference, but if I was using GitLab or BitBucket, etc, I would use that specific provider per the docs.

<ItemGroup>

<PackageReference Include="Microsoft.SourceLink.GitHub" Version="1.0.0-beta-63127-02" PrivateAssets="All"/>
</ItemGroup>

Now I'll pack up my project as a NuGet package.

D:\github\SourceLinkTest\PsuedoizerCore [master ≡]> dotnet pack -c release

Microsoft (R) Build Engine version 15.8.166+gd4e8d81a88 for .NET Core
Copyright (C) Microsoft Corporation. All rights reserved.

Restoring packages for D:\github\SourceLinkTest\PsuedoizerCore\PsuedoizerCore.csproj...
Generating MSBuild file D:\github\SourceLinkTest\PsuedoizerCore\obj\PsuedoizerCore.csproj.nuget.g.props.
Restore completed in 96.7 ms for D:\github\SourceLinkTest\PsuedoizerCore\PsuedoizerCore.csproj.
PsuedoizerCore -> D:\github\SourceLinkTest\PsuedoizerCore\bin\release\netstandard2.0\PsuedoizerCore.dll
Successfully created package 'D:\github\SourceLinkTest\PsuedoizerCore\bin\release\PsuedoizerCore.1.0.0.nupkg'.

Let's look inside the .nupkg as they are just ZIP files. Ah, check out the generated *.nuspec file that's inside!

<?xml version="1.0" encoding="utf-8"?>

<package xmlns="http://schemas.microsoft.com/packaging/2012/06/nuspec.xsd">
<metadata>
<id>PsuedoizerCore</id>
<version>1.0.0</version>
<authors>PsuedoizerCore</authors>
<owners>PsuedoizerCore</owners>
<requireLicenseAcceptance>false</requireLicenseAcceptance>
<description>Package Description</description>
<repository type="git" url="https://github.com/shanselman/PsuedoizerCore.git" commit="35024ca864cf306251a102fbca154b483b58a771" />
<dependencies>
<group targetFramework=".NETStandard2.0" />
</dependencies>
</metadata>
</package>

See under repository it points back to the location AND commit hash for this binary! That means I can give it to you or a coworker and they'd be able to get to the source. But what's the consumption experience like? I'll go over and start a new Console app that CONSUMES my NuGet library package. To make totally sure that I don't accidentally pick up the source from my machine I'm going to delete the entire folder. This source code no longer exists on this machine.

I'm using a "local" NuGet Feed. In fact, it's just a folder. Check it out:

D:\github\SourceLinkTest\AConsumerConsole> dotnet add package PsuedoizerCore -s "c:\users\scott\desktop\LocalNuGetFeed"

Writing C:\Users\scott\AppData\Local\Temp\tmpBECA.tmp
info : Adding PackageReference for package 'PsuedoizerCore' into project 'D:\github\SourceLinkTest\AConsumerConsole\AConsumerConsole.csproj'.
log : Restoring packages for D:\github\SourceLinkTest\AConsumerConsole\AConsumerConsole.csproj...
info : GET https://api.nuget.org/v3-flatcontainer/psuedoizercore/index.json
info : NotFound https://api.nuget.org/v3-flatcontainer/psuedoizercore/index.json 465ms
log : Installing PsuedoizerCore 1.0.0.
info : Package 'PsuedoizerCore' is compatible with all the specified frameworks in project 'D:\github\SourceLinkTest\AConsumerConsole\AConsumerConsole.csproj'.
info : PackageReference for package 'PsuedoizerCore' version '1.0.0' added to file 'D:\github\SourceLinkTest\AConsumerConsole\AConsumerConsole.csproj'.

See how I used -s to point to an alternate source? I could also configure my NuGet feeds, be they local directories or internal servers with "dotnet new nugetconfig" and including my NuGet Servers in the order I want them searched.

Here is my little app:

using System;

using Utils;

namespace AConsumerConsole
{
class Program
{
static void Main(string[] args)
{
Console.WriteLine(Pseudoizer.ConvertToFakeInternationalized("Hello World!"));
}
}
}

And the output is [Ħęľľő Ŵőřľđ! !!! !!!].

But can I step into it? I don't have the source remember...I'm using SourceLink.

In Visual Studio 2017 I confirm that SourceLink is enabled. This is the Portable PDB version of SourceLink, not the "SourceLink 1.0" that was "Enable Source Server Support." That only worked on Windows..

Enable Source Link Support

You'll also want to turn off "Just My Code" since, well, this isn't your code.

Disable Just My Code

Now I'll start a Debug Session in my consumer app and hit F11 to Step Into the Library whose source I do not have!

Source Link Will Download from The Internet

Fantastic. It's going to get the source for me! Without git cloning the repository it will seamlessly let me continue my debugging session.

The temporary file ended up in C:\Users\scott\AppData\Local\SourceServer\4bbf4c0dc8560e42e656aa2150024c8e60b7f9b91b3823b7244d47931640a9b9 if you're interested. I'm able to just keep debugging as if I had the source...because I do! It came from the linked source.

Debugging into a NuGet that I don't have the source for

Very cool. I'm going to keep digging into SourceLink and learning about it. It seems that if YOU have a library or published NuGet either inside your company OR out in the open source world that you absolutely should be using SourceLink.

You can even install the sourcelink global tool and test your .pdb files for greater insight.

D:\github\SourceLinkTest\PsuedoizerCore>dotnet tool install --global sourcelink

D:\github\SourceLinkTest\PsuedoizerCore\bin\release\netstandard2.0>sourcelink print-urls PsuedoizerCore.pdb
43c83e7173f316e96db2d8345a3f963527269651 sha1 csharp D:\github\SourceLinkTest\PsuedoizerCore\Psuedoizer.cs
https://raw.githubusercontent.com/shanselman/PsuedoizerCore/02c09baa8bfdee3b6cdf4be89bd98c8157b0bc08/Psuedoizer.cs
bfafbaee93e85cd2e5e864bff949f60044313638 sha1 csharp C:\Users\scott\AppData\Local\Temp\.NETStandard,Version=v2.0.AssemblyAttributes.cs
embedded

Think about how much easier consumers of your library will have it when debugging their apps! Your package is no longer a black box. Go set this up on your projects today.


Sponsor: Rider 2018.2 is here! Publishing to IIS, Docker support in the debugger, built-in spell checking, MacBook Touch Bar support, full C# 7.3 support, advanced Unity support, and more.


© 2018 Scott Hanselman. All rights reserved.
     

Headless CMS and Decoupled CMS in .NET Core

$
0
0

Headless by Wendy used under CC https://flic.kr/p/HkESxWI'm sure I'll miss some, so if I do, please sound off in the comments and I'll update this post over the next week or so!

Lately I've been noticing a lot of "Headless" CMSs (Content Management System). A ton, in fact. I wanted to explore this concept and see if it's a fad or if it's really something useful.

Given the rise of clean RESTful APIs has come the rise of Headless CMS systems. We've all evaluated CMS systems (ones that included both front- and back-ends) and found the front-end wanting. Perhaps it lacks flexibility OR it's way too flexible and overwhelming. In fact, when I wrote my podcast website I considered a CMS but decided it felt too heavy for just a small site.

A Headless CMS is a back-end only content management system (CMS) built from the ground up as a content repository that makes content accessible via a RESTful API for display on any device.

I could start with a database but what if I started with a CMS that was just a backend - a headless CMS. I'll handle the front end, and it'll handle the persistence.

Here's what I found when exploring .NET Core-based Headless CMSs. One thing worth noting, is that given Docker containers and the ease with which we can deploy hybrid systems, some of these solutions have .NET Core front-ends and "who cares, it returns JSON" for the back-end!

Lynicon

Lyncicon is literally implemented as a NuGet Library! It stores its data as structured JSON. It's built on top of ASP.NET Core and uses MVC concepts and architecture.

It does include a front-end for administration but it's not required. It will return HTML or JSON depending on what HTTP headers are sent in. This means you can easily use it as the back-end for your Angular or existing SPA apps.

Lyncion is largely open source at https://github.com/jamesej/lyniconanc. If you want to take it to the next level there's a small fee that gives you updated searching, publishing, and caching modules.

ButterCMS

ButterCMS is an API-based CMS that seamlessly integrates with ASP.NET applications. It has an SDK that drops into ASP.NET Core and also returns data as JSON. Pulling the data out and showing it in a few is easy.

public class CaseStudyController : Controller
{
    private ButterCMSClient Client;
    private static string _apiToken = "";
    public CaseStudyController()
    {
        Client = new ButterCMSClient(_apiToken);
    }
    [Route("customers/{slug}")]
    public async Task<ActionResult> ShowCaseStudy(string slug)
    {
      butterClient.ListPageAsync()
        var json = await Client.ListPageAsync("customer_case_study", slug)
        dynamic page = ((dynamic)JsonConvert.DeserializeObject(json)).data.fields;
        ViewBag.SeoTitle = page.seo_title;
        ViewBag.FacebookTitle = page.facebook_open_graph_title;
        ViewBag.Headline = page.headline;
        ViewBag.CustomerLogo = page.customer_logo;
        ViewBag.Testimonial = page.testimonial;
        return View("Location");
    } 
}

Then of course output into Razor (or putting all of this into a RazorPage) is simple:

<html>
  <head>
    <title>@ViewBag.SeoTitle</title>
    <meta property="og:title" content="@ViewBag.FacebookTitle" /> 
  </head>
  <body>
    <h1>@ViewBag.Headline</h1>
    <img width="100%" src="@ViewBag.CustomerLogo">
    <p>@ViewBag.Testimonial</p>
  </body>
</html>

Butter is a little different (and somewhat unusual) in that their backend API is a SaaS (Software as a Service) and they host it. They then have SDKs for lots of platforms including .NET Core. The backend is not open source while the front-end is https://github.com/ButterCMS/buttercms-csharp.

Piranha CMS

Piranha CMS is built on ASP.NET Core and is open source on GitHub. It's also totally package-based using NuGet and can be easily started up with a dotnet new template like this:

dotnet new -i Piranha.BasicWeb.CSharp
dotnet new piranha
dotnet restore
dotnet run

It even includes a new Blog template that includes Bootstrap 4.0 and is all set for customization. It does include optional lightweight front-end but you can use those as guidelines to create your own client code. One nice touch is that Piranha also images image resizing and cropping.

Umbraco Headless

The main ASP.NET website currently uses Umbraco as its CMS. Umbraco is a well-known open source CMS that will soon include a Headless option for more flexibility. The open source code for Umbraco is up here https://github.com/umbraco.

Orchard Core

Orchard is a CMS with a very strong community and fantastic documentation. Orchard Core is a redevelopment of Orchard using open source ASP.NET Core. While it's not "headless" it is using a Decoupled Architecture. Nothing would prevent you from removing the UI and presenting the content with your own front-end. It's also cross-platform and container friendly.

Squidex

"Squidex is an open source headless CMS and content management hub. In contrast to a traditional CMS Squidex provides a rich API with OData filter and Swagger definitions." Squidex is build with ASP.NET Core and the CQRS pattern and works with both Windows and Linux on today's browsers.

Squidex is open source with excellent docs at https://docs.squidex.io. Docs are at https://docs.squidex.io. They are also working on a hosted version you can play with here https://cloud.squidex.io. Samples on how to consume it are here https://github.com/Squidex/squidex-samples.

The consumption is super clean:

[Route("/{slug},{id}/")]
public async Task<IActionResult> Post(string slug, string id)
{
    var post = await apiClient.GetBlogPostAsync(id);
    var vm = new PostVM
    {
        Post = post
    };
    return View(vm);
}

And then the View:

@model PostVM
@{
    ViewData["Title"] = Model.Post.Data.Title;
}
<div>
    <h2>@Model.Post.Data.Title</h2>
    @Html.Raw(Model.Post.Data.Text)
</div>

What .NET Core Headless CMSs did I miss? Let me know.

*Photo "headless" by Wendy used under CC https://flic.kr/p/HkESxW


Sponsor: Telerik DevCraftTelerik DevCraft is the comprehensive suite of .NET and JavaScript components and productivity tools developers use to build high-performant, modern web, mobile, desktop apps and chatbots. Try it!


© 2018 Scott Hanselman. All rights reserved.
     

Troubleshooting Windows 10 Nearby Sharing and Bluetooth Antennas

$
0
0

wifi

When building my Ultimate Developer PC I picked this motherboard, and it's lovely.

  • ASUS ROG STRIX LGA2066 X299 ATX Motherboard - Good solid board with built in BT and Wifi, an M.2 heatsink included, 3x PCIe 3.0 x16 SafeSlots (supports triple @ x16/x16/x8), 1x PCIe 3.0 x4, 2x PCIe 3.0 x1 and a Max of 128 gigs of RAM. It also has 8x USB 3.1s and a USB C which is nice.

I put it all together and I've thrilled with the machine. However, recently I was trying to use the new Windows 10 "Nearby Devices" feature.

It's this cool feature that lets you share stuff to "Nearby Devices" - that means your laptop, other desktops, whatever. Similar to AirDrop, it solves that problem of moving stuff between devices without using an intermediate server.

You can turn it on in Settings on Windows 10 and decide if you want to receive data from everyone or just contacts.

Nearby Sharing

So I started using on my new Desktop, IRONHEART, but I kept getting this "Looking for nearby devices" dialog...and it would just do nothing.

Looking for Nearby Devices

It turns out that the ASUS Motherboard also comes with a Wi-Fi Antenna. I don't use Wifi (I'm wired) so I didn't bother attaching it. It seems that this antenna is also a Bluetooth antenna and if you plug it in you'll ACTUALLY GET A LOVELY BLUETOOTH SIGNAL. Who knew? ;)

Now I can easily right click on files in Explorer or Web Pages in Edge and transfer them between systems.

Sharing a file with Nearby Sharing

A few tips on Nearby Sharing

  • Make sure you know your visibility settings. From the Start Menu type "nearby sharing" and confirm them.
  • Make sure the receiving device doesn't have "Focus Assist" on (via the Action Center in the lower right of the screen) or you might miss the notification.
  • And if you're using a desktop like me, ahem, plug in your BT antenna

Hope this helps someone because Nearby Sharing is a great feature that I'm now using all the time.


Sponsor: Telerik DevCraft is the comprehensive suite of .NET and JavaScript components and productivity tools developers use to build high-performant, modern web, mobile, desktop apps and chatbots. Try it!


© 2018 Scott Hanselman. All rights reserved.
     

Using Enhanced Mode Ubuntu 18.04 for Hyper-V on Windows 10

$
0
0

I run Windows as my daily driver but I use WSL (Windows Subsystem for Linux) all day long but WSL is just the command-line and has some perf issues with heavy file system work. I use Docker for Windows which works amazingly and has it good perf but sometimes I want to test on a full Ubuntu Desktop.

ASIDE: No joke. My Linux/Ubuntu bona fides go back a while. Here's me installing Ubuntu 10.4 on Windows 7 over 8 years ago. Umuntu ngumuntu ngabantu!

To be frank, historically Ubuntu has sucked on Window's Hyper-V. If you wanted to get a higher (read: usable) resolution it would take a miracle. If you wanted shared clipboards or shared disk drives, well, again, miracle or a ton of manual set up. It's possible but it's not fun.

Why can't it be easy? Well, it is. I installed the Windows 10 "Fall Creators Update" - yes the name is stupid. It's Windows 10 "1809" - that's 2018 and the 9th month. Just type "Winver" from the Start menu. You may have "1803" from March. Go update.

Windows 10 includes Hyper-V Quick Create which has this suspiciously short list under "Select an operating system." Anytime a list has 1 or 2 items and some whitespace that means it will someday have n+1 list items.

Recently Ubuntu 18.04.1 LTS showed up in this list. You can quickly and easily create an Ubuntu VM from here and it's all handled, downloading, network switch, VM create, etc.

Create Virtual Machine

I dig it. So click create, start it up...get to the set up screen. Now, here, make sure you click "Require my password to login." What we want to do won't work with "Log in Automatically" and you don't want that anyway.

Setting up an Ubuntu VM

After you've created your VM and got it mostly setup, close the Hyper-V client window. Just X it out. The VM is still running of course.

Go over to Hyper-V Manager and right click on it and "Connect."

Connect to VM

You'll see a resolution dialog...pick one! Go crazy! Do be aware that there are issues on 4k display but you can adjust within Ubuntu itself.

Set Resolution

Now, BEFORE you click Connect, click "Show Options" and then "Local Resources." Under here, uncheck Smart Cards and Check "Drives."

Uncheck Smart Cards and Check Drives

Click OK and Connect...and you get this weird dialog! You're actually RDP'ing into Ubuntu! Rather than using the historical weird Hyper-V Client stuff to talk to Ubuntu and struggle with video cards and resolutions, here you are literally just Remote Desktoping into Ubuntu using integrated open source xrdp!

Login with your name and password (remember before when I said don't automatically login? This is why.)

Login to xrdp

What about Dynamic Resizing?

Here's an even better possible future. What we REALLY want (don't we, Dear Reader) is Dynamic Resolution and Resizing without Reconnection! Today you can just close and reconnect to change resolutions but I'd love to just resize the Ubuntu window like I do Windows 7/8/10 VM client windows.

The feature "Dynamic resolution update" was introduced in RDP 8.1. It enables to resize screen resolution on-the-fly.

Since we are using xrdp and that's open source over https://github.com/neutrinolabs/xrdp/ AND there's even a issue about this AND a lovely person has the code in their own branch and agreed to possibly upstream it maybe we can start using it and this great feature will just light up for folks who use Hyper-V Quick Create. Certainly we're talking weeks and months here (unless you want to help) but the lion's share of the work is done. I'm looking forward to resizing Ubuntu VMs dynamically.

What's in Enhanced Mode Today?

Back to today! You can read about how Linux VMs (Ubuntu or Arch) are set up in this GitHub repo https://github.com/Microsoft/linux-vm-tools You can set them up yourself with scripts, but the nice thing about Hyper-V Quick Create is that the work is done for us to make these "enhanced session" RDP-friendly VMs. No need to fear, you can just read the scripts yourself.

I can connect quickly and Enhanced Mode VMs give me:

  • a shared clipboard
  • the resolution of my choice on connect
  • fast painting/video/scrolling
  • automatic shared-drives
  • Smooth and automatic mouse capture

Fantastic.

Ubuntu on Windows 10

What about installing Visual Studio Code? Of course. And also .NET Core.NET Core, natch.

image

This took like 10 min and 8 of it was waiting for Hyper-V Create to download Ubuntu. Try it out!


Sponsor: Check out the latest JetBrains Rider with built-in spell checking, enhanced debugger, Docker support, full C# 7.3 support, publishing to IIS and more advanced Unity support.


© 2018 Scott Hanselman. All rights reserved.
     

C# and .NET Core scripting with the "dotnet-script" global tool

$
0
0

dotnet scriptYou likely know that open source .NET Core is cross platform and it's super easy to do "Hello World" and start writing some code.

You just install .NET Core, then "dotnet new console" which will generate a project file and basic app, then "dotnet run" will compile and run your app? The 'new' command will create all the supporting code, obj, and bin folders, etc. When you do "dotnet run" it actually is a combination of "dotnet build" and "dotnet exec whatever.dll."

What could be easier?

What about .NET Core as scripting?

Check out dotnet script:

C:\Users\scott\Desktop\scriptie> dotnet tool install -g dotnet-script

You can invoke the tool using the following command: dotnet-script
C:\Users\scott\Desktop\scriptie>copy con helloworld.csx
Console.WriteLine("Hello world!");
^Z
1 file(s) copied.
C:\Users\scott\Desktop\scriptie>dotnet script helloworld.csx
Hello world!

NOTE: I was a little tricky there in step two. I did a "copy con filename" to copy from the console to the destination file, then used Ctrl-Z to finish the copy. Feel free to just use notepad or vim. That's not dotnet-script-specific, that's Hanselman-specific.

Pretty cool eh? If you were doing this in Linux or OSX you'll need to include a "shebang" as the first line of the script. This is a standard thing for scripting files like bash, python, etc.

#!/usr/bin/env dotnet-script

Console.WriteLine("Hello world");

This lets the operating system know what scripting engine handles this file.

If you you want to refer to a NuGet package within a script (*.csx) file, you'll use the Roslyn #r syntax:

#r "nuget: AutoMapper, 6.1.0"

Console.WriteLine("whatever);

Even better! Once you have "dotnet-script" installed as a global tool as above:

dotnet tool install -g dotnet-script

You can use it as a REPL! Finally, the C# REPL (Read Evaluate Print Loop) I've been asking for for only a decade! ;)

C:\Users\scott\Desktop\scriptie>dotnet script

> 2+2
4
> var x = "scott hanselman";
> x.ToUpper()
"SCOTT HANSELMAN"

This is super useful for a learning tool if you're teaching C# in a lab/workshop situation. Of course you could also learn using http://try.dot.net in the browser as well.

In the past you may have used ScriptCS for C# scripting. There's a number of cool C#/F# scripting options. This is certainly not a new thing:

In this case, I was very impressed with the easy of dotnet-script as a global tool and it's simplicity. Go check out https://github.com/filipw/dotnet-script and try it out today!


Sponsor: Check out the latest JetBrains Rider with built-in spell checking, enhanced debugger, Docker support, full C# 7.3 support, publishing to IIS and more advanced Unity support.


© 2018 Scott Hanselman. All rights reserved.
     
Viewing all 1148 articles
Browse latest View live


<script src="https://jsc.adskeeper.com/r/s/rssing.com.1596347.js" async> </script>