Quantcast
Channel: Scott Hanselman's Blog
Viewing all 1148 articles
Browse latest View live

Securing an Azure App Service Website under SSL in minutes with Let's Encrypt

$
0
0

A screenshot that says "Your connection to this site is not secure."Let’s Encrypt is a free, automated, and open Certificate Authority. That means you can get free SSL certs and change your sites from http:// to https://. What's the catch? The SSL Certificates only last 90 days - not a year or years. They do this to encourage automation. If you set this up, you'll want to have some scripts or background process to automatically renew and install the certificates.

I run nearly two dozen websites (some small, some significant) on Azure. Given that Chrome 68+ is going to call out non HTTPS sites explicitly as "Not secure" in July, now's as good a time as any for us to get our sites - large and small - encrypted. I have some small static "brochure-ware" sites like http://babysmash.com that just aren't worth the money for a cert. Now it's free, so let's do it.

In some theorectical future, I hope that Azure and Clouds like it will have a single "encrypt it" button and handle the details for us, but as of the date of this blog post, there's some manual initial setup and some great work from the community.

There's a protocol for getting certificates called "ACME" - Automated Certificate Management Environment - and the EFF has a tool called Certbot that helps you request and deploy certs. There is a whole ecosystem around it, and if you are running Windows/IIS you can use a great simple ACME client called "Win-ACME." There are also UI's like Certify SSL Manager and PowerShell commands for ACME and systems like "GetSSL - Azure Automation," so you can feel free to roll your own script in an afternoon. Again, if you have a Windows VM and IIS, it's pretty straightforward and getting easier every day.

I'm currently using Simon J.K. Pedersen's lovely (and volunteer and unsupported, so be nice) Azure Let's Encrypt Web App Site Extension. I followed the instructions here but hit a few snags and a few things that aren't totally obvious. Many kudos and thanks to Simon for his hard work on this, as he's saving us all many hours of trouble!

Securing an Azure Web App with Let's Encrypt and the (unofficial) SJKP Let's Encrypt Site Extension

I'll go and secure BabySmash.com right now. Make a text file and keep track of these few things.

What's our checklist?

  • Azure Storage connection string - You'll need one for the extension to store state.
  • App Service Hosting Plan and App Service Resource Group Name - Ideally your "plan" (the VM your site runs on) and your site are in the same Resource Group (a resource group is just a name for a pile of stuff)
  • Service Principal Client/Application ID - This is like an account that the Site Extension will run as to do its job. It's an "on behalf of" delegate that will automate the changes to your site. You might see "client id" or "application id," they are the same thing.
  • Service Principal Client Secret - You'll make a new Key in your Service Principal. I called mine "login" but it doesn't matter, then some value like a generated password (also doesn't matter) and then hit Save. You'll then get a long hashed value - THAT is your Client Secret. Save it, you'll never see it again and you can't get it back.

Cool. Let's do it. Again, following along with the wiki, I'll make an App under Active Directory | App Registrations in the Azure Portal at https://portal.azure.com

Add a new App Registration in the Azure Portal

Make a new app...

Creating a new App Registration

Now grab the Application ID, aka Client ID and save that in your scratch space/notepad/sticky note/smart brain/don't lose it.

Copying the App Registration ClientID

Now click Settings, Keys, make a new one called "login" with a password and click Save. COPY THAT VALUE. You'll never see it again.
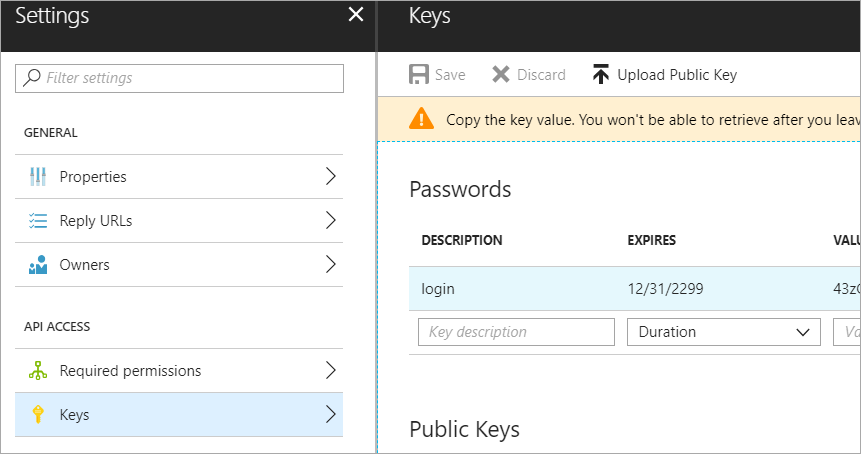
Adding a Key to the App Registration

Now, go to the Resource Group for your App Service and App Service Plan. Ideally it'll be the same one, but if it's not, go to each one and keep track of the names. I went there with the search box at the top of the Azure Portal.

Going to the Resource Group

The Portal changes sometimes, and this next step didn't line up to the Wiki instructions exactly. Click add, then make your new App Registration from above a "Contributor" to your Resource Group.

Adding the App as a Contributor to the Resource Group

Now head over to your actual App Service, and click Extensions.

App Service Extentions

I picked Azure Let's Encrypt to have this run as a Web Job in the background.

Adding the Let's Encrypt App Service Extension

Now, while you're at your Web App/Site, go to Settings and make sure you've set the following two Connection strings AzureWebJobsDashboard and AzureWebJobsStorage - Don't forget this step or it'll all work once but fail in 3 months during the renewal.

Both of these should be set to your Azure Storage Account connection string, e.g. DefaultEndpointsProtocol=https;AccountName=[myaccount];AccountKey=[mykey];

Remember the Web Job needs this storage so it can renew the certs every 3 months. Add them as "Custom."

Connection Strings in App Settings

Next, the instructions say to "configure the Site Extension." That can be confusing until you realize a Site Extension is really a "Side car web site." It is its own little website, running off to the side of your site. It will be at http://YOURSITENAME.scm.azurewebsites.net/LetsEncrypt so mine is at http://babysmash.scm.azurewebsites.net/LetsEncrypt.

You'll then want to full this form out. Your "Tenant ID" is your Azure Active Directory URL. You'll find your SubscriptionId in the "Overview" tab.

Configuring the Let's Encrypt Extension

Next next, and then hold down CTRL (as this is a multi-selection dialog) and pick the sites you want a certificate for. Note that www.yourdomin and and .yourdomain (the naked domain) are two different certs.

Requesting two SSL Certs

You'll want to confirm you see "Certificate successfully installed."

Certificate successfully installed.

Then head back over to the Azure Portal and turn on HTTPS Only if you'd like Azure itself (versus your code) to ensure and redirect all non-secure links to https://. Also confirm your SSL Bindings are correct. They should have been set up automatically.

HTTPS Only in the Azure Portal

Now I'll go hit https://babysmash.com and...

A screenshot that says "Your connection to this site is not secure."

It's not secure! Ah, now my site is in "mixed mode." That means that some of the resources like gifs or css were fetched with non-ssl (HTTP://) links. I'll update my site and all its external resources like YouTube embeds and fonts with https:// so that everything is secure. Since I'm using Git Deploy with Azure Web Apps (Azure App Service) I'll just make the changes and push the site again. You can also look at the elements as they load in F12 Browser Tools if you are having trouble finding out which image, css, or js file came in over http://

I'll redeploy and after a few tries, boom.

https://www.babysmash.com

And there's the cert. Note its expiration date. If the Site Extension does its job it will renew the cert before it expires!

A Let's Encrypt SSL Cert

Once I knew what I was doing, it took about 10 minutes per site. Thanks Simon for your work, and while there are multiple ways to do this, I found Simon's App Service Extension the easiest. I hope the Azure team comes up with a "One Click Solution" to this.

What do you think?


Sponsor: Learn how .NET in 2018 addresses the challenges developers are working on with future-focused technology. Get the new whitepaper on "The State of .NET in 2018" by the Progress Telerik team!


© 2018 Scott Hanselman. All rights reserved.
     

Automatically change your Audio Input, Output and Volume per application in Windows 10

$
0
0

I recently blogged about an amazing little utility called AudioSwitcher that makes it two-clicks easy to switch your audio inputs and outputs. I need to switch audio devices a lot as I'm either watching video, doing a podcast, doing a conference call, playing a game, etc. That's at least three different "scenarios" for my audio setup. I've got 5 inputs and 5 outputs and I've seen PC audiophiles with even more.

  • I set up this AudioSwitcher and figured, cool, solved that silly problem.
  • Then I got "EarTrumpet" - it's an applet that lets you control the volume of classic and modern Windows Apps in one nice UI! Switching, volume, and more. Very "prosumer," which is me, so I dig it.

A little birdie said that I should also look closer at Windows 10 itself. What? I know this OS like the back of my hand! Nonsense!

Hit the Start Menu and search for either "Sound Mixer" or "App Volume"

Sound mixer options

There's a page that does double duty called App Volume and Device Preferences.

You can also get to it from the regular Settings | Audio page:

change the device or app volume

See where it says "Change the device or app volume?" Ok, now DRINK THIS IN.

You can set the volume in active apps on an app-by-app basis. Cool. NOT IMPRESSED ARE YOU? Of course not, because while that's a lovely feature it's not the hidden power I'm talking about.

You can set the Preferred Input and Output device on an App by App Basis.

App Volume and Device Preferences

You can set the Preferred Input and Output device on an App by App Basis.

Read that again. I'll wait.

Rather than me constantly using the Audio Switcher (lovely as it is) I'll just set my ins and outs for each app.

The only catch is that this list only shows the apps that are currently using the mic/speaker, so if you want to get a nice setup, you'll want to run apps in order to change the settings for your app.

  • Here I've got the system sounds running through Default (usually the main speakers and the default mic is a webcam)
  • The Speech Runtime (I use WIN+H to use Windows 10 built-in Dragon-Naturally-Style-But-Not free dictation in any app) uses the Webcam mic explicitly as it has the best recognition in my experience.
  • Skype for Business is now using the phone. You can certainly set these things in the apps themselves, but in my experience Skype for Business doesn't care about your feelings or your audio settings. ;)
  • I record my podcast with Zencastr so I've setup Chrome for my preferred/optimal settings.

I can still use the AudioSwitcher but now my defaults are contextual so I'm switching a LOT LESS.

Be sure to pick up "EarTrumpet" for even more advanced options!

What do you think? Did YOU know this existed?


Sponsor: Learn how .NET in 2018 addresses the challenges developers are working on with future-focused technology. Get the new whitepaper on "The State of .NET in 2018" by the Progress Telerik team!


© 2018 Scott Hanselman. All rights reserved.
     

Carriage Returns and Line Feeds will ultimately bite you - Some Git Tips

$
0
0

Typewriter by Matunos used under Creative CommonsWhat's a Carriage and why is it Returning? Carriage Return Line Feed WHAT DOES IT ALL MEAN!?!

The paper on a typewriter rides horizontally on a carriage. The Carriage Return or CR was a non-printable control character that would reset the typewriter to the beginning of the line of text.

However, a Carriage Return moves the carriage back but doesn't advance the paper by one line. The carriage moves on the X axes...

And Line Feed or LF is the non-printable control character that turns the Platen (the main rubber cylinder) by one line.

Hence, Carriage Turn and Line Feed. Two actions, and for years, two control characters.

Every operating system seems to encode an EOL (end of line) differently. Operating systems in the late 70s all used CR LF together literally because they were interfacing with typewriters/printers on the daily.

Windows uses CRLF because DOS used CRLF because CP/M used CRLF because history.

Mac OS used CR for years until OS X switched to LF.

Unix used just a single LF over CRLF and has since the beginning, likely because systems like Multics started using just LF around 1965. Saving a single byte EVERY LINE was a huge deal for both storage and transmission.

Fast-forward to 2018 and it's maybe time for Windows to also switch to just using LF as the EOL character for Text Files.

Why? For starters, Microsoft finally updated Notepad to handle text files that use LF.

BUT

Would such a change be possible? Likely not, it would break the world. Here's NewLine on .NET Core.

public static String NewLine {
    get {
        Contract.Ensures(Contract.Result() != null);
#if !PLATFORM_UNIX
        return "\r\n";
#else
        return "\n";
#endif // !PLATFORM_UNIX
    }
}

Regardless, if you regularly use Windows and WSL (Linux on Windows) and Linux together, you'll want to be conscious and aware of CRLF and LF.

I ran into an interesting situation recently. First, let's review what Git does

You can configure .gitattributes to tell Git how to to treat files, either individually or by extension.

When

git config --global core.autocrlf true

is set, git will automatically convert files quietly so that they are checked out in an OS-specific way. If you're on Linux and checkout, you'll get LF, if you're on Windows you'll get CRLF.

99% of the time this works great.

Except when you are sharing file systems between Linux and Windows. I use Windows 10 and Ubuntu (via WSL) and keep stuff in /mnt/c/github.

However, if I pull from Windows 10 I get CRLF and if I pull from Linux I can LF so then my shell scripts MAY OR MAY NOT WORK while in Ubuntu.

I've chosen to create a .gitattributes file that set both shell scripts and PowerShell scripts to LF. This way those scripts can be used and shared and RUN between systems.

*.sh eol=lf
*.ps1 eol=lf

You've got lots of choices. Again 99% of the time autocrlf is the right thing.

From the GitHub docs:

You'll notice that files are matched--*.c, *.sln, *.png--, separated by a space, then given a setting--text, text eol=crlf, binary. We'll go over some possible settings below.

  • text=auto
    • Git will handle the files in whatever way it thinks is best. This is a good default option.
  • text eol=crlf
    • Git will always convert line endings to CRLF on checkout. You should use this for files that must keep CRLF endings, even on OSX or Linux.
  • text eol=lf
    • Git will always convert line endings to LF on checkout. You should use this for files that must keep LF endings, even on Windows.
  • binary
    • Git will understand that the files specified are not text, and it should not try to change them. The binary setting is also an alias for -text -diff.

Again, the defaults are probably correct. BUT - if you're doing weird stuff, sharing files or file systems across operating systems then you should be aware. If you're having trouble, it's probably CRLF.

* Typewriter by Matunos used under Creative Commons


Sponsor: Check out JetBrains Rider: a cross-platform .NET IDE. Edit, refactor, test and debug ASP.NET, .NET Framework, .NET Core, Xamarin or Unity applications. Learn more and download a 30-day trial!


© 2018 Scott Hanselman. All rights reserved.
     

ASP.NET Core Architect David Fowler's hidden gems in 2.1

$
0
0

ASP.NET Architect David FowlerOpen source ASP.NET Core 2.1 is out, and Architect David Fowler took to twitter to share some hidden gems that not everyone knows about. Sure, it's faster, builds faster, runs faster, but there's a number of details and fun advanced techniques that are worth a closer look at.

.NET Generic Host

ASP.NET Core introduced a new hosting model. .NET apps configure and launch a host.

The host is responsible for app startup and lifetime management. The goal of the Generic Host is to decouple the HTTP pipeline from the Web Host API to enable a wider array of host scenarios. Messaging, background tasks, and other non-HTTP workloads based on the Generic Host benefit from cross-cutting capabilities, such as configuration, dependency injection (DI), and logging.

This means that there's not just a WebHost anymore, there's a Generic Host for non-web-hosting scenarios. You get the same feeling as with ASP.NET Core and all the cool features like DI, logging, and config. The sample code for a Generic Host is up on GitHub.

IHostedService

A way to run long running background operations in both the generic host and in your web hosted applications. ASP.NET Core 2.1 added support for a BackgroundService base class that makes it trivial to write a long running async loop. The sample code for a Hosted Service is also up on GitHub.

Check out a simple Timed Background Task:

public Task StartAsync(CancellationToken cancellationToken)

{
_logger.LogInformation("Timed Background Service is starting.");

_timer = new Timer(DoWork, null, TimeSpan.Zero,
TimeSpan.FromSeconds(5));

return Task.CompletedTask;
}

Fun!

Windows Services on .NET Core

You can now host ASP.NET Core inside a Windows Service! Lots of people have been asking for this. Again, no need for IIS, and you can host whatever makes you happy. Check out Microsoft.AspNetCore.Hosting.WindowsServices on NuGet and extensive docs on how to host your own ASP.NET Core app without IIS on Windows as a Windows Service.

public static void Main(string[] args)

{
var pathToExe = Process.GetCurrentProcess().MainModule.FileName;
var pathToContentRoot = Path.GetDirectoryName(pathToExe);

var host = WebHost.CreateDefaultBuilder(args)
.UseContentRoot(pathToContentRoot)
.UseStartup<Startup>()
.Build();

host.RunAsService();
}

IHostingStartup - Configure IWebHostBuilder with an Assembly Attribute

Simple and clean with source on GitHub as always.

[assembly: HostingStartup(typeof(SampleStartups.StartupInjection))]

Shared Source Packages

This is an interesting one you should definitely take a moment and pay attention to. It's possible to build packages that are used as helpers to share source code. We internally call these "shared source packages." These are used all over ASP.NET Core for things that should be shared BUT shouldn't be public APIs. These get used but won't end up as actual dependencies of your resulting package.

They are consumed like this in a CSPROJ. Notice the PrivateAssets attribute.

<PackageReference Include="Microsoft.Extensions.ClosedGenericMatcher.Sources" PrivateAssets="All" Version="" />

<PackageReference Include="Microsoft.Extensions.ObjectMethodExecutor.Sources" PrivateAssets="All" Version="" />

ObjectMethodExecutor

If you ever need to invoke a method on a type via reflection and that method could be async, we have a helper that we use everywhere in the ASP.NET Core code base that is highly optimized and flexible called the ObjectMethodExecutor.

The team uses this code in MVC to invoke your controller methods. They use this code in SignalR to invoke your hub methods. It handles async and sync methods. It also handles custom awaitables and F# async workflows

SuppressStatusMessages

A small and commonly requested one. If you hate the output that dotnet run gives when you host a web application (printing out the binding information) you can use the new SuppressStatusMessages extension method.

WebHost.CreateDefaultBuilder(args)

.SuppressStatusMessages(true)
.UseStartup<Startup>();

AddOptions

They made it easier in 2.1 to configure options that require services. Previously, you would have had to create a type that derived from IConfigureOptions<TOptions>, now you can do it all in ConfigureServices via AddOptions<TOptions>

public void ConfigureServicdes(IServiceCollection services)

{
services.AddOptions<MyOptions>()
.Configure<IHostingEnvironment>((o,env) =>
{
o.Path = env.WebRootPath;
});
}

IHttpContext via AddHttpContextAccessor

You likely shouldn't be digging around for IHttpContext, but lots of folks ask how to get to it and some feel it should be automatic. It's not registered by default since having it has a performance cost. However, in ASP.NET Core 2.1 a PR was put in for an extension method that makes it easy IF you want it.

services.AddHttpContextAccessor();

So ASP.NET Core 2.1 is out and ready to go

New features in this release include:

Check out What's New in ASP.NET Core 2.1 in the ASP.NET Core docs to learn more about these features. For a complete list of all the changes in this release, see the release notes.

Go give it a try. Follow this QuickStart and you can have a basic Web App up in 10 minutes.


Sponsor: Check out JetBrains Rider: a cross-platform .NET IDE. Edit, refactor, test and debug ASP.NET, .NET Framework, .NET Core, Xamarin or Unity applications. Learn more and download a 30-day trial!


© 2018 Scott Hanselman. All rights reserved.
     

EarTrumpet 2.0 makes Windows 10's audio subsystem even better...and it's free!

$
0
0

EarTrumpetLast week I blogged about some new audio features in Windows 10 that make switching your inputs and outputs easier, but even better, allow you to set up specific devices for specific programs. That means I can have one mic and headphones for Audition, while another for browsing, and yet another set for Skype.

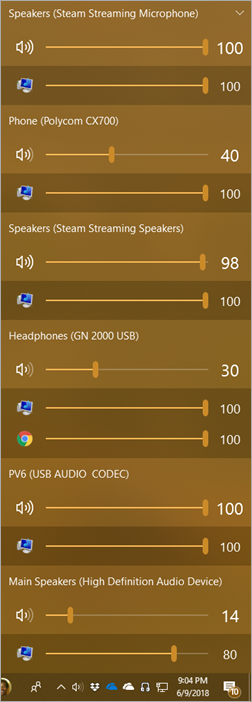
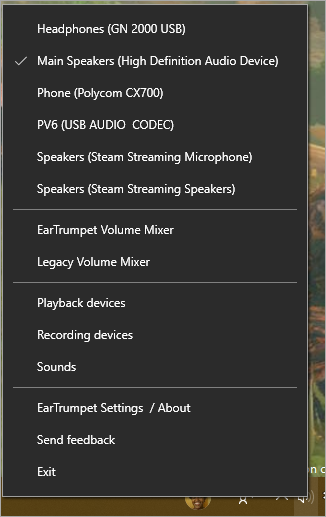
However, while doing my research and talking about this on Twitter, lots of people started recommending I check out "EarTrumpet" - it's an applet that lets you control the volume of classic and modern Windows Apps in one nice UI! Switching, volume, and more. Consider EarTrumpet a prosumer replacement for the little Volume icon down by the clock in Windows 10. You'll hide the default one and drag EarTrumpet over in its place and use it instead!

EarTrumpet

EarTrumpet is available for free in the Windows Store and works on all versions of Windows 10, even S! I have no affiliation with the team that built it and it's a free app, so you have literally nothing to lose by trying it out!

EarTrumpet is also open source and on GitHub. The team that built it is:

  • Rafael Rivera - a software forward/reverse engineer
  • David Golden - lead engineer on MetroTwit, the greatest WPF Twitter Client the world has never known.
  • Dave Amenta - ex-Microsoft, worked on shell and Start menu for Windows 8 and 10

It was originally built as a replacement for the Volume Control in Windows back in 2015, but EarTrumpet 2.0's recent release makes it easy to use the new audio capabilities in the Windows 10's April 2018 Update.

Looks Good

It's easy to make a crappy Windows App. Heck, it's easy to make a crappy app. But EarTrumpet is NOT just an "applet" or an app. It's a perfect example of how a Windows 10 app - not made by Microsoft - can work and look seamlessly with the operating system. You'll think it's native - and it adds functionality that probably should be built in to Windows!

It's got light/dark theme support (no one bothers to even test this, but EarTrumpet does) and a nice acrylic blur. It looks like it's built-in/in-box. There's a sample app so you can make your apps look this sharp up on Rafael's GitHub and here's the actual BlurWindowExtensions that EarTrumpet uses.

Works Good

Quickly switch outputEarTrumpet 1.x works on Windows "RS3 and below" so that's 10.0.16299 and down. But 2.0 works on the latest Windows and is also written entirely in C#. Any remaining C++ code has been removed with no missing functionality.

EarTrumpet may SEEM like a simple app but there's a lot going on to be this polished AND work with any combination of audio hardware. As a podcaster and remote workers I have a LOT of audio devices but I now have one-click control over it all.

Given how fast Windows 10 has been moving with Insiders Builds and all, it seems like there's a bunch of APIs with new functionality that lacks docs. The EarTrumpet team has reverse engineered the parts the needed.

Modern Resource Technology (MRT) Resource Manager

Internal Audio Interface: IAudioPolicyConfigFactory

  • Gets them access to new APIs (GetPersistedDefaultAudioEndpoint / SetPersistedDefaultAudioEndpoint) in RS4 that let's them 'redirect' apps to different playback devices. Same API used in modern sound settings.
      • Code here with no public API yet?

    Internal Audio Interface: IPolicyConfig

    • Gets them access to SetDefaultEndpoint API; lets us change the default playback device
    • Code here and no public API yet?

    Acrylic Blur (win32)

    From a development/devops perspective, I am told EarTrumpet's team is able to push a beta flight through the Windows 10 Store in just over 30 minutes. No waiting for days to get beta test data. They use Bugsnag for their generous OSS license to catch crashes and telemetry. So far they're getting >3000 new users a month as the word gets out with nearly 100k users so far! Hopefully +1 as you give EarTrumpet a try yourself!


    Sponsor: Check out dotMemory Unit, a free unit testing framework for fighting all kinds of memory issues in your code. Extend your unit testing with the functionality of a memory profiler.


    © 2018 Scott Hanselman. All rights reserved.
         

    Penny Pinching in the Cloud: Deploying Containers cheaply to Azure

    $
    0
    0

    imageI saw a tweet from a person on Twitter who wanted to know the easiest and cheapest way to get an Web Application that's in a Docker Container up to Azure. There's a few ways and it depends on your use case.

    Some apps aren't web apps at all, of course, and just start up in a stateless container, do some work, then exit. For a container like that, you'll want to use Azure Container Instances. I did a show and demo on this for Azure Friday.

    Azure Container Instances

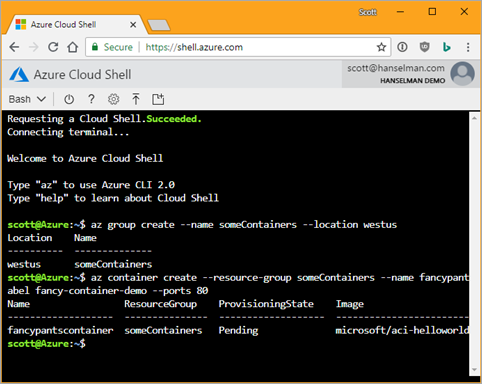
    Using the latest Azure CLI  (command line interface - it works on any platform), I just do these commands to start up a container quickly. Billing is per-second. Shut it down and you stop paying. Get in, get out.

    Tip: If you don't want to install anything, just go to https://shell.azure.com to get a bash shell and you can do these command there, even on a Chromebook.

    I'll make a "resource group" (just a label to hold stuff, so I can delete it en masse later). Then "az container create" with the image. Note that that's a public image from Docker Hub, but I can also use a private Container Registry or a private one in Azure. More on that in a second.

    Anyway, make a group (or use an existing one), create a container, and then either hit the IP I get back or I can query for (or guess) the full name. It's usually dns=name-label.location.azurecontainer.io.

    > az group create --name someContainers --location westus
    
    Location Name
    ---------- --------------
    westus someContainers
    > az container create --resource-group someContainers --name fancypantscontainer --image microsoft/aci-helloworl
    d --dns-name-label fancy-container-demo --ports 80
    Name ResourceGroup ProvisioningState Image IP:ports CPU/Memory OsType Location
    ------------------- --------------- ------------------- ------------------------ ---------------- --------------- -------- ----------
    fancypantscontainer someContainers Pending microsoft/aci-helloworld 40.112.167.31:80 1.0 core/1.5 gb Linux westus
    > az container show --resource-group someContainers --name fancypantscontainer --query "{FQDN:ipAddress.fqdn,ProvisioningState:provisioningState}" --out table
    FQDN ProvisioningState
    --------------------------------------------- -------------------
    fancy-container-demo.westus.azurecontainer.io Succeeded

    Boom, container in the cloud, visible externally (if I want) and per-second billing. Since I made and named a resource group, I can delete everything in that group (and stop billing) easily:

    > az group delete -g someContainers 

    This is cool because I can basically run Linux or Windows Containers in a "serverless" way. Meaning I don't have to think about VMs and I can get automatic, elastic scale if I like.

    Azure Web Apps for Containers

    ACI is great for lots of containers quickly, for bringing containers up and down, but I like my long-running web apps in Azure Web Apps for Containers. I run 19 Azure Web Apps today via things like Git/GitHub Deploy, publish from VS, or CI/CD from VSTS.

    Azure Web Apps for Containers is the same idea, except I'm deploying containers directly. I can do a Single Container easily or use Docker Compose for multiple.

    I wanted to show how easy it was to set this up so I did a video (cold, one take, no rehearsal, real accounts, real app) and put it on YouTube. It explains "How to Deploy Containers cheaply to Azure" in 21 minutes. It could have been shorter, but I also wanted to show how you can deploy from both Docker Hub (public) or from your own private Azure Container Registry.

    I did all the work from the command line using Docker commands where I just pushed to my internal registry!

    > docker login hanselregistry.azurecr.io
    
    > docker build -t hanselregistry.azurecr.io/podcast .
    > docker push hanselregistry.azurecr.io/podcast

    Took minutes to get my podcast site running on Azure in Web Apps for Containers. And again - this is the penny pinching part - keep control of the App Service Plan (the VM underneath the App Service) and use the smallest one you can and pack the containers in tight.

    Watch the video, and note when I get to the part where I add create an "App Service Plan." Again, that's the VM under a Web App/App Service. I have 19 smallish websites inside a Small (sometime a Medium, I can scale it whenever) App Service. You should be able to fit 3-4 decent sites in small ones depending on memory and CPU characteristics of the site.

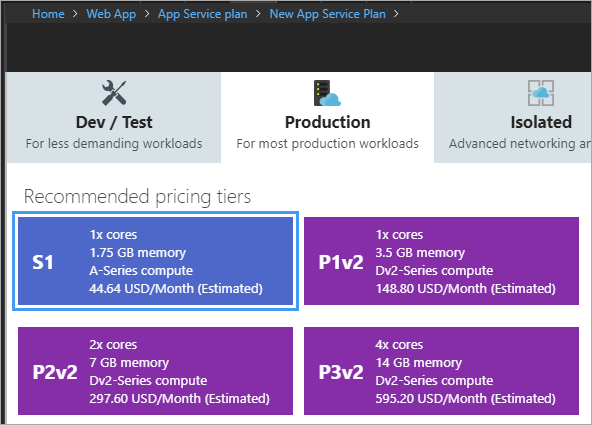
    Click Pricing Plan and you'll get here:

    Recommend Pricing tiers have many choices

    Be sure to explore the Dev/Test tab on the left as well. When you're making a non-container-based App Service you'll see F1 and D1 for Free and Shared. Both are fine for small websites, demos, hosting your github projects, etc.

    Free, Shared, or Basic Infrastructure

    If you back up and select Docker as the "OS"...

    Windows, Linux, or Docker

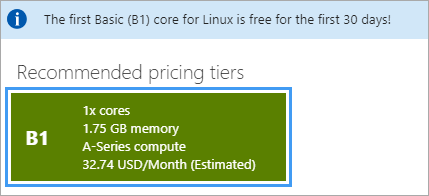
    Again check out Dev/Test for less demanding workloads and note B1 - Basic.

    B1 is $32.74

    The first B1 is free for 30 days! Good to kick the tires. Then as of the timing of this post it's US$32.74 (Check pricing for different regions and currencies) but has nearly 2 gigs of RAM. I can run several containers in there.

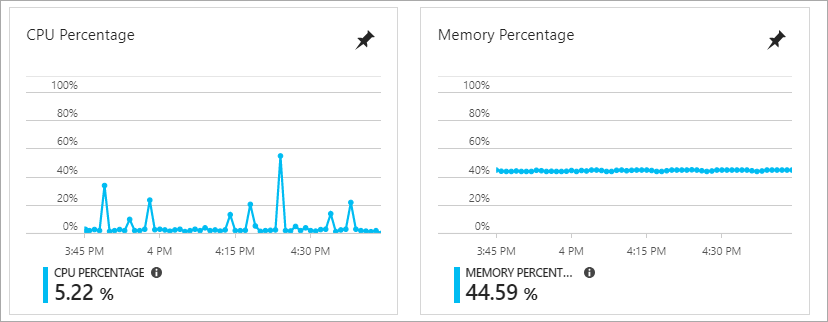
    Just watch your memory and CPU and pack them in. Again, more money means better perf, but the original ask here was how to save money.

    Low CPU and 40% memory

    To sum up, ACI is great for per-second billing and spinning up n containers programmatically and getting out fast) and App Service for Containers is an easy way to deploy your Dockerized apps. Hope this helps.


    Sponsor: Check out dotMemory Unit, a free unit testing framework for fighting all kinds of memory issues in your code. Extend your unit testing with the functionality of a memory profiler.


    © 2018 Scott Hanselman. All rights reserved.
         

    Using ASP.NET Core 2.1's HttpClientFactory with Refit's REST library

    $
    0
    0

    Strong by Lucyb_22 used under Creative Commons from FlickrWhen I moved my podcast site over to ASP.NET Core 2.1 I also started using HttpClientFactory and wrote up my experience. It's a nice clean way to centralize both settings and policy for your HttpClients, especially if you're using a lot of them to talk to a lot of small services.

    Last year I explored Refit, an automatic type-safe REST library for .NET Standard. It makes it super easy to just declare the shape of a client and its associated REST API with a C# interface:

    public interface IGitHubApi
    
    {
    [Get("/users/{user}")]
    Task<User> GetUser(string user);
    }

    and then ask for an HttpClient that speaks that API's shape, then call it. Fabulous.

    var gitHubApi = RestService.For<IGitHubApi>("https://api.github.com");
    

    var octocat = await gitHubApi.GetUser("octocat");

    But! What does Refit look like and how does it work in an HttpClientFactory-enabled world? Refit has recently been updated with first class support for ASP.NET Core 2.1's HttpClientFactory with the Refit.HttpClientFactory package.

    Since you'll want to centralize all your HttpClient configuration in your ConfigureServices method in Startup, Refit adds a nice extension method hanging off of Services.

    You add a RefitClient of a type, then add whatever other IHttpClientBuilder methods you want afterwards:

    services.AddRefitClient<IWebApi>()
    
    .ConfigureHttpClient(c => c.BaseAddress = new Uri("https://api.example.com"));
    // Add additional IHttpClientBuilder chained methods as required here:
    // .AddHttpMessageHandler<MyHandler>()
    // .SetHandlerLifetime(TimeSpan.FromMinutes(2));

    Of course, then you can just have your HttpClient automatically created and passed into the constructor. You'll see in this sample from their GitHub that you get an IWebAPI (that is, whatever type you want, like my IGitHubApi) and just go to town with a strongly typed interfaces of an HttpClient with autocomplete.

    public class HomeController : Controller
    
    {
    public HomeController(IWebApi webApi)
    {
    _webApi = webApi;
    }

    private readonly IWebApi _webApi;

    public async Task<IActionResult> Index(CancellationToken cancellationToken)
    {
    var thing = await _webApi.GetSomethingWeNeed(cancellationToken);

    return View(thing);
    }
    }

    Refit is easy to use, and even better with ASP.NET Core 2.1. Go get Refit and try it today!

    * Strong image by Lucyb_22 used under Creative Commons from Flickr


    Sponsor: Check out dotMemory Unit, a free unit testing framework for fighting all kinds of memory issues in your code. Extend your unit testing with the functionality of a memory profiler.


    © 2018 Scott Hanselman. All rights reserved.
         

    Using Flurl to easily build URLs and make testable HttpClient calls in .NET

    $
    0
    0

    FlurlI posted about using Refit along with ASP.NET Core 2.1's HttpClientFactory earlier this week. Several times when exploring this space (both on Twitter, googling around, and in my own blog comments) I come upon Flurl as in, "Fluent URL."

    Not only is that a killer name for an open source project, Flurl is very active, very complete, and very interesting. By the way, take a look at the https://flurl.io/ site for a great example of a good home page for a well-run open source library. Clear, crisp, unambiguous, with links on how to Get It, Learn It, and Contribute. Not to mention extensive docs. Kudos!

    Flurl is a modern, fluent, asynchronous, testable, portable, buzzword-laden URL builder and HTTP client library for .NET.

    You had me at buzzword-laden! Flurl embraces the .NET Standard and works on .NET Framework, .NET Core, Xamarin, and UWP - so, everywhere.

    To use just the Url Builder by installing Flurl. For the kitchen sink (recommended) you'll install Flurl.Http. In fact, Todd Menier was kind enough to share what a Flurl implementation of my SimpleCastClient would look like! Just to refresh you, my podcast site uses the SimpleCast podcast hosting API as its back-end.

    My super basic typed implementation that "has a" HttpClient looks like this. To be clear this sample is WITHOUT FLURL.

    public class SimpleCastClient
    
    {
    private HttpClient _client;
    private ILogger<SimpleCastClient> _logger;
    private readonly string _apiKey;

    public SimpleCastClient(HttpClient client, ILogger<SimpleCastClient> logger, IConfiguration config)
    {
    _client = client;
    _client.BaseAddress = new Uri($"https://api.simplecast.com"); //Could also be set in Startup.cs
    _logger = logger;
    _apiKey = config["SimpleCastAPIKey"];
    }

    public async Task<List<Show>> GetShows()
    {
    try
    {
    var episodesUrl = new Uri($"/v1/podcasts/shownum/episodes.json?api_key={_apiKey}", UriKind.Relative);
    _logger.LogWarning($"HttpClient: Loading {episodesUrl}");
    var res = await _client.GetAsync(episodesUrl);
    res.EnsureSuccessStatusCode();
    return await res.Content.ReadAsAsync<List<Show>>();
    }
    catch (HttpRequestException ex)
    {
    _logger.LogError($"An error occurred connecting to SimpleCast API {ex.ToString()}");
    throw;
    }
    }
    }

    Let's explore Tim's expression of the same client using the Flurl library!

    Not we set up a client in Startup.cs, use the same configuration, and also put in some nice aspect-oriented events for logging the befores and afters. This is VERY nice and you'll note it pulls my cluttered logging code right out of the client!

    // Do this in Startup. All calls to SimpleCast will use the same HttpClient instance.
    
    FlurlHttp.ConfigureClient(Configuration["SimpleCastServiceUri"], cli => cli
    .Configure(settings =>
    {
    // keeps logging & error handling out of SimpleCastClient
    settings.BeforeCall = call => logger.LogWarning($"Calling {call.Request.RequestUri}");
    settings.OnError = call => logger.LogError($"Call to SimpleCast failed: {call.Exception}");
    })
    // adds default headers to send with every call
    .WithHeaders(new
    {
    Accept = "application/json",
    User_Agent = "MyCustomUserAgent" // Flurl will convert that underscore to a hyphen
    }));

    Again, this set up code lives in Startup.cs and is a one-time thing. The Headers, User Agent all are dealt with once there and in a one-line chained "fluent" manner.

    Here's the new SimpleCastClient with Flurl.

    using Flurl;
    
    using Flurl.Http;

    public class SimpleCastClient
    {
    // look ma, no client!
    private readonly string _baseUrl;
    private readonly string _apiKey;

    public SimpleCastClient(IConfiguration config)
    {
    _baseUrl = config["SimpleCastServiceUri"];
    _apiKey = config["SimpleCastAPIKey"];
    }

    public Task<List<Show>> GetShows()
    {
    return _baseUrl
    .AppendPathSegment("v1/podcasts/shownum/episodes.json")
    .SetQueryParam("api_key", _apiKey)
    .GetJsonAsync<List<Show>>();
    }
    }

    See in GetShows() how we're also using the Url Builder fluent extensions in the Flurl library. See that _baseUrl is actually a string? We all know that we're supposed to use System.Uri but it's such a hassle. Flurl adds extension methods to strings so that you can seamlessly transition from the strings (that we all use) representations of Urls/Uris and build up a Query String, and in this case, a GET that returns JSON.

    Very clean!

    Flurl also prides itself on making HttpClient testing easier as well. Here's a more sophisticated example of a library from their site:

    // Flurl will use 1 HttpClient instance per host
    
    var person = await "https://api.com"
    .AppendPathSegment("person")
    .SetQueryParams(new { a = 1, b = 2 })
    .WithOAuthBearerToken("my_oauth_token")
    .PostJsonAsync(new
    {
    first_name = "Claire",
    last_name = "Underwood"
    })
    .ReceiveJson<Person>();

    This example is doing a post with an anonymous object that will automatically turn into JSON when it hits the wire. It also receives JSON as the response. Even the query params are created with a C# POCO (Plain Old CLR Object) and turned into name=value strings automatically.

    Here's a test Flurl-style!

    // fake & record all http calls in the test subject
    
    using (var httpTest = new HttpTest()) {
    // arrange
    httpTest.RespondWith(200, "OK");
    // act
    await sut.CreatePersonAsync();
    // assert
    httpTest.ShouldHaveCalled("https://api.com/*")
    .WithVerb(HttpMethod.Post)
    .WithContentType("application/json");
    }

    Flurl.Http includes a set of features to easily fake and record HTTP activity. You can make a whole series of assertions about your APIs:

    httpTest.ShouldHaveCalled("http://some-api.com/*")
    
    .WithVerb(HttpMethd.Post)
    .WithContentType("application/json")
    .WithRequestBody("{\"a\":*,\"b\":*}") // supports wildcards
    .Times(1)

    All in all, it's an impressive set of tools that I hope you explore and consider for your toolbox! There's a ton of great open source like this with .NET Core and I'm thrilled to do a small part to spread the word. You should to!


    Sponsor: Check out dotMemory Unit, a free unit testing framework for fighting all kinds of memory issues in your code. Extend your unit testing with the functionality of a memory profiler.


    © 2018 Scott Hanselman. All rights reserved.
         

    .NET Core and Docker

    $
    0
    0

    If you've got Docker installed you can run a .NET Core sample quickly just like this. Try it:

    docker run --rm microsoft/dotnet-samples

    If your Docker for Windows is in "Windows Container mode" you can try .NET Framework (the full 4.x Windows Framework) like this:

    docker run --rm microsoft/dotnet-framework-samples

    vs-docker-toolsI did a video last week with a write up showing how easy it is to get a containerized application into Azure AND cheaply with per-second billing.

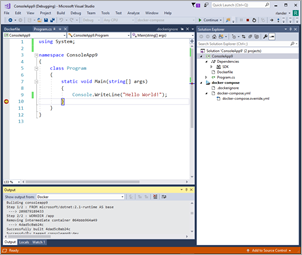
    Container images are easy to share via Docker Hub, the Docker Store, and private Docker registries, such as the Azure Container Registry. Also check out Visual Studio Tools for Docker. It all works very nicely together.

    I like this quote from Richard Lander:

    Imagine five or so years ago someone telling you in a job interview that they care so much about consistency that they always ship the operating system with their app. You probably wouldn’t have hired them. Yet, that’s exactly the model Docker uses!

    And it's a good model! It gives you guaranteed consistency. "Containers include the application and all of its dependencies. The application executes the same code, regardless of computer, environment or cloud." It's also a good way to make sure your underlying .NET is up to date with security fixes:

    Docker is a game changer for acquiring and using .NET updates. Think back to just a few years ago. You would download the latest .NET Framework as an MSI installer package on Windows and not need to download it again until we shipped the next version. Fast forward to today. We push updated container images to Docker Hub multiple times a month.

    The .NET images get built using the official Docker images which is nice.

    .NET images are built using official images. We build on top of Alpine, Debian, and Ubuntu official images for x64 and ARM. By using official images, we leave the cost and complexity of regularly updating operating system base images and packages like OpenSSL, for example, to the developers that are closest to those technologies. Instead, our build system is configured to automatically build, test and push .NET images whenever the official images that we use are updated. Using that approach, we’re able to offer .NET Core on multiple Linux distros at low cost and release updates to you within hours.

    Here's where you can find .NET Docker Hub repos:

    .NET Core repos:

    .NET Framework repos:

    • microsoft/dotnet-framework – includes .NET Framework runtime and sdk images.
    • microsoft/aspnet – includes ASP.NET runtime images, for ASP.NET Web Forms and MVC, configured for IIS.
    • microsoft/wcf – includes WCF runtime images configured for IIS.
    • microsoft/iis – includes IIS on top of the Windows Server Core base image. Works for but not optimized for .NET Framework applications. The microsoft/aspnet and microsoft/wcfrepos are recommended instead for running the respective application types.

    There's a few kinds of images in the microsoft/dotnet repo:

    • sdk — .NET Core SDK images, which include the .NET Core CLI, the .NET Core runtime and ASP.NET Core.
    • aspnetcore-runtime — ASP.NET Core images, which include the .NET Core runtime and ASP.NET Core.
    • runtime — .NET Core runtime images, which include the .NET Core runtime.
    • runtime-deps — .NET Core runtime dependency images, which include only the dependencies of .NET Core and not .NET Core itself. This image is intended for self-contained applications and is only offered for Linux. For Windows, you can use the operating system base image directly for self-contained applications, since all .NET Core dependencies are satisfied by it.

    For example, I'll use an SDK image to build my app, but I'll use aspnetcore-runtime to ship it. No need to ship the SDK with a running app. I want to keep my image sizes as small as possible!

    For me, I even made a little PowerShell script (runs on Windows or Linux) that builds and tests my Podcast site (the image tagged podcast:test) within docker. Note the volume mapping? It stores the Test Results outside the container so I can look at them later if I need to.

    #!/usr/local/bin/powershell
    
    docker build --pull --target testrunner -t podcast:test .
    docker run --rm -v c:\github\hanselminutes-core\TestResults:/app/hanselminutes.core.tests/TestResults podcast:test

    Pretty slick.

    Results File: /app/hanselminutes.core.tests/TestResults/_898a406a7ad1_2018-06-28_22_05_04.trx
    

    Total tests: 22. Passed: 22. Failed: 0. Skipped: 0.
    Test execution time: 8.9496 Seconds

    Go read up on how the .NET Core images are built, managed, and maintained. It made it easy for me to get my podcast site - once dockerized - running on .NET Core on a Raspberry Pi (ARM32).


    New Sponsor! Never type an invoice again! With DocSight OCR by ActivePDF, you’ll extract data from bills, invoices, PO’s & other documents using zonal data capture technology. Achieve Digital Transformation today!


    © 2018 Scott Hanselman. All rights reserved.
         

    Detecting that a .NET Core app is running in a Docker Container and SkippableFacts in XUnit

    $
    0
    0

    Container Ship by NOAA used under CCI have moved my podcast site over to ASP.NET Core 2.1 and I've got it running in a Docker container. Take a moment a check out some of the blog posts, as I've been blogging as I've been learning.
    I've added Unit Tests as well as Selenium Tests that are also run with the XUnit Unit Test Runner. However, I don't want those Selenium Tests that automate Google Chrome to run within the context of Docker.

    I tried to add an Environment Variable within my Dockerfile like this:

    ENV INDOCKER=1

    I figured I'd check for that variable and conditionally skip tests. Simple, right? Well, I decided to actually READ the Dockerfiles that my ASP.NET Core 2.1 app uses. Remember, Dockerfiles (and the resulting images) are layered, and with all things .NET, are Open Source. 

    Looking at my own layers and exploring the source on Github, I see I'm using:

    Nice, so I don't need to set anything to know I'm running .NET in a Container! I wouldn't have known any of this if I hadn't taken 15 minutes and exploring/asserted/confirmed my stack. Just because I'm running Docker containers doesn't mean it's not useful to take the time to KNOW what I'm running! Assert your assumptions and all that, right?

    I added a little helper in my Tests:

    private bool InDocker { get { return Environment.GetEnvironmentVariable("DOTNET_RUNNING_IN_CONTAINER") == "true";} }
    

    Since I'm using XUnit, I decided to bring in the very useful helper Xunit.SkippableFact!

    For example:

    [SkippableFact]
    public void LoadTheMainPageAndCheckTitle()
    {
        Skip.If(InDocker, "We are in Docker, y'all!");
        Browser.Navigate().GoToUrl(Server.RootUri);
        Assert.StartsWith("Hanselminutes Technology Podcast - Fresh Air and Fresh Perspectives for Developers", Browser.Title);
    }

    SkippableFact lets me skip tests for basically any reason. I could help if I'm in Docker, as I'm doing here. Or, given that Selenium Tests will throw an "OpenQA.Selenium.WebDriverException" when it can't find the Selenium Web Driver, I could also do this, skipping because a specific Exception was through. Note this means it's a SKIP not a FAIL.

    [SkippableFact(typeof(OpenQA.Selenium.WebDriverException))]
    public void KevinScottTestThenGoHome()
    {
       Browser.Navigate().GoToUrl(Server.RootUri + "/631/how-do-you-become-a-cto-with-microsofts-cto-kevin-scott");
       var headerSelector = By.TagName("h1");
       var link = Browser.FindElement(headerSelector);
       link.Click();
    }
    

    The results look like this:

    Total tests: 22. Passed: 18. Failed: 0. Skipped: 4.
    Test Run Successful.
    Test execution time: 8.7878 Seconds

    You could choose to Skip Tests if a backend, 3rd party API, or DB was down, but you still wanted to test as much as possible. I'm pretty happy with the results!


    New Sponsor! Never type an invoice again! With DocSight OCR by ActivePDF, you’ll extract data from bills, invoices, PO’s & other documents using zonal data capture technology. Achieve Digital Transformation today!


    © 2018 Scott Hanselman. All rights reserved.
         

    The whole of WordPress compiled to .NET Core and a NuGet Package with PeachPie

    $
    0
    0

    Compiling WordPress to .NET CoreWhy? Because it's awesome. Sometimes a project comes along that is impossibly ambitious and it works. I've blogged a little about Peachpie, the open source PHP compiler that runs PHP under .NET Core. It's a project hosted at https://www.peachpie.io.

    But...why? Here's why:

    1. Performance: compiled code is fast and also optimized by the .NET Just-in-Time Compiler for your actual system. Additionally, the .NET performance profiler may be used to resolve bottlenecks.
    2. C# Extensibility: plugin functionality can be implemented in a separate C# project and/or PHP plugins may use .NET libraries.
    3. Sourceless distribution: after the compilation, most of the source files are not needed.
    4. Power of .NET: Peachpie allows the compiled WordPress clone to run in a .NET JIT'ted, secure and manageable environment, updated through windows update.
    5. No need to install PHP: Peachpie is a modern compiler platform and runtime distributed as a dependency to your .NET project. It is downloaded automatically on demand as a NuGet package or it can be even deployed standalone together with the compiled application as its library dependency.

    A year ago you could very happily run Wordpress (a very NON-trivial PHP application, to be clear) under .NET Core using Peachpie. You would compile your PHP into an assembly and then do something like this in your Startup.cs:

    public void Configure(IApplicationBuilder app)
    {
        app.UseSession();
        app.UsePhp(new PhpRequestOptions(scriptAssemblyName: "peachweb"));
        app.UseDefaultFiles();
        app.UseStaticFiles();
    }
    

    And that's awesome. However, I noticed something on their GitHub recently, specifically under https://github.com/iolevel/wpdotnet-sdk. It says:

    The solution compiles all of WordPress into a .NET assembly and additionally provides C# wrappers for utilization of compiled sources.

    Whoa. Drink that in. The project consists of several parts:

    • wordpress contains sources of WordPress that are compiled into a single .NET Core assembly (wordpress.dll). Together with its content files it is packed into a NuGet package PeachPied.WordPress. The project additionally contains the "must-use" plugin peachpie-api.php which exposes the WordPress API to .NET.
    • PeachPied.WordPress.Sdk defines abstraction layer providing .NET interfaces over PHP WordPress instance. The interface is implemented and provided by peachpie-api.php.
    • PeachPied.WordPress.AspNetCore is an ASP.NET Core request handler that configures the ASP.NET pipeline to pass requests to compiled WordPress scripts. The configuration includes response caching, short URL mapping, various .NET enhancements and the settings of WordPress database.
    • app project is the executable demo ASP.NET Core web server making use of compiled WordPress.

    They compiled the whole of WordPress into a NuGet Package.

    YES.

    • The compiled website runs on .NET Core
    • You're using ASP.NET Core request handling and you can extend WordPress with C# plugins and themes

    Seriously. Go get the .NET Core SDK version 2.1.301 over at https://dot.net and clone their repository locally from https://github.com/iolevel/wpdotnet-sdk.

    Make sure you have a copy of mySQL running. I get one started FAST with Docker using this command:

    docker run --name=mysql1 -p 3306:3306 -e MYSQL_ROOT_PASSWORD=password -e MYSQL_DATABASE=wordpress mysql --default-authentication-plugin=mysql_native_password

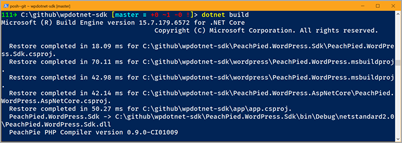
    Then just "dotnet build" at the root of the project, then go into the app folder and "dotnet run." It will show up on localhost:5004.

    NOTE: I needed to include the default authentication method to prevent the generic Wordpress "Cannot establish database connection." I also added the MYSQL_DATABASE environment variable so I could avoid logging initially using the mysql client and creating the database manually with "CREATE DATABASE wordpress."

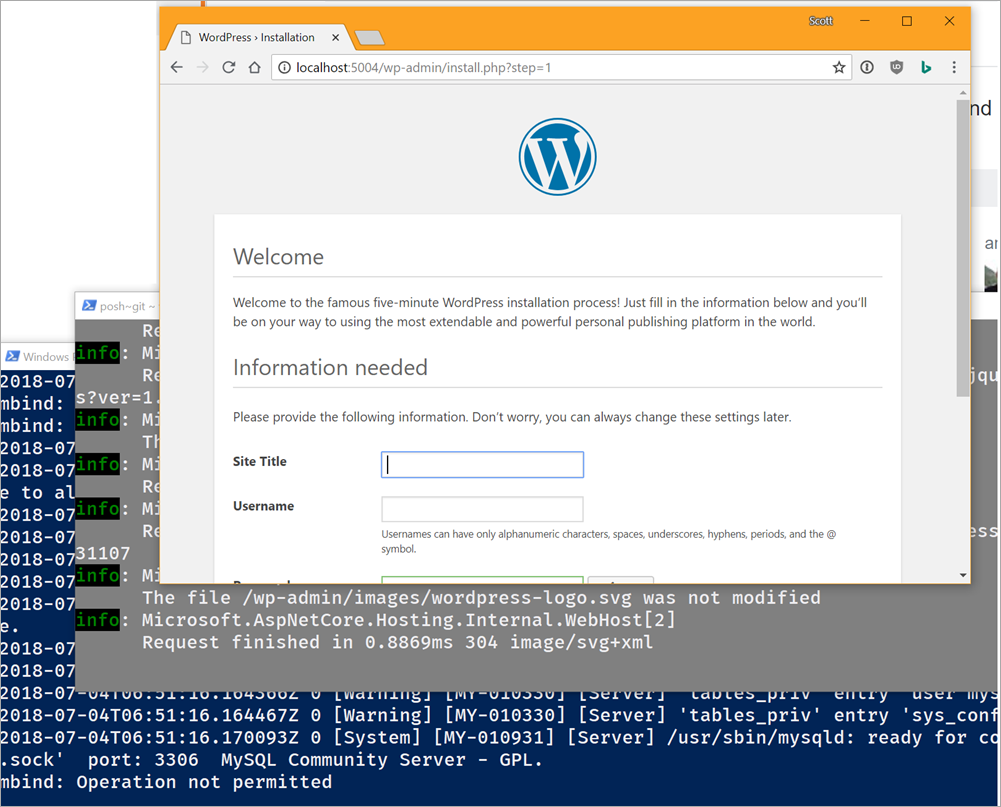
    Look at that. I have my mySQL in one terminal listening on 3306, and ASP.NET Core 2.1 running on port 5004 hosting freaking WordPress compiled into a single NuGet package.

    Wordpress under .NET Core

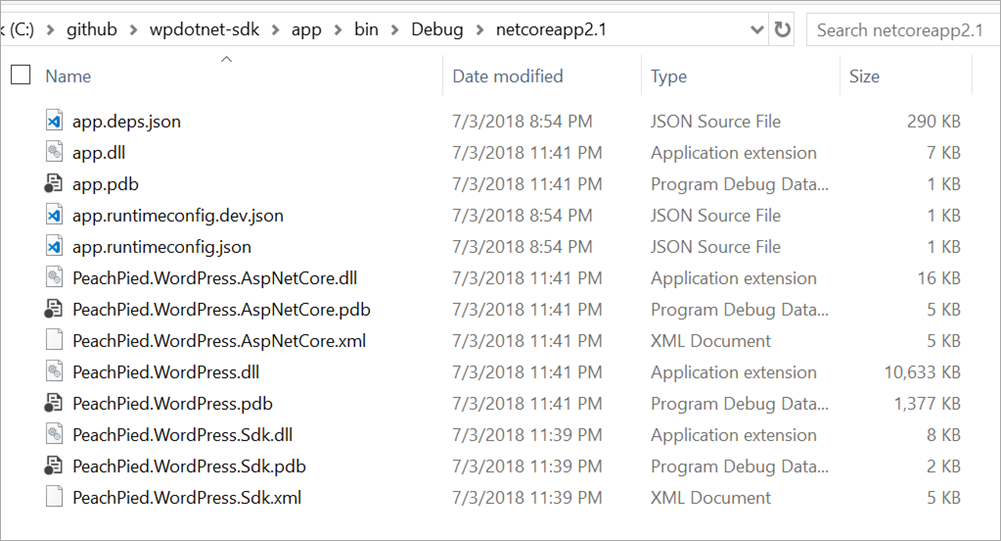
    Here's my bin folder:

    WordPress as a single DLL

    There's no PHP files which is a nice security bonus - not only are you running from the one assembly but there's no text files for any rogue plugins to modify or corrupt.

    Here's the ASP.NET Core 2.1 app that hosts it, in full:

    using System.IO;
    using Microsoft.AspNetCore;
    using Microsoft.AspNetCore.Builder;
    using Microsoft.AspNetCore.Hosting;
    using Microsoft.Extensions.Configuration;
    using PeachPied.WordPress.AspNetCore;
    namespace peachserver
    {
        class Program
        {
            static void Main(string[] args)
            {
                // make sure cwd is not app\ but its parent:
                if (Path.GetFileName(Directory.GetCurrentDirectory()) == "app")
                {
                    Directory.SetCurrentDirectory(Path.GetDirectoryName(Directory.GetCurrentDirectory()));
                }
                //
                var host = WebHost.CreateDefaultBuilder(args)
                    .UseStartup<Startup>()
                    .UseUrls("http://*:5004/")
                    .Build();
                host.Run();
            }
        }
        class Startup
        {
            public void Configure(IApplicationBuilder app, IHostingEnvironment env, IConfiguration configuration)
            {
                // settings:
                var wpconfig = new WordPressConfig();
                configuration
                    .GetSection("WordPress")
                    .Bind(wpconfig);
                //
                if (env.IsDevelopment())
                {
                    app.UseDeveloperExceptionPage();
                }
                app.UseWordPress(wpconfig);
                app.UseDefaultFiles();
            }
        }
    }
    

    I think the app.UseWordPress() is such a nice touch. ;)

    I often get emails from .NET developers asking what blog engine they should consider. Today, I think you should look closely at Peachpie and strongly consider running WordPress under .NET Core. It's a wonderful open source project that brings two fantastic ecosystems together! I'm looking forward to exploring this project more and I'd encourage you to check it out and get involved with Peachpie.


    Sponsor: Check out dotMemory Unit, a free unit testing framework for fighting all kinds of memory issues in your code. Extend your unit testing with the functionality of a memory profiler!


    © 2018 Scott Hanselman. All rights reserved.
         

    dotnet outdated helps you keep your projects up to date

    $
    0
    0

    I've moved my podcast site over to ASP.NET Core 2.1 over the last few months. You might want to follow the saga by checking out some of the recent blog posts.
    That's just a few of the posts. Be sure to check out the last several months' posts in the calendar view. Anyway, I've been trying lots of new open source tools and libraries like coverlet for .NET Core Code Coverage, and frankly, keeping my project files and dependencies up to date has sucked.

    Npm has "npm outdated" and paket has "paket outdated," why doesn't dotnet Core have this also? Certainly at a macro level there's more things to consider as NuGet would need to find the outdated packages for UWP, C++, and a lot of other project types as well. However if we just focus on .NET Core as an initial/primary use case, Jerrie Pelser has "dotnet outdated" for us and it's fantastic!

    Once you've got the .NET Core 2.1 SDK or newer, just install the tool globally with one line:

    dotnet tool install --global dotnet-outdated

    At this point I'll run "dotnet outdated" on my podcast website. While that's running, let me just point you to https://github.com/jerriep/dotnet-outdated as a lovely example of how to release a tool (no matter how big or small) on GitHub.

    • It has an AppVeyor CI link along with a badge showing you that it's passing its build and test suite. Nice.
    • It includes both a NuGet link to the released package AND a myGet link and badge to the dailies.
    • It's got clear installation and clear usage details.
    • Bonus points of screenshots. While not accessible to call, I admit personally that I'm more likely to feel that a project is well-maintained if there are clear screenshots that tell me "what am I gonna get with this tool?"

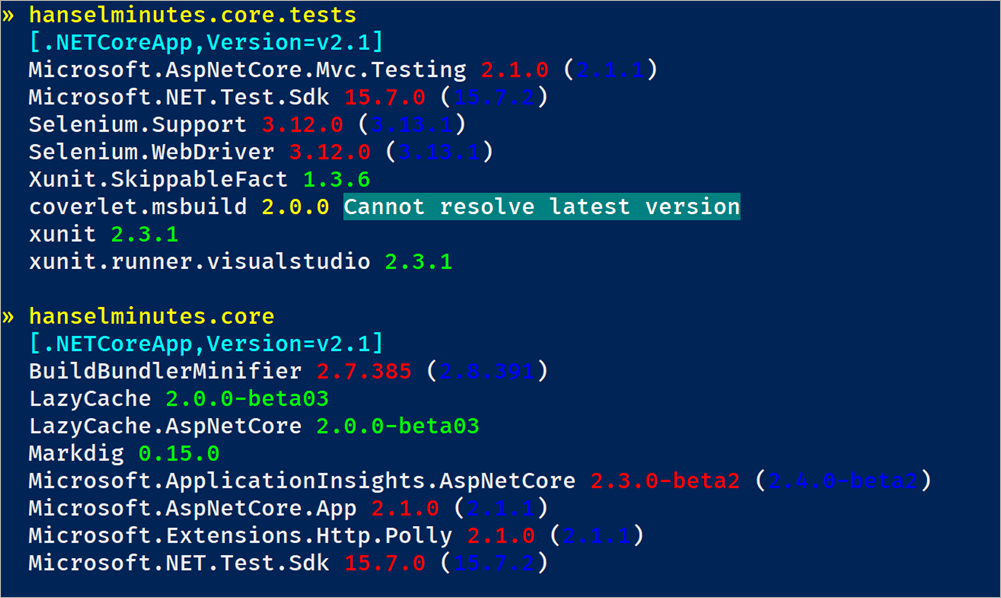
    Here's the initial output on my Site and Tests.

    dotnet outdated

    After updating the patch versions, here's the output, this time as text. For some reason it's not seeing Coverlet's NuGet so I'm getting a "Cannot resolve latest version" error but I haven't debugged that yet.

    » hanselminutes.core.tests
      [.NETCoreApp,Version=v2.1]
      Microsoft.AspNetCore.Mvc.Testing 2.1.1
      Microsoft.NET.Test.Sdk 15.7.2
      Selenium.Support 3.13.1
      Selenium.WebDriver 3.13.1
      Xunit.SkippableFact 1.3.6
      coverlet.msbuild 2.0.1 Cannot resolve latest version
      xunit 2.3.1
      xunit.runner.visualstudio 2.3.1
    » hanselminutes.core
      [.NETCoreApp,Version=v2.1]
      BuildBundlerMinifier 2.8.391
      LazyCache 2.0.0-beta03
      LazyCache.AspNetCore 2.0.0-beta03
      Markdig 0.15.0
      Microsoft.ApplicationInsights.AspNetCore 2.4.0-beta2
      Microsoft.AspNetCore.App 2.1.1
      Microsoft.Extensions.Http.Polly 2.1.1
      Microsoft.NET.Test.Sdk 15.7.2

    As with all projects and references, while things aren't *supposed* to break when you update a Major.Minor.Patch/Revision.build...things sometimes do. You should check your references and their associated websites and release notes to confirm that you know what's changed and you know what changes you're bringing in.

    Shayne blogged about dotnet out-dated and points out the -vl (version lock) options that allows you to locking on Major or Minor versions. No need to take things you aren't ready to take.

    All in all, a super useful tool that you should install TODAY.

    dotnet tool install --global dotnet-outdated

    The source is up at https://github.com/jerriep/dotnet-outdated if you want to leave issues or get involved.


    Sponsor: Check out dotMemory Unit, a free unit testing framework for fighting all kinds of memory issues in your code. Extend your unit testing with the functionality of a memory profiler!


    © 2018 Scott Hanselman. All rights reserved.
         

    NuKeeper for automated NuGet Package Reference Updates on Build Servers

    $
    0
    0

    Last week I looked at "dotnet outdated," a super useful .NET Core Global Tool for keeping a project's NuGet packages up to date. Since then I've discovered there's a whole BUNCH of great projects solving different aspects of the "minor version problem." I love this answer "Why?" from the NuKeeper (inspired by Greenkeeper) project with emphasis mine. NuKeeper will check for updates AND try to update your references for you! Why not automate the tedious!

    NuGet package updates are a form of change that should be deployed, and we likewise want to change the cycle from "NuGet package updates are infrequent and contain lots of package changes, therefore NuGet package updates are hard and dangerous..." to "NuGet package updates are frequent and contain small changes, therefore NuGet package updates are easy and routine...".

    Certainly no one is advocating updating the major versions of your dependent NuGet packages, but small compatible bug fixes come often and are often missed. Including a tool to discover - and optionally apply - these changes in a CI/CD (Continuous Integration/Continuous Deployment) pipeline can be a great timesaver.

    Why do we deploy code changes frequently but seldom update NuGet packages?

    Good question!

    NuKeeper

    NuKeeper is a .NET tool as well that you can install safely with:

    dotnet tool install --global NuKeeper

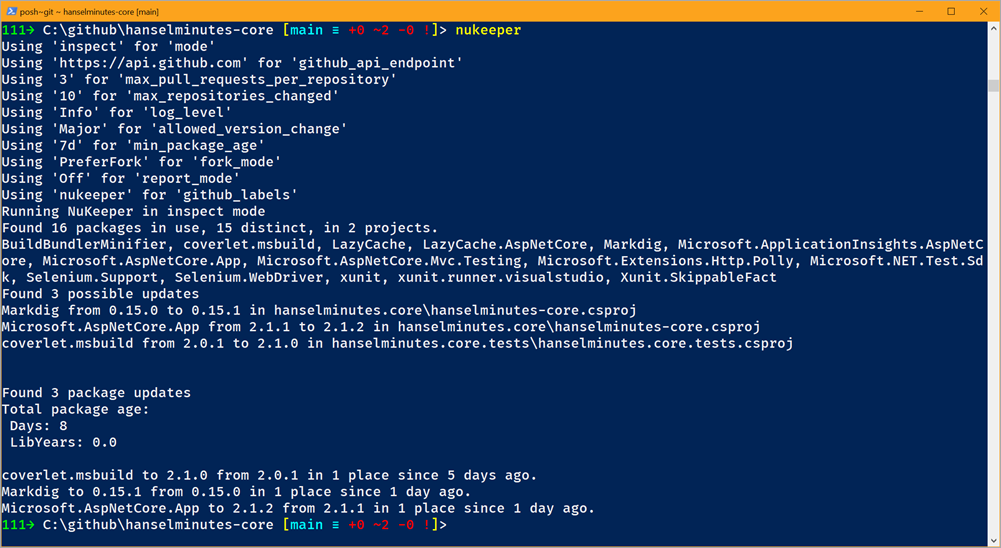
    Here it is running on my regularly updated podcast website that is running ASP.NET Core 2.1:

    NuKeeper says I have 3 packages to update

    Looks like three of my packages are out of date. NuKeeper shows what version I have and what I could update to, as well as how long an update has been available.

    You can also restrict your updates by policy, so "age=3w" for packages over 3 weeks old (so you don't get overly fresh updates) or "change=minor" or "change=patch" if you trust your upstream packages to not break things in patch releases, etc.

    NuKeeper is picking up steam and while (as of the time of this writing) its command line parameter style is a little unconventional, Anthony Steele and the team is very open to feedback with many improvements already in progress as this project matures!

    The update functionality is somewhat experimental and currently does 1 update per local run, but I'm really enjoying the direction NuKeeper is going!

    Automatic NuGet Updates via Pull Request

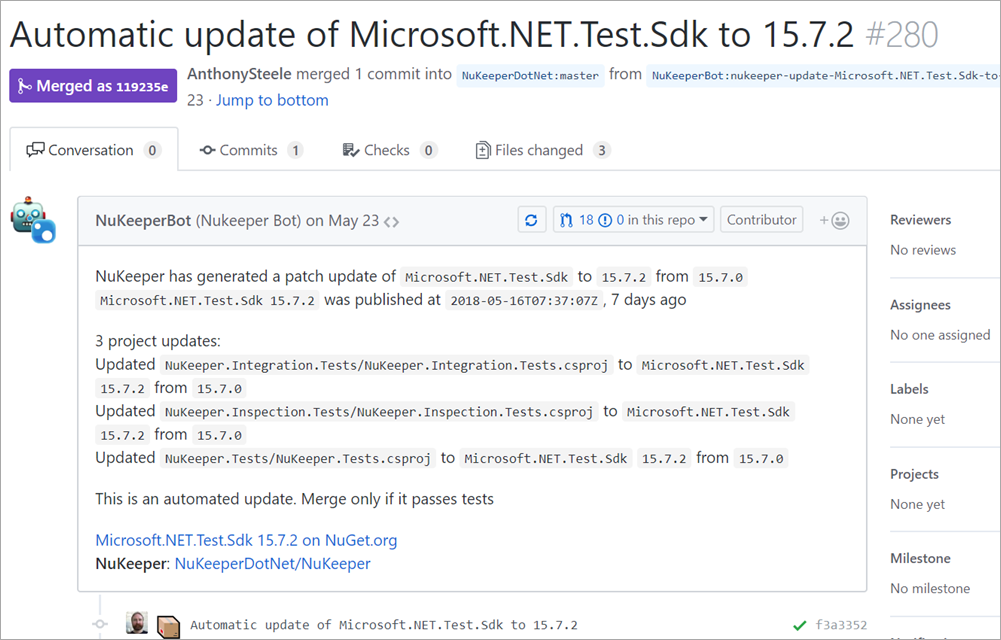
    NuKeeper has a somewhat unique and clever feature called Repository Mode in that it can automatically issue a Pull Request against your repository with the changes needed to update your NuGet references. Check out this example PullRequest!

    The NuKeeperBot has automatically issued a PR with a list of packages to update

    Again, it's early days, but between NuKeeper and "dotnet outdated," I'm feeling more in control of my package references than ever before! What are YOU using?


    Sponsor: Scale your Python for big data & big science with Intel® Distribution for Python. Near-native code speed. Use with NumPy, SciPy & scikit-learn. Get it Today!


    © 2018 Scott Hanselman. All rights reserved.
         

    Lynx is dead - Long live Browsh for text-based internet browsing

    $
    0
    0

    The standard for browsing the web over a text-=based terminal is Lynx, right? It's the legendary text web browser that you can read about at https://lynx.invisible-island.net/ or, even better, run right now with

    docker run --rm -it nbrown/lynx lynx http://hanselman.com/

    Awesome, right? But it's text. Lynx runs alt-text rather than images, and doesn't really take advantage of modern browser capabilities OR modern terminal capabilities.

    Enter Browsh! https://www.brow.sh/

    Browsh is a fully-modern text-based browser. It renders anything that a modern browser can; HTML5, CSS3, JS, video and even WebGL. Its main purpose is to be run on a remote server and accessed via SSH/Mosh

    Imagine running your browser on a remote machine connected to full power while ssh'ing into your hosted browsh instance. I don't know about you, but my laptop is currently using 2 gigs of RAM for Chrome and it's basically just all fans. I might be able to get 12 hours of battery life if I hung out in tmux and used browsh! Not to mention the bandwidth savings. If I'm tethered or overseas on a 3G network, I can still get a great browsing experience and just barely sip data.

    Browsing my blog with Browsh

    You can even open new tabs! Check out the keybindings! You gotta try it. Works great on Windows 10 with the new console. Just run this one Docker command:

    docker run -it --rm browsh/browsh

    If you think this idea is silly, that's OK. I think it's brilliant and creative and exactly the kind of clever idea the internet needs. This solves an interesting browser in an interesting way...in fact it returns us back to the "dumb terminal" days, doesn't it?

    There was a time when I my low-power machine waited for text from a refrigerator-sized machine. The fridge did the work and my terminal did the least.

    Today my high-powered machine waits for text from another high-powered machine and then struggles to composite it all as 7 megs of JavaScript downloads from TheVerge.com. But I'm not bitter. ;)

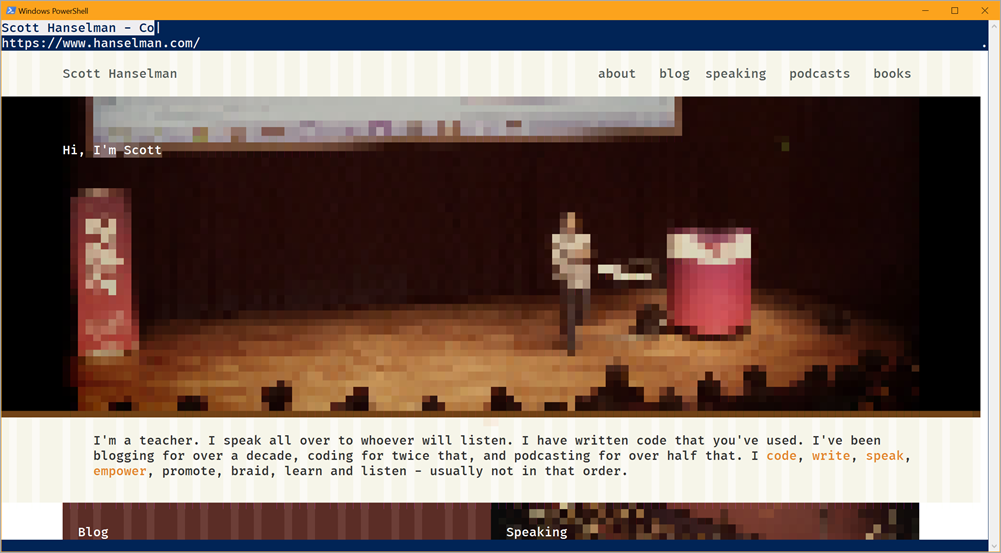
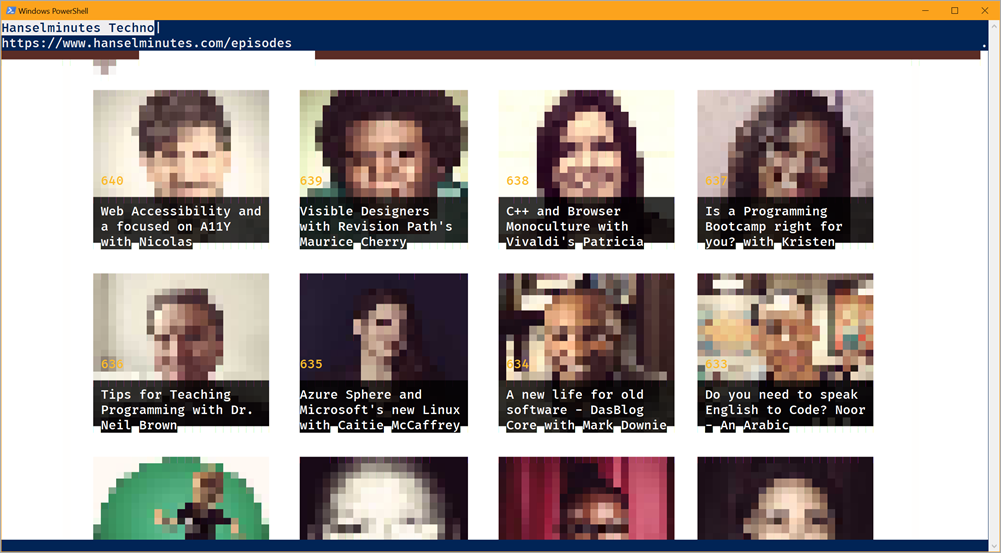
    Check out my podcast site on Browsh. Love it.

    Tiny pixelated heads made with ASCII

    If you agree that Browsh is amazing and special, consider donating! It's currently maintained by just one person and they just want $1000 a month on their Patreon to work on Browsh all the time! Go tell Tom on Twitter that you think is special, then give him some coins. What an exciting and artful project! I hope it continues!


    Sponsor: Scale your Python for big data & big science with Intel® Distribution for Python. Near-native code speed. Use with NumPy, SciPy & scikit-learn. Get it Today!


    © 2018 Scott Hanselman. All rights reserved.
         

    .NET Core Code Coverage as a Global Tool with coverlet

    $
    0
    0

    Last week I blogged about "dotnet outdated," an essential .NET Core "global tool" that helps you find out what NuGet package reference you need to update.

    .NET Core Global Tools are really taking off right now. They are meant for devs - this isn't a replacement for chocolatey or apt-get - this is more like npm's global developer tools. They're putting together a better way to find and identify global tools, but for now Nate McMaster has a list of some great .NET Core Global Tools on his GitHub. Feel free to add to that list!

    .NET tools can be installed like this:

    dotnet tool install -g <package id>

    So for example:

    C:\Users\scott> dotnet tool install -g dotnetsay
    
    You can invoke the tool using the following command: dotnetsay
    Tool 'dotnetsay' (version '2.1.4') was successfully installed.
    C:\Users\scott> dotnetsay

    Welcome to using a .NET Core global tool!

    You know, all the important tools. Seriously, some are super fun. ;)

    Coverlet is a cross platform code coverage tool that's in active development. In fact, I automated my build with code coverage for my podcast site back in March. I combined VS Code, Coverlet, xUnit, plus these Visual Studio Code extensions

    for a pretty nice experience! All free and open source.

    I had to write a little PowerShell script because the "dotnet test" command for testing my podcast site with coverlet got somewhat unruly. Coverlet.msbuild was added as a package reference for my project.

    dotnet test /p:CollectCoverage=true /p:CoverletOutputFormat=lcov /p:CoverletOutput=./lcov .\hanselminutes.core.tests

    I heard last week that coverlet had initial support for being a .NET Core Global Tool, which I think would be convenient since I could use it anywhere on any project without added references.

    dotnet tool install --global coverlet.console

    At this point I can type "Coverlet" and it's available anywhere.

    I'm told this is an initial build as a ".NET Global Tool" so there's always room for constructive feedback.

    From what I can tell, I run it like this:

    coverlet .\bin\Debug\netcoreapp2.1\hanselminutes.core.tests.dll --target "dotnet" --targetargs "test --no-build"

    Note I have to pass in the already-built test assembly since coverlet instruments that binary and I need to say "--no-build" since we don't want to accidentally rebuild the assemblies and lose the instrumentation.

    Coverlet can generate lots of coverage formats like opencover or lcov, and by default gives a nice ASCII table:

    88.1% Line Coverage in Hanselminutes.core

    I think my initial feedback (I'm not sure if this is possible) is smarter defaults. I'd like to "fall into the Pit of Success." That means, even I mess up and don't read the docs, I still end up successful.

    For example, if I type "coverlet test" while the current directory is a test project, it'd be nice if that implied all this as these are reasonable defaults.

    .\bin\Debug\whatever\whatever.dll --target "dotnet" --targetargs "test --nobuild"

    It's great that there is this much control, but I think assuming "dotnet test" is a fair assumption, so ideally I could go into any folder with a test project and type "coverlet test" and get that nice ASCII table. Later I'd be more sophisticated and read the excellent docs as there's lots of great options like setting coverage thresholds and the like.

    I think the future is bright with .NET Global Tools. This is just one example! What's your favorite?


    Sponsor: Preview the latest JetBrains Rider with its built-in spell checking, initial Blazor support, partial C# 7.3 support, enhanced debugger, C# Interactive, and a redesigned Solution Explorer.


    © 2018 Scott Hanselman. All rights reserved.
         

    AltCover and ReportGenerator give amazing code coverage on .NET Core

    $
    0
    0

    I'm continuing to explore testing and code coverage on open source .NET Core. Earlier this week I checked out coverlet. There is also the venerable OpenCover and there's some cool work being done to get OpenCover working with .NET Core, but it's Windows only.

    Today, I'm exploring AltCover by Steve Gilham. There are coverage tools that use the .NET Profiling API at run-time, instead, AltCover weaves IL for its coverage.

    As the name suggests, it's an alternative coverage approach. Rather than working by hooking the .net profiling API at run-time, it works by weaving the same sort of extra IL into the assemblies of interest ahead of execution. This means that it should work pretty much everywhere, whatever your platform, so long as the executing process has write access to the results file. You can even mix-and-match between platforms used to instrument and those under test.

    AltCover is a NuGet package but it's also available as .NET Core Global Tool which is awesome.

    dotnet tool install --global altcover.global

    This makes "altcover" a command that's available everywhere without adding it to my project.

    That said, I'm going to follow the AltCover Quick Start and see how quickly I can get it set up!

    I'll Install into my test project hanselminutes.core.tests

    dotnet add package AltCover
    

    and then run

    dotnet test /p:AltCover=true

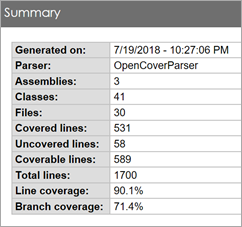
    90.1% Line Coverage, 71.4% Branch CoverageCool. My tests run as usual, but now I've got a coverage.xml in my test folder. I could also generate LCov or Cobertura reports if I'd like. At this point my coverage.xml is nearly a half-meg! That's a lot of good information, but how do I see  the results in a human readable format?
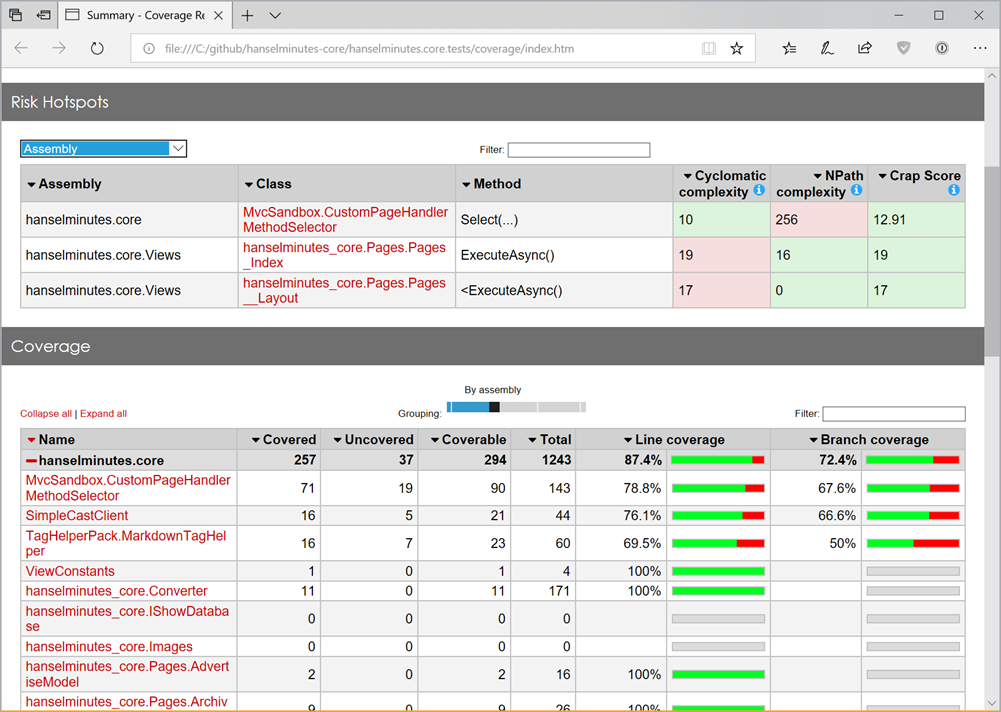
    This is the OpenCover XML format and I can run ReportGenerator on the coverage file and get a whole bunch of HTML files. Basically an entire coverage mini website!

    I downloaded ReportGenerator and put it in its own folder (this would be ideal as a .NET Core global tool).

    c:\ReportGenerator\ReportGenerator.exe -reports:coverage.xml -targetdir:./coverage

    Make sure you use a decent targetDir otherwise you might end up with dozens of HTML files littered in your project folder. You might also consider .gitignoring the resulting folder and coverage file. Open up index.htm and check out all this great information!

    Coverage Report says 90.1% Line Coverage

    Note the Risk Hotspots at the top there! I've got a CustomPageHandler with a significant NPath Complexity and two Views with a significant Cyclomatic Complexity.

    Also check out the excellent branch coverage as expressed here in the results of the coverage report. You can see that EnableAutoLinks was always true, so I only ever tested one branch. I might want to add a negative test here and explore if there's any side effects with EnableAutoLinks is false.

    Branch Coverage

    Be sure to explore AltCover and its Full Usage Guide. There's a number of ways to run it, from global tools, dotnet test, MSBuild Tasks, and PowerShell integration!

    There's a lot of great work here and it took me literally 10 minutes to get a great coverage report with AltCover and .NET Core. Kudos to Steve on AltCover! Head over to https://github.com/SteveGilham/altcover and give it a STAR, file issues (be kind) or perhaps offer to help out! And most of all, share cool Open Source projects like this with your friends and colleagues.


    Sponsor: Preview the latest JetBrains Rider with its built-in spell checking, initial Blazor support, partial C# 7.3 support, enhanced debugger, C# Interactive, and a redesigned Solution Explorer.


    © 2018 Scott Hanselman. All rights reserved.
         

    Example Code - Opinionated ContosoUniversity on ASP.NET Core 2.0's Razor Pages

    $
    0
    0

    The best way to learn about code isn't just writing more code - it's reading code! Not all of it will be great code and much of it won't be the way you would do it, but it's a great way to expand your horizons.
    In fact, I'd argue that most people aren't reading enough code. Perhaps there's not enough clean code bases to check out and learn from.

    I was pleased to stumble on this code base from Jimmy Bogard called Contoso University at https://github.com/jbogard/ContosoUniversityDotNetCore-Pages.

    There's a LOT of good stuff to read in this repo so I won't claim to have read it all or as deeply as I could. In fact, there's a good solid day of reading and absorbing here.However, here's some of the things I noticed and that I appreciate. Some of this is very "Jimmy" code, since it was written for and by Jimmy. This is a good thing and not a dig. We all collect patterns and make libraries and develop our own spins on architectural styles. I love that Jimmy collects a bunch of things he's created or contributed to over the years and put it into a nice clear sample for us to read. As Jimmy points out, there's a lot in https://github.com/jbogard/ContosoUniversityDotNetCore-Pages to explore:

    Clone and Build just works

    A low bar, right? You'd be surprised how often I git clone someone's repository and they haven't tested it elsewhere. Bonus points for a build.ps1 that bootstraps whatever needs to be done. I had .NET Core 2.x on my system already and this build.ps1 got the packages I needed and built the code cleanly.

    It's an opinioned project with some opinions. ;) And that's great, because it means I'll learn about techniques and tools that I may not have used before. If someone uses a tool that's not the "defaults" it may me that the defaults are lacking!

    • Build.ps1 is using a build script style taken from PSake, a powershell build automation tool.
    • It's building to a folder called ./artifacts as as convention.
    • Inside build.ps1, it's using Roundhouse, a Database Migration Utility for .NET using sql files and versioning based on source control http://projectroundhouse.org
    • It's set up for Continuous Integration in AppVeyor, a lovely CI/CD system I use myself.
    • It uses the Octo.exe tool from OctopusDeploy to package up the artifacts.

    Organized and Easy to Read

    I'm finding the code easy to read for the most part. I started at Startup.cs to just get a sense of what middleware is being brought in.

    public void ConfigureServices(IServiceCollection services)
    {
        services.AddMiniProfiler().AddEntityFramework();
        services.AddDbContext<SchoolContext>(options =>
            options.UseSqlServer(Configuration.GetConnectionString("DefaultConnection")));
        services.AddAutoMapper(typeof(Startup));
        services.AddMediatR(typeof(Startup));
        services.AddHtmlTags(new TagConventions());
        services.AddMvc(opt =>
            {
                opt.Filters.Add(typeof(DbContextTransactionPageFilter));
                opt.Filters.Add(typeof(ValidatorPageFilter));
                opt.ModelBinderProviders.Insert(0, new EntityModelBinderProvider());
            })
            .SetCompatibilityVersion(CompatibilityVersion.Version_2_1)
            .AddFluentValidation(cfg => { cfg.RegisterValidatorsFromAssemblyContaining<Startup>(); });
    }
    
    Here I can see what libraries and helpers are being brought in, like AutoMapper, MediatR, and HtmlTags. Then I can go follow up and learn about each one.

    MiniProfiler

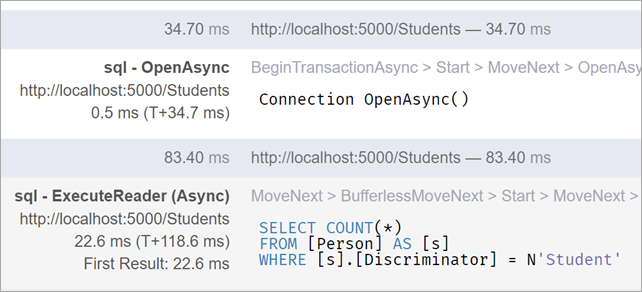
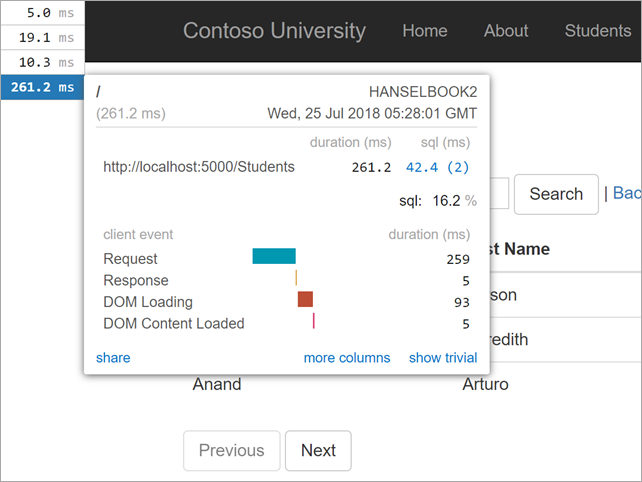
    I've always loved MiniProfiler. It's a hidden gem of .NET and it's been around being awesome forever. I blogged about it back in 2011! It sits in the corner of your web page and gives you REAL actionable details on how your site behaves and what the important perf timings are.

    MiniProfiler is the profiler you didn't know you needed

    It's even better with EF Core in that it'll show you the generated SQL as well! Again, all inline in your web site as you develop it.

    inline SQL in MiniProfiler

    Very nice.

    Clean Unit Tests

    Jimmy is using XUnit and has an IntegrationTestBase here with some stuff I don't understand, like SliceFixture. I'm marking this as something I need to read up on and research. I can't tell if this is the start of a new testing helper library, as it feels too generic and important to be in this sample.

    He's using the CQRS "Command Query Responsibility Segregation" pattern. Here starts with a Create command, sends it, then does a Query to confirm the results. It's very clean and he's got a very isolated test.

    [Fact]
    public async Task Should_get_edit_details()
    {
        var cmd = new Create.Command
        {
            FirstMidName = "Joe",
            LastName = "Schmoe",
            EnrollmentDate = DateTime.Today
        };
        var studentId = await SendAsync(cmd);
        var query = new Edit.Query
        {
            Id = studentId
        };
        var result = await SendAsync(query);
        result.FirstMidName.ShouldBe(cmd.FirstMidName);
        result.LastName.ShouldBe(cmd.LastName);
        result.EnrollmentDate.ShouldBe(cmd.EnrollmentDate);
    }

    FluentValidator

    https://fluentvalidation.net is a helper library for creating clear strongly-typed validation rules. Jimmy uses it throughout and it makes for very clean validation code.

    public class Validator : AbstractValidator<Command>
    {
        public Validator()
        {
            RuleFor(m => m.Name).NotNull().Length(3, 50);
            RuleFor(m => m.Budget).NotNull();
            RuleFor(m => m.StartDate).NotNull();
            RuleFor(m => m.Administrator).NotNull();
        }
    }
    

    Useful Extensions

    Looking at a project's C# extension methods is a great way to determine what the author feels are gaps in the underlying included functionality. These are useful for returning JSON from Razor Pages!

    public static class PageModelExtensions
    {
        public static ActionResult RedirectToPageJson<TPage>(this TPage controller, string pageName)
            where TPage : PageModel
        {
            return controller.JsonNet(new
                {
                    redirect = controller.Url.Page(pageName)
                }
            );
        }
        public static ContentResult JsonNet(this PageModel controller, object model)
        {
            var serialized = JsonConvert.SerializeObject(model, new JsonSerializerSettings
            {
                ReferenceLoopHandling = ReferenceLoopHandling.Ignore
            });
            return new ContentResult
            {
                Content = serialized,
                ContentType = "application/json"
            };
        }
    }
    

    PaginatedList

    I've always wondered what to do with helper classes like PaginatedList. Too small for a package, too specific to be built-in? What do you think?

    public class PaginatedList<T> : List<T>
    {
        public int PageIndex { get; private set; }
        public int TotalPages { get; private set; }
        public PaginatedList(List<T> items, int count, int pageIndex, int pageSize)
        {
            PageIndex = pageIndex;
            TotalPages = (int)Math.Ceiling(count / (double)pageSize);
            this.AddRange(items);
        }
        public bool HasPreviousPage
        {
            get
            {
                return (PageIndex > 1);
            }
        }
        public bool HasNextPage
        {
            get
            {
                return (PageIndex < TotalPages);
            }
        }
        public static async Task<PaginatedList<T>> CreateAsync(IQueryable<T> source, int pageIndex, int pageSize)
        {
            var count = await source.CountAsync();
            var items = await source.Skip((pageIndex - 1) * pageSize).Take(pageSize).ToListAsync();
            return new PaginatedList<T>(items, count, pageIndex, pageSize);
        }
    }
    

    I'm still reading all the source I can. Absorbing what resonates with me, considering what I don't know or understand and creating a queue of topics to read about. I'd encourage you to do the same! Thanks Jimmy for writing this large sample and for giving us some code to read and learn from!


    Sponsor: Scale your Python for big data & big science with Intel® Distribution for Python. Near-native code speed. Use with NumPy, SciPy & scikit-learn. Get it Today!


    © 2018 Scott Hanselman. All rights reserved.
         

    SQL Server on Linux or in Docker plus cross-platform SQL Operations Studio

    $
    0
    0

    imageI recently met some folks that didn't know that SQL Server 2017 also runs on Linux but they really needed to know. They had a single Windows desktop and a single Windows Server that they were keeping around to run SQL Server. They had long-been a Linux shop and was now fully containerzed...except for this machine under Anna's desk. (I assume The Cloud is next...pro tip: Don't have important servers under your desk). You can even get a license first and decide on the platform later.
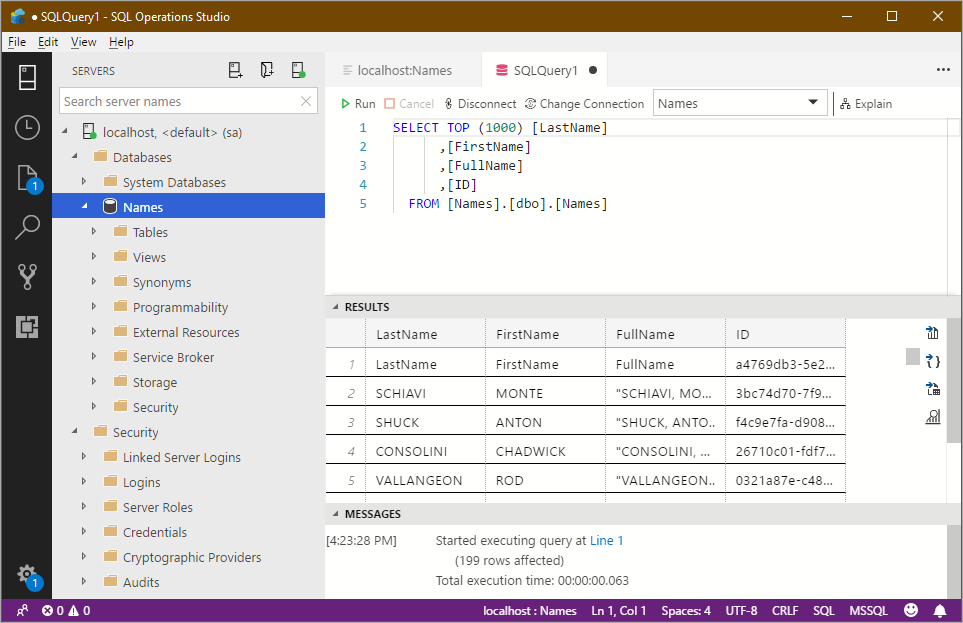
    You can run SQL Server on a few Linux flavors...

    or, even better, run it on Docker...

    Of course you'll want to do the appropriate volume mapping to keep your database on durable storage. I'm digging being able to spin up a full SQL Server inside a container on my Windows machine with no install.

    I've got Docker for Windows on my laptop and I'm using Shayne Boyer's "Docker Why" repo to make the point. Look at his sample DockerCompose that includes both a web frontend and a backend using SQL Server on Linux.

    version: '3.0'
    
    services:

    mssql:
    image: microsoft/mssql-server-linux:latest
    container_name: db
    ports:
    - 1433:1433
    volumes:
    - /var/opt/mssql
    # we copy our scripts onto the container
    - ./sql:/usr/src/app
    # bash will be executed from that path, our scripts folder
    working_dir: /usr/src/app
    # run the entrypoint.sh that will import the data AND sqlserver
    command: sh -c ' chmod +x ./start.sh; ./start.sh & /opt/mssql/bin/sqlservr;'
    environment:
    ACCEPT_EULA: 'Y'
    SA_PASSWORD: P@$$w0rdP@$$w0rd

    Note his starting command where he's doing an initial population of the database with sample data, then running sqlservr itself. The SQL Server on Linux Docker container includes the "sqlcmd" command line so you can set up the database, maintain it, etc with the same command line you've used on Windows. You can also configure SQL Server from Environment Variables so it makes it easy to use within Docker/Kubernetes. It'll take just a few minutes to get going.

    Example:

    /opt/mssql-tools/bin/sqlcmd -S localhost -d Names -U SA -P $SA_PASSWORD -I -Q "ALTER TABLE Names ADD ID UniqueIdentifier DEFAULT newid() NOT NULL;"

    I cloned his repo (and I have .NET Core 2.1) and did a "docker-compose up" and boom, running a front end under Alpine and backend with SQL Server on Linux.

    101→ C:\Users\scott> docker ps
    
    CONTAINER ID IMAGE COMMAND CREATED STATUS PORTS NAMES
    e5b4dae93f6d namesweb "dotnet namesweb.dll" 38 minutes ago Up 38 minutes 0.0.0.0:57270->80/tcp, 0.0.0.0:44348->443/tcp src_namesweb_1
    5ddffb76f9f9 microsoft/mssql-server-linux:latest "sh -c ' chmod +x ./…" 41 minutes ago Up 39 minutes 0.0.0.0:1433->1433/tcp mssql

    Command lines are nice, but SQL Server is known for SQL Server Management Studio, a nice GUI for Windows. Did they release SQL Server on Linux and then expect everyone use Windows to manage it? I say nay nay! Check out the cross-platform and open source SQL Operations Studio, "a data management tool that enables working with SQL Server, Azure SQL DB and SQL DW from Windows, macOS and Linux." You can download SQL Operations Studio free here.

    SQL Ops Studio is really impressive. Here I am querying SQL Server on Linux running within my Docker container on my Windows laptop.

    SQL Ops Studio - Cross platform SQL management

    As I'm digging in and learning how far cross-platform SQL Server has come, I also checked out the mssql extension for Visual Studio Code that lets you develop and execute SQL against any SQL Server. The VS Code SQL Server Extension is also open source!

    Go check it SQL Server in Docker at https://github.com/Microsoft/mssql-docker and try Shayne's sample at https://github.com/spboyer/docker-why


    Sponsor: Scale your Python for big data & big science with Intel® Distribution for Python. Near-native code speed. Use with NumPy, SciPy & scikit-learn. Get it Today!


    © 2018 Scott Hanselman. All rights reserved.
         

    One click deploy for MakeCode and the amazing AdaFruit Circuit Playground Express

    $
    0
    0

    Circuit Playground Express and CrickitThere's a ton of great open source hardware solutions out there. Often they're used to teach kids how to code, but their also fun for adults to learn about hardware!
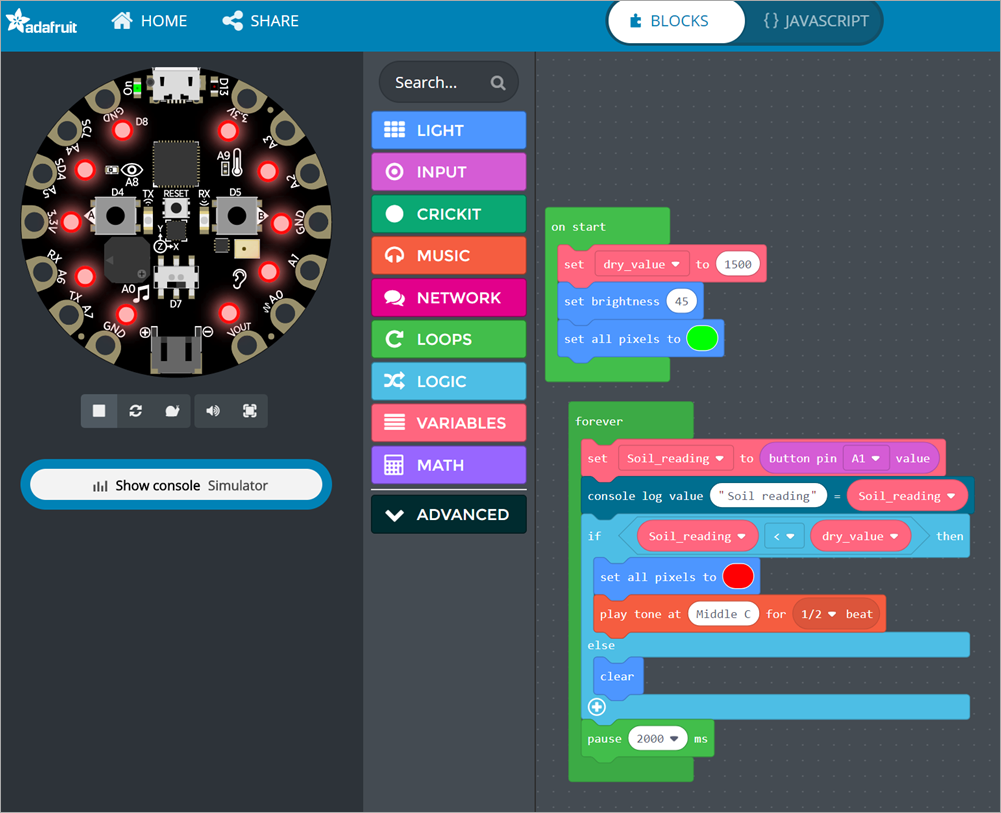
    Ultimately that "LED Moment" can be the start of a love affair with open source hardware and software! Arduino is great, as is Arduino talking to the Cloud! If that's too much or too many moving parts, you always start small with other little robot kits for kids.

    Recently my 10 year old and I have been playing with the Circuit Playground Express from Adafruit. We like it because it supports not just block-based programming and JavaScript via MakeCode (more on that in a moment) but you can also graduate to Circuit Python. Want to be even more advanced/ You can also use the Arduino IDE to talk to Circuit Playground Express. It's quickly becoming our favorite board. Be sure to get the board, some batteries and a holder, as well as a few alligator clips.

    The Circuit Playground Express board is round and has alligator-clip pads around it so you don't have to solder to get started. It has as bunch of sensors for light, temperature, motion, sound, as well as an IR receiver and transmitter and LEDs for visual output. There's a million things you can do with it. This summer Microsoft Research is doing a project a week you can do with the kids in your life with Make Code!

    I think the Circuit Playground Express is excellent by itself, but I like that I can stack it on top of the AdaFruit Crickit to make a VERY capable robotics platform. It's an ingenious design where three screws and metal standoffs connect the Crickit to the Circuit Playground and provide a bus for power and communication. The 10 year old wants to make a BattleBot now.

    Sitting architecturally on top of all this great hardware is the open source Microsoft Make Code development environment. It's amazing and more people should be talking about it. MakeCode works with LEGO Mindstorms EV3, micro:bit, Circuit Playground Express, Minecraft, Cue robots, Chibichips, and more. The pair of devices is truly awesome.

    Frankly I'm blown away at how easy it is and how easily my kids were productive. The hardest part of the whole thing was the last step where they need to copy the compiled code to the Circuit Playground Express. The editor is all online at GitHub https://github.com/Microsoft/pxt and you can run it locally if you like but there's no reason to unless you're developing new packages.

    We went to https://makecode.adafruit.com/ for the Circuit Playground Express. We made a new project (and optionally added the Crickit board blocks as an extension) and then got to work. The 10 year old followed a tutorial and made a moisture sensor that uses an alligator clip and a nail to check if our plants need to be watered! (If they do, it beeps and turns red!)

    You can see the code here as blocks...

    The MakeCode IDE

    or see the same code as JavaScript!

    let Soil_reading = 0
    let dry_value = 0
    dry_value = 1500
    light.setBrightness(45)
    light.setAll(0x00ff00)
    forever(function () {
        Soil_reading = input.pinA1.value()
        console.logValue("Soil reading", Soil_reading)
        if (Soil_reading < dry_value) {
            light.setAll(0xff0000)
            music.playTone(262, music.beat(BeatFraction.Half))
        } else {
            light.clear()
        }
        pause(__internal.__timePicker(2000))
    })
    

    When you've written your code, you just click DOWNLOAD and you'll get a "uf2" file.

    Downloading compiled MakeCode UF2 files

    Then the hardest part, you plug in the Circuit Playground Express via USB, it shows up as a Drive called "CPLAYBOOT," and you copy that file over. It's easy for techies, but a speed bump for kids.

    Downloading compiled MakeCode UF2 files

    It's really a genius process where they have removed nearly every obstacle in the hardware. After the file gets copied over (literally after the last byte is written) the device resets and starts running it.

    The "Developer's Inner Loop" is as short as possible, so kudos to the team. Code, download, deploy, run/test, repeat.

    This loop is fast and clever, but I wanted to speed it up a little so I wrote this little utility to automatically copy your MakeCode file to the Circuit Playground Express. Basically the idea is:

    • Associate my app with *.uf2 files
    • When launched, look for a local drive labeled CPLAYBOOK and copy the uf2 file over to it.

    That's it. It speeds up the experience and saves me a number of clicks. Sure there's batch file/powershell/script ways to do it but this wasn't hard.

    static void Main(string[] args)
    {
        var sourceFile = args[0];
        var drive = (from d in DriveInfo.GetDrives()
                     where d.VolumeLabel == "CPLAYBOOT"
                     select d.RootDirectory).FirstOrDefault();
        
        if (drive == null) {
            Console.WriteLine("Press RESET on your Circuit Playground Express and try again!");
            Environment.Exit(1);
        }
        Console.WriteLine($"Found Circuit Playground Express at {drive.FullName}");
        File.Copy(sourceFile, Path.Combine(drive.FullName, Path.GetFileName(sourceFile)));
    }
    

    Then I double click on the uf2 file and get this dialog and SCROLL DOWN and click "Look for another app on this PC." (They are making this hard because they want you to use a Store App, which I haven't made yet)

    Selecting a custom app for UF2 files

    Now I can just click my uf2 files in Windows Explorer and they'll automatically get deployed to my Circuit Playground Express!

    Found Circuit Playground Express at D:\

    You can find source here https://github.com/shanselman/MakeCodeLaunchAndCopy if you're a developer, just get .NET Core 2.1 and run my .cmd file on Windows to build it yourself. Feel free to make it a Windows Store App if you're an overachiever. Pull Requests appreciated ;)

    Otherwise, get the a little release here https://github.com/shanselman/MakeCodeLaunchAndCopy/releases and unzip the contents into its own folder on Windows, go double-click a UF2 file and point Windows to the MakeCodeLaunchAndCopy.exe file and you're all set!


    Sponsor: Preview the latest JetBrains Rider with its built-in spell checking, initial Blazor support, partial C# 7.3 support, enhanced debugger, C# Interactive, and a redesigned Solution Explorer.


    © 2018 Scott Hanselman. All rights reserved.
         

    Developing locally with ASP.NET Core under HTTPS, SSL, and Self-Signed Certs

    $
    0
    0

    Last week on Twitter @getify started an excellent thread pointing out that we should be using HTTPS even on our local machines. Why?

    You want your local web development set up to reflect your production reality as much as possible. URL parsing, routing, redirects, avoiding mixed-content warnings, etc. It's very easy to accidentally find oneself on http:// when everything in 2018 should be under https://.

    I'm using ASP.NET Core 2.1 which makes local SSL super easy. After installing from http://dot.net I'll "dotnet new razor" in an empty folder to make a quick web app.

    Then, when I "dotnet run" I see two URLs serving pages:

    C:\Users\scott\Desktop\localsslweb> dotnet run
    
    Hosting environment: Development
    Content root path: C:\Users\scott\Desktop\localsslweb
    Now listening on: https://localhost:5001
    Now listening on: http://localhost:5000
    Application started. Press Ctrl+C to shut down.

    One is HTTP over port 5000 and the other is HTTPS over 5001. However, if I hit https://localhost:5001, I may see an error:

    Your connection to this site is not secure

    That's because this is an untrusted SSL cert that was generated locally:

    Untrusted cert

    There's a dotnet global tool built into .NET Core 2.1 to help with certs at dev time, called "dev-certs."

    C:\Users\scott> dotnet dev-certs https --help
    

    Usage: dotnet dev-certs https [options]

    Options:
    -ep|--export-path Full path to the exported certificate
    -p|--password Password to use when exporting the certificate with the private key into a pfx file
    -c|--check Check for the existence of the certificate but do not perform any action
    --clean Cleans all HTTPS development certificates from the machine.
    -t|--trust Trust the certificate on the current platform
    -v|--verbose Display more debug information.
    -q|--quiet Display warnings and errors only.
    -h|--help Show help information

    I just need to run "dotnet dev-certs https --trust" and I'll get a pop up asking if I want to trust this localhost cert..

    You want to trust this local cert?

    On Windows it'll get added to the certificate store and on Mac it'll get added to the keychain. On Linux there isn't a standard way across distros to trust the certificate, so you'll need to perform the distro specific guidance for trusting the development certificate.

    Close your browser and open up again at https://localhost:5001 and you'll see a trusted "Secure" badge in your browser.

    Secure

    Note also that by default HTTPS redirection is included in ASP.NET Core, and in Production it'll use HTTP Strict Transport Security (HSTS) as well, avoiding any initial insecure calls.

    public void Configure(IApplicationBuilder app, IHostingEnvironment env)
    
    {
    if (env.IsDevelopment())
    {
    app.UseDeveloperExceptionPage();
    }
    else
    {
    app.UseExceptionHandler("/Error");
    app.UseHsts();
    }

    app.UseHttpsRedirection();
    app.UseStaticFiles();
    app.UseCookiePolicy();

    app.UseMvc();
    }

    That's it. What's historically been a huge hassle for local development is essentially handled for you. Given that Chrome is marking http:// sites as "Not Secure" as of Chrome 68 you'll want to consider making ALL your sites Secure by Default. I wrote up how to get certs for free with Azure and Let's Encrypt.


    Sponsor: Preview the latest JetBrains Rider with its built-in spell checking, initial Blazor support, partial C# 7.3 support, enhanced debugger, C# Interactive, and a redesigned Solution Explorer.


    © 2018 Scott Hanselman. All rights reserved.
         
    Viewing all 1148 articles
    Browse latest View live


    <script src="https://jsc.adskeeper.com/r/s/rssing.com.1596347.js" async> </script>