Quantcast
Channel: Scott Hanselman's Blog
Viewing all 1148 articles
Browse latest View live

Using Home Assistant to integrate a Unifi Protect G4 Doorbell and Amazon Alexa to announce visitors

$
0
0

I am not a Home Assistant expert, but it's clearly a massive and powerful ecosystem. I've interviewed the creator of Home Assistant on my podcast and I encourage you to check out that chat.

Home Assistant can quickly become a hobby that overwhelms you. Every object (entity) in your house that is even remotely connected can become programmable. Everything. Even people! You can declare that any name:value pair that (for example) your phone can expose can be consumable by Home Assistant. Questions like "is Scott home" or "what's Scott's phone battery" can be associated with Scott the Entity in the Home Assistant Dashboard.

I was amazed at the devices/objects that Home Assistant discovered that it could automate. Lights, remotes, Spotify, and more. You'll find that any internally connected device you have likely has an Integration available.

Temperature, Light Status, sure, that's easy Home Automation. But integrations and 3rd party code can give you details like "Is the Living Room dark" or "is there motion in the driveway." From these building blocks, you can then build your own IFTTT (If This Then That) automations, combining not just two systems, but any and all disparate systems.

What's the best part? This all runs LOCALLY. Not in a cloud or the cloud or anyone's cloud. I've got my stuff running on a Raspberry Pi 4. Even better I put a Power Over Ethernet (PoE) hat on my Rpi so I have just one network wire into my hub that powers the Pi.

I believe setting up Home Assistant on a Pi is the best and easiest way to get started. That said, you can also run in a Docker Container, on a Synology or other NAS, or just on Windows or Mac in the background. It's up to you. Optionally, you can pay Nabu Casa $5 for remote (outside your house) network access via transparent forwarding. But to be clear, it all still runs inside your house and not in the cloud.

Basic Home Assistant Setup

OK, to the main point. I used to have an Amazon Ring Doorbell that would integrate with Amazon Alexa and when you pressed the doorbell it would say "Someone is at the front door" on our all Alexas. It was a lovely little integration that worked nicely in our lives.

Front Door UniFi G4 Doorbell

However, I swapped out the Ring for a Unifi Protect G4 Doorbell for a number of reasons. I don't want to pump video to outside services, so this doorbell integrates nicely with my existing Unifi installation and records video to a local hard drive. However, I lose any Alexa integration and this nice little "someone is at the door" announcement. So this seems like a perfect job for Home Assistant.

Here's the general todo list:

  • Install Home Assistant
  • Install Home Assistant Community Store
    • This enables 3rd party "untrusted" integrations directly from GitHub. You'll need a GitHub account and it'll clone custom integrations directly into your local HA.
    • I also recommend the Terminal & SSH (9.2.2), File editor (5.3.3) add ons so you can see what's happening.
  • Get the UniFi Protect 3rd party integration for Home Assistant
    • NOTE: Unifi Protect support is being promoted in Home Assistant v2022.2 so you won't need this step soon as it'll be included.
    • "The UniFi Protect Integration adds support for retrieving Camera feeds and Sensor data from a UniFi Protect installation on either an Ubiquiti CloudKey+, Ubiquiti UniFi Dream Machine Pro or UniFi Protect Network Video Recorder."
    • Authenticate and configure this integration.
  • Get the Alexa Media Player integration
    • This makes all your Alexas show up in Home Assistant as "media players" and also allows you to tts (text to speech) to them.
    • Authenticate and configure this integration.

I recommend going into your Alexa app and making a Multi-room Speaker Group called "everywhere." Not only because it's nice to be able to say "play the music everywhere" but you can also target that "Everywhere" group in Home Assistant.

Go into your Home Assistant UI at http://homeassistant.local:8123/ and into Developer Tools. Under Services, try pasting in this YAML and clicking "call service."

service: notify.alexa_media_everywhere
data:
  message: Someone is at the front door, this is a test
  data:
    type: announce
    method: speak

If that works, you know you can automate Alexa and make it say things. Now, go to Configuration, Automation, and Add a new Automation. Here's mine. I used the UI to create it. Note that your Entity names may be different if you give your front doorbell camera a different name.

Binary_sensor.front_door_doorbell

Notice the format of Data, it's name value pairs within a single field's value.

Alexa Action

...but it also exists in a file called Automations.yaml. Note that the "to: 'on'" trigger is required or you'll get double announcements, one for each state change in the doorbell.

- id: '1640995128073'
  alias: G4 Doorbell Announcement with Alexa
  description: G4 Doorbell Announcement with Alexa
  trigger:
  - platform: state
    entity_id: binary_sensor.front_door_doorbell
    to: 'on'
  condition: []
  action:
  - service: notify.alexa_media_everywhere
    data:
      data:
        type: announce
        method: speak
      message: Someone is at the front door
  mode: single

It works! There's a ton of cool stuff I can automate now!


Sponsor: Make login Auth0’s problem. Not yours. Provide the convenient login features your customers want, like social login, multi-factor authentication, single sign-on, passwordless, and more. Get started for free.


© 2021 Scott Hanselman. All rights reserved.
    

I got tired

$
0
0

I got tired - photo by Elisa VenturI have been blogging here for the last 20 years. Every Tuesday and Thursday, quite consistently, for two decades. But last year, without planning it, I got tired and stopped. Not sure why. It didn't correspond with any life events. Nothing interesting or notable happened. I just stopped.

I did find joy on TikTok and amassed a small group of like-minded followers there. I enjoy my YouTube as well, and my weekly podcast is going strong with nearly 900 (!) episodes of interviews with cool people. I've also recently started posting on Mastodon (a fediverse (federated universe)) Twitter alternative that uses the ActivityPub web standard. I see that Mark Downie has been looking at ActivityPub as well for DasBlog (the blog engine that powers this blog) so I need to spend sometime with Mark soon.

Being consistent is a hard thing, and I think I did a good job. I gave many talks over many years about Personal Productivity but I always mentioned doing what "feeds your spirit." For a minute here the blog took a backseat, and that's OK. I filled that (spare) time with family time, personal projects, writing more code, 3d printing, games, taekwondo, and a ton of other things.

Going forward I will continue to write and share across a number of platforms, but it will continue to start here as it's super important to Own Your Words. Keep taking snapshots and backups of your keystrokes as you never know when your chosen platform might change or go away entirely.

I'm still here. I hope you are too! I will see you soon.

Related Links:


© 2021 Scott Hanselman. All rights reserved.
    

Use your own user @ domain for Mastodon discoverability with the WebFinger Protocol without hosting a server

$
0
0

Mastodon is a free, open-source social networking service that is decentralized and distributed. It was created in 2016 as an alternative to centralized social media platforms such as Twitter and Facebook.

One of the key features of Mastodon is the use of the WebFinger protocol, which allows users to discover and access information about other users on the Mastodon network. WebFinger is a simple HTTP-based protocol that enables a user to discover information about other users or resources on the internet by using their email address or other identifying information. The WebFinger protocol is important for Mastodon because it enables users to find and follow each other on the network, regardless of where they are hosted.

WebFinger uses a "well known" path structure when calling an domain. You may be familiar with the robots.txt convention. We all just agree that robots.txt will sit at the top path of everyone's domain.

The WebFinger protocol is a simple HTTP-based protocol that enables a user or search to discover information about other users or resources on the internet by using their email address or other identifying information. My is first name at last name .com, so...my personal WebFinger API endpoint is here https://www.hanselman.com/.well-known/webfinger

The idea is that...

  1. A user sends a WebFinger request to a server, using the email address or other identifying information of the user or resource they are trying to discover.

  2. The server looks up the requested information in its database and returns a JSON object containing the information about the user or resource. This JSON object is called a "resource descriptor."

  3. The user's client receives the resource descriptor and displays the information to the user.

The resource descriptor contains various types of information about the user or resource, such as their name, profile picture, and links to their social media accounts or other online resources. It can also include other types of information, such as the user's public key, which can be used to establish a secure connection with the user.

There's a great explainer here as well. From that page:

When someone searches for you on Mastodon, your server will be queried for accounts using an endpoint that looks like this:

GET https://${MASTODON_DOMAIN}/.well-known/webfinger?resource=acct:${MASTODON_USER}@${MASTODON_DOMAIN}

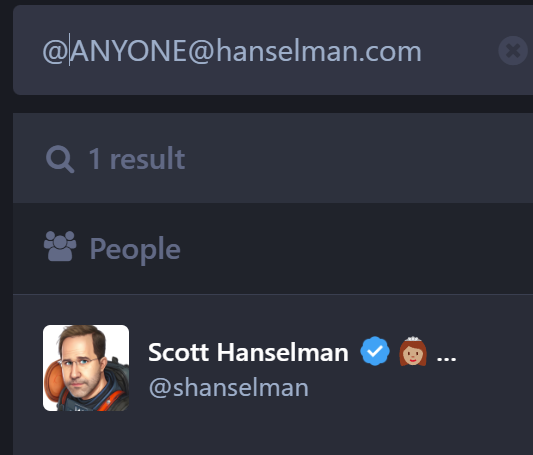
Note that Mastodon user names start with @ so they are @username@someserver.com. Just like twiter would be @shanselman@twitter.com I can be @shanselman@hanselman.com now!

Searching for me with Mastodon

So perhaps https://www.hanselman.com/.well-known/webfinger?resource=acct:FRED@HANSELMAN.COM

Mine returns

{

"subject":"acct:shanselman@hachyderm.io",
"aliases":
[
"https://hachyderm.io/@shanselman",
"https://hachyderm.io/users/shanselman"
],
"links":
[
{
"rel":"http://webfinger.net/rel/profile-page",
"type":"text/html",
"href":"https://hachyderm.io/@shanselman"
},
{
"rel":"self",
"type":"application/activity+json",
"href":"https://hachyderm.io/users/shanselman"
},
{
"rel":"http://ostatus.org/schema/1.0/subscribe",
"template":"https://hachyderm.io/authorize_interaction?uri={uri}"
}
]
}

This file should be returned as a mime type of application/jrd+json

My site is an ASP.NET Razor Pages site, so I just did this in Startup.cs to map that well known URL to a page/route that returns the JSON needed.

services.AddRazorPages().AddRazorPagesOptions(options =>

{
options.Conventions.AddPageRoute("/robotstxt", "/Robots.Txt"); //i did this before, not needed
options.Conventions.AddPageRoute("/webfinger", "/.well-known/webfinger");
options.Conventions.AddPageRoute("/webfinger", "/.well-known/webfinger/{val?}");
});

then I made a webfinger.cshtml like this. Note I have to double escape the @@ sites because it's Razor.

@page

@{
Layout = null;
this.Response.ContentType = "application/jrd+json";
}
{
"subject":"acct:shanselman@hachyderm.io",
"aliases":
[
"https://hachyderm.io/@@shanselman",
"https://hachyderm.io/users/shanselman"
],
"links":
[
{
"rel":"http://webfinger.net/rel/profile-page",
"type":"text/html",
"href":"https://hachyderm.io/@@shanselman"
},
{
"rel":"self",
"type":"application/activity+json",
"href":"https://hachyderm.io/users/shanselman"
},
{
"rel":"http://ostatus.org/schema/1.0/subscribe",
"template":"https://hachyderm.io/authorize_interaction?uri={uri}"
}
]
}

This is a static response, but if I was hosting pages for more than one person I'd want to take in the url with the user's name, and then map it to their aliases and return those correctly.

Even easier, you can just use the JSON file of your own Mastodon server's webfinger response and SAVE IT as a static json file and copy it to your own server!

As long as your server returns the right JSON from that well known URL then it'll work.

So this is my template https://hachyderm.io/.well-known/webfinger?resource=acct:shanselman@hachyderm.io from where I'm hosted now.

If you want to get started with Mastodon, start here. https://github.com/joyeusenoelle/GuideToMastodon/ it feels like Twitter circa 2007 except it's not owned by anyone and is based on web standards like ActivityPub.

Hope this helps!


© 2021 Scott Hanselman. All rights reserved.
    

GitHub Copilot for CLI for PowerShell

$
0
0

GitHub Next has this cool project that is basically Copilot for the CLI (command line interface). You can sign up for their waitlist at the Copilot for CLI site.

Copilot for CLI provides three shell commands: ??, git? and gh?

This is cool and all, but I use PowerShell. Turns out these ?? commands are just router commands to a larger EXE called github-copilot-cli. So if you go "?? something" you're really going "github-copilot-cli what-the-shell something."

So this means I should be able to to do the same/similar aliases for my PowerShell prompt AND change the injected prompt (look at me I'm a prompt engineer) to add 'use powershell to.'

Now it's not perfect, but hopefully it will make the point to the Copilot CLI team that PowerShell needs love also.

Here are my aliases. Feel free to suggest if these suck. Note the addition of "user powershell to" for the ?? one. I may make a ?? and a p? where one does bash and one does PowerShell. I could also have it use wsl.exe and shell out to bash. Lots of possibilities.

function ?? { 

$TmpFile = New-TemporaryFile
github-copilot-cli what-the-shell ('use powershell to ' + $args) --shellout $TmpFile
if ([System.IO.File]::Exists($TmpFile)) {
$TmpFileContents = Get-Content $TmpFile
if ($TmpFileContents -ne $nill) {
Invoke-Expression $TmpFileContents
Remove-Item $TmpFile
}
}
}

function git? {
$TmpFile = New-TemporaryFile
github-copilot-cli git-assist $args --shellout $TmpFile
if ([System.IO.File]::Exists($TmpFile)) {
$TmpFileContents = Get-Content $TmpFile
if ($TmpFileContents -ne $nill) {
Invoke-Expression $TmpFileContents
Remove-Item $TmpFile
}
}
}
function gh? {
$TmpFile = New-TemporaryFile
github-copilot-cli gh-assist $args --shellout $TmpFile
if ([System.IO.File]::Exists($TmpFile)) {
$TmpFileContents = Get-Content $TmpFile
if ($TmpFileContents -ne $nill) {
Invoke-Expression $TmpFileContents
Remove-Item $TmpFile
}
}
}

It also then offers to run the command. Very smooth.

image

Hope you like it. Lots of fun stuff happening in this space.


© 2021 Scott Hanselman. All rights reserved.
    

Using WSL and Let's Encrypt to create Azure App Service SSL Wildcard Certificates

$
0
0

There are many let's encrypt automatic tools for azure but I also wanted to see if I could use certbot in wsl to generate a wildcard certificate for the azure Friday website and then upload the resulting certificates to azure app service.

Azure app service ultimately needs a specific format called dot PFX that includes the full certificate path and all intermediates.

Per the docs, App Service private certificates must meet the following requirements:

  • Exported as a password-protected PFX file, encrypted using triple DES.
  • Contains private key at least 2048 bits long
  • Contains all intermediate certificates and the root certificate in the certificate chain.

If you have a PFX that doesn't meet all these requirements you can have Windows reencrypt the file.

I use WSL and certbot to create the cert, then I import/export in Windows and upload the resulting PFX.

Within WSL, install certbot:

sudo apt update

sudo apt install python3 python3-venv libaugeas0
sudo python3 -m venv /opt/certbot/
sudo /opt/certbot/bin/pip install --upgrade pip

Then I generate the cert. You'll get a nice text UI from certbot and update your DNS as a verification challenge. Change this to make sure it's two lines, and your domains and subdomains are correct and your paths are correct.

sudo certbot certonly --manual --preferred-challenges=dns --email YOUR@EMAIL.COM   

--server https://acme-v02.api.letsencrypt.org/directory
--agree-tos --manual-public-ip-logging-ok -d "azurefriday.com" -d "*.azurefriday.com"
sudo openssl pkcs12 -export -out AzureFriday2023.pfx
-inkey /etc/letsencrypt/live/azurefriday.com/privkey.pem
-in /etc/letsencrypt/live/azurefriday.com/fullchain.pem

I then copy the resulting file to my desktop (check your desktop path) so it's now in the Windows world.

sudo cp AzureFriday2023.pfx /mnt/c/Users/Scott/OneDrive/Desktop

Now from Windows, import the PFX, note the thumbnail and export that cert.

Import-PfxCertificate -FilePath "AzureFriday2023.pfx" -CertStoreLocation Cert:\LocalMachine\My 

-Password (ConvertTo-SecureString -String 'PASSWORDHERE' -AsPlainText -Force) -Exportable

Export-PfxCertificate -Cert Microsoft.PowerShell.Security\Certificate::LocalMachine\My\597THISISTHETHUMBNAILCF1157B8CEBB7CA1
-FilePath 'AzureFriday2023-fixed.pfx' -Password (ConvertTo-SecureString -String 'PASSWORDHERE' -AsPlainText -Force)

Then upload the cert to the Certificates section of your App Service, under Bring Your Own Cert.

Custom Domains in Azure App Service

Then under Custom Domains, click Update Binding and select the new cert (with the latest expiration date).

image

Next step is to make this even more automatic or select a more automated solution but for now, I'll worry about this in September and it solved my expensive Wildcard Domain issue.


© 2021 Scott Hanselman. All rights reserved.
    

Updating to .NET 8, updating to IHostBuilder, and running Playwright Tests within NUnit headless or headed on any OS

$
0
0

All the Unit Tests passI've been doing not just Unit Testing for my sites but full on Integration Testing and Browser Automation Testing as early as 2007 with Selenium. Lately, however, I've been using the faster and generally more compatible Playwright. It has one API and can test on Windows, Linux, Mac, locally, in a container (headless), in my CI/CD pipeline, on Azure DevOps, or in GitHub Actions.

For me, it's that last moment of truth to make sure that the site runs completely from end to end.

I can write those Playwright tests in something like TypeScript, and I could launch them with node, but I like running end unit tests and using that test runner and test harness as my jumping off point for my .NET applications. I'm used to right clicking and "run unit tests" or even better, right click and "debug unit tests" in Visual Studio or VS Code. This gets me the benefit of all of the assertions of a full unit testing framework, and all the benefits of using something like Playwright to automate my browser.

In 2018 I was using WebApplicationFactory and some tricky hacks to basically spin up ASP.NET within .NET (at the time) Core 2.1 within the unit tests and then launching Selenium. This was kind of janky and would require to manually start a separate process and manage its life cycle. However, I kept on with this hack for a number of years basically trying to get the Kestrel Web Server to spin up inside of my unit tests.

I've recently upgraded my main site and podcast site to .NET 8. Keep in mind that I've been moving my websites forward from early early versions of .NET to the most recent versions. The blog is happily running on Linux in a container on .NET 8, but its original code started in 2002 on .NET 1.1.

Now that I'm on .NET 8, I scandalously discovered (as my unit tests stopped working) that the rest of the world had moved from IWebHostBuilder to IHostBuilder five version of .NET ago. Gulp. Say what you will, but the backward compatibility is impressive.

As such my code for Program.cs changed from this

public static void Main(string[] args)

{
CreateWebHostBuilder(args).Build().Run();
}

public static IWebHostBuilder CreateWebHostBuilder(string[] args) =>
WebHost.CreateDefaultBuilder(args)
.UseStartup<Startup>();

to this:

public static void Main(string[] args)

{
CreateHostBuilder(args).Build().Run();
}

public static IHostBuilder CreateHostBuilder(string[] args) =>
Host.CreateDefaultBuilder(args).
ConfigureWebHostDefaults(WebHostBuilder => WebHostBuilder.UseStartup<Startup>());

Not a major change on the outside but tidies things up on the inside and sets me up with a more flexible generic host for my web app.

My unit tests stopped working because my Kestral Web Server hack was no longer firing up my server.

Here is an example of my goal from a Playwright perspective within a .NET NUnit test.

[Test]

public async Task DoesSearchWork()
{
await Page.GotoAsync(Url);

await Page.Locator("#topbar").GetByRole(AriaRole.Link, new() { Name = "episodes" }).ClickAsync();

await Page.GetByPlaceholder("search and filter").ClickAsync();

await Page.GetByPlaceholder("search and filter").TypeAsync("wife");

const string visibleCards = ".showCard:visible";

var waiting = await Page.WaitForSelectorAsync(visibleCards, new PageWaitForSelectorOptions() { Timeout = 500 });

await Expect(Page.Locator(visibleCards).First).ToBeVisibleAsync();

await Expect(Page.Locator(visibleCards)).ToHaveCountAsync(5);
}

I love this. Nice and clean. Certainly here we are assuming that we have a URL in that first line, which will be localhost something, and then we assume that our web application has started up on its own.

Here is the setup code that starts my new "web application test builder factory," yeah, the name is stupid but it's descriptive. Note the OneTimeSetUp and the OneTimeTearDown. This starts my web app within the context of my TestHost. Note the :0 makes the app find a port which I then, sadly, have to dig out and put into the Url private for use within my Unit Tests. Note that the <Startup> is in fact my Startup class within Startup.cs which hosts my app's pipeline and Configure and ConfigureServices get setup here so routing all works.

private string Url;

private WebApplication? _app = null;

[OneTimeSetUp]
public void Setup()
{
var builder = WebApplicationTestBuilderFactory.CreateBuilder<Startup>();

var startup = new Startup(builder.Environment);
builder.WebHost.ConfigureKestrel(o => o.Listen(IPAddress.Loopback, 0));
startup.ConfigureServices(builder.Services);
_app = builder.Build();

// listen on any local port (hence the 0)
startup.Configure(_app, _app.Configuration);
_app.Start();

//you are kidding me
Url = _app.Services.GetRequiredService<IServer>().Features.GetRequiredFeature<IServerAddressesFeature>().Addresses.Last();
}

[OneTimeTearDown]
public async Task TearDown()
{
await _app.DisposeAsync();
}

So what horrors are buried in WebApplicationTestBuilderFactory? The first bit is bad and we should fix it for .NET 9. The rest is actually every nice, with a hat tip to David Fowler for his help and guidance! This is the magic and the ick in one small helper class.

public class WebApplicationTestBuilderFactory 

{
public static WebApplicationBuilder CreateBuilder<T>() where T : class
{
//This ungodly code requires an unused reference to the MvcTesting package that hooks up
// MSBuild to create the manifest file that is read here.
var testLocation = Path.Combine(AppContext.BaseDirectory, "MvcTestingAppManifest.json");
var json = JsonObject.Parse(File.ReadAllText(testLocation));
var asmFullName = typeof(T).Assembly.FullName ?? throw new InvalidOperationException("Assembly Full Name is null");
var contentRootPath = json?[asmFullName]?.GetValue<string>();

//spin up a real live web application inside TestHost.exe
var builder = WebApplication.CreateBuilder(
new WebApplicationOptions()
{
ContentRootPath = contentRootPath,
ApplicationName = asmFullName
});
return builder;
}
}

The first 4 lines are nasty. Because the test runs in the context of a different directory and my website needs to run within the context of its own content root path, I have to force the content root path to be correct and the only way to do that is by getting the apps base directory from a file generated within MSBuild from the (aging) MvcTesting package. The package is not used, but by referencing it it gets into the build and makes that file that I then use to pull out the directory.

If we can get rid of that "hack" and pull the directory from context elsewhere, then this helper function turns into a single line and .NET 9 gets WAY WAY more testable!

Now I can run my Unit Tests AND Playwright Browser Integration Tests across all OS's, headed or headless, in docker or on the metal. The site is updated to .NET 8 and all is right with my code. Well, it runs at least. ;)


© 2021 Scott Hanselman. All rights reserved.
    

Open Sourcing DOS 4

$
0
0

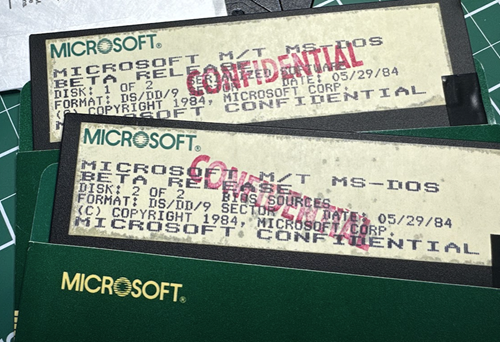
Beta DOS DisksSee the canonical version of this blog post at the Microsoft Open Source Blog!

Ten years ago, Microsoft released the source for MS-DOS 1.25 and 2.0 to the Computer History Museum, and then later republished them for reference purposes. This code holds an important place in history and is a fascinating read of an operating system that was written entirely in 8086 assembly code nearly 45 years ago.

Today, in partnership with IBM and in the spirit of open innovation, we're releasing the source code to MS-DOS 4.00 under the MIT license. There's a somewhat complex and fascinating history behind the 4.0 versions of DOS, as Microsoft partnered with IBM for portions of the code but also created a branch of DOS called Multitasking DOS that did not see a wide release.

https://github.com/microsoft/MS-DOS

A young English researcher named Connor "Starfrost" Hyde recently corresponded with former Microsoft Chief Technical Officer Ray Ozzie about some of the software in his collection. Amongst the floppies, Ray found unreleased beta binaries of DOS 4.0 that he was sent while he was at Lotus. Starfrost reached out to the Microsoft Open Source Programs Office (OSPO) to explore releasing DOS 4 source, as he is working on documenting the relationship between DOS 4, MT-DOS, and what would eventually become OS/2. Some later versions of these Multitasking DOS binaries can be found around the internet, but these new Ozzie beta binaries appear to be much earlier, unreleased, and also include the ibmbio.com source. 

Scott Hanselman, with the help of internet archivist and enthusiast Jeff Sponaugle, has imaged these original disks and carefully scanned the original printed documents from this "Ozzie Drop". Microsoft, along with our friends at IBM, think this is a fascinating piece of operating system history worth sharing. 

Jeff Wilcox and OSPO went to the Microsoft Archives, and while they were unable to find the full source code for MT-DOS, they did find MS DOS 4.00, which we're releasing today, alongside these additional beta binaries, PDFs of the documentation, and disk images. We will continue to explore the archives and may update this release if more is discovered. 

Thank you to Ray Ozzie, Starfrost, Jeff Sponaugle, Larry Osterman, our friends at the IBM OSPO, as well as the makers of such digital archeology software including, but not limited to Greaseweazle, Fluxengine, Aaru Data Preservation Suite, and the HxC Floppy Emulator. Above all, thank you to the original authors of this code, some of whom still work at Microsoft and IBM today!

If you'd like to run this software yourself and explore, we have successfully run it directly on an original IBM PC XT, a newer Pentium, and within the open source PCem and 86box emulators. 


© 2021 Scott Hanselman. All rights reserved.
    

Webcam randomly pausing in OBS, Discord, and websites - LSVCam and TikTok Studio

$
0
0

I use my webcam constantly for streaming and I'm pretty familiar with all the internals and how the camera model on Windows works. I also use OBS extensively, so I regularly use the OBS virtual camera and flow everything through Open Broadcasting Studio.

For my podcast, I use Zencastr which is a web-based app that talks to the webcam via the browser APIs. For YouTubes, I'll use Riverside or StreamYard, also webapps.

I've done this reliably for the last several years without any trouble. Yesterday, I started seeing the most weird thing and it was absolutely perplexing and almost destroyed the day. I started seeing regular pauses in my webcam stream but only in two instances.

  • The webcam would pause for 10-15 seconds every 90 or so seconds when access the Webcam in a browser
  • I would see a long pause/hang in OBS when double clicking on my Video Source (Webcam) to view its properties

Micah initially said USB but my usb bus and hubs have worked reliably for years. Thought something might have changed in my El Gato capture device, but that has also been rock solid for 1/2 a decade. Then I started exploring virtual cameras and looked in the windows camera dialog under settings for a list of all virtual cameras.

Interestingly, virtual cameras don't get listed under Cameras in Settings in Windows:

List of Cameras in Windows

From what I can tell, there's no user interface to list out all of your cameras - virtual or otherwise - in windows.

Here's a quick PowerShell script you can run to list out anything 'connected' that also includes the string "cam" in your local devices

Get-CimInstance -Namespace root\cimv2 -ClassName Win32_PnPEntity |

Where-Object { $_.Name -match 'Cam' } |
Select-Object Name, Manufacturer, PNPDeviceID

and my output

Name                                     Manufacturer        PNPDeviceID

---- ------------ -----------
Cam Link 4K Microsoft USB\VID_0FD9&PID_0066&MI_00\7&3768531A&0&0000
Digital Audio Interface (2- Cam Link 4K) Microsoft SWD\MMDEVAPI\{0.0.1.00000000}.{AF1690B6-CA2A-4AD3-AAFD-8DDEBB83DD4A}
Logitech StreamCam WinUSB Logitech USB\VID_046D&PID_0893&MI_04\7&E36D0CF&0&0004
Logitech StreamCam (Generic USB Audio) USB\VID_046D&PID_0893&MI_02\7&E36D0CF&0&0002
Logitech StreamCam Logitech USB\VID_046D&PID_0893&MI_00\7&E36D0CF&0&0000
Remote Desktop Camera Bus Microsoft UMB\UMB\1&841921D&0&RDCAMERA_BUS
Cam Link 4K (Generic USB Audio) USB\VID_0FD9&PID_0066&MI_03\7&3768531A&0&0003
Windows Virtual Camera Device Microsoft SWD\VCAMDEVAPI\B486E21F1D4BC97087EA831093E840AD2177E046699EFBF62B27304F5CCAEF57

However, when I list out my cameras using JavaScript enumerateDevices() like this

// Put variables in global scope to make them available to the browser console.

async function listWebcams() {
try {
const devices = await navigator.mediaDevices.enumerateDevices();
const webcams = devices.filter(device => device.kind === 'videoinput');

if (webcams.length > 0) {
console.log("Connected webcams:");
webcams.forEach((webcam, index) => {
console.log(`${index + 1}. ${webcam.label || `Camera ${index + 1}`}`);
});
} else {
console.log("No webcams found.");
}
} catch (error) {
console.error("Error accessing media devices:", error);
}
}
listWebcams();

I would get:

Connected webcams:
test.html:11 1. Logitech StreamCam (046d:0893)
test.html:11 2. OBS Virtual Camera (Windows Virtual Camera)
test.html:11 3. Cam Link 4K (0fd9:0066)
test.html:11 4. LSVCam
test.html:11 5. OBS Virtual Camera

So, what, what's LSVCam? And depending on how I'd call it I'd get the pause and

getUserMedia error: NotReadableError NotReadableError: Could not start video source

Some apps could see this LSVCam and others couldn't. OBS really dislikes it, browsers really dislike it and it seemed to HANG on enumeration of cameras. Why can parts of Windows see this camera and others can't?

I don't know. Do you?

Regardless, it turns that it appears once in my registry, here (this is a dump of the key, you just care about the Registry PATH)

Windows Registry Editor Version 5.00


[HKEY_CLASSES_ROOT\CLSID\{860BB310-5D01-11d0-BD3B-00A0C911CE86}\Instance\LSVCam]
"FriendlyName"="LSVCam"
"CLSID"="{BA80C4AD-8AED-4A61-B434-481D46216E45}"
"FilterData"=hex:02,00,00,00,00,00,20,00,01,00,00,00,00,00,00,00,30,70,69,33,\
08,00,00,00,00,00,00,00,01,00,00,00,00,00,00,00,00,00,00,00,30,74,79,33,00,\
00,00,00,38,00,00,00,48,00,00,00,76,69,64,73,00,00,10,00,80,00,00,aa,00,38,\
9b,71,00,00,00,00,00,00,00,00,00,00,00,00,00,00,00,00

If you want to get rid of it, delete HKEY_CLASSES_ROOT\CLSID\{860BB310-5D01-11d0-BD3B-00A0C911CE86}\Instance\LSVCam

WARNING: DO NOT delete the \Instance, just the LSVCam and below. I am a random person on the internet and you got here by googling, so if you mess up your machine by going into RegEdit.exe, I'm sorry to this man, but it's above me now.

Where did LSVCam.dll come from, you may ask? TikTok Live Studio, baby. Live Studio Video/Virtual Cam, I am guessing.

Directory of C:\Program Files\TikTok LIVE Studio\0.67.2\resources\app\electron\sdk\lib\MediaSDK_V1


09/18/2024 09:20 PM 218,984 LSVCam.dll
1 File(s) 218,984 bytes

This is a regression that started recently for me, so it's my opinion that they are installing a virtual camera for their game streaming feature but they are doing it poorly. It's either not completely installed, or hangs on enumeration, but the result is you'll see hangs on camera enumeration in your apps, especually browser apps that poll for cameras changes or check on a timer.

Nothing bad will happen if you delete the registry key BUT it'll show back up when you run TikTok Studio again. I still stream to TikTok, I just delete this key each time until someone on the TikTok Studio development team sees this blog post.

Hope this helps!


© 2021 Scott Hanselman. All rights reserved.
    

Viewing all 1148 articles
Browse latest View live