Quantcast
Channel: Scott Hanselman's Blog
Viewing all 1148 articles
Browse latest View live

The wires are crossed, literally! - Learning low level computing with Ben Eater's 6502 kit

$
0
0

I've blogged about the importance of the LED Moment. You know, that moment when you get it to blink.

Ben Eater is a bit of an internet legend. His site at https://eater.net has a shop and YouTube videos where he's creating educational videos showing low level (and some what historical) computing.

He's known for "building an 8-bit CPU from scratch."

This tutorial walks through building a fully programmable 8-bit computer from simple logic gates on breadboards.

imageSimple logic gates? Yep, like && and || and 7400 series chips and what not. I learned on these 25 years ago in college and I sucked at it. I think I ended up making A CLOCK. Ben makes A COMPUTER.

This Christmas my gift to myself was to learn to build a 6502 computer (that's the processor that powered the Apple ][, the NES, the C64, the BBC Micro and more - it's literally the processor of my entire childhood). Ben has made the videos available free on YouTube and the parts list can be sourced however you'd like, but I chose to get mine directly from Ben as he's done all the work of putting the chips and wires in a box. I got the 6502 Computer Kit, the Clock Module Kit, and an EEPROM Programmer. I also ordered a Quimat 2.4" TFT Digital Oscilloscope Kit which is AMAZING for the value. Later I ordered a Pokit Oscilloscope that will use my phone for the screen.

I'm about halfway through the videos. There are 4 videos of about 1 hour each, but I've been following along and pausing. Ben will wire something up and speed up the video, so each 1 hour video has taken me about 4-5 hours of actual time, as I'm cutting and stripping wires manually and trying to get my board to look and behave like Ben's in the video. More importantly, I made the promise to myself that I'd not continue if I didn't understand (mostly) what was happening AND I wouldn't continue if my board didn't actually work.

At the middle-end of Video 2, we're hooking up a newly flashed EEPROM that has our computer program on it. This isn't even at Assembly Language yet - we're writing the actual Hex Codes of the processor instructions into a 32768 byte long binary file and then flashing the result to an EEPROM and reseating it each time.

Madness! Flashing an EEPROM

I'd respectfully ask that you follow me on Instragram as I'm documenting my experience in photos.

A few days ago I was manually stepping (one clock pulse at a time) through some code and I kept getting "B2" - and by "getting" that value, I mean that quite literally there are 8 blue wires coming off the data line (8 pins) on an EEPROM and they are going to turn 8 LEDs on or off. I wanted to get the number "AA."

What. I'm getting B2, I want AA. I have no idea. Do I pull it apart and redo the whole board? How many hours ago did I make a mistake? 3? 7? I was sad and dejected.

And I stared.

But then I thought. Why is AA is a lovely hex number? Because it's as it's alternating 1s and 0s, of 10101010.

I was getting B2 which is 10110010.

10110010

10110010

I had swapped two of the wires going from the EEPROM to the Processor. I was getting exactly what I asked for. I swapped to wires/pins so the bins were swapped.

I wasn't groking it until I stopped a thought and looked from multiple angles. What am I doing? What's my goal? What is physically happening here? What abstractions have I added? (even voltage -> binary -> hex is three abstractions!)

It seems a small and stupid thing. Perhaps you, Dear Reader, immediately knew what I had done wrong and were shouting it at this blog post 3 paragraphs ago. Perhaps you've never spent 13 hours debugging a Carriage Return.

But I didn't understand. And then I did. And I swapped two wires and it worked, dammit. Here is a video of it working, in fact.

It felt very good. My jaw dropped.

I feel like NOW, today, I'm ready to go to college and fix my B in Electronics Class.

Youth is wasted on the young, my friends. What have YOU been learning lately?


Sponsor: Like C#? We do too! That’s why we've developed a fast, smart, cross-platform .NET IDE which gives you even more coding power. Clever code analysis, rich code completion, instant search and navigation, an advanced debugger... With JetBrains Rider, everything you need is at your fingertips. Code C# at the speed of thought on Linux, Mac, or Windows. Try JetBrains Rider today!


© 2019 Scott Hanselman. All rights reserved.
     

Yori - The quiet little CMD replacement that you need to install NOW

$
0
0

I did a post on the difference between a console, a terminal, and a shell a while back. We talk a lot about alternative "Terminals" like the Windows Terminal (that you should download immediately) but not shells. You do see a lot of choices in the Linux space with the top give being Bash, Zsh, Fish, Tcsh, and Ksh but not a lot about alternative shells for Windows. Did you love 4DOS? Well, READ ON. (Yes I know TCC is a thing, but Yori is a different thing)

So let's talk about a quiet little CMD replacement shell that is quietly taking over my life. You should check it out and spend some time with it. It's called Yori and it's open source and it's entirely written by one Malcolm Smith. It deserves your attention and respect because Yori has quickly become my goto "DOS but not DOS" prompt.

Yori is DOS, kinda

Of course, cmd.exe isn't DOS but it's evocative of DOS and it's "Close enough to be DOS." It'll run .cmd files and batch files. If dir, and del *.*, and rd /s feels more intuitive to you than bash shell commands, Yori will fit into your life nicely.

I use PowerShell a lot as a shell and I use Bash via WSL and Ubuntu but since I started on CMD (or command.com, even) Yori feels very comfortable because it's literally "CMD reimagined."Yori offers a number of cmd++ enhancements like:

  • Autocomplete suggestions as you type
  • Ctrl+to select Values
  • WAY better Tab completiion
  • Awesome file matching
  • Beyond MAX_PATH support for "DOS"
  • Rich Text Copy!
  • Backquote support
  • Background Jobs like Unix but for DOS. SO you can use & like a real person!
  • Alias! My goodness!
  • which (like where, but it's which!) command
  • hexdump, lines, touch, and more great added tools
  • lots of "y" utils like ydate and ymem and ymore.
  • New Environment variables make your batch files shine
  • ANSI colors/UTF-8 support!

Download Yori, make a link, pin it, or add it to your Windows Terminal of choice (see below), and then explore the extensive Guide To Yori.

Did I mention & jobs support! How often have you done a copy or xcopy and wanted to &! it and then check it later with job? Now you can!

C:\Users\Scott\Desktop>dir &!

Job 2: c:\Program Files\Yori\ydir.exe
C:\Users\Scott\Desktop>job
Job 1 (completed): c:\Program Files\Yori\ydir.exe
Job 2 (executing): c:\Program Files\Yori\ydir.exe
Job 2 completed, result 0: c:\Program Files\Yori\ydir.exe

Yori also support updating itself with "ypm -u" which is clever. Other lovely Yori-isms that will make you smile?

  • cd ~ - it works
  • cd ~desktop - does what you think it'd do
  • Win32 versions of UNIX favorites including cut, date, expr, fg, iconv, nice, sleep, split, tail, tee, wait and which
  • dir | clip - supports HTML as well!
  • durable command history

And don't minimize the amount of work that's happened here. It's a LOT. And it's a great balance between compatibility and breaking compatibility to bring the best of the old and the best of the new into a bright future.

Other must-have Malcolm Smith Tools

Now that I've "sold" you Yori (it's free!) be sure to pick up sdir (so good, a gorgeous dir replacement) and other lovely tools that Malcolm has written and put them ALL in your c:\utils folder (you have one, right? Make one! Put it in DropBox/OneDrive! Then add it to your PATH on every machine you have!) and enjoy!

Yori is lovely, paired with SDIR

Adding Yori to the Windows Terminal

Yori includes it's own improved Yori-specific terminal (to go with the Yori shell) but it also works with your favorite terminal.

If you are using the Windows Terminal, head over to your settings file (from the main Windows Terminal menu) and add something like this for a Yori menu. You don't need all of this, just the basics like commandline. I added my own colorScheme and tabTitle. You can salt your own to taste.

{

"acrylicOpacity": 0.85000002384185791,
"closeOnExit": true,
"colorScheme": "Lovelace",
"commandline": "c://Program Files//Yori//yori.exe",
"cursorColor": "#00FF00",
"cursorHeight": 25,
"cursorShape": "vintage",
"fontFace": "Cascadia Code",
"fontSize": 20,
"guid": "{7d04ce37-c00f-43ac-ba47-992cb1393215}",
"historySize": 9001,
"icon": "ms-appdata:///roaming/cmd-32.png",
"name": "DOS but not DOS",
"padding": "0, 0, 0, 0",
"snapOnInput": true,
"startingDirectory": "C:/Users/Scott/Desktop",
"tabTitle": "DOS, Kinda",
"useAcrylic": true
},

Great stuff!

I want YOU, Dear Reader, to head over to https://github.com/malxau/yori right now and give Yori and Malcolm a STAR. He's got 110 as of the time of this posting. Let's make that thousands. There's so many amazing folks out there quietly writing utilities for themselves, tirelessly, and a star is a small thing you can do to let them know "I see you and I appreciate you."


Sponsor: Curious about the state of software security as we head into 2020? Check out Veracode’s 2019 SOSS X report to learn common vulnerability types, how to improve fix rates, and crucial industry data.


© 2019 Scott Hanselman. All rights reserved.
     

Updating my ASP.NET podcast site to System.Text.Json from Newtonsoft.Json

$
0
0

JSON LogoNow that .NET Core 3.1 is LTS (Long Term Support) and will be supported for 3 years, it's the right time for me to update all my .NET Core 2.x sites to 3.1. It hasn't take long at all and the piece of mind is worth it. It's nice to get all these sites (in the Hanselman ecosystem LOL) onto the .NET Core 3.1 mainline.

While most of my sites working and running just fine - the upgrade was easy - there was an opportunity with the podcast site to move off the venerable Newtonsoft.Json library and move (upgrade?) to System.Text.Json. It's blessed by (and worked on by) James Newton-King so I don't feel bad. It's only a good thing. Json.NET has a lot of history and existed before .NET Standard, Span<T>, and existed in a world where .NET thought more about XML than JSON.

Now that JSON is essential, it was time that JSON be built into .NET itself and System.Text.Json also allows ASP.NET Core to existed without any compatibility issues given its historical dependency on Json.NET. (Although for back-compat reasons you can add Json.NET back with one like using AddJsonOptions if you like).

Everyone's usage of JSON is different so your mileage will depend on how much of Json.NET you used, how much custom code you wrote, and how deep your solution goes. My podcast site uses it to access a number of JSON files I have stored in Azure Storage, as well as to access 3rd party RESTful APIs that return JSON. My podcast site's "in memory database" is effectively a de-serialized JSON file.

I start by bringing in two namespaces, and removing Json.NET's reference and seeing if it compiles! Just rip that Band-Aid off fast and see if it hurts.

using System.Text.Json;

using System.Text.Json.Serialization;

I use Json Serialization in Newtonsoft.Json and have talked before about how much I like C# Type Aliases. Since I used J as an alias for all my Attributes, that made this code easy to convert, and easy to read. Fortunately things like JsonIgnore didn't have their names changed so the namespace was all that was needed there.

NOTE: The commented out part in these snippets is the Newtonsoft bit so you can see Before and After

//using J = Newtonsoft.Json.JsonPropertyAttribute;

using J = System.Text.Json.Serialization.JsonPropertyNameAttribute;

/* SNIP */

public partial class Sponsor
{
[J("id")]
public int Id { get; set; }

[J("name")]
public string Name { get; set; }

[J("url")]
public Uri Url { get; set; }

[J("image")]
public Uri Image { get; set; }
}

I was using Newtonsoft's JsonConvert, so I changed that DeserializeObject call like this:

//public static v2ShowsAPIResult FromJson(string json) => JsonConvert.DeserializeObject<v2ShowsAPIResult>(json, Converter.Settings);

public static v2ShowsAPIResult FromJson(string json) => JsonSerializer.Deserialize<v2ShowsAPIResult>(json);

In other classes some of the changes weren't stylistically the way I'd like them (as an SDK designer) but these things are all arguable either way.

For example, ReadAsAsync<T> is a super useful extension method that has hung off of HttpContent for many years, and it's gone in .NET 3.x. It was an extension that came along for the write inside Microsoft.AspNet.WebApi.Client, but it would bring Newtonsoft.Json back along for the ride.

In short, this Before becomes this After which isn't super pretty.

return await JsonSerializer.DeserializeAsync<List<Sponsor>>(await res.Content.ReadAsStreamAsync());

//return await res.Content.ReadAsAsync<List<Sponsor>>();

But one way to fix this (if this kind of use of ReadAsAsync is spread all over your app) is to make your own extension class:

public static class HttpContentExtensions

{
public static async Task<T> ReadAsAsync<T>(this HttpContent content) =>
await JsonSerializer.DeserializeAsync<T>(await content.ReadAsStreamAsync());
}

My calls to JsonConvert.Serialize turned into JsonSerializer.Serialize:

//public static string ToJson(this List<Sponsor> self) => JsonConvert.SerializeObject(self);

public static string ToJson(this List<Sponsor> self) => JsonSerializer.Serialize(self);

And the reverse of course with JsonSerializer.Deserialize:

//public static Dictionary<string, Shows2Sponsor> FromJson(string json) => JsonConvert.DeserializeObject<Dictionary<string, Shows2Sponsor>>(json);

public static Dictionary<string, Shows2Sponsor> FromJson(string json) => JsonSerializer.Deserialize<Dictionary<string, Shows2Sponsor>>(json);

All in all, far easier than I thought. How have YOU found System.Text.Json to work in your apps?


Sponsor: When DevOps teams focus on fixing new flaws first, they can add to mounting security debt. Veracode’s 2019 SOSS X report spotlights how developers can reduce fix rate times by 72% with frequent scans.


© 2019 Scott Hanselman. All rights reserved.
     

My Interview and Podcast Production Process on the Hanselminutes Podcast

$
0
0

artwork 300x300Hey! Did you know I have a podcast? A few actually but Hanselminutes has been doing for over 700 episodes over 13 years and it's pretty good if I may say so myself. It's a 30 min show meant for your commute. It offers fresh faces and a fresh perspective on lots of topics. While it's often tech and programming-focused, I do often have guests on to talk about less techie things like relationships, mental health, life hacks and more. I model the show after Fresh Air with Terry Gross.

I recently got a tweet from Xi Xaio asking how I host my show. The planning, the content, the restricted timing, the energy, avoiding wasted time and words, etc. Getting a good question is a gift as it leads to a blog post! So thank you Xi for this gift.

If you work for NPR, you're welcome to put all 350 hours of the show on any public radio station. I'm also available to host Fresh Air or, ahem, Science Friday, and I'd do a good job at it.

Here are Xi's questions and my answers. You might also like my article How to start your first podcast - equipment, editing, publishing and more as well.

How do you keep up the number of guests for a weekly podcast?

I haven’t had too much trouble as I just watch hacker news, Reddit, Twitter, etc and if I see someone cool I will invite them. I have 8 guests "in the can"right now so I like to stay a month or two ahead. I also prioritize quieter people. Lots of folks have a PR or press person (I get a dozen pitches a week) but the most interesting people aren't doing podcasts because they are making amazing art/tech. So I like to talk to them. I know I've gotten someone good when their response is "me? Why me?" Well, because you're making/thinking/commentating!

What drives you to keep publishing even when you are on holiday, for the promise of a new episode each week - for better audience engagement, or for the demands of the advertisers?

Consistency is key and king. If you publish regularly people start to (consciously or unconsciously) come to expect it. You can fit into their life when they know your show is every week, for example. Others “publish when they can” and that means their show has no heartbeat and can’t be counted on. Life is a marathon, not a sprint, and step one is showing up. I like to show up every week. When I took a few months off last year to stay in South Africa, I had 12 shows already recorded and scheduled before I left.

You introduce the guest on their behalf. Why not let guests do it themselves?

Because most people aren’t good at introducing themselves, advocating for themselves, or talking about themselves. I like to take a moment, be consistent and talk them up. It starts the show well because it reminds them they are awesome!

You keep the episode length within 30 mins. Guests are different, some keep talking and some are succinct. How do you achieve this goal?

A typical show has 6 bullet points, 5 minutes each, as I plan the content. I'll do a lot of research (think 50 tabs open, etc) and then I work out the story arc (where do we want to take the audience) with the guest ahead of time, and I optimize the show and conversation for that process.

We bounce bullet points back and forth over email for a while or have a preliminary Skype/Facetime.

Would you mind sharing your content producing procedures after recording? I'd love to learn what steps you take from editing to publishing, and tips to be more efficient.

I store everything in a workflow of folders in Dropbox. I have an “input raw shows” folder and an “output produced shows” folder. I use zencastr to record, and the result is a WAV file for each speaker. Then my paid producer Mandy will level the audio, edit and merge them in Audacity, then add the music, produce the MP3, add the ID3tags, and put the result in the output folder. Then she uploads it to Simplecast and schedules the show for Thursday. My custom-built podcast site then pulls the show from the Simplecast REST API and it shows up at http://hanselminutes.com.

In addition to your perseverance, what other recommendations do you have to new tech podcast hosts, like me?

Perseverance is key. No one listened to my first hundred shows. Do this for yourself first, and the audience later. 

Also, audio quality is everything. If it’s low or bad or hard to hear you’ll lose audiences. One other tip, as you get better as an interviewer the less you’ll have too edit, which will save you time. If you mess up, stop. Clap, then start again. The clap makes it easy to see the mistake (it'll be a spike on the audio waveform) and then you can do a "pull up" and just elide that portion.

What do you mean by "I optimize the show and conversation for that process"

The point of a story is the story arc. You can't just randomly chat with folks, you need to have a plan and a direction. Where are you taking the listener? How will you get them there? Are you being empathic and putting yourself in the shoes of the listener? What do they know, what do they not know?

How much should you talk?

Less. It's not about me or you, it's about the guest. I play a role. I play the foil. What is a foil?

foil - a person or thing that contrasts with and so emphasizes and enhances the qualities of another.

Here is a real show. I'm in green. I'm there to ask YOUR questions (as you're not there!) and advocate for the listener. Whether or not I know the answer or not isn't important. I'm there to expand acronyms, provide context, and guide the journey.

Talk less, listen more

Do you have a podcast? Leave a link below and share YOUR process!


Sponsor: Like C#? We do too! That’s why we've developed a fast, smart, cross-platform .NET IDE which gives you even more coding power. Clever code analysis, rich code completion, instant search and navigation, an advanced debugger... With JetBrains Rider, everything you need is at your fingertips. Code C# at the speed of thought on Linux, Mac, or Windows. Try JetBrains Rider today!


© 2019 Scott Hanselman. All rights reserved.
     

.NET everywhere apparently also means Windows 3.11 and DOS

$
0
0

I often talk about how .NET Core is open source and runs "everywhere." MonoGame, Unity, Apple Watches, Raspberry Pi, and Microcontrollers (as well as a dozen Linuxes, Windows, etc) is a lot of places.

Michal Strehovský wants C# to run EVERYWHERE and I love him for it.

C# running on Windows 3.11

He recently got some C# code running in two "impossible" places that are now added to our definition of everywhere. While these are fun experiments (don't do this in production) it does underscore the flexibility of both Michals' technical abilities and the underlying platform.

Running C# on Windows 3.11

In this 7 tweet thread Michael talks about how he got C# running in Windows 3.11. The app is very simple, just calling MessageBoxA which has been in Windows since Day 1. He's using DllImport/PInvoke to call MessageBox and receive its result.

I'm showing this Windows 3.11 app first because it's cool, but he started where his DOS experiment left off. He's compiling C# native code, and once that's done you can break all kinds of rules.

In this example he's running Win16...not Win32. However (I was alive and coding and used this on a project!) in 1992 there was a bridge technology called Win32s that was a subset of APIs that were in Windows NT and were backported to Windows 3.11 in the form of Win32s. Given some limitations, you could write 32 bit code and thunk from Win16 to Win32.

Michal learned that the object files that CoreTR's AOT (ahead of time) compiler in 2020 can be linked with the 1994 linker from Visual C++ 2.0. The result is native code that links up with Win32s that runs in 16-bit (ish) Windows 3.11. Magical. Kudos Michal.

Simple Hello World C# app

Running C# in 8kb on DOS

I've blogged about self-contained .NET Core 3.x executables before and I'm a huge fan. I got my app down to 28 megs. It's small by some measurements, given that it includes the .NET runtime and a lot of accoutrements. Certainly one shouldn't judge a VM/runtime by its hello world size, but Michal wanted to see how small he could go - with 8000 bytes as the goal!

He's using text-mode which I think is great. He also removes the need for the garbage collector by using a common technique - no allocations allowed. That means you can't use new anywhere. No reference types.

He uses things like "fixed char[]" fields to declare fixed arrays, remembering they must live on the stack and the stack is small.

Of course, when you dotnet publish something self-contained, you'll initially get a 65 meg ish EXE that includes the app, the runtime, and the standard libraries.

dotnet publish -r win-x64 -c Release

He can use ILLinker and PublishedTrimmed to use .NET Core 3.x's Tree Trimming, but that gets it down to 25 megs.

He tries using Mono and mkbundle and that gets him down to 18.2 megs but then he hits a bug. And he's still got a runtime.

So the only runtime that isn't a runtime is CoreRT which includes no virtual machine, just functions to support you.

dotnet publish -r win-x64 -c Release /p:Mode=CoreRT

And this gets him to 4.7 megs, but still too big. Some tweaks go to about 3 megs. He can pull out reflection entirely and get to 1.2 megs! It'll fit on a floppy now!

dotnet publish -r win-x64 -c Release /p:Mode=CoreRT-ReflectionFree

This one megabyte size seems to be a hardish limit with just the .NET SDK.

Here's where Michal goes off the rails. He makes a stub reimplementation of the  System base types! Then recompiles with some magic switches to get an IL only version of the EXE

csc.exe /debug /O /noconfig /nostdlib /runtimemetadataversion:v4.0.30319 MiniBCL.cs Game\FrameBuffer.cs Game\Random.cs Game\Game.cs Game\Snake.cs Pal\Thread.Windows.cs Pal\Environment.Windows.cs Pal\Console.Windows.cs /out:zerosnake.ilexe /langversion:latest /unsafe

Then he feeds that to CoreIT to get the native code

ilc.exe zerosnake.ilexe -o zerosnake.obj --systemmodule zerosnake --Os -g

yada yada yada and he's now here

"Now we have zerosnake.obj — a standard object file that is no different from object files produced by other native compilers such as C or C++. The last step is linking it."

A few more tweaks at he's at 27kb! He then pulls off a few linker switches to disable and strip various things - using the same techniques that native developers use and the result is 8176 bytes. Epic.

link.exe /debug:full /subsystem:console zerosnake.obj /entry:__managed__Main kernel32.lib ucrt.lib /merge:.modules=.rdata /merge:.pdata=.rdata /incremental:no /DYNAMICBASE:NO /filealign:16 /align:16

a

What's the coolest and craziest place you've ever run .NET code? Go follow Michal on Twitter and give him some applause.


Sponsor: Like C#? We do too! That’s why we've developed a fast, smart, cross-platform .NET IDE which gives you even more coding power. Clever code analysis, rich code completion, instant search and navigation, an advanced debugger... With JetBrains Rider, everything you need is at your fingertips. Code C# at the speed of thought on Linux, Mac, or Windows. Try JetBrains Rider today!


© 2019 Scott Hanselman. All rights reserved.
     

My views on community, productivity, kindness, and mindfulness on the Hanselminutes Fresh Tech Podcast

$
0
0

Scott HanselmanAt the start of a new decade and over 700 episodes of my tech podcast, I did something weird. I had myself on the show. Egotistical, perhaps, given the show literally has my name in it, but the way it happened was interesting.

This episode wasn't supposed to be an episode! I was invited by Jeff Fritz of Twitch fame to talk to his community team of Live Coders on Discord. They recorded it, and mentioned several times that it was useful content! I didn't go into the private meeting thinking I'd record a show. It was effectively a conference call with friends old and new. It's unedited and off the cuff.

So, why not try something new and make this an episode! Let me know on Twitter if you find my views on community, productivity, and life useful to you!

I talk about:

  • Longevity - Sticking to your goals
  • Relationships - Business plans/goals/life settings/culture
  • Living Life By Design rather than By Default
  • Setting the Tone
  • Positivity and how to maintain it
  • Scaling yourself and your community
  • Why Kindness Matters
  • Blogging - it's a marathon not a sprint
  • Feeding your spirit
  • Why do we do something and why do we procrastinate?
  • Removing Mental Clutter
  • Why do I blog/create? Why do you?
  • Conserving your keystrokes
  • Advice to my 20 year old self
  • Willpower and catching up
  • What can you talk about? What can you write about?
  • A question is a gift
  • Why would I allow someone who doesn't love me ruin my day?
  • Interviewing techniques and empathy
  • The importance of improv and "yes, and"
  • Charisma On Command
  • Dealing with Imposter Syndrome
  • Deliberate Practice
  • Mindfulness
  • Owning what you're good at
  • Freaking Out
  • Acceptance
  • Priorities - family and life
  • What's important?
  • Plan, execute on the plan, make a new plan

Please go listen to Episode 719 of the Hanselminutes Podcast, it's just 54 minutes long.

Hanselminutes Podcast

It's called "Myself: It's not weird at all" and I'm actually kind of proud of it. Let me know what you think in the comments!

if you like this show, you can give ME a gift by SHARING it with your people!


Sponsor: Veracode analyzed 1.4 million scans for their 2019 SOSS X report. The findings? 83% of apps have flaws like cross-site scripting, injection, and authentication—all adding to rising security debt.


© 2019 Scott Hanselman. All rights reserved.
     

Trying out Container Tools in Visual Studio 2019

$
0
0

I've been doing more and more work in Docker containers (rather than on the metal) and I noticed recently that Visual Studio 2019 added updated support for containers within VS itself so gave it a try.

When you make a new ASP.NET Core web app, make sure to check "enable docker support" when you click create.

Enable docker support

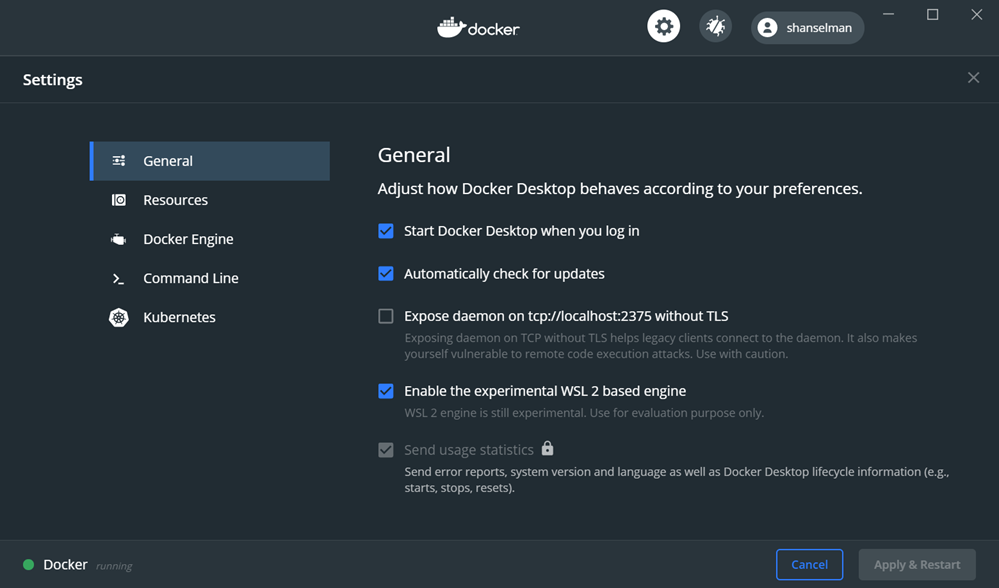
You'll need Docker for Windows first, of course. I'm using the new Docker Desktop for Windows that uses WSL2 for its backend rather than a utility VM that's visible in Hyper-V.

Now, within Visual Studio 2019, go to the View Menu and click "Other Windows | Containers." I like to dock this new tool window at the bottom.

Container Tool Window in Visual Studio 2019

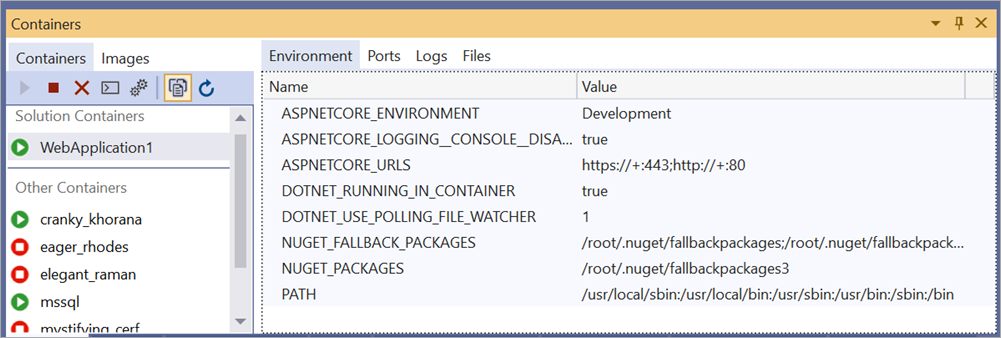
Note in my screenshot above I'm starting up SQL Server on Linux within a container. This window is fantastic and includes basically everything you'd want to know and see when developing within a container.

You can see the ports exposed, the container's local file system, the environment, and the logs as they happen.

Docker Environment Variables

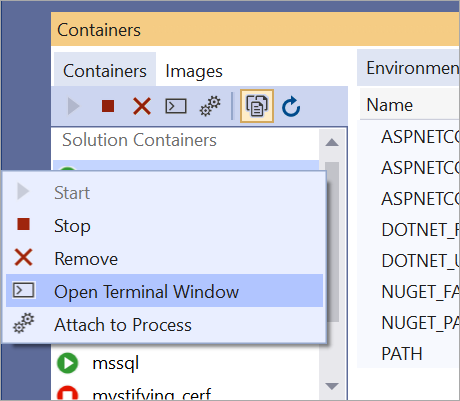
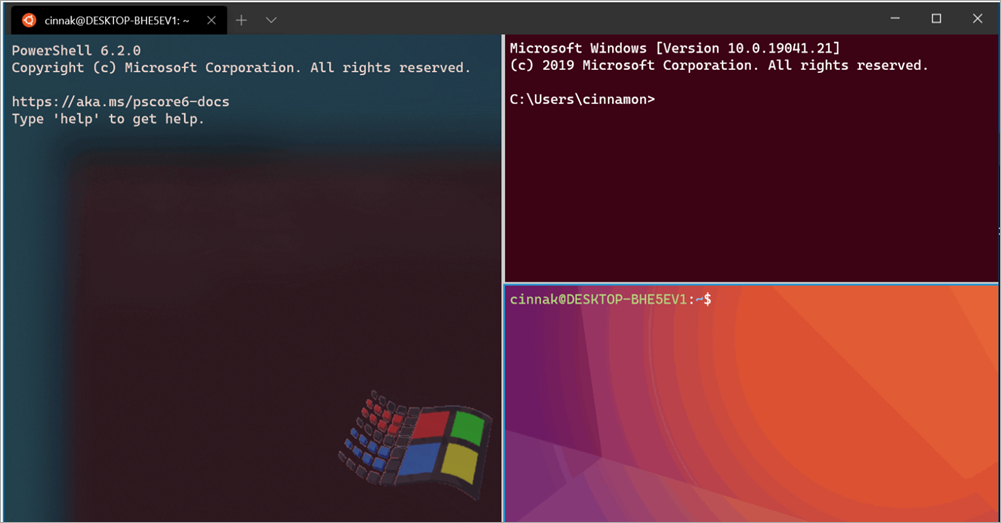
You can even right-click on a container and get a Terminal Window into that running container if you like:

Terminal in a running Container

You can also see https://aka.ms/containerfastmode to understand how Visual Studio uses your multistage Dockerfile (like the one below) to build your images for faster debugging.

FROM mcr.microsoft.com/dotnet/core/aspnet:3.1-buster-slim AS base

WORKDIR /app
EXPOSE 80
EXPOSE 443

FROM mcr.microsoft.com/dotnet/core/sdk:3.1-buster AS build
WORKDIR /src
COPY ["WebApplication1/WebApplication1.csproj", "WebApplication1/"]
RUN dotnet restore "WebApplication1/WebApplication1.csproj"
COPY . .
WORKDIR "/src/WebApplication1"
RUN dotnet build "WebApplication1.csproj" -c Release -o /app/build

FROM build AS publish
RUN dotnet publish "WebApplication1.csproj" -c Release -o /app/publish

FROM base AS final
WORKDIR /app
COPY --from=publish /app/publish .
ENTRYPOINT ["dotnet", "WebApplication1.dll"]

Go read about the new Container Tools in Visual Studio. Chances are you have a dockerfile in your project but you haven't brought this Containers Tool Window out to play!


Sponsor: Organizations that scan their code more than 300 times a year have 5x less security debt than those with sporadic testing processes. The 2019 SOSS X report from Veracode digs into this data—and more.


© 2019 Scott Hanselman. All rights reserved.
     

Retrogaming by modding original consoles to remove moving parts and add USB or SD-Card support

$
0
0

I'm a documented big fan of Retrogaming (playing older games and introducing my kids to those older games).

For example, we enjoy the Hyperkin Retron 5 in that it lets us play NES, Famicom, SNES, Super Famicom, Genesis, Mega Drive, Game Boy, Game Boy Color, & Game Boy over 5 category ports. with one additional adapter, it adds Game Gear, Master System, and Master System Cards. It uses emulators at its heart, but it requires the use of the original game cartridges. However, the Hyperkin supports all the original controllers - many of which we've found at our local thrift store - which strikes a nice balance between the old and the new. Best of all, it uses HDMI as its output plug which makes it super easy to hook up to our TV.

I've also blogged about modding/updating existing older consoles to support HDMI. On my Sega Dreamcast I've been very happy with this Dreamcast to HDMI adapter (that's really internally Dreamcast->VGA->HDMI).

The Dreamcast was lovely

When retrogaming there's a few schools of thought:

  • Download ROMs and use emulators - I try not to do this as I want to support small businesses (like used game stores, etc) as well as (in a way) the original artists.
  • Use original consoles with original cartridges
  • Use original consoles with backup images through an I/O mod.
    • I've been doing this more and more as many of my original consoles' CD-ROMs and other moving parts have started to fail.

It's the failure of those moving parts that is the focus of THIS post.

For example, the CD-ROM on my Panasonic 3DO Console was starting to throw errors and have trouble spinning up so I was able to mod it to load the CD-ROMs (for my owned discs) off of USB.

This last week my Dreamcast's GD-ROM finally started to get out of alignment.

Fixing Dreamcast Disc Errors

You can can align a Dreamcast GD-ROM by opening it up by removing the four screws on the bottom. Lift up the entire GD-ROM unit without pulling too hard on the ribbon cable. You may have to push the whole laser (don't touch the lens) back in order to flip the unit over.

Then, via trial and error, turn the screw shown below to the right about 5 degrees (very small turn) and test, then do it again, until your drive spins up reliably. It took me 4 tries and about 20 degrees. Your mileage may vary.

The Dreamcast GD-ROM just pops outTake out the whole GD-ROM

Turn this screw to align your laser on your Dreamcast

This fix worked for a while but it was becoming clear that I was going to eventually have to replace the whole thing. These are moving parts and moving parts wear out.

Adding solid state (SD-Card) storage to a Dreamcast

Assuming you, like me, have a VA1 Dreamcast (which is most of them) there are a few options to "fake" the GD-ROM. My favorite is the GDEMU mod which requires no soldering and can be done in just a few minutes. You can get them directly or on eBay. I ordered a version 5.5 and it works fantastically.

You can follow the GDEMU instructions to lay out a FAT32 formatted SD Card as it wants it, or you can use this little obscure .NET app called GDEMU SD Card Maker.

The resulting Dreamcast now has an SD Card inside, under where the GD-ROM used to be. It works well, it's quiet, it's faster than the GD-ROM and it allows me to play my backups without concern of breaking any moving parts.

Modded Dreamcast

Other small Dreamcast updates

As a moving part, the fan can sometimes fail so I replaced fan my using a guide from iFixit. In fact, a 3-pin 5V Novtua silent fan works great. You can purchase that fan plus a mod kit with a 3d printed adapter that includes a fan duct and conversion gable with 10k resistor, or you can certainly 3D print your own.

If you like this kind of content, go follow me on Instagram!


Sponsor: When you use my Amazon.com affiliate links to buy small things it allows me to also buy small things. Thanks!


© 2019 Scott Hanselman. All rights reserved.
     

Hosting your own NuGet Server and Feed for build artifacts with BaGet

$
0
0

BaGet is a great NuGet alternativeNuGet is the package management system underlying the .NET programming platform. Just like Ruby Gems or NPM Packages, you can bring in 3rd party packages or make your own. The public repository is hosted at http://nuget.org BUT the magic is that there's alternatives! There are lots of alternative servers, as well as alterative clients like Paket.

There's a whole ecosystem of NuGet servers. You can get filtered views, authenticated servers, special virus scanned repositories, your own custom servers where your CI/CD (Continuous Integration/Continuous Deployment) system can publish daily (hourly?) NuGet packages for other teams to consume.

Ideally in a team situation you'll have one team produce NuGet Packages and publish them to a private NuGet feed to be consumed by other teams.

Here's just a few cool NuGet servers or views on NuGet.org:

  • FuGet.org
    • FuGet is "pro nuget package browsing!" Creating by the amazing Frank A. Krueger - of whom I am an immense fan - FuGet offers a different view on the NuGet package library. NuGet is a repository of nearly 150,000 open source libraries and the NuGet Gallery does a decent job of letting one browse around. However, https://github.com/praeclarum/FuGetGallery is an alternative web UI with a lot more depth.
  • Artifactory
    • Artifactory is a, ahem, factory for build artifacts of all flavors, NuGet being just one of them. You can even make your own internal cache of NuGet.org. You can remove or block access to packages you don't want your devs to have.
  • NuGet Gallery
    • You can just run your OWN instance of the NuGet.org website! It's open source
  • NuGet.Server
    • NuGet.Server is an MVP (Minimum Viable Product) of a NuGet Server. It's small and super lightweight but it's VERY limited. Consider using BaGet (below) instead.
  • GitHub Packages
    • GitHub has a package repository with a small free tier, and it also scales up to Enterprise size if you want a "SaaS" offering (software as a service)
  • Azure Artifacts
    • Azure Artifacts can also provide a SaaS setup for your NuGet packages. Set it up and forget it. A simple place for your automated build to drop your build artifacts.
  • MyGet
    • MyGet can hold packages of all kinds, including NuGet.They are well known for their license compliance system, so you can make sure your devs and enterprise are only using the projects your org can support.\
  • LiGet
    • A NuGet server with a Linux-first approach
  • BaGet (pronounced baguette)
    • This is one of my favorites. It's a new fresh NuGet server written entirely in ASP.NET Core 3.1. It's cross platform, open source, and runs in Azure, AWS, Google Cloud, behind IIS, or via Docker. Lovely!  It's also a great example of some thoughtfully architected code, good plugin model, nice separation of concerns, and a good test suite. If you are using NuGet.Server now, move over to BaGet!

Let's focus on BaGet for now! Go give them some love/stars on GitHub!

Setting up a cross platform personal NuGet Server with BaGet

BaGet is a lovely little server. So far it supports:

The most initially powerful feature in my opinion is the Read-through caching.

This lets you index packages from an upstream source. You can use read-through caching to:

  1. Speed up your builds if restores from nuget.org are slow
  2. Enable package restores in offline scenarios

This can be great for folks on low bandwidth or remote scenarios. Put BaGet in front of your developers and effectively make a NuGet "edge CDN" that's private to you.

If you are familiar with Docker, you can get a BaGet NuGet server up in minutes. You can also use Azure or AWS or another cloud to store your artifacts in a scaleable way.

NOTE: You'll notice that the docs for things like "running BaGet on Azure" aren't complete. This is a great opportunity for YOU to help out and get involved in open source! Note that BaGet has a number of open issues on their GitHub *and* they've labeled some as "Good First Issue!"

If you want to try running BaGet without Docker, just

  1. Install .NET Core SDK
  2. Download and extract BaGet's latest release
  3. Start the service with dotnet BaGet.dll
  4. Browse http://localhost:5000/ in your browser

That's it! All the details on Getting Started with BaGet are on their GitHub. Go give them some love and stars.


© 2019 Scott Hanselman. All rights reserved.
     

Hundreds of practical ASP.NET Core samples to learn the fundamentals

$
0
0

There's a growing world of .NET 101 samples out there. From our own http://dot.net/videos starter videos on YouTube (over 100 and adding more all the time!) to the whole .NET learning center where you can learn and practice C# online in your browser with no install!

There's also a new "Take your first steps with C#" 4 hour online Learning Path that you can also take entirely online!

image

Another great resource for learning and improving your coding skills is READING and exploring code.

Community member Dody Gunawinata has been amassing a wonderful online resource on their GitHub called Practical ASP.NET Core and you should definitely check it out and give the repository a star and a bookmark! If you are studying ASP.NET Core, Dody is often found on this Gitter Channel answering questions and generally being helpful.

Over 300 samples for ASP.NET Core 2.1, 2.2, 3.0 and 3.1 fundamentals

This is a massive amount of work. Check it out at https://github.com/dodyg/practical-aspnetcore and again, star it!

Kudos to Dody for doing it and I'd encourage you to get in there an help out!

He has lots of small compartmentalized samples that show you everything from Hello World (with increasingly complex and interesting bits layered on top) to lower level samples around WebSockets and building URIs.

Many of the samples are on .NET Core 2.1 as of the timing of this blog post, but Dody has an active 3.1 LTS Branch with updated ASP.NET 3.1 samples as well! Amazing!

Here's just a few of the resources on the Practical ASP.NET Repository:

I know Dody would appreciate the help and this is a great way for you to get involved in open source AND learn a little about ASP.NET. Check out the Contributor Guidelines! As they say, "There is no sample that is too small!"


© 2019 Scott Hanselman. All rights reserved.
     

Your Todo application is too complex or not complex enough

$
0
0

Reading Code is FunI've blogged before about ASP.NET Architect David Fowler's hidden gems in ASP.NET. His GitHub is worth following because he's always exploring and thinking and he's doing it in public. I love reading other people's source code.

He's been working on a local orchestrator called Micronetes that is worth reading about, but for this blog post I want to focus on his "Todos" repository.

Making a Todo List is a form of Hello World on the web, similar to making a blog or a simple website. Everyone knows what a Todo app should look and act like, so you can just focus on your tools and not on the requirements. You may feel that a Todo app "isn't complex enough" or isn't a good example app to make. That's fine, but it is worth exploring and reading the different ways the same thing can be done.

David's repository https://github.com/davidfowl/Todos is of note because it's not ONE Todo App. As of the time of this writing it's 8 todo apps, each with a different reason to exist.

What's a basic app look like? What if you add Auth? What if you add Dependency Injection? What about Controllers? You get the idea.

Some languages and platforms (*ahem* enterprise) get a reputation for being too complex, too layered, too many projects. Others may get the opposite reputation - that's a toy, it'll never scale (in size, traffic, size of team, whatever).

The point is that not everything is a hammer and not everything is a screw. You may think this is a cop out, but the answers is always "It depends." The more experience you get in software and the more mistakes you make and the more systems you put into production the more you'll realize that - wait for it - it depends. Disagree if you like, but one size doesn't fit all.

Some cool stuff about David's Todo code

All that said, there's some cool "before and afters" if you look at the code for earlier ideomatic C# and what newer APIs and language features allow. For example, if we assume some extensions and new APIs added for clarity, here's a POST

static async Task PostAsync(HttpContext context)

{
var todo = await context.Request.ReadJsonAsync<Todo>(_options);

using var db = new TodoDbContext();
await db.Todos.AddAsync(todo);
await db.SaveChangesAsync();

context.Response.StatusCode = StatusCodes.Status204NoContent;
}

and the GET

static async Task GetAllAsync(HttpContext context)

{
using var db = new TodoDbContext();
var todos = await db.Todos.ToListAsync();

await context.Response.WriteJsonAsync(todos, _options);
}

I personally do think that stuff like this is too complex. I hate that out parameter.

static async Task GetAsync(HttpContext context)

{
if (!context.Request.RouteValues.TryGet("id", out long id))
{
context.Response.StatusCode = StatusCodes.Status400BadRequest;
return;
}

using var db = new TodoDbContext();
var todo = await db.Todos.FindAsync(id);
if (todo == null)
{
context.Response.StatusCode = StatusCodes.Status404NotFound;
return;
}

await context.Response.WriteJsonAsync(todo);
}

This is made-up code from me that doesn't work. It's even still a little too much.

static async Task GetAsync(HttpContext context)

{
if (!RouteValues.Exist("id")) return Http.400;

using var db = new TodoDbContext();
var todo = await db.Todos.FindAsync(RouteValues["id"] as int);
if (todo == null) return Http.404

await Json(todo);
}

These are all useful exercises and are fun to explore. It also brings up some hard questions:

  • What is the difference between terse and clear versus obscure and inaccessible?
  • How important is the Law of Demeter?
  • Are some problems better solved by language changes or by main library changes?
  • How many things should/can be put into extension methods?
    • And when those basic scenarios break down, are you dropped into a Func<T<T<T<T<T<T>>>>> hellscape?

Do you enjoy reading code like this as much as I do, Dear Reader? I think it's a great learning tool. I could do a whole day-long class facilitating conversation around this code https://github.com/davidfowl/Todos

Enjoy!


© 2019 Scott Hanselman. All rights reserved.
     

Announcing .NET Interactive - Try .NET includes .NET Notebooks and more

$
0
0

At Microsoft Ignite 2019, we were happy to announce that the "Try .NET global tool" added support for C# and F# Jupyter notebooks. Last week, the same team that brought you .NET Notebooks announced Preview 2 of the .NET Notebook.

Name Change - .NET interactive

As the scenarios for what was "Try .NET" continued to grow, the team wanted to a name that encompassed all the experiences they have as well as all the experiences they will have in the future. What was the Try .NET family of projects is now .NET interactive.

The F# community has enjoyed F# in Juypter Notebooks from years with the pioneering functional work of Rick Minerich, Colin Gravill and many other contributors! .NET Interactive is a family of tools and kernels that offer support across a variety of experiences as a 1st party Microsoft-supported offering.

.NET interactive is a group of CLI (command line interface) tools and APIs that enable users to create interactive experiences across the web, markdown, and notebooks.

.NET Interactive APIs and Tools

Here is what the command line looks like using the dotnet CLI.

  • dotnet interactive global tool:
  • dotnet try global tool:
    • Used for workshops and offline documentation. Interactive markdown with a backing project. I wrote about this in May 2019.
  • trydotnet.js API
    • Currently, only used internally at Microsoft, this API is used on the .NET page and C# documentation. Maybe one day I can use it on my blog? And yours?

Installing .NET Interactive

You can start playing with it today, locally or in the cloud! Seriously. Just click and start using it.

Before you install the .NET interactive global tool, please make sure you have the following:

> jupyter kernelspec list
  python3        ~\jupyter\kernels\python3
  • Open Windows terminal and install the dotnet interactive global tool:
> dotnet tool install --global Microsoft.dotnet-interactive
  • Switch back to Anaconda prompt and install the .NET kernel. To be clear, here we are using the dotnet CLI to let the Jupyter CLI know that we exist!
> dotnet interactive jupyter install
[InstallKernelSpec] Installed kernelspec .net-csharp in ~\jupyter\kernels\.net-csharp
.NET kernel installation succeeded
[InstallKernelSpec] Installed kernelspec .net-fsharp in ~\jupyter\kernels\.net-fsharp
.NET kernel installation succeeded
[InstallKernelSpec] Installed kernelspec .net-powershell in ~\jupyter\kernels\.net-powershell
.NET kernel installation succeeded
  • While still in Anaconda prompt, verify that .NET kernel is installed like this
> jupyter kernelspec list
  .net-csharp     ~\jupyter\kernels\.net-csharp
  .net-fsharp     ~\jupyter\kernels\.net-fsharp
  .net-powershell ~\jupyter\kernels\.net-powershell
  python3         ~\jupyter\kernels\python3

Now you can just run "jupyter lab" at the command line and you're ready to go!

More Languages - PowerShell

The .NET kernel now comes PowerShell support too! In Preview 2, the .NET interactive team partnered with PowerShell to enable this scenario. You can read more about the announcement of the PowerShell blog.

.NET in Jupyter Notebooks

The .NET interactive team is looking forward to hearing your thoughts. You can talk to them at https://github.com/dotnet/interactive

Multi .NET language Notebooks

I wanted to highlight one of the hidden gems .NET interactive has had since Preview 1 - multi-language notebooks. That means that users can switch languages in a single notebook. Here is an example of a C#, F#, and PowerShell in a single .ipynb file.

Multiple Language Notebooks

Using one of the language magic commands (#!csharp, #!fsharp,#pwsh) tells the .NET Interactive kernel to run the cell in a specific language. To see a complete list of the available magic commands, enter the #!lsmagic command into a new cell and run it.

.NET Code in nteract.io

Additionally, you can now write .NET Code in nteract.io. Nteract is an open-source organization that builds SDKs, applications, and libraries that helps people make the most of interactive notebooks and REPLs. We are excited to have our .NET users take advantage of the rich REPL experience nteract provides, including the nteract desktop app.

Charts and graphs in nteract

To get started with .NET Interactive in nteract please download the nteract desktop app and install the .NET kernels.

Learn More

The team is looking forward to seeing what you build. Moving forward, the team has split dotnet try and dotnet interactive tools into separate repos.

  • For any issues, feature requests, and contributions to .NET Notebooks, please visit the .NET Interactive repo.
  • For any issues, feature requests, and contributions on interactive markdown and trydotnet.js, please visit the Try .NET repo.

Sponsor: Have you tried developing in Rider yet? This fast and feature-rich cross-platform IDE improves your code for .NET, ASP.NET, .NET Core, Xamarin, and Unity applications on Windows, Mac, and Linux.


© 2019 Scott Hanselman. All rights reserved.
     

It's time for you to install Windows Terminal

$
0
0

It's time. It's the feature complete release of the Windows Terminal. Stop reading, and go install it. I'll wait here. You done? OK.

You can download the Windows Terminal from the Microsoft Store or from the GitHub releases page. There's also an unofficial Chocolatey release. I recommend the Store version if possible.

NOTE: Have you already downloaded the Terminal, maybe a while back? Enough has changed that you should delete your profiles.json and start over.

BIG NOTE: Educate yourself about the difference between a console, a terminal, and a shell. This isn't a new "DOS Prompt." Windows Terminal is the view into whatever shell makes you happy.

What's new? A lot. At this point this is the end of the new features before 1.0 though, and now it's all about bug fixes and rock solid stability.

The Windows Terminal

So you've downloaded the Windows Terminal...now what?

You might initially be underwhelmed. This is a Terminal, it's not going to hold your hand.

The Documentation is just getting started but you can start here! This would be a great way for you to get involved in Open Source, by the way!

Here's the big new change that is very exciting!

Windows Terminal Command Line Arguments

You may know you can run Windows Terminal with "wt.exe" and this version now supports Command line arguments! Here's an examples to give you a taste:

  • wt ; split-pane -p "Windows PowerShell" ; split-pane -H wsl.exe
  • wt -d .
  • wt -d c:\github

At this point you can get as advanced as you want. Make other icons, pin them to the taskbar, have a blast. There's subcommands like new-tab, split-pane, and focus-tab.ter

Other Windows Terminal things to note

Please share YOUR blogs, YOUR profiles, YOUR favorite themes and terminal hacks as well!


Sponsor: Have you tried developing in Rider yet? This fast and feature-rich cross-platform IDE improves your code for .NET, ASP.NET, .NET Core, Xamarin, and Unity applications on Windows, Mac, and Linux.


© 2019 Scott Hanselman. All rights reserved.
     

How to install Visual Studio Code on a Raspberry Pi 4 in minutes

$
0
0

Four years ago I wrote how to BUILD (literally compile) Visual Studio Code for a Raspberry Pi ARM machine. Just a few months later in November, community member Jay Rodgers released his labor of love - nightly builds of VS Code for Chromebooks and Raspberry Pi.

If you want to get unofficial builds of Visual Studio Code running on a Raspberry Pi (I know you have one!) you should use his instructions. He has done a lot of work to make this very simple. Head over to http://code.headmelted.com/ and make it happen for yourself, now!

Jay says:

I've maintained the project for a few years now and it has expanded from providing binaries for Pi to providing support and tools to get VS Code running on low-end ARM devices that might not otherwise support it like Chromebooks (which make up about 60% of the devices in schools now).

The project has really taken off among educators (beyond what I would have thought), not least because they're restricted to the devices provided and it gives them a route to teach coding to students on these computers that might not otherwise be there.

Again, Jay is doing this out of love for the community and the work that makes it happen is hosted at https://github.com/headmelted/codebuilds. I'd encourage you to head over there right now and give him a STAR.

There's so many community members out there doing "thankless" work. Thank them. Thank them with a thank you email, a donation, or just your kindness when you file an issue and complain about all the free work they do for you.

I just picked up a Raspberry Pi 4 from Amazon, and I was able to get a community build of VS Code running on it easily!

Open a terminal, run "sudo -s" and then this script (again, the script is open source):

. <( wget -O - https://code.headmelted.com/installers/apt.sh )

Jay has done the work! That's just the apt instructions, but he's got Chrome OS, APT, YUM, and a manual option over at http://code.headmelted.com/!

Thank you for making this so much easier for us all.

Visual Studio Code on a Raspberry Pi 4

Love Raspberry Pis? Here's some fun stuff you can do with the Raspberry that you bought, the one you meant to do fun stuff with, and the one in your junk drawer. DO IT!

Enjoy!


Sponsor: Couchbase gives developers the power of SQL with the flexibility of JSON. Start using it today for free with technologies including Kubernetes, Java, .NET, JavaScript, Go, and Python.


© 2019 Scott Hanselman. All rights reserved.
     

How to set up Docker within Windows System for Linux (WSL2) on Windows 10

$
0
0

MagicI've written about WSL2 and it's glorious wonders many times. As its release (presumably) grows closer - as of this writing it's on Windows Insiders Slow and Fast - I wanted to update a few posts. I've blogged about a few cool thing around WSL and Docker

Here's a little HanselFAQ and some resources.

I want to run Linux on Windows

You can certainly use HyperV or VirtualBox and run a standard Virtual Machine. Download an ISO and mount it and run "a square within a square." It won't be seamlessly integrated within Windows - it'll be like the movie Inception - but it's time-tested.

Better yet, install WSL or WSL2. It'll take 5-10 minutes tops if your Windows 10 is somewhat up to date.

  • How to install WSL on Windows 10
    • WSL doesn't include a Linux kernel. Its Linux file system access is kinda slow, but it accesses Windows files super fast. If you use Cygwin, you'll love this, because it's really Linux, just the kernel is emulated.
  • How to install WSL2 on Windows 10
    • This ships an actual Linux kernel and its Linux file system is 5x-10x faster than WSL2. Do all your development work inside here, while still using VS Code on Windows. It's amazing. Watch me set up a friend with WSL2, LIVE on YouTube.

I want to SSH into Linux stuff from Windows

There's 15 years of websites telling you to install Putty but you might not need it. OpenSSH has been shipping in Windows 10 for over two years. You can add them with Windows Features, or if you like, grab a release and put it on your PATH.

You can also do things like set up keys to use Windows 10's built-in OpenSSH to automatically SSH into a remote Linux machine. I also like to setup Signed Git Commits with a YubiKey NEO and GPG and Keybase on Windows.

I need a better Terminal in Windows

The new Windows Terminal is for you. Download Windows Terminal now for free. It's open source. You can then run the Win64/Win32 ssh from above, or run any Linux distros SSH. Have fun. It's time.

NOTE: Have you already downloaded the Terminal, maybe a while back? Enough has changed that you should delete your profiles.json and start over.

You can download the Windows Terminal from the Microsoft Store or from the GitHub releases page. There's also an unofficial Chocolatey release. I recommend the Store version if possible.

My prompt and fonts are ugly

Make them pretty. You deserve the best. Go get Cascadia Code's CascadiaPL.ttf and PowerLine and buckle up buttercup. Get a nice theme and maybe a GIF background.

image_e2447ddd-416e-4036-9584-e728455e6d9d

I want to use Docker on Windows and I want it to not suck

Surprise, it's actually awesome. You may have had some challenges with Docker a few years ago on Windows and gave up, but come back. There's been a huge (and fascinating) architecture of Docker on Windows. It's very nicely integrated if you have WSL2.

If you have WSL2 set up nicely, then get Docker Desktop WSL2. This version of Docker for Windows uses WSL2 as its engine allowing you to share your docker context across Windows and Linux on the same machine! As the maker intended!

WSL 2 introduces a significant architectural change as it is a full Linux kernel built by Microsoft, allowing Linux containers to run natively without emulation. With Docker Desktop running on WSL 2, users can leverage Linux workspaces and avoid having to maintain both Linux and Windows build scripts.

So that means

  1. Install Windows 10 Insider Preview build 19018 or higher
  2. Enable WSL 2 feature on Windows. For detailed instructions, refer to the Microsoft documentation.
  3. Download Docker Desktop Edge 2.1.6.0 or a later release.

Ensure your default WSL instances is WSL2. You can do that with wsl -l -v, and then wsl --set-version  <distro> 2

Then within Docker Desktop for Windows you've got two things to check. First, are you using WSL2 as your backend?

Docker for Windows | Enable WSL2

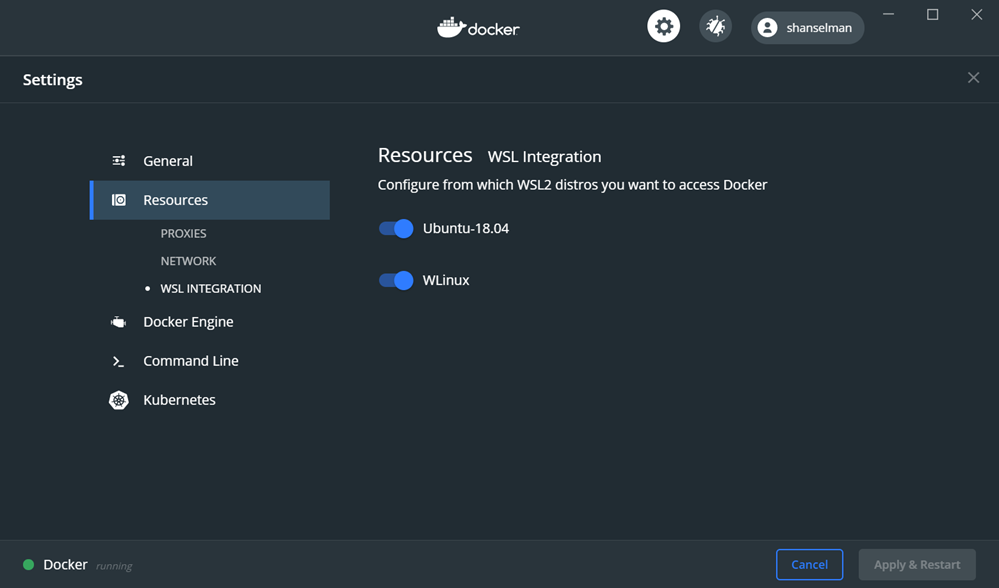
And then, the often missed setup, check under Resources | WSL Integration and tell Docker which WSL2 distros you want to use to access Docker. If you're paying attention you may notice that Docker Desktop tries to prompt you with a notification in Action Center but you might miss it.

Docker | Resources | WSL Integration

NOTE: If you used an early Tech Preview, you might have an extra now-vestigial Docker context named "wsl." You want to use the Default one, not the WSL one.

This isn't intuitive or obvious and you might get weird errors like these

docker wsl open //./pipe/docker_wsl: The system cannot find the file specified.

or

error during connect: Get http://%2F%2F.%2Fpipe%2Fdocker_wsl/v1.40/images/json?all=1: open //./pipe/docker_wsl: The system cannot find the file specified.

You can see if you have an extra context from before like below. That "wsl" one is older (if you have it) and you want to use default in both Windows and WSL2.

docker context ls

NAME DESCRIPTION DOCKER ENDPOINT KUBERNETES ENDPOINT
default * Current DOCKER_HOST based configuration npipe:////./pipe/docker_engine https://kubernetes.docker
wsl Docker daemon hosted in WSL 2 npipe:////./pipe/docker_wsl

I actually removed that one to avoid confusion with docker context rm wsl.

Here's Ubuntu on my Windows machine

Docker in Ubuntu

And here's my Windows machine. Note that docker images in both instances returns the same list. They are the same Docker backend!

Docker on Windows

I want to code in VS Code on Windows but compile on Linux

At this point once I've set things up I can go bananas. I can do Container-based development, where I use VS Code to run all my developer tools and builds insider a container...maybe I never event install Go or PHP or .NET Core. It's all just inside a container.

Oh, by the way, please Subscribe to my YouTube! I talk a lot about this stuff over there.


Sponsor: Couchbase gives developers the power of SQL with the flexibility of JSON. Start using it today for free with technologies including Kubernetes, Java, .NET, JavaScript, Go, and Python.


© 2019 Scott Hanselman. All rights reserved.
     

How to set up a tab profile in Windows Terminal to automatically SSH into a Linux box

$
0
0

A lovely list of Profiles in Windows TerminalBy now I hope you've installed Windows Terminal. If not, go do that, I'll wait. It's time.

You may also have customize your settings. If you tried terminal a few versions ago and haven't gone back in, it's also time to let the Windows Terminal generate you a nice fresh new profiles.json (settings file). It's OK to zero-out/delete yours. Windows Terminal will regenerate it when it next starts.

I have a number of things in my Terminal dropdown. It looks like this.

However, I'd like to be able to have a profile that ssh's into Linux machines that I use regularly. Perhaps those remote machine can have their own cool menu item? Let's see what that would look like and how we'd do it.

Adding a New Profile to Windows Terminal

Click the down arrow in the Windows Terminal top tab bar. Note that there are a ton of great and useful settings so explore the Settings Schema, and when you're editing the settings make sure that Visual Studio Code is set as your default handler for .json files. That's important because the Windows Terminal settings profile.json includes a JSON Schema and you'll want your settings to have autocomplete/intellisense. This will make it easier to create and discover new settings.

I'll add a profile to the "profiles" array. To start, and to learn, let's add the simplest possible profile! I'm just adding the { } as an array item in the larger profiles [] and giving it a name.

"profiles": [

{
"name": "This is a name"
},

This will make a new menu item in Windows Terminal with the same name. It will have no icon and it'll launch cmd.exe as the default shell because I didn't set any other command line! It I add it at the top (as the first) item in the profiles array it'll also appear first in the menu and have the hotkey Ctrl+Shift+1.

This is lame, so let's add more. I'll add a tabTitle and a commandline.

    {

"name": "This is a name",
"tabTitle": "This is a tab title",
"commandline": "powershell"
},

This menu item will appear as "This is a name" in the menu, but the the tab will be called "This is a tab title." It'll launch powershell. Note that I didn't include .exe even though I could have. I wanted to make sure you're clear that Windows Terminal is basically just called Process.Start so you can set a profile tab to call anything in the PATH, or you can be explicit. I could also add "startingDirectory" and a bunch of other options.

Since I can call anything in the PATH, what else can I get away with?

Using OpenSSH on Windows

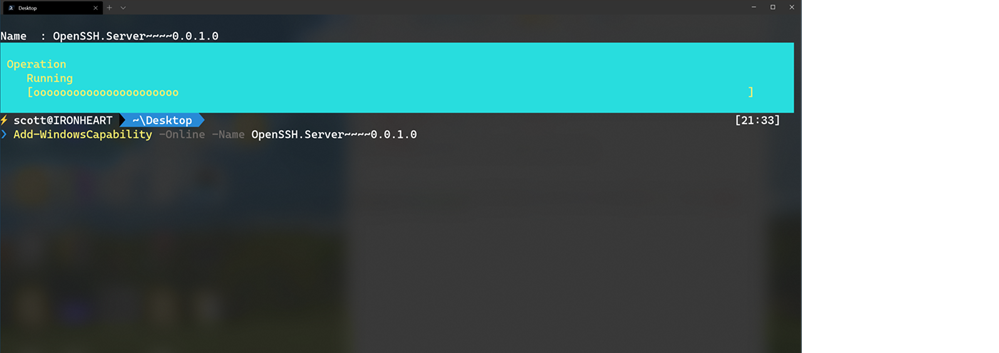
You may not have heard but OpenSSH has shipped in Windows for a few years now. That means that a lot of the utilities that you might have installed Putty for are already available in Windows. You can open an admin PowerShell and run one command to ensure OpenSSH's client apps are there:

Add-WindowsCapability -Online -Name OpenSSH.Client~~~~0.0.1.0

This installs the the client, but there's an optional server as well if you'd like.

I'm going to focus only on the client. Skip to the next area if you want to do your SSH'ing from Linux, not Windows.

Here's what's installed in c:\windows\System32\OpenSSH

OpenSSH utilties

Here we've got sftp, scp, and most importantly, ssh.exe and ssh-agent. Since ssh is in the PATH when it's installed with Windows I can change my Windows Terminal profile to look like this and log into my Raspberry Pi 4.

{

"name": "ssh hanselPi4",
"tabTitle": "HanselPi4",
"commandline": "ssh pi@hanselpi4"
},

Note in this screenshot I've got the ssh connection listed at the top, and when I click on it it opens ssh.exe and prompts me for a password. I have no ssh keys on my system that would enable auto-login, hence the password is needed.

ssh'ing into a Raspberry Pi

Automatically SSH'ing/logging into a Linux machine from a Windows Terminal profile

Now this is important, so pay attention. If you have WSL or WSL already on your machine you can certainly just use the SSH keys and utils that are included in your preferred Linux distro.

In that case, your command line in your Windows Terminal profile would be something like:

wsl ssh pi@hanselpi4

or if you want a specific distro, you can launch a distro and ssh from there.

wsl -d Ubuntu-18.04 ssh pi@hanselpi4

If you know Linux, then you're familiar with how to set up your public keys to allow this. However, most folks think you need Putty or some 3rd party tool to do this on Windows so I'll focus on how do to that here.

I want to be able to type "ssh pi@hanselpi4" from my Windows machine and automatically be logged in. More specifically I want to click the profile and have it Just Work.

I will

  • Make a key on my Window machine. The FROM machine, in this case, Windows. Then I want to ssh FROM here TO the remote Linux machine.
  • Tell the Linux machine (by transferring it over) about the public piece of my key and add it to a specific user's allowed_keys.

I'll run ssh-keygen to make a key from my command line on Windows. I just hit enter to generate it but you can make your own filename if you want, just use the full path and make sure you keep track of where things are. Defaults are usually best.

>ssh-keygen

Generating public/private rsa key pair.
Enter file in which to save the key (C:\Users\scott/.ssh/id_rsa):
Enter passphrase (empty for no passphrase):
Enter same passphrase again:
Your identification has been saved in hanselpi4.
Your public key has been saved in hanselpi4.pub.

Remember the path is c:\users\yourname because that's the Windows equivalent of the ~ home folder and the keys are in c:\users\yourname\.ssh.

Now I want to transfer what's in id_rsa.pub over to my Raspberry Pi. You can scp (secure copy) if you want, but it's best to append the key to the authorized_keys file on the destination machine.

NOTE: I'm type'ing (cat on Linux is type on Windows) that text file out and piping it into SSH where I login that remote machine with the user pi and I then cat (on the Linux side now) and append >> that text to the .ssh/authorized_keys folder. The ~ folder is implied but could be added if you like.

Run this command once on Windows to output your key and pipe it over to, and append to, the right file on your remote Linux machine. You'll be prompted for your password once.

type c:\users\scott\.ssh\id_rsa.pub | ssh pi@hanselpi4 'cat >> .ssh/authorized_keys'

Make sure you understand what's happening in the line above.

Adding a profile Icon - the raspberry on top

At this point I can click the menu item in Windows Terminal and automatically be ssh'ed/logged into the remote terminal. But, scandalously, the Terminal menu item has no icon. This is clearly unacceptable M$sft sucks, right? I'll go get a nice 32x32 Raspberry Pi Icon and put it somewhere. You might put yours in a Dropbox or OneDrive so they are available everywhere you go.

Now my profile looks like this:

"profiles": [

{
"name": "ssh hanselPi4",
"tabTitle": "HanselPi4",
"commandline": "ssh pi@hanselpi4",
"icon": "c:/users/scott/downloads/icons8-raspberry-pi-32.png"
},

How lovely is this?

A nice Raspbery Pi icon in my profile

Looks good, has a nice title and icon, and I can use a hotkey to automatically SSH into my remote machine.

One final note, you've already got the Azure Cloud Shell in the Windows Terminal (you can get there for free at http://shell.azure.com in your browser and access a free Linux container anywhere anytime with a persistent cloud drive) but now you can follow the instructions in this post and set up one-click SSH to anywhere.

Hope this is useful!


Sponsor: This week's sponsor is...me! This blog and my podcast has been a labor of love for over 18 years. Your sponsorship pays my hosting bills for both AND allows me to buy gadgets to review AND the occasional taco. Join me!


© 2019 Scott Hanselman. All rights reserved.
     

Love in a time of Corona Virus - Tips, Tricks and Best Practices for Working Remotely

$
0
0

Remote worker ScottIn this time of the Corona Virus and COVID-19, Microsoft has taken the unprecedented move of shutting down their Seattle campus. No one goes in to work until March 25th. That means they're all remote workers! Like me! For 13 years!

Do note that I am deeply sympathetic for the situation we all find ourselves in and I'm deeply aware of the privilege we have as tech/desk workers to be able to do our jobs remotely. I am also (dare I say) looking forward to what I believe will be a dramatic increase in Remote Worker Empathy on the part of the in office folks.

Check out my previous posts on being remote and explore the Remote Work category if you like.

I also want to showcase some of the great tips and suggestion for remote work that are being shared. Here's tips from our own Adrian Murphy who has shared them internally at the company and has given me permission to share them externally. You can follow Adrian on Twitter and thank him his team for sharing all this information and for their kindness!

These tips are written in the context of using Microsoft Teams (which has an extraordinary free plan, BTW) but you can replace those references with Zoom/Skype/Whatever and the tips are the same.

Tips, Tricks and Best Practices for Working Remotely

Working remote can be quite a shift from being in the office, and sometimes the things you take for granted in person suddenly become massive inconveniences when working remotely. Whether this is your first time being remote or you're a remote superstar from the Antarctica office, this collection of tips and best practices may help you get settled.

Communication

  • Be mindful of time zones. Your middle of the day may be someone’s 3:00 am, so when scheduling calls or pinging via Teams, don’t forget to take into account the time zone differences for all involved.
  • Turn on your video when on a call with your team (there’s a bunch of communication which is non-verbal). Occasionally show off your pets on said video. It’s the little things that make it all feel more human.
    • Some might have reduced bandwidth. Consider turning on video at the beginning during intro and turning it off during important parts if you experience hiccups.
  • During calls, make sure to wait a few extra seconds when asking if folks online have any comments. It can take time for folks to un-mute themselves, and sometimes things can chug or hiccup. It’s not as instant as it is face to face, so you don’t want to move on before folks can even get a word out on a call.
    • Some headsets have a hardware mute button and different conference software has hotkeys for mute/unmute. That can make it faster to unmute yourself.
  • If you are in a room full of people with a conference mic, speak loudly and clearly regardless of where you are sitting. While folks in the room may be able to hear you fine from 6-10 feet away, the conference room mic registers barely a whisper for those dialing in.
  • Mute your mic in big meetings, in small meetings it’s up to you—an unmuted mic will also give some of the incidental non-verbal (but vocal) indicators of what you’re thinking/feeling.
  • If you plan to present, prepare for meetings ahead of time by pre-loading web pages, powerpoints, or other presentation materials. During larger calls Teams can sometimes get bogged down, esp with many video sources at once, and this will cause the rest of your software to run slower. Having a room of 15+ people watch a web page load for 30 seconds is a great way to lose friends.
  • Summarize action items or conclusions in the call for everyone when one has been reached. Finalizing a conversation by summarizing the key take away is a great way to make sure the information is correct, and allows the folks on the call have a chance to hear it and respond if need be before the meeting moves on.
  • If you are leading/proctoring a meeting, be prepared to play switchboard operator if multiple people speak up at once. In person we use social cues and body language to naturally reach a speaking order, in a remote call someone is going to have to make sure only one person is speaking at a time, but also that everyone gets heard eventually. It can be as simple as “why don’t we have person A speak first, then person B” and let the conversation flow from there.
    • If someone has something to say but is waiting their turn, and the conversation veers in a different direction for a few mins, make sure to check back with the person who was waiting. It’s possible their comment was addressed during the course of that conversation, but don’t assume so. Offer them the chance to speak before the meeting moves on.
  • If you are presenting from your machine remotely, ZOOM IN. What looks fine to you on a home monitor may be microscopic on a projected screen in a room of 20 people. You can use the free ZoomIt tool from SysInternals and draw on the screen if you like.
  • If possible/acceptable, record meetings in Teams. This allows folks who weren’t able to attend, or may have otherwise missed a moment in the meeting due to a bandwidth hiccup, to catch up after the fact. Add the video link to your meeting notes when sending out (Teams will usually finish processing a recorded video within 10-15 mins of capturing it, and sends a notification to you in outlook that it’s ready).
  • Keep on top of your mails and Teams inboxes. If people can’t walk up to tap you on the shoulder, this is your only interface with your colleagues. Consider enabling pop up notifications or flashing task bar indicators for when you have unread messages.
    • Likewise, be aware that Teams chat is async by nature, just like e-mail. Expect more delay than when you walk to someone’s desk to ask them a question.
  • Never forget that there’s a real person behind every email address, Teams message, and DevOps Tickets.
  • You may have to “read the room” more as a remote worker. You may not be able to see someone’s body language to know whether or not they are joking, smiling, or upset about something.
  • It’s okay to take calls in casual clothes if you're comfortable and able. Don’t wear anything that’s offensive, explicit, etc - use your best judgment - but don’t feel like you have to get super dressed and be uncomfortable all day. Enjoy being home and wear your sweatpants!
  • It’s okay to eat on calls if it’s your dinner or lunch time, we do it all the time in the Boston office! Just mute your mic, chewing sounds are gross!!!!

Equipment

  • Make sure that you machine is properly enrolled in Intune and has VPN access before attempting to work from home
  • Make sure you have at least one of your comm tools (email, teams, slack) on your phone in addition to your laptop, so that you can let people know whats up if you lose power/internet at your home.
  • Keep your laptop batteries charged.
  • Get mobile with unlimited data if possible.
  • Stock up on necessary dongles, adapters, cords, and wires. Lack of necessary connectors can decrease your productivity.
  • Consider a headset for calls, specially ones with an easy to access mute button and fold down mic. It really can improve the quality of your audio. Webcams, specially those not at keyboard level (pointing up your nose) are also important.

Lifestyle

  • Take a little time to make your work environment pleasant. If you’re working in a mop closet with no windows, or the spare-room-equivalent thereof, you probably won’t be that productive. We’re complex beings. Put a plant on your desk, get some music going, clean.
  • You may wish to have a conversation with your kids that goes something like this: “Now, when I’m at my desk this week, it means I’m working. I can be interrupted a little bit sometimes, but most of the time I’ll need to be able to concentrate.”
    • You may wish to choose a work place in your house with a door to make this more explicit for children. “When this door is shut I am at work and you need to find your other parent”
  • EAT. You’ll forget to eat when you’re not surrounded by huge cafeterias or a team of people asking you what you want to do for lunch.
  • Working remotely can be lonely sometimes. Find a way to reproduce the feeling of that office chatter, or the casual hallway/water-cooler conversation. Music, podcast, background TV noise (when appropriate), etc.
  • Get some fresh air from time to time. Normally when you’re at the office you’re walking to/from the office and from your building to the cafeteria for coffee or lunch so you get outside quite a bit, but when working from home and the kitchen is just downstairs, you can very easily go a few days without actually leaving the house. It doesn’t need to be far, and with COVID19 around it probably shouldn’t be, but maybe sit on your porch while you drink your coffee, it helps clear the lungs and the head.
  • Good light is important. Having good lighting closer to natural light wavelengths makes the environment much more pleasant.
  • Build a routine of specific cues to help you switch into “work mode”. For example, you may still get dressed as you would if you were heading into the office to put you into the right mindset for the day.
  • Get interesting drinks and snacks!!! If you drink 12 cans of seltzer a day, make sure you have seltzer in your fridge. If you like getting peanut M&Ms from the team room at 2pm, grab some for your home! You’d be surprised how boring your regular drinks are when you’re used to fridges filled with flavorful things and a huge tea selection etc.

Things to avoid

  • If you are in a meeting room with other folks, try to keep side conversations and noises to a minimum. Imagine you are sitting in the center of the table and hear the things closes to the mic the loudest, because that’s how it is for anyone calling in.
  • Don’t sit right next to the microphone if you are going to be taking notes on a loud keyboard. It will drown out every voice in the room.
  • Don’t disclose sensitive information if there are others in your home office when you’re in a meeting. Generally speaking, it’s better to be using headphones if others are around.
  • Don’t direct a question to more than one individual at a time. This can be mildly awkward in person, but over a call it becomes nearly impossible to figure out who will speak first without any of the visual/bodily cues we normally rely on to resolve speaking order conflicts.
  • Don’t use whiteboards unless they are clearly visible to the room camera (and even then it can be tricky to see). Digital mediums present in Teams are always going to be superior for folks who are calling in.

What are your tips?


Sponsor: This week's sponsor is...me! This blog and my podcast has been a labor of love for over 18 years. Your sponsorship pays my hosting bills for both AND allows me to buy gadgets to review AND the occasional taco. Join me!


© 2019 Scott Hanselman. All rights reserved.
     

Making a cleaner and more intentional azure-pipelines.yml for an ASP.NET Core Web App

$
0
0

Azure Pipelines releasing to LinuxA few months back I moved my CI/CD (Continuous Integration/Continuous Development) to Azure DevOps for free. You get 1800 build minutes a month FREE and I'm not even close to using it with three occasionally-updated sites building on it.

It wasn't too hard, but as with all build pipelines you'll end up with a bunch of trial and error builds until you really get it dialed in.

I was working/pairing with Damian today because I wanted to get my git commit hashes and build ids embedded into the actual website so I could see exactly what commit is in production. How to do that will be the next post!

However, while tidying up we noticed some possible speed up and potential issues with my original azurepipeslines.yml file, so here's my new one!

NOTE: There's MANY ways to write one of these. For example, note that I'm allowing the "dotnet restore" to happen automatically as a sign effect of the call to dotnet build. Damian prefers to make that more explicit as its own task so he can see timing info for it. It's up to you, just know the side effects and measure!

Let's read the YAML and see what's up here.

  • My primary Git branch is called "main" so my Pipeline triggers on commits to main.
  • I'm using a VM from the pool that's the latest Ubuntu.
  • I'm doing a Release (not Debug) build and putting that value in a variable that I can use later in the pipeline.
  • I'm using a "runtime id" of linux-x64 and I'm storing that value also for use later. That's the .NET Core runtime I'm interested in.
  • I'm passing in the -r $(rid) to be absolutely clear about my intent at every step.
  • I want to build ONCE so I'm using --no-build on the publish command. It's likely not needed, but because I was using a rid on the build and then not using it later, my publish was wasting time by building again.
  • The dotnet test command uses -r for results (dumb) so I have to pass in --runtime if I want to pass in a rid. Again, likely not needed, but it's explicit.
  • I publish and name the artifact (fancy word for the resulting ZIP file) so it can be used later in the Deployment pipeline.

Here's the YAML

# https://docs.microsoft.com/azure/devops/pipelines/languages/dotnet-core


trigger:
- main

pool:
vmImage: 'ubuntu-latest'

variables:
buildConfiguration: 'Release'
rid: 'linux-x64'

steps:
- task: UseDotNet@2
inputs:
version: '3.1.x'
packageType: sdk

- task: DotNetCoreCLI@2
displayName: 'dotnet build $(buildConfiguration)'
inputs:
command: 'build'
arguments: '-r $(rid) --configuration $(buildConfiguration) /p:SourceRevisionId=$(Build.SourceVersion)'

- task: DotNetCoreCLI@2
displayName: "Test"
inputs:
command: test
projects: '**/*tests/*.csproj'
arguments: '--runtime $(rid) --configuration $(buildConfiguration)'

- task: DotNetCoreCLI@2
displayName: "Publish"
inputs:
command: 'publish'
publishWebProjects: true
arguments: '-r $(rid) --no-build --configuration $(BuildConfiguration) --output $(Build.ArtifactStagingDirectory)'
zipAfterPublish: true

- task: PublishBuildArtifacts@1
displayName: "Upload Artifacts"
inputs:
pathtoPublish: '$(Build.ArtifactStagingDirectory)'
artifactName: 'hanselminutes'

Did I miss anything? What are your best tips for a clean YAML file that you can use to build and deploy a .NET Web app?


Sponsor: This week's sponsor is...me! This blog and my podcast has been a labor of love for over 18 years. Your sponsorship pays my hosting bills for both AND allows me to buy gadgets to review AND the occasional taco. Join me!


© 2019 Scott Hanselman. All rights reserved.
     

Adding a git commit hash and Azure DevOps Build Number and Build ID to an ASP.NET website

$
0
0

imageA few months back I moved my CI/CD (Continuous Integration/Continuous Development) to Azure DevOps for free. You get 1800 build minutes a month FREE and I'm not even close to using it with three occasionally-updated sites building on it. Earlier this week I wrote about making a cleaner and more intentional azure-pipelines.yml for an ASP.NET Core Web App

I was working/pairing with Damian today because I wanted to get my git commit hashes and build ids embedded into the actual website so I could see exactly what commit is in production.

That's live on hanselminutes.com righ tnow and looks like this

© Copyright 2020, Scott Hanselman. Design by @jzy, Powered by .NET Core 3.1.2 and deployed from commit 6b48de via build 20200310.7

There's a few things here and it's all in my ASP.NET Web App's main layout page called _layout.cshtml. You can look all about ASP.NET Core 101, .NET and C# over at https://dot.net/videos if you'd like. They've lovely videos.

My website footer has git commits

So let's take this footer apart, shall we?

<div class="copyright">&copy; Copyright @DateTime.Now.Year, 

<a href="http://feeds.hanselman.com/~/t/0/0/scotthanselman/~https://www.hanselman.com">Scott Hanselman</a>.
Design by <a href="http://feeds.hanselman.com/~/t/0/0/scotthanselman/~www.8164.org/">@@jzy</a>,
Powered by @System.Runtime.InteropServices.RuntimeInformation.FrameworkDescription
and deployed from commit <a href="http://feeds.hanselman.com/~/t/0/0/scotthanselman/~https://github.com/shanselman/hanselminutes-core/commit/@appInfo.GitHash">@appInfo.ShortGitHash</a>
via build <a href="http://feeds.hanselman.com/~/t/0/0/scotthanselman/~https://dev.azure.com/hanselman/Hanselminutes%20Website/_build/results?buildId=@appInfo.BuildId&view=results">@appInfo.BuildNumber</a>
</div>

First, the obvious floating copyright year. Then a few credits that are hard coded.

Next, a call to @System.Runtime.InteropServices.RuntimeInformation.FrameworkDescription which gives me this string ".NET Core 3.1.2" Note that there was a time for a while where that Property was somewhat goofy, but no longer.

I have two kinds of things I want to store along with my build artifact and output.

  • I want the the Git commit hash of the code that was deployed.
    • Then I want to link it back to my source control. Note that my site is a private repo so you'll get a 404
  • I want the Build Number and the Build ID
    • This way I can link back to my Azure DevOps site

Adding a Git Commit Hash to your .NET assembly

There's lots of Assembly-level attributes you can add to your .NET assembly. One lovely one is AssemblyInformationalVersion and if you pass in SourceRevisionId on the dotnet build command line, it shows up in there automatically. Here's an example:

[assembly: AssemblyConfiguration("Release")]

[assembly: AssemblyFileVersion("1.0.0.0")]
[assembly: AssemblyInformationalVersion("1.0.0+d6b3d432970c9acbc21ecd22c9f5578892385305")]
[assembly: AssemblyProduct("hanselminutes.core")]
[assembly: AssemblyTitle("hanselminutes.core")]
[assembly: AssemblyVersion("1.0.0.0")]

From this command line:

dotnet build --configuration Release /p:SourceRevisionId=d6b3d432970c9acbc21ecd22c9f5578892385305

But where does that hash come from? Well, Azure Dev Ops includes it in an environment variable so you can make a YAML task like this:

- task: DotNetCoreCLI@2

displayName: 'dotnet build $(buildConfiguration)'
inputs:
command: 'build'
arguments: '-r $(rid) --configuration $(buildConfiguration) /p:SourceRevisionId=$(Build.SourceVersion)'

Sweet. That will put in VERSION+HASH, so we'll pull that out of a utility class Damian made like this (full class will be shown later)

public string GitHash

{
get
{
if (string.IsNullOrEmpty(_gitHash))
{
var version = "1.0.0+LOCALBUILD"; // Dummy version for local dev
var appAssembly = typeof(AppVersionInfo).Assembly;
var infoVerAttr = (AssemblyInformationalVersionAttribute)appAssembly
.GetCustomAttributes(typeof(AssemblyInformationalVersionAttribute)).FirstOrDefault();

if (infoVerAttr != null && infoVerAttr.InformationalVersion.Length > 6)
{
// Hash is embedded in the version after a '+' symbol, e.g. 1.0.0+a34a913742f8845d3da5309b7b17242222d41a21
version = infoVerAttr.InformationalVersion;
}
_gitHash = version.Substring(version.IndexOf('+') + 1);

}

return _gitHash;
}
}

Displaying it is then trivial given the helper class we'll see in a minute. Note that hardcoded paths for my private repo. No need to make things complex.

deployed from commit <a href="http://feeds.hanselman.com/~/t/0/0/scotthanselman/~https://github.com/shanselman/hanselminutes-core/commit/@appInfo.GitHash">@appInfo.ShortGitHash</a>

Getting and Displaying Azure DevOps Build Number and Build ID

This one is a little more complex. We could theoretically tunnel this info into an assembly as well but it's just as easy, if not easier to put it into a text file and make sure it's part of the ContentRootPath (meaning it's just in the root of the website's folder).

To be clear, an option: There are ways to put this info in an Attribute but not without messing around with your csproj using some not-well-documented stuff. I like a clean csproj so I like this. Ideally there'd be another thing like SourceRevisionID to carry this metadata.

You'd need to do something like this, and then pull it out with reflection. Meh.

<ItemGroup>

<AssemblyAttribute Include="System.Reflection.AssemblyMetadataAttribute" Condition="$(BuildNumber) != ''" >
<_Parameter1>BuildNumber</_Parameter1>
<_Parameter2>$(BuildNumber)</_Parameter2>
</AssemblyAttribute>
<AssemblyAttribute Include="System.Reflection.AssemblyMetadataAttribute" Condition="$(BuildId) != ''" >
<_Parameter1>BuildId</_Parameter1>
<_Parameter2>$(BuildId)</_Parameter2>
</AssemblyAttribute>
</ItemGroup>

Those $(BuildNumber) and $(BuildId) dealies are build variables. Again, this csproj messing around is not for me.

Instead, a simple text file, coming along for the ride.

- script: 'echo -e "$(Build.BuildNumber)\n$(Build.BuildId)" > .buildinfo.json'

displayName: "Emit build number"
workingDirectory: '$(Build.SourcesDirectory)/hanselminutes.core'
failOnStderr: true

I'm cheating a little as I gave it the .json extension, only because JSON files are copying and brought along as "Content." If it didn't have an extension I would need to copy it manually, again, with my csproj:

<ItemGroup>

<Content Include=".buildinfo">
<CopyToOutputDirectory>Always</CopyToOutputDirectory>
</Content>
</ItemGroup>

So, to be clear, two build variables inside a little text file. Then make a little helper class from Damian. Again, that file is in ContentRootPath and was zipped up and deployed with our web app.

public class AppVersionInfo

{
private static readonly string _buildFileName = ".buildinfo.json";
private string _buildFilePath;
private string _buildNumber;
private string _buildId;
private string _gitHash;
private string _gitShortHash;

public AppVersionInfo(IHostEnvironment hostEnvironment)
{
_buildFilePath = Path.Combine(hostEnvironment.ContentRootPath, _buildFileName);
}

public string BuildNumber
{
get
{
// Build number format should be yyyyMMdd.# (e.g. 20200308.1)
if (string.IsNullOrEmpty(_buildNumber))
{
if (File.Exists(_buildFilePath))
{
var fileContents = File.ReadLines(_buildFilePath).ToList();

// First line is build number, second is build id
if (fileContents.Count > 0)
{
_buildNumber = fileContents[0];
}
if (fileContents.Count > 1)
{
_buildId = fileContents[1];
}
}

if (string.IsNullOrEmpty(_buildNumber))
{
_buildNumber = DateTime.UtcNow.ToString("yyyyMMdd") + ".0";
}

if (string.IsNullOrEmpty(_buildId))
{
_buildId = "123456";
}
}

return _buildNumber;
}
}

public string BuildId
{
get
{
if (string.IsNullOrEmpty(_buildId))
{
var _ = BuildNumber;
}

return _buildId;
}
}

public string GitHash
{
get
{
if (string.IsNullOrEmpty(_gitHash))
{
var version = "1.0.0+LOCALBUILD"; // Dummy version for local dev
var appAssembly = typeof(AppVersionInfo).Assembly;
var infoVerAttr = (AssemblyInformationalVersionAttribute)appAssembly
.GetCustomAttributes(typeof(AssemblyInformationalVersionAttribute)).FirstOrDefault();

if (infoVerAttr != null && infoVerAttr.InformationalVersion.Length > 6)
{
// Hash is embedded in the version after a '+' symbol, e.g. 1.0.0+a34a913742f8845d3da5309b7b17242222d41a21
version = infoVerAttr.InformationalVersion;
}
_gitHash = version.Substring(version.IndexOf('+') + 1);

}

return _gitHash;
}
}

public string ShortGitHash
{
get
{
if (string.IsNullOrEmpty(_gitShortHash))
{
_gitShortHash = GitHash.Substring(GitHash.Length - 6, 6);
}
return _gitShortHash;
}
}
}

How do we access this class? Simple! It's a Singleton added in one line in Startup.cs's ConfigureServices():

services.AddSingleton<AppVersionInfo>();

Then injected in one line in our _layout.cshtml!

@inject AppVersionInfo appInfo

Then I can use it and it's easy. I could put an environment tag around it to make it only show up in staging:

<environment include="Staging">

<cache expires-after="@TimeSpan.FromDays(30)">
<div class="copyright">&copy; Copyright @DateTime.Now.Year, <a href="http://feeds.hanselman.com/~/t/0/0/scotthanselman/~https://www.hanselman.com">Scott Hanselman</a>. Design by <a href="http://feeds.hanselman.com/~/t/0/0/scotthanselman/~www.8164.org/">@@jzy</a>, Powered by @System.Runtime.InteropServices.RuntimeInformation.FrameworkDescription and deployed from commit <a href="http://feeds.hanselman.com/~/t/0/0/scotthanselman/~https://github.com/shanselman/hanselminutes-core/commit/@appInfo.GitHash">@appInfo.ShortGitHash</a> via build <a href="http://feeds.hanselman.com/~/t/0/0/scotthanselman/~https://dev.azure.com/hanselman/Hanselminutes%20Website/_build/results?buildId=@appInfo.BuildId&view=results">@appInfo.BuildNumber</a> </div>
</cache>
</environment>

I could also wrap it all in a cache tag like this. Worst case for a few days/weeks at the start of a new year the Year is off.

<cache expires-after="@TimeSpan.FromDays(30)">


<cache>

Thoughts on this technique?


Sponsor: This week's sponsor is...me! This blog and my podcast has been a labor of love for over 18 years. Your sponsorship pays my hosting bills for both AND allows me to buy gadgets to review AND the occasional taco. Join me!


© 2019 Scott Hanselman. All rights reserved.
     

How to SSH into a Windows 10 Machine from Linux OR Windows OR anywhere

$
0
0

I've been shushing all over the place lately. I SSH into Linux from Windows using the built-in OpenSSH Client that Windows 10 has shipped for years that you didn't know about. ;) You don't need Putty to SSH with Windows (unless it makes you happy, then putty on, my friend.)

Adding OpenSSH Server to Windows

From an Administrative PowerShell I'll see what OpenSSH stuff I have enabled. I can also do this with by typing "Windows Features" from the Start Menu.

> Get-WindowsCapability -Online | ? Name -like 'OpenSSH*'


Name : OpenSSH.Client~~~~0.0.1.0
State : Installed

Name : OpenSSH.Server~~~~0.0.1.0
State : NotPresent

Looks like I have the OpenSSH client stuff but not the server. I can SSH from Windows, but not to.

I'll add it with a similar command with the super weirdo but apparently necessary version thing at the end:

Add-WindowsCapability -Online -Name OpenSSH.Server~~~~0.0.1.0

Starting SSHD on Windows as a Service

Once this has finished (and you can of course run this with OpenSSH.Client as well to get both sides if you hadn't) then you can start the SSH server (as a Windows Service) with this, then make sure it's running.

Start-Service sshd

Get-Service sshd

Since it's a Windows Service you can see it as "OpenSSH SSH Server" in services.msc as well as set it to start automatically on Startup if you like. You can do that again, from PowerShell if you prefer

Set-Service -Name sshd -StartupType 'Automatic'

Remember that we SSH over port 22 so you'll have a firewall rule incoming on 22 at this point. It's up to you to be conscious of security. Maybe you only allow SSHing into your Windows machine with public keys (no passwords) or maybe you don't mind. Just be aware, it's on you, not me.

Now, from any Linux (or Windows) machine I can SSH into my Windows machine like a pro! Note I'm using the .local domain suffix to make sure I don't get a machine on my VPN (staying in my local subnet)

$ ssh scott@ironheart.local

Microsoft Windows [Version 10.0.19041.113]
(c) 2020 Microsoft Corporation. All rights reserved.

scott@IRONHEART C:\Users\scott>pwsh
PowerShell 7.0.0
Copyright (c) Microsoft Corporation. All rights reserved.

https://aka.ms/powershell
Type 'help' to get help.

Loading personal and system profiles took 1385ms.
⚡ scott@IRONHEART>

Note that when I SSH'ed into Windows I got the default cmd.exe shell. Remember also that there's a difference between a console, a terminal, and a shell! I can ssh with any terminal into any machine and end up at any shell. In this case, the DEFAULT was cmd.exe, which is suboptimal.

Configuring the default shell for OpenSSH in Windows

On my server (the Windows machine I'm SSHing into) I will set a registry key to set the default shell. In this case, I'll use open source cross platform PowerShell Core. You can use whatever makes you happy.

New-ItemProperty -Path "HKLM:\SOFTWARE\OpenSSH" -Name DefaultShell -Value "C:\Program Files\PowerShell\7\pwsh.exe" -PropertyType String -Force

Now when I ssh into my Windows machine from elsewhere (even my iPad!) I get the shell I want:

$ ssh scott@ironheart.local

PowerShell 7.0.0
Copyright (c) Microsoft Corporation. All rights reserved.

https://aka.ms/powershell
Type 'help' to get help.

Loading personal and system profiles took 1854ms.
⚡ scott@IRONHEART>

Even better if I wanted to add a menu item (profile) to my Windows Terminal with an entry for my Windows Machine that would automatically log me into it from elsewhere using public keys, I could do that also!

Additionally, now that this is set up I can use WinSCP (available on the Window Store) as well as scp (Secure Copy) to transfer files.

Of course you can also use WinRM or PowerShell Remoting over SSH but for my little internal network I've found this mechanism to be simple and clean. Now my shushing around is non-denominational!


Sponsor: Have you tried developing in Rider yet? This fast and feature-rich cross-platform IDE improves your code for .NET, ASP.NET, .NET Core, Xamarin, and Unity applications on Windows, Mac, and Linux.


© 2019 Scott Hanselman. All rights reserved.
     
Viewing all 1148 articles
Browse latest View live


<script src="https://jsc.adskeeper.com/r/s/rssing.com.1596347.js" async> </script>