Quantcast
Channel: Scott Hanselman's Blog
Viewing all 1148 articles
Browse latest View live

Penny Pinching in the Cloud: Your web app doesn't need 64-bit

$
0
0

Often times I hear folks say that they need (or want) 64-bit support when they deploy to the cloud. They'll deploy their modest application to Azure, for example, as a Web Application, then immediately go to the settings and set it to 64-bit. So many years later and it's "do I need 64-bit" is still confusing to a lot of people.

Change your Azure bitness settings here

I made basic Hello World ASP.NET app and deployed it. Now, I go to that Web Apps "blade" in the Azure Portal, click Tools, then Process Explorer (after exercising the app a little.) I'm running 32-bit here. The K is the Kudu "sidecar" deployment site (for things like Git deploy and diagnostics), and the other icon is the production site.

30 meg working set for IIS in 32 bit mode

Now, I'll swap it to 64-bit and exercise the web app again. Remember, this app is just a super basic app.

102 meg working set in IIS in 64-bit mode

See how the working set (memory) jump? It's a little extreme in a hello world example, but it's always going to be bigger than 32-bit. Always. 64-bit'll do that. Does your site need to address more than 4 gigabytes of memory from any single process? No? Then your web app probably doesn't need to be 64-bit. Don't believe me? Test it for yourself.

I'll go even further. Most web apps don't need 64-bit, but here's the real reason. If you stay 32-bit when putting your Web Application in the cloud you can fit more applications into a limited space. Maybe your Medium App Service Plan can actually be a Small and save you money.

Until 64-bit only is the default in things like Nano Server, today you can fit more Web Apps into limited memory if you stick with 32-bit.

I personally have 18 web apps in a Standard Small App Service in my personal Microsoft Azure account. They are sites like my podcast Hanselminutes and they get decent traffic. But most never get over 300-600 megs of memory and there's literally no reason for them to be 64-bit today. As such, I can fit more in the Small App Service Plan I've chosen.

18 web apps in a single app service plan

Remember that the Azure Pricing Calculator isn't totally obvious when it comes to Web Applications. It's not ~$55 per Basic Web Site. There's a Virtual Machine under there, they call the whole thing an "App Service Plan" and your Web Apps sit on top of that plan/VM. It's really $55 for a plan that supports as many web applications you can comfortably fit in there.

The cloud is a great deal when you're smart about the resources you've been given. If you're using Azure and you're not using most of the the resources in your service plan, you're possibly wasting money.

What Penny Pinching in the Cloud tips do you have? Disagree with this advice? Sound off in the comments.

Related Links


Sponsor: Thanks to my friends at Accusoft for sponsoring the feed this week. Just a few lines of code lets you add HTML5 document viewing, redaction, annotation, and more to your apps and websites. Download a free trial now!


© 2015 Scott Hanselman. All rights reserved.
     

Moving beyond Beginner when 3D Printing and becoming a Handy Person

$
0
0

OK, let's just say it. I'm not that handy and I'll never be handy. I'm consistently impressed with all my friends and family members who put up pictures of their amazing dining room tables made from scratch. "Ya, I raised this tree from a sapling, cut it down, and made this table with tools from the 1700s. #diy."

Every time I pick up a saw or a drill I feel like I'm faking it. But I try.

The most important thing when making, I think, is to identify your comfort zone and then push past it a little bit.

I've been doing some 3D Printing lately. In fact I'm being teased by people at work who say the printer is always going whenever they call. I say, if I'm going to make a big purchase like this, it needs to be used all the time or non-technical spouse will tell me that buying it was a mistake.

Here's some of my 3D Printing posts so far:

I'm still a beginner, but I think I'm quickly moving into intermediate skills when printing things on a 3D Printer.  Here's some lessons I've learned.

Making a Minecraft Chess Set

3D Printers are marketed wrong.

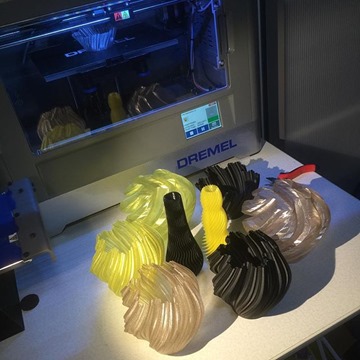
Listen up, 3D Printer makers, you're selling these things wrong. I was over at Home Depot recently, it's a lumber/tools/fixit shop here in the states (where Handy People go to cut wood, I guess) and they had a Dremel 3D Printer on the end of the aisle. I have a Dremel, so asked a few questions and pretended to be a new customer. They had setup a bunch of little colorful plastic toys. You've seen these demonstrations, right? It's all the little crap like Yoda heads and stuff. It has its place, but at some point you're like "OK, but what can I make that I can use?"

It's a Home Improvement Store where Handy People go, not a Hobby Shop. Show me stuff I can make that will fix my house!

3D Printed stuff and a yoda head

The first thing I printed was a wall bracket for my Dyson Handheld Vacuum. (Again, the goal here is to have non-technical spouse appreciate that I, too, am a Handy Person.)

Making a dyson vaccum bracket

3D Printer manufacturers should showcase all the cool utilitarian stuff you can make. Which leads me to...

Material/Filament - There's more than just vanilla PLA and ABS

When you print, you use filament which are spools of plastic spaghetti. There's lots of materials but the first one we all use is PLA, which is a plant-based biodegradable plastic. Later folks move on to ABS Plastic, which is what LEGO bricks are made of. I haven't gotten that far yet and have only printed PLA...however.

There is a company called Proto-Pasta that makes and sells "exotic filaments" including PLAs that include Carbon Fiber, Magnetic Iron, like a Conductive PLA, or High Temp PLA. The High Temp PLA can be head treated (put them in the oven) and they'll then become very heat resistant AND a lot stiffer and stronger.

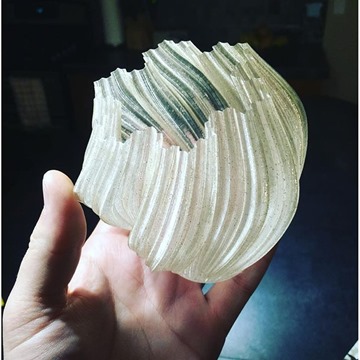
On the left in this pic is a clear High Temp PLA print of a bracket I wanted. Then I put it in the Oven for 20 min at 230F. The one on the right has crystalized and changed from translucent to opaque and it's VERY STRONG.

Proto Pasta's High Temp PLA

I mention this because discovering and using this High Temp PLA opened up a whole world to me. Now I can try printing simple circuit boards with Conductive PLA! The point is, I was playing it safe, but now my possibilities have multiplied. 

Software - Way more important than I thought

As I mentioned in my post on The Basics of 3D Printing in 2015 there is a lot of great open source software that you can use to 3D Print with. In fact, you can make your own 3D printer using off the shelf parts and open source design, so there's no real need for you to spend any money on software.

But. I was talking with a 3D Printing expert at a MakerFaire and they gushed about Simplify3D. It's an all in one 3D Printing software that can take in 3D models, arrange them, slice them (slicing means turn the 3D model into x-y-z movements for the printer) and so much more.

Before I was using multiple apps, constantly tinkering, fighting with the built-in software, moving files from app to app in a disjoint workflow. With Simplify3D not only is it easier, but the parts are better. How? It is just that much smarter software, IMHO.

Simplify3D is amazing

I love this view below. I've got a bracket I'm going to print, and the have colored the "moves" of the print head intelligently showing how many mm per min (mm/min) the print head will move. See how the software is smart about the speed of the supports versus the walls versus the parts that stick up?

Simplify3D made the Minecraft Chess set possible when other systems were creating weird supports or moving too fast and tipping over the fragile parts.

Simplify3D is amazing

Seriously, if you're moving to intermediate like I am, pay the money and buy Simplify3D. I don't say that lightly. I'm just scratching the surface and learning what it can do, but so far it's already been worth the money. I have no relationship with the company and there's no affiliate code on the link.

Fear - I was still afraid of the device...until I took it apart

For the most part I've been using my Dremel and Printrbot 3D Printers without issue or incident. However after a few hundred hours of successful printing a snag in the filament spool as it unraveled somehow caused a clog in the Dremel. I was kind of freaking out. 3D Printers are somewhat persnickety and when you have one well-calibrated you don't usually want to mess with it. I thought.  

Taking apart a Dremel

I called Dremel Tech Support and let me tell you, someone give Adrian Malone at Dremel Consumer Services a raise. I called them up and Adrian was in the middle of a print. First, I love that, folks that use their products. He say he had over 1000 hours on that machine (the machines keep track) and he talked my courage up until I felt prepared to take about the whole head and unclog it. His instructions were crystal clear, he was patient and kind. All the things Tech Support should be. Gave me his extension but told me anyone could help...and I have a feeling they could. I've heard tales of Dremel Tech Support being amazing for these printers before this cemented it.

Keep Printing - If you're not using it, you're not learning

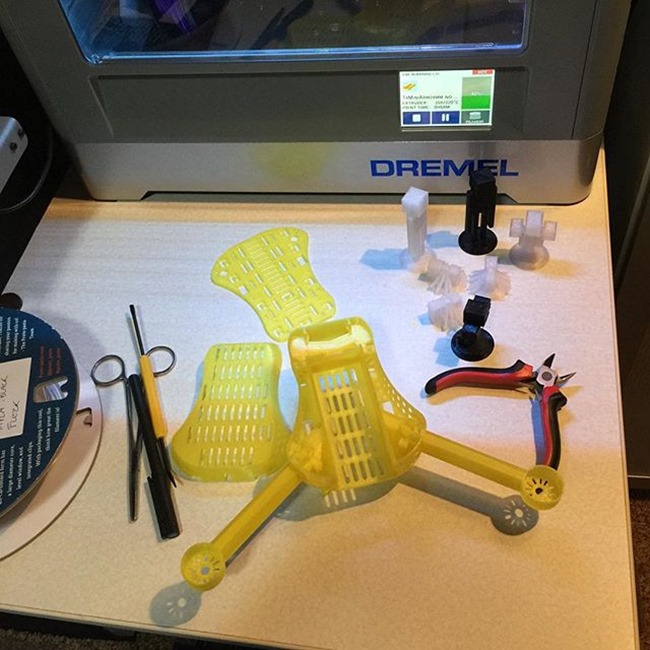
My 7 year old and I are printing a quadcopter from places called "CrossFire 2" as a (many) weekend project. We printed a money clip for his allowance last week. We just finished the Minecraft Chess Set today. We're always making, but more importantly, we're always learning. \

3D printing a Quadcopter

Are you 3D Printing? What kinds of stuff do you make? What tips did I miss? Sound off in the comments.


Sponsor: Thanks to my friends at Accusoft for sponsoring the feed this week. Just a few lines of code lets you add HTML5 document viewing, redaction, annotation, and more to your apps and websites.Download a free trial now!


© 2015 Scott Hanselman. All rights reserved.
     

Diabetes Technology: Dexcom G5 CGM Review - So much wasted potential

$
0
0

Dexcom G5 for iPhoneAs you may know, I'm a Type 1 Diabetic and have been for well over 20 years. I wear a Medtronic Insulin Pump 24 hours a day and use a Dexcom CGM (Continuous Glucose Meter) to monitor my blood sugar, also 24 hours a day.

This post won't explain how diabetes works to you, so check these posts out (or this video) first if you're not familiar.

Moving from a Dexcom G4 to a Dexcom G5

A CGM (Continuous Glucose Meter) doesn't keep you from pricking your fingers. You'll still do finger sticks in order to calibrate a CGM, at least twice a day.

The Dexcom G4 "with Share" worked like this. There was a small transmitter that is attached to me, and it talks a proprietary RF wireless format to a Receiver and then the Receiver talks Bluetooth LE to your iPhone, like this picture below.

One the sugar number got to my iPhone it's then optionally uploaded to  the Dexcom Share Cloud. My wife can install the Dexcom Follow application on her iPhone and see my sugar on her phone. She also gets the same notifications and warnings I get.

How the Dexcom G4 system works

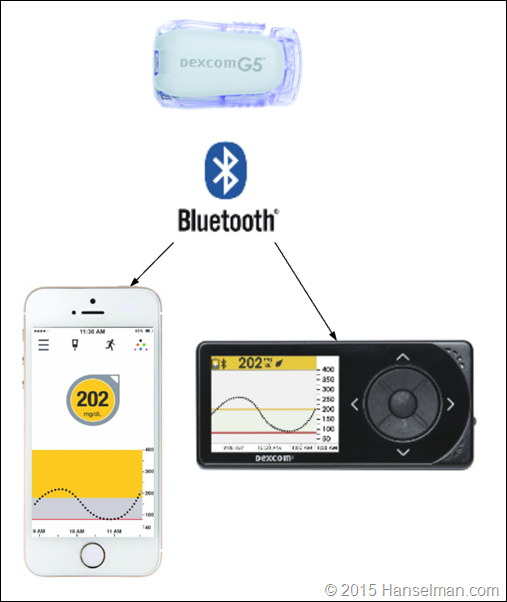
When you "upgrade" to the G5 from the G4, you'll likely do what I did. I called Dexcom support to see if I was eligible. They had a US$199 upgrade fee which I paid, and the G5 transmitter showed up a week later. I then called them back to get an "upgrade code" which was a 12 digit unique number (GUID) that I had to enter into their Dexcom Studio application on my Windows machine. I plugged in my Dexcom G4 with Share Receiver to my Windows machine using Microsoft USB and ran the upgrader. I needed that upgrade key. Then about 20 minutes later the G4 receiver (remember it talked RF to the G4 transmitter) is now a G5 and only speaks Bluetooth directly to the Bluetooth-enabled G5 transmitter. That means it works like this now:

How the Dexcom G5 system works

The G5 software that runs on the iPhone can also upload to the same Dexcom Cloud which means my wife's Dexcom Follow app *works unchanged*. This was a relief.

The Good

  • If I forget my Receiver device at home I can still see my sugars on my phone. This is huge if you're someone who didn't want to get a Dexcom CGM simply because you didn't want another device in your pocket. That is no longer a blocker.
    • You can carry and use either or both of them. However, if a family member is "Following" you and needs to see your numbers, only the phone is uploading them.
    • You can calibrate on either device and they'll both stay in sync. This was a nice touch as I was concerned I'd have to treat the iPhone as a "Virtual Receiver" and calibrate on both devices twice. Just calibrate on either device and the other sees it.


The Bad

First I want to say that I REALLY appreciate Dexcom, the company, the product, and the people, and I appreciate what you've done for myself and for Diabetics everywhere. The Dexcom sensor technology is unparalleled and a fundamental life changer. I can't imagine living without my CGM and I wholly and completely recommend a Dexcom CGM for ANY and ALL Type 1 Diabetics who want to get a real clear view of what's happening inside your body.

That said, I'm going to be very honest here, so if you work for Dexcom, please take my feedback as what it is. It's firm, crisp, actionable feedback. You should fix these things. They are bad and wrong.

There's no gap filling.

With the G4, if I had the receiver in my pocket but my phone was elsewhere, the phone would "fill the gaps" and load in missed readings that might have happened while the phone and receiver were apart. This doesn't happen anymore and it sucks. Sometimes the phone misses readings and sometimes the receiver misses them and I don't get a complete smooth curve even though the data seems to be available in the ether. As a techie, I'm assuming this means that the new Transmitter has no memory and just yells out the last reading over Bluetooth until a new reading shows up. IMHO it should remember maybe 5 to 10 and sync up gaps when possible. And if the receiver has records the phone doesn't or vice versus, for goodness sake, close the gaps.

IMG_1738

The phone just isn't a reliable receiver.

Remember when I said that having the G5 means you don't need the phone with you all the time? Well, kind of. I'm not sure that's 100% true. Here's 3+ hours of data that was completely missed this morning. The phone was 3 feet from my transmitter at all times, sitting on my night stand. My physical receiver was under my pillow and picked up the whole nights numbers, but the fact is, numbers were missed.

Yes, Bluetooth is a troublesome thing, but my Tile BT devices NEVER lose a connection. My Apple Watch never loses connection. My Microsoft Band doesn't lose connections. My car doesn't lose connections. You get the idea. I don't trust the Dexcom G5 software to use only my phone to view my data. I just can't avoid a lost hour.

Also, it's unclear to me how this data gets over the the iPhone from a software perspective. Is it a background task? Can the Dexcom software get ejected from memory when playing high memory pressure games? I need these answers.

I'd like to have a Dexcom engineer tell me/us that this is a transmitter/phone/software/hardware/radio/whatever problem, but who knows. They must know it's not as reliable as the physical device.

IMG_1735  

The Missed Opportunities

Please, Dexcom Engineer who must be reading this post, read these and explain.

  • There's no Watch app? The Dexcom G4 has an Apple Watch app, but this "upgrade" doesn't include one. Not cool. Don't remove functionality. I don't want to  pick up my iPhone and run an app every time I want to see my sugar. Glance-able data, people. 
    • complications_explained_2xWatch OS2 has the idea of "complications" which are AMAZING. Dexcom needs to let me put my sugar in an active area on my watch screen. To not to do this hurts. It hurts every day as I glance at my numbers hundreds of times a  day.
  • There's a HUGE amount of wasted whitespace in the chart. Huge. Notice that my goal area (the gray area) is less than 10% of my screen space. The area that I'm NOT supposed to be in (from 150 and up is huge). Please let us change the Y-Axis. Please. 300 to 400 mg/dl is far too much Y-axis for many folks. Give us a logarithmic scale. Let me change it to 200 or 250 until I get higher.
  • The app scales on iPhone 6+. If you want to play in the Apple App Store then play correctly. Make nice scalable graphics, and make it look pleasant everywhere.
  • No interactive graph until I landscape the device. The main screen is static. I can't change the axes (Y or X!) and I can't touch existing records. This is a dumb app on a pocket super-computer. Not being able to explore my data is unacceptable.
    • That said, I can flip the device into landscape and look at up to 24 hours in the past, and run my fingers over the results. Why not portrait?
  • No "iOS widgets." iOS has the notion of Widgets. Little active areas of contact for data like my calendar or the weather. I need to see my Glucose here. Again, this is a huge missed opportunity. Huge. Do it now.

Net net, was it a good upgrade? I'm not sure yet. The sensor tech is amazing. The accuracy remains amazing. I like having the option to not take my receiver with me, but the fact that I can't trust the phone not to disconnect when it's in my pocket on the same side the transmitter is remains a serious concern. Buy the G5 if you like Tech and new Stuff, but know that the G4 is still a great device, it's just one you have to carry with you no matter what.


Sponsor: Thanks to Infragistics for sponsoring the feed this week! Responsive web design on any browser, any platform and any device with Infragistics jQuery/HTML5 Controls.  Get super-charged performance with the world’s fastest HTML5 Grid - Download for free now!


© 2015 Scott Hanselman. All rights reserved.
     

Control how your bower packages are installed with a gulpfile in ASP.NET 5

$
0
0

ASP.NET 5 beta 8 is out. Yes, that's a lot of betas, but it's important to get things right when you're doing something new like this. You can find instructions in our documentation for installing ASP.NET 5 beta8 on Windows, Mac and Linux.

ASP.NET 5 uses the NuGet package manager to get server-side libraries but for client-side things we recommend folks use Bower. The most popular JavaScript and CSS libraries are there, and there's no need for us to duplicate them in NuGet. This means ASP.NET 5 folks get to use the same great client-side libraries that other open web technologies enjoy.

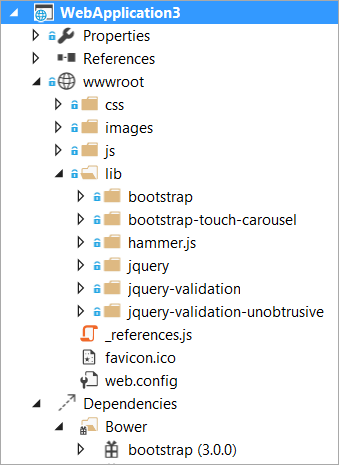
In very early builds of ASP.NET 5 we put those libraries in a folder outside the web root (wwwroot) into bower_components or npm_components and then used a gulp/grunt (think MSBuild for JavaScript) task to copy the files you want to deploy into wwwroot in preparation for deployment. However this confused a LOT of folks who weren't familiar with these tools. It also meant another step after installing a new JavaScript library. For example, you'd install angular with bower, then manually edit the gulp file to copy the .js you wanted into the folder of your choice, then run gulp to actually move it. These are common tasks for many of today's open web developers, but have been confusing for ASP.NET 5 users who don't usually work on the command line. So, this was changed a while back and your bower libraries show up right in your wwwroot.

bower stuff under wwwroot

While this is convenient change and great to starters, at some point you'll want to graduate to a more formal process and want to move your bower client libraries back out, and then setup a task to move in just a files you want. Let's take a moment and switch it back the way it was.

Here's how.

Update your .bowerrc and project.json

In the root of your project is a .bowerrc file. It looks like this:

{

"directory": "wwwroot/lib"
}

Change it to something like this, and delete your actual wwwroot/lib folder.

{

"directory": "bower_components"
}

Exclude your source bower folder from your project.json

You'll also want to go into your project.json file for ASP.NET 5 and make sure that your source bower_components folder is excluded from the project and any packing and publishing process.

"exclude": [

"wwwroot",
"node_modules",
"bower_components"
],

Update your gulpfile.js

In your gulpfile, make sure that path is present in paths. There are totally other ways to do this, including having gulp install bower and figure out the path. It's up to you how sophisticated you want your gulpfile to get as long as the result is that production ready .js ends up in your wwwroot ready to be served to the customer. Also include a lib or destination for where your resulting JavaScript gets copied. Could be scripts, could be js, could be lib as in my case.

var paths = {

webroot: "./" + project.webroot + "/",
bower: "./bower_components/",
lib: "./" + project.webroot + "/lib/"
};

Add a copy task to your Gulpfile

Now open your Gulpfile and note all the tasks. You're going to add a copy task to copy in just the files you want for deployment with your web app.

Here is an example copy task:

gulp.task("copy", ["clean"], function () {

var bower = {
"bootstrap": "bootstrap/dist/**/*.{js,map,css,ttf,svg,woff,eot}",
"bootstrap-touch-carousel": "bootstrap-touch-carousel/dist/**/*.{js,css}",
"hammer.js": "hammer.js/hammer*.{js,map}",
"jquery": "jquery/jquery*.{js,map}",
"jquery-validation": "jquery-validation/jquery.validate.js",
"jquery-validation-unobtrusive": "jquery-validation-unobtrusive/jquery.validate.unobtrusive.js"
}

for (var destinationDir in bower) {
gulp.src(paths.bower + bower[destinationDir])
.pipe(gulp.dest(paths.lib + destinationDir));
}
});

Do note this is a very simple and very explicit copy tasks. Others might just copy more or less, or even use a globbing wildcard. It's up to you. The point is, if you don't like a behavior in ASP.NET 5 or in the general build flow of your web application you have more power than ever before.

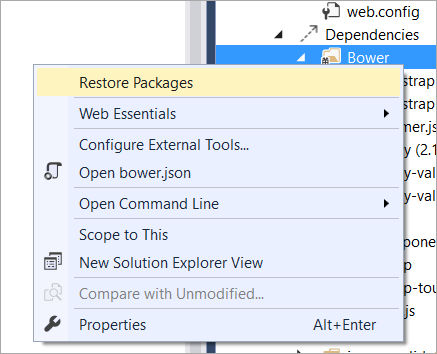
Right click the Bower node in the Solution Explorer and "Restore Packages." You can also do this in the command line or just let it happen at build time.

image

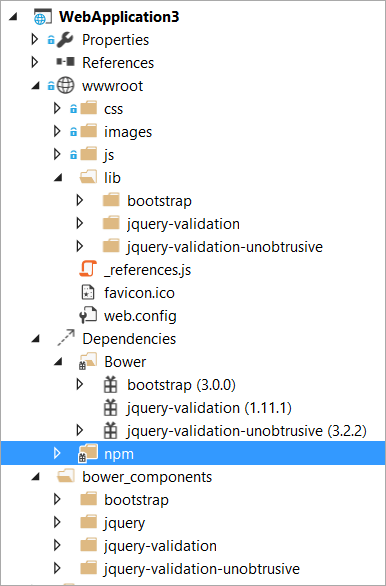
Looking in this simplified screenshot, you can see the bower dependencies that come down into the ~/bower_components folder. Just the parts I want are moved into the ~/wwwroot/lib/** folder when the gulpfile runs the copy task.

A new flow for my JavaScript

Feel free to share in the comments links to your blog posts on how YOU like your gulpfiles and build process to work!


Sponsor: Thanks to Infragistics for sponsoring the feed this week! Responsive web design on any browser, any platform and any device with Infragistics jQuery/HTML5 Controls.  Get super-charged performance with the world’s fastest HTML5 Grid - Download for free now!


© 2015 Scott Hanselman. All rights reserved.
     

Integrating Visual Studio Code with dnx-watch to develop ASP.NET 5 applications

$
0
0

Visual Studio Code is a great cross platform code editor that is also free. You can get it at code.visualstudio.com for Mac, Windows, or Linux. It's great for web development, and particularly shines with node.js. Since ASP.NET 5 is still in active beta and moving very fast, some of the features I want when VSCode is used with ASP.NET aren't there yet. Fortunately VSCode is very configurable and I was able to get it to do what I wanted in about 10 minutes of messing around.

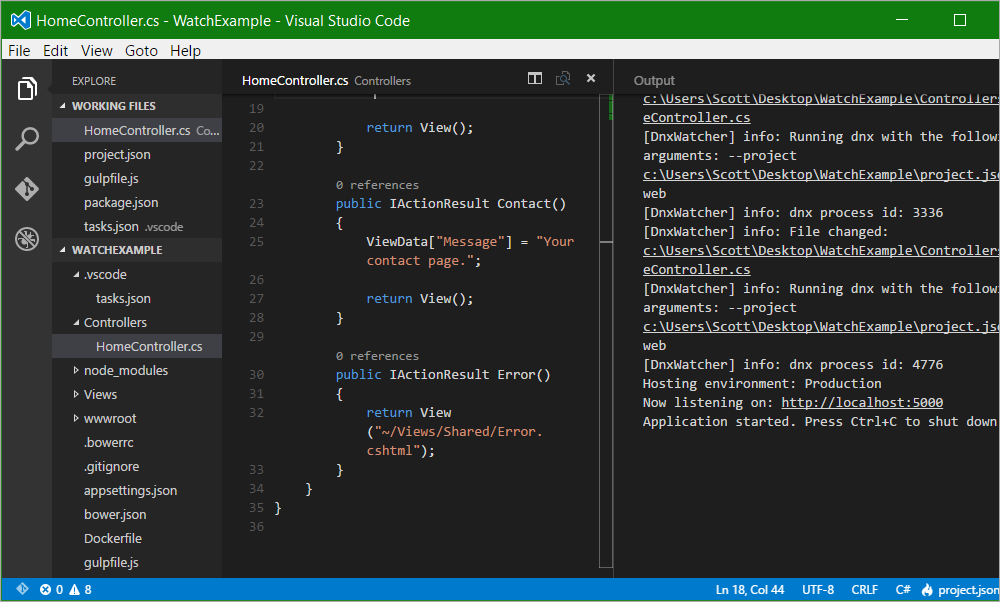
dnx-watch in VSCode

One of the promises of ASP.NET is the ability to write code, hit Ctrl-S (Save) in your editor and then hit F5 (refresh) in your browser to see the results. Rinse, repeat. Any "build" step should be basically hidden.

After you've got .NET Core and ASP.NET 5 with the DNX (for now, the "dotnet execution engine") you should take a look at the dnx-watcher command. It's a command you can install in one line:

dnu commands install Microsoft.Dnx.Watcher

This convenience command wraps dnx, so when you want to run your app rather than "dnx web" you'll say "dnx-watch web." It will watch your source files directory for changes. When you make a change, be it in VSCode or in Notepad, dnx-watch will kick the process and start it again so you can hit F5 in your browser.

Visual Studio Code doesn't have a Build or Debug menu for ASP.NET today, but I wanted to be able to "Ctrl-Shift-B" and build/start my web application. Specifically I wanted to run dnx-web on the current app.

Here's how you do that today. First, install dnx-watch as above.

Next, make a folder at the top of your project called ".vscode" and put a file called "tasks.json" inside it. This is a special file that lets you tell Visual Studio Code what gulp tasks it should know about.

Here I'm saying there's a task (that we'll create in a second) called "watch" (I decide on the name) and it's the Build command for this project. I could make a Test command if I wanted, as well. I want to see the output.

{

"version": "0.1.0",
"command": "gulp",
"isShellCommand": true,
"tasks": [
{
"taskName": "watch",
"isBuildCommand": true,
"showOutput": "always",
"isWatching": true
}
]
}

Now where does this "watch" task go? Well it goes in my project's gulpfile.js! It's a gulp task like any other.

I want to shell out and run dnx-watch, so I'll have to bring in a small library called gulp-shell by adding it to my package.json, then running npm.install. That will give me the ability to shell out to arbitrary command line apps like dnx-watch. Visual Studio Code will capture and stream the output as seen in the screenshot above.

Then I just add one line to my gulpfile:

gulp.task('watch', shell.task(['dnx-watch web']))

ASIDE: There is the beginnings of a gulp plugin for ASP.NET called "gulp-dnx" that knows about DNX and ASP.NET 5 but since I just wanted this one feature, this was easier. When gulp-dnx knows about dnx-watch, it might be easier, but the general flow would remain the same.

At this point, I can code all I want, press Save and dnx-watch will automatically restart my application. I can put Visual Studio Code side by side with my browser and Save/Refresh over and over.

Now you can always add your own keybindings by editing keybindings.js from File | Preferences | Keyboard Shortcuts. For example, here Ctrl-Q is bound to Terminate Task (that will let me stop dnx-watch). However, because we said "isBuildCommand: true" in the tasks.js file, we've told Visual Studio Code that our "watch" gulp command IS our project's command to build. You could add test commands, make your gulp file more sophisticated; the sky's the limit.

Give it a try!


Sponsor: Many thanks to Atalasoft for sponsoring the feed this week. If your project requires image viewing, format freedom, scanning, or other document-centric workflows, Atalasoft’s document imaging experts can help. Evaluate their developer tools for 30 days with remarkable human support.


© 2015 Scott Hanselman. All rights reserved.
     

It's happening - OpenSSH for Windows...from Microsoft

$
0
0
OpenSSH for Windows

Back in June the folks over at the Microsoft PowerShell blog indicated they were going to support SSH in Windows soon. I read the post a few times and I must admit I read deeply between the lines and enjoyed the post very much. For example, this passage, with emphasis mine.

Finally, I'd like to share some background on today’s announcement, because this is the 3rd time the PowerShell team has attempted to support SSH.  The first attempts were during PowerShell V1 and V2 and were rejected.  Given our changes in leadership and culture, we decided to give it another try and this time, because we are able to show the clear and compelling customer value, the company is very supportive.  So I want to take a minute and thank all of you in the community who have been clearly and articulately making the case for why and how we should support SSH! 

Fast forward a few months and they've just released a VERY early version. It's not quite useful enough for a daily driver but it's heartening that it's happening. Sure, it's late, and ya, it should have happened years ago, but it's happening and it'll be built in. SSH will be one less thing to worry about.

Note as they said:

With this initial milestone complete, we are now making the code publicly available and open for public contributions. Please note that this code is still very early and should be treated as a developer preview and is not supported for use in production.

The repository is over at https://github.com/PowerShell/Win32-OpenSSH and the first release is here https://github.com/PowerShell/Win32-OpenSSH/releases. I just unblocked the zip and unzipped it into my c:\utils folder so it was in my path.

I SSH'ed into an Ubuntu machine I have running in Azure like this:

>ssh scott@foofoo.cloudapp.net -p 12345

I did have an issue immediately with an error and some formatting, which I filed and also discussed here. I was able to mostly work around with it "export TERM=xterm" but I'm sure they'll fix it, as again, it's super early.

As an alternative SSH client, try the Bitvise SSH Client. It has a command line app called "stermc" that acts like SSH. I made an ssh.bat file that contains just "stermc %1" and this let's me shush around nicely.


Sponsor: Many thanks to Atalasoft for sponsoring the feed this week. If your project requires image viewing, format freedom, scanning, or other document-centric workflows, Atalasoft’s document imaging experts can help. Evaluate their developer tools for 30 days with remarkable human support.


© 2015 Scott Hanselman. All rights reserved.
     

NuGet Package of the Week: Microphone registers and discovers Web APIs and REST services with Consul

$
0
0

I'm sitting on a plane on the way back from a lovely time in Europe. I attended and spoke at some great conferences and met some cool people - some of which you'll hear on the podcast soon. Anyway, one of the things that I heard mentioned by attendees more than once was the issue of (micro) service discovery for RESTful APIs. Now if you lived through the WS*.* years you'll perhaps feel a lot of this is familiar or repeated territory, but the new stuff definitely fits together more effortlessly than in the past.

Consul is a system that does service discovery, configuration management, and health checking for your services. You can write Web APIs in lots of things, Rails, Python, and ASP.NET with WebAPI or NancyFX.

Microphone is a library by Roger Johansson that plugs into both WebAPI and Nancy and very simply and easily registers your services with Consul. It's recently been expanded to support CoreOs-ETCD as well, so it's really a general purpose framework.

I made a little .NET 4.6 console app that self hosts a WebAPI like this.

namespace ConsulSelfHostedWebAPIService

{
class Program
{
static void Main(string[] args)
{
Cluster.Bootstrap(new WebApiProvider(), new ConsulProvider(), "HanselWebApiService", "v1");
Console.ReadLine();
}
}

public class DefaultController : ApiController
{
public string Get()
{
return "Hey it's my personal WebApi Service";
}
}
}

Now my Web API is registered with Consul, and now Consul itself is a RESTful Web API where I can hit http://localhost:8500/v1/agent/services and get a list of registered services. It's the Discovery Service.

Consul reporting my WebAPI

Then later in a client or perhaps another Web API, I can ask for it by name and I'll get back the address and port that it's on, then call it.

var instance = await Cluster.FindServiceInstanceAsync("Heycool");


return String.Format("Look there's a service at {0}:{1}", instance.Address, instance.Port);

Here's an active debug session showing the address and port in the instance:

Using Microphone.WebAPI and Consul for Service Discovery

It will be interesting to see what will happen with Consul and systems like it if the Azure Service Fabric gains traction. Service Fabric offers a lot more, but I wonder if there is a use case for both, with Service Fabric managing lifecycles and Consul doing discovery.

This is all early days, but it's interesting. What do you think about these new discovery services for Web APIs?


Sponsor: Big thanks to Infragistics for sponsoring the feed this week. Quickly & effortlessly create advanced, stylish, & high performing UIs for ASP.NET MVC with Ignite UI. Leverage the full power of Infragistics’ JavaScript-based jQuery/HTML5 control suite today.


© 2015 Scott Hanselman. All rights reserved.
     

How to simulate a low bandwidth connection for testing web sites and applications

$
0
0

Facebook just announced an internal initiative called "2G Tuesdays" and I think it's brilliant. It's a clear and concrete way to remind folks with fast internet (who likely have always had fast internet) that not everyone has unlimited bandwidth or a fast and reliable pipe. Did you know Facebook even has a tiny app called "Facebook Lite" that is just 1Mb and has good support for slower developing networks?

You should always test your websites and applications on a low bandwidth connection, but few people take the time. Many people don't know how to simulate simulate low bandwidth or think it's hard to set up.

Simulating low bandwidth with Google Chrome

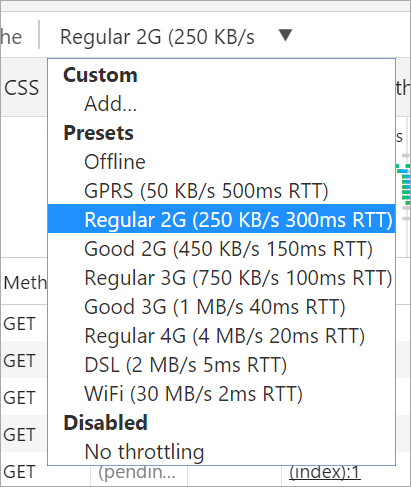
If you're using Google Chrome, you can go to the Network Tab in F12 Tools and select a bandwidth level to simulate:

Selecting lower bandwidth in Google Chrome F12 Tools

Even better, you can also add Custom Profile to specify not only throughput but custom latency:

Custom Profiles for Google Chrome that control throughput and latency

Once you've set this up, you can also click "disable cache" and simulate a complete cold start for your site on a slow connection. 20 seconds is a long time to wait.

Google Chrome timeline showing my site on a 2G connection

Simulating a slow connection with a Proxy Server like Fiddler

If you aren't using Chrome or you want to simulate a slow connection for your apps or other browsers, you can slow it down from a Proxy Server like Fiddler or Charles.

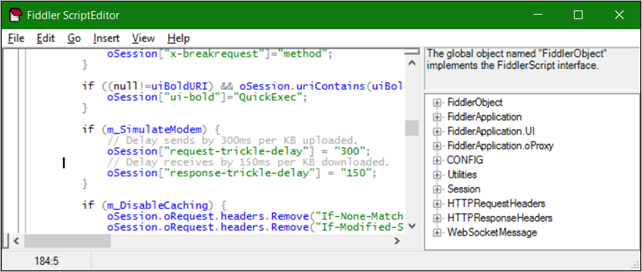
Fiddler has a "simulate modem" option under Rules | Performance, and you can change the values from Rules | Customize Rules:

image

You can put in delays in milliseconds per KB in the script under m_SimulateModem:

if (m_SimulateModem) {

// Delay sends by 300ms per KB uploaded.
oSession["request-trickle-delay"] = "300";
// Delay receives by 150ms per KB downloaded.
oSession["response-trickle-delay"] = "150";
}

There's a number of proxy servers you can get to slow down traffic across your system. If you have Java, you can also try out one called "Sloppy." What's your favorite tool for slowing traffic down?

Conclusion

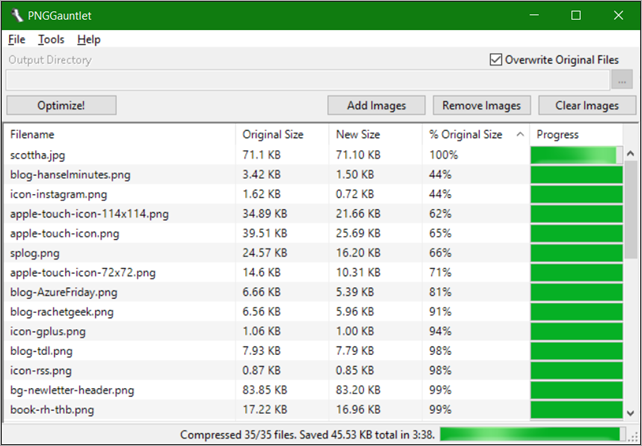
There is SO MUCH you can do to make the experience of loading your site better, not just for low-bandwidth folks, but for everyone. Squish your images! Don't use PNGs when a JPEG would do. Minify! Use CDNs!

image

However, step 0 is actually using your website on a slow connection. Go do that now.

Related Links


Sponsor: Big thanks to Infragistics for sponsoring the feed this week. Quickly & effortlessly create advanced, stylish, & high performing UIs for ASP.NET MVC with Ignite UI. Leverage the full power of Infragistics’ JavaScript-based jQuery/HTML5 control suite today.


© 2015 Scott Hanselman. All rights reserved.
     

Using the Surface Pro 4 Type Cover with Fingerprint Reader on a Surface Pro 3

$
0
0

Using the Surface Pro 4 Type Cover with Fingerprint Reader on a Surface Pro 3Last year in August I went and bought a Surface Pro 3 with my own money (it's not machine that work paid for) and I've been very happy with it. Now the Surface Pro 4 came out, and well, it's silly to upgrade for me when it's been just a year.

But. That Keyboard. The Surface Pro 4 has an all new Keyboard and Touch Pad.

The Surface Pro 3 keyboard is good, to be clear, but the touchpad sucks. After I used it for a few months I called it out as sucking. It's usable, but it's not fun to use.

Turns out that you can get a Surface Pro 4 Type Cover keyboard and it works and fits perfectly on a Surface Pro 3. You can upgrade your Surface Pro 3 (and pretend it's a 4, which is what I'm doing) by just adding the new Keyboard.

Fingerprint Reader

There's lots of new color Type Covers but the really interesting one is the Type Cover with Fingerprint Reader. Sadly, only available in Black, but it has an integrated Fingerprint Reader that lets you use the new "Windows Hello" login feature of Windows 10. Windows Hello means "using biometrics like fingerprints and faces and eye scanning to login to your computer."

It works and it works great. There was an Oct 26th "Firmware Update" in Windows Update that gives you the drivers you'll need. A Firmware Update for a Surface is essentially a "driver pack." Run Windows Update and attach the keyboard and you're set.

Windows Hello for Fingerprints

You enroll as many fingers as you want in Sign-In Options and that's it. Now you log in with your fingerprint. Lovely.

All new keyboard and touchpad

The picture before shows my original Surface Pro 3 Type Cover next to my new Surface Pro 4 Type Cover with Fingerprint Reader. First, the keyboard was already good on the Surface Pro 3, but it's just better on the 4. There are actual spaces between the keys, and you can see from the pic how the keys go even closer to the edge/bezel of the cover's surface. The keys are also slightly rearranged for the better. FN has been moved to the left, which makes sense, and a "context key" (which is effectively Shift-F10).

Another nice touch is that the FN key now has a light. On SP3 you had no way to see if it was locked, and you had to FN-CapsLock to force it on, and would have no visual indicator.

Finally, the silly Share and Settings secondary functions for Function F7 and F8 are gone and there's now an actual PrtScn button. It's the little things.

image

Now, to the touchpad. IT IS SO MUCH BETTER. It's actually usable. It's way larger (they say 40%) and it feels nicer. Before I always took another mouse with me because the SP3 touchpad was crippling. No longer. It's large enough for multi-finger gestures, including 3 and 4-finger taps. I'm still holding out for a "4 finger swipe" for Virtual Desktop switching, though.

One other subtlety that is worth pointing out...the fold. With the Surface Pro 3 Type Cover keyboard, when you fold it up to keep the Type Cover off the table, the fold makes it hard to press the "Start Button" on the screen because the keyboard butted right up against the screen. The Pro 4 Type Cover folds tighter and lower against the bottom bezel such that pressing icons in the taskbar and the Start button isn't a problem anymore. Subtle, but again, it's the little things.

I totally recommend this keyboard. It's given my Surface Pro 3 new life. It's the keyboard it should have always had.

* My links are Amazon Affiliate Links! Use them as they help support my blog and buy me tacos.


Sponsor: Big thanks to my friends at Octopus Deploy for sponsoring the feed this week. Build servers are great at compiling code and running tests, but not so great at deployment. When you find yourself knee-deep in custom scripts trying to make your build server do something it wasn't meant to, give Octopus Deploy a try.


© 2015 Scott Hanselman. All rights reserved.
     

Using Redis as a Service in Azure to speed up ASP.NET applications

$
0
0

Microsoft Azure has a Redis Cache as a Service. There's two tiers. Basic is a single cache node, and Standard is as a complete replicated Cache (two nodes, with automatic failover). Microsoft manages automatic replication between the two nodes, and offers a high-availability SLA. The Premium tier can use up to a half-terabyte of RAM and tens of thousands of client connections and be clustered and scaled out to even bigger units. Sure, I could manage your own Redis in my own VM if I wanted to, but this is SAAS (Software as a Service) that I don't have to think about - I just use it and the rest is handled.

I blogged about Redis on Azure last year but wanted to try it in a new scenario now, using it as a cache for ASP.NET web apps. There's also an interesting open source Redis Desktop Manager I wanted to try out. Another great GUI for Redis is Redsmin.

For small apps and sites I can make a Basic Redis Cache and get 250 megs. I made a Redis instance in Azure. It takes a minute or two to create. It's SSL by default. I can talk to it programmatically with something like StackExchange.Redis or ServiceStack.Redis or any of a LOT of other great client libraries.

However, there's now great support for caching and Redis in ASP.NET. There's a library called Microsoft.Web.RedisSessionStateProvider that I can get from NuGet:

Install-Package Microsoft.Web.RedisSessionStateProvider 

It uses the StackExchange library under the covers, but it enables ASP.NET to use the Session object and store the results in Redis, rather than in memory on the web server. Add this to your web.config:

<sessionState mode="Custom" customProvider="FooFoo">

<providers>
<add name="MySessionStateStore"
type="Microsoft.Web.Redis.RedisSessionStateProvider"
host="hanselcache.redis.cache.windows.net"
accessKey="THEKEY"
ssl="true"
port="1234" />
</providers>
</sessionState>

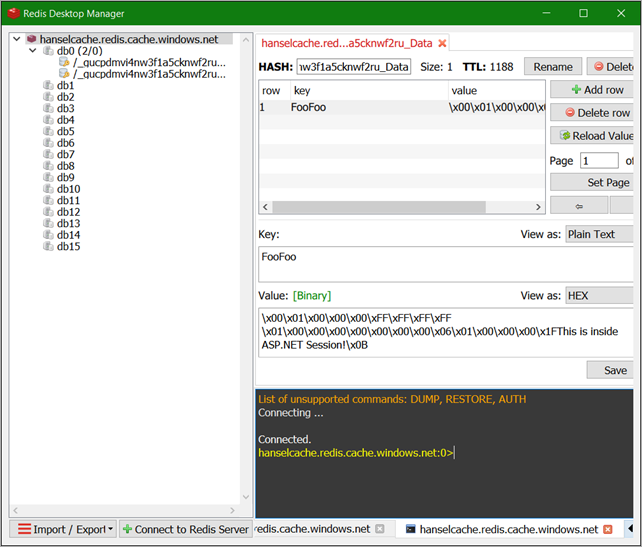
Here's a string from ASP.NET Session stored in Redis as viewed in the Redis Desktop Manager. It's nice to use the provider as you don't need to change ANY code.

ASP.NET Session stored in a Redis Cache

You can turn off SSL and connect to Azure Redis Cache over the open internet but you really should use SSL. There's instructions for using Redis Desktop Manager with SSL and Azure Redis. Note the part where you need a .pem file which is the Azure Redis Cache SSL public key. You can get that SSL key here as of this writing.

Not only can you use Redis for Session State, but you can also use it for a lightning fast Output Cache. That means caching full HTTP responses. Setting it up in ASP.NET 4.x is very similar to the Session State Provider:

Install-Package Microsoft.Web.RedisOutputCacheProvider 

Now when you use [OutputCache] attributes in MVC Controllers or OutputCache directives in Web Forms like <%@ OutputCache Duration="60" VaryByParam="*" %> the responses will be handled by Redis. With a little thought about how your query strings and URLs work, you can quickly take an app like a Product Catalog, for example, and make it 4x or 10x faster with caching. It's LOW effort and HIGH upside. I am consistently surprised even in 2015 how often I see folks going to the database on EVERY HTTP request when the app's data freshness needs just doesn't require the perf hit.

You can work with Redis directly in code, of course. There's docs for .NET, Node.js, Java and Python on Azure. It's a pretty amazing project and having it be fully managed as a service is nice. From the Azure Redis site:

Perhaps you're interested in Redis but you don't want to run it on Azure, or perhaps even on Linux. You can run Redis via MSOpenTech's Redis on Windows fork. You can install it from NuGet, Chocolatey or download it directly from the project github repository. If you do get Redis for Windows (super easy with Chocolatey), you can use the redis-cli.exe at the command line to talk to the Azure Redis Cache as well (of course!).

It's easy to run a local Redis server with redis-server.exe, test it out in development, then change your app's Redis connection string when you deploy to Azure. Check it out. Within 30 min you may be able to configure your app to use a cache (Redis or otherwise) and see some really significant speed-up.


Sponsor: Big thanks to my friends at Octopus Deploy for sponsoring the feed this week. Build servers are great at compiling code and running tests, but not so great at deployment. When you find yourself knee-deep in custom scripts trying to make your build server do something it wasn't meant to, give Octopus Deploy a try.


© 2015 Scott Hanselman. All rights reserved.
     

The Crowdsourcing of Software Quality

$
0
0
Stock photo used under CC from WoCinTechChat's "stock photos of women of color in tech"

I posted a rant back in 2012 called "Everything's broken and nobody's upset." Here's another. Lots of people commented on that first post and a number agreed with the general premise. Some were angry and thought that I was picking on particular companies or groups. Sure, it's easy to throw stones, and criticism is a great example of stone throwing. So, in the years since I posted I made a concerted and focused effort on a personal level to report bugs. By this, I mean, I REPORT BUGS. I take screencasts or videos, I email reproductions (repros) and I fill bug issues anywhere and anytime I can because a Bug Report is a Gift.

Fast forward a few years, and I think that we as an industry are perhaps still headed in the wrong way.

Technology companies are outsourcing QA to the customer and we're doing it using frequent updates as an excuse.

This statement isn't specific to Apple, Google, Microsoft or any one organization. It's specific to ALL organizations. The App Store make it easy to update apps. Web Sites are even worse. How often have you been told "clear your cache" which is the 2015 equivalent to "did you turn it on and off again?"

It's too easy to ship crap and it's too easy to update that crap. When I started in software we were lucky to ship every 6 to 9 months. Some places ship every year or two, and others still ship once.

I see folks misusing Scrum and using it as an excuse to be sloppy. They'll add lots of telemetry and use it as an excuse to avoid testing. The excitement and momentum around Unit Testing in the early 2000s has largely taken a back seat to renewed enthusiasm around Continuous Deployment.

But it's not just the fault of technology organizations, is it? It's also our fault - the users. We want it now and we like it beta. We look at software like iOS6 and say "it feels dated." I even overheard someone recently say that iOS9 felt visually dated. It JUST came out. Do we really have to restyle our sites and reship our apps every few months to satisfy a finicky public?

As with many rants, there isn't a good conclusion. I think it's clear this is happening. The question for you, Dear Reader, is do you agree? Do you see it in in your own organization and in the software and hardware that you use every day? Is the advent of the evergreen browser and the always updated phone a good thing or a bad thing?

Sound off in the comments.


Sponsor: Thanks to Infragistics for sponsoring the feed this week. Responsive web design on any browser, any platform and any device with Infragistics jQuery/HTML5 Controls.  Get super-charged performance with the world’s fastest HTML5 Grid - Download for free now!


© 2015 Scott Hanselman. All rights reserved.
     

ASP.NET 5 and .NET Core RC1 in context (Plus all the Connect 2015 News)

$
0
0

Connect() 2015 - Scott Hanselman's KeynoteIt was a huge day in New York today as I got to join Scott Guthrie and the team at the Connect() 2015 event as they announced a bunch of stuff, including, but not limited to:

  • Visual Studio Code is now Open Source and a new Beta that supports extensions is out now!
  • ASP.NET 5 RC1 is out with .NET Core and has a Go Live License. This means you can go into production with ASP.NET 5 on Windows or Linux and Microsoft will support you.
  • You can get ASP.NET at, wait for it, http://get.asp.net. Yes. This lively URL is a mini-site that will look at your OS and show you Linux, Mac, or Windows (try visiting it on a mobile phone for fun, too) and tell you how to get ASP.NET.
    • If you insist, you can visit https://get.asp.net/OtherDownloads for a list of all the packages and combinations available. There is a .pkg for Mac and a .tar.gz and some instructions for Linux. In the future I hope/expect we'll have .NET in some popular OS package managers.
  • Node.js Tools 1.1 for Visual Studio was also released. A lot of folks don't realize how cool Node.js development is in Visual Studio. Node.js Tools for VS is free and open source AND works with the Visual Studio Community, which, ahem, is also free.

If you don't have Visual Studio, I'd recommend you grab Visual Studio Code which is a non-threatening size and runs on any OS, then if you're a command line person you can do this on Windows:

@powershell -NoProfile -ExecutionPolicy unrestricted -Command "&{iex ((new-object net.webclient).DownloadString('https://dist.asp.net/dnvm/dnvminstall.ps1'))}"

or this on Linux/Mac.

curl -sSL https://dist.asp.net/dnvm/dnvminstall.sh | sh && source ~/.dnx/dnvm/dnvm.sh

And yes, we have have formal ways to get this and you can again, always go to https://get.asp.net and check our SSL cert. ;)

Connect 2015 Keynotes and Videos

You can watch everyone's talks here and my specific keynote here. My talk was complex and varied but also very personal as we built all the demos around my diabetes and blood sugar system. I also used the Nightscout Open Source CGM Project and gave them a shoutout as well. I use Nightscout to remote my continuous glucose meter's data to the cloud. That glucose data collector runs in an Azure Web Job that I've blogged about before.

We had so much fun making our "parade" of cool cloud demos. I get tired of doing demos around product catalogs and such, so we build a connected Health Clinic. We pulled data in from thousands of (simulated) Microsoft Bands, as well as my actual physical Band 2 that I wear every day. We combined my heart rate data with my actual live and historical glucose data and ran it through Azure Machine Learning to create a "Hanselman Stress Index" to get a sense of how stress and my schedule affects my heart rate and blood glucose. You should really watch the video to get the full effect.

We'll do some cleanup of the slides and code and try to get it all on GitHub soon(ish) so please be patient with us.

image

I also want to point out the documentation for ASP.NET 5 RC1 over at http://docs.asp.net. This documentation is hosted and built at ReadTheDocs using Python and Sphinx and managed as source in GitHub using reStructuredText.

Contributing to the docs is a great way for YOU to get involved in Open Source, especially if you are a FirstTimer! Check out this great video on how to contribute to the ASP.NET documentation.  The community can contribute by:

The Mega List of Connect() 2015 Information

You want it all? OK, here you go, the list of everything announced at Connect() 2015:

What does it all mean?

It means that you can build basically whatever you want, however you want. You can use the editor you like, the OS you like, and the languages you like. VSCode on a Mac doing Node and deploying to Azure? Check. ASP.NET 5 with C# to Docker Containers in a bunch of VMs created in Azure and managed with Microsoft Operations Manager? Check. And on and on. Node.js on VS, C to Raspberry Pi's in C in VS, whatever you dig. It's a whole new world.


Sponsor: Big thanks to Octopus Deploy for sponsoring the feed this week! Check out their amazing product. I'm a fan.

Build servers are great at compiling code and running tests, but not so great at deployment. When you find yourself knee-deep in custom scripts trying to make your build server do something it wasn't meant to, give Octopus Deploy a try.


© 2015 Scott Hanselman. All rights reserved.
     

RFC: Server-side Image and Graphics Processing with .NET Core and ASP.NET 5

$
0
0
image

The .NET Core and the Core Libraries are open source and run on Windows, Mac, and Linux. In fact, you can run them with support, today, in production on Windows and Linux (Mac is for development, not production).

Head over to http://get.asp.net to get ASP.NET 5 with .NET Core on any platform. Also get the free cross platform editor Visual Studio Code as well.

Because .NET Core runs anywhere, there are things that it doesn't have. It doesn't have a UI layer (no WinForms, for example, because that makes no sense on Linux) or Registry Access (that's only on Windows, so it's simply omitted). While these omissions make sense, others don't exist because of lack of times, changing priorities, or peoplepower.

Currently, as of the time of this blog post's writing, .NET Core has no good built-in option for image resizing or image generation/creation. There is no System.Drawing because there is no Win32 GDI. There are some options, that I'll point out later, but this clearly hasn't been a priority so it's not done yet. There has been some work on System.Drawing.Graphics, but it seems stalled.

Nathanael Jones is the very accomplished author of ImageResizer and the primary at Imazen, an imaging software company. I've talked about ImageResizer before, it's fantastic. Nathanael has been pushing hard to get folks at Microsoft to commit to a story around Server-side Graphics in ASP.NET 5 and recently updated his own roadmap with respect to ImageResizer and the new ASP.NET 5 (that runs on .NET Core as well as the full .NET Framework). Take a moment and read it, there's a lot there. Concerns about how to call native code, how to distribute managed code that has to call native code, and lots more. I've worked with Nathanael for the last year trying to work out some way to solve this problem but it hasn't worked out well. Big company, sigh.

Another library in the .NET imaging space is called ImageProcessor by James M. South. Jim also wants to solve the program of server side image manipulation. He's currently working on a re-write of his ImageProcessor as a cross-platform library and I'm sure he would appreciate your help.

Jim himself says:

Is this wise? Honestly... I don't know. I could be writing code that may be suddenly obsolete. There has been little feedback on questions I've asked but it's a nice learning process if anything and I will definitely be releasing the code for consumption.

Over in the Microsoft corefxlab repo Jim has asked some questions and tried to push as well, but the issue is currently closed. Fortunately it is just closed for lack of interest. Krzysztof Cwalina from Microsoft says:

We have nobody working actively on this. It's a interesting problem space, but it does not align with our current priorities. I will close this for now. Please let me know if anybody wants to work on it and I will reopen.

Enter, you, us, the community. Jim has asked for help, and I'm also asking for help. Is Server-Side graphics manipulation in ASP.NET 5 important? Jim asks:

Please... Spread the word, contribute algorithms, submit performance improvements, unit tests. Help me set up CI for nightly releases.

Performance is a biggie, if you know anything about the new vector types and can apply some fancy new stuff with that it would be awesome.

There's a lot of developers out there who could write this stuff a lot better and faster than I and I would love to see what we collectively can come up with so please, if you can help in any way it would be most welcome and beneficial for all.

So, two things.

First, head over to https://github.com/JimBobSquarePants/ImageProcessor/tree/V3 and talk to James M. South on Twitter. If you can, offer support. Perhaps help with a AppVeyor setup, or offer your own CI server for builds. Do you have a need for server-side image work now or perhaps you have a cache of unit tests? See what you can offer. Even if you're a First Timer to Open Source.

Second, if you want to work on it, either with James, or with Microsoft, check out the closed issues on GitHub at https://github.com/dotnet/corefxlab/issues/86#issuecomment-158459437 and engage there. It'd be awesome to see this problem solved.


Sponsor: Thanks to RedGate for sponsoring the blog this week. They're offering a free .NET eBook! Discover 52 tips to improve your .NET performance! Our new eBook features dozens of tips and tricks to boost .NET performance. With contributions from .NET experts around the world, you’ll have a faster app in no time. Download your free copy.


© 2015 Scott Hanselman. All rights reserved.
     

Announcing PowerApps with Azure App Service

$
0
0

Introducing PowerAppsMicrosoft announced Azure App Service in March of this year on ScottGu's blog. Azure App Service includes all this stuff for one price. In fact, if you are already using Web Apps/Sites, have many of these features but may not know it:

  • Web Apps - This is the Azure Web Sites that you use today. .NET, node.js, Python, Java, PHP, and more.
  • Mobile Apps - libraries and runtimes for iOS/Windows/Android/Mac, plus offline sync support, notifications, and more
  • Logic Apps - Workflow in the cloud (like IIFTTT but hosted and controlled by you) that can orchestrate business processes within your App Service
  • API Apps - RESTful web services, connections to lots of SaaS systems like Dropbox, Office365, etc, plus security and automatic versioning.

In April the Azure team added isolated App Service Environments. An App Service Environment provides a isolated and fully dedicated environment for securely running all of your apps including Web Apps, Mobile Apps, API Apps and Logic Apps. Your apps run on virtual machines that only run your apps. You aren't on a pool of shared machines like much of the cloud. These dedicated App Service Environments can also scale much larger than the standard App Service. App Service Environments always run in their own private virtual network that you control.

Today at the Convergence Conference in Spain, Bill Staples announced PowerApps. The team I work on doesn't just make ASP.NET, we also make tools and services for Azure App Service and for the last year the team has been building PowerApps. PowerApps makes it easy to quickly create new business apps, connect systems and then share those apps with anyone on your team.

You should go check out http://www.powerapps.com to learn about the creation process for business users (like, folks who use Office but don't program), but I decided to focus more on how a professional developer would use Azure App Service and PowerApps, so I made a video to demonstrate a real example.

PowerApps for developers

bricksA Real Scenario

I wrote an app something like 13 years ago for Pioneer Courthouse Square here in Portland. The square is the Center of the City and it's covered with bricks that have the name of the people who donated to have the square built. There's tens of thousands of bricks and they are hard to find. There was an Access Database and a paper map but that was lame, so I put together an ASP app and a SQL database to generate a printable map that gets visitors within ten or so feet of their brick.

This is a real legacy app that has been running - happily and unchanged - for over a decade. We don't like to admit apps like this exist but the world is full of them. This apps was created before the iPhone, before ubiquitous connectivity, before web services, and before federated security. I thought it would be cool to make this legacy data available as a JSON-based web service, secure it's admin access with Azure Active Directory, build a CRUD mobile admin app with PowerApps for iOS, Android, and Windows, and then, just for fun, also create a native Android app with Xamarin 4 and the Azure Mobile Apps libraries so that volunteers can manage requests for photographs of bricks.

What does this all mean? What's changed?

PowerApps is the business application creation side. Think of it as a new member of the Office Family. It's not a Visual Studio thing. Apps made with PowerApps are sharable with in your organization as easy as sharing documents and they run on Windows, Android, and iOS. A business user could build a new workflow app and share it with everyone. They can auth that new app against APIs like Office 365, Microsoft Dynamics, Salesforce, Dropbox, Twitter, Google Drive, and OneDrive. For example, my example app takes photos of the bricks and puts the result in Azure Storage, but I could just as easily drop them in Google Drive or OneDrive.

However, for Visual Studio developers, or any developer, you still use the language of your choice (C#, F#, node.js, PHP, etc) and write Web APIs and Apps and host them in Azure App Service as you always have. But, if you want, those APIs can live in a new gallery that is specific to your organization so that anyone in your org (developer or business user alike) can use in their applications. My legacy BrickFinder is now an authenticated API living in an Azure App Service Environment. The API is being used by a website, an Android app written with Xamarin, and also an application created with PowerApps, running everywhere.

One other interesting point to note is that PowerApps pricing isn't consumption based, it's user-based pricing. Pay by the head, rather than prices fluctuating by consumption. For companies with public facing apps like my startup, I like pricing that changes with the popularity and usage of my app. For enterprise and large companies, simple pricing that's per-user makes more sense and is easier to budget for.

Check out the launch videos. PowerApps is in private preview now (go sign up at http://www.powerapps.com if you like), but you'll be hearing more about it in the months to come. 


Sponsor: Big thanks to Infragistics for sponsoring the feed this week. Responsive web design on any browser, any platform and any device with Infragistics jQuery/HTML5 Controls.  Get super-charged performance with the world’s fastest HTML5 Grid - Download for free now!


© 2015 Scott Hanselman. All rights reserved.
     

Fixed: Microsoft Edge can't see or open VirtualBox-hosted local web sites

$
0
0

I'm using VirtualBox on a Windows 10 machine along with Docker to deploy ASP.NET websites to local Linux Containers. To be clear, this isn't accessing websites with http://localhost, this is accessing locally an VirtualBox virtual network.

For example, my local IP and subnet is here, but my VirtualBox is here:

Ethernet adapter Ethernet:

IPv4 Address. . . . . . . . . . . : 192.168.0.140

Ethernet adapter VirtualBox Host-Only Network:
IPv4 Address. . . . . . . . . . . : 192.168.99.1

Make sense? A Linux VM running Docker containers is then http://192.168.99.100, for example, on various ports.

Strangely, however, I was unable to access these VirtualBox-hosted websites with Microsoft Edge, while they worked on Chrome and Firefox. I wanted to fix this. Just saying "use another browser" isn't enough, I like to figure it out.

I ended up trying this, and oddly, I was right. Go to Start, type "Internet Options" then then the Security Tab, then click Local Intranet, then Sites. Add your Virtual Machine's IP (in this case, the Docker Host) in that list and you're golden.

Add your VirtualBox VM's IP in the local intranet list of sites

Now about the WHY....I have no idea. I'll report back as I keep poking around.


Sponsor: Big thanks to Infragistics for sponsoring the feed this week. Responsive web design on any browser, any platform and any device with Infragistics jQuery/HTML5 Controls.  Get super-charged performance with the world’s fastest HTML5 Grid - Download for free now!


© 2015 Scott Hanselman. All rights reserved.
     

Brainstorming development workflows with Docker, Kitematic, VirtualBox, Azure, ASP.NET, and Visual Studio

$
0
0

Kitematic for WindowsFirst, a disclaimer. I have no idea what I'm talking about. I'm learning and exploring some ideas, and I wanted to see what the development process looks like today (December 2015) with Docker, ASP.NET, and Visual Studio on my Windows 10 machine. I'm also interested in your ideas in the comments, and I'll share them directly with the folks who are working on making Docker integration with Visual Studio.

This post uses the bits and stuff and hacks that are working today. Some of this is alpha, some is hacky, but it's all very interesting. What do you think?

Setting up Docker on Windows

I got a new laptop and needed to set it up. This seemed like a good to time re-discover Docker on Windows.

  • For this ASP.NET-centric example, I'm assuming you have Windows with Visual Studio, but you can get Visual Studio 2015 Community for free if you need it. You'll want ASP.NET 5 RC1 as well.
  • Go to https://www.docker.com, click Get Started, then Windows. You'll end up here: http://docs.docker.com/windows/started/.
    • Note, you'll need hardware virtualization enabled in your systems BIOs, and if you are already running HyperV, either turn it off (I just to go Windows Features and uncheck it. It can be quickly turned back on later) or create a boot menu to switch between Hyper-V and VirtualBox.
    • The Docker website could get to the point faster, but they are making sure you're prepped for success.
  • Download Docker Toolbox which has a great chained installer that includes:
    • Docker Client - This is the "docker" windows command you'll use at the command line, if you want to.
    • Docker Machine - Docker Machine creates Docker hosts anywhere and configures Docker to talk to those machines.
    • Docker Compose - This is a tool for defining multi-container Docker applications.
    • Docker Kitematic - Kitematic is really accessible. It's the Docker GUI and runs on Mac and Windows.
      • I like to think of Docker Kitematic as "GitHub for Windows for Docker." Just as GitHub for Windows is an attractive and functional GUI for 80% of the things you'd want to do with Git, then Kitematic is the same for Docker. I personally think that while Kitematic is in alpha, it will be the thing that gets new people using Docker. It definitely made onboarding more comfortable for me.
    • VirtualBox - Oracles free and excellent Virtual Machine software. I use this instead of Hyper-V on the client. Hyper-V is great on the server or in the cloud, but it's not optimized for client software development or running Ubuntu VMs and remoting into them. Also, VirtualBox is extremely easy to automate, and Docker and Kitematic will be automating creating the VMs for you.

When you run Kitematic the first time it will automate VirtualBox and use a "boot2docker.iso" to boot up a new that will host your Docker containers.

VirtualBox

If you want to test things, click New in Kitematic and search for "Ghost." Kitematic will download the Dockerfile, create a VM and Container, provision everything, and run Ghost inside Docker within your (hidden from view) VM. Click Settings and you can see what port it's running on, or just click the Arrow next to Web Preview and Kitematic will launch a web browser talking to the node.js-based Ghost Blog running in Docker.

Note: Microsoft Edge is having some troubles talking to VirtualBox virtual network adapters, and I'm tracking workarounds here. Other browsers are fine.

Kitematic publishig Ghost

ASP.NET 5 and Linux and Docker

ASP.NET 5 and the .NET Core CLR are both open source and run on Windows, Mac, and Linux. We're going to make an ASP.NET in Visual Studio and deploy it to a Linux Container via Docker. The "Dockerfile" that describes ASP.NET 5 is open source and is here on GitHub https://github.com/aspnet/aspnet-docker but you don't really need to sweat that even if it is interesting.

NOTE: You can get and install ASP.NET here http://get.asp.net. Visit it from any OS and it will give you the details you need to install and get started.

An example Dockerfile for your basic ASP.NET 5 application would look like this:

FROM microsoft/aspnet:1.0.0-rc1-final


ADD . /app

WORKDIR /app/approot

ENTRYPOINT ["./web"]

It says, "start from this base docker file, add the files in . to ./app, and we'll be running from /app/approot. Then run ./web."

Deploy to Docker from within Visual Studio

The Visual Studio 2015 Tools for Docker are just a Preview, but they are pretty useful even in their Alpha state. Install them in Visual Studio 2015 - it just takes a second.

Make a new ASP.NET application with File | New Project. I made one without authentication.

Go into the Project.json and change this line to include the --server.urls bit. The important part is the *, otherwise the Kestrel web server will only listen for localhost and we want it to listen everywhere:

"commands": {

"web": "Microsoft.AspNet.Server.Kestrel --server.urls http://*:5000"
}

Right Click Solution Explorer and click Publish and you should see this:

Docker Tools for Visual Studio

From here, select Docker, and you will have a change to make a VM in Azure or publish to an existing VM.

Instead, click "Custom Docker Host" because we are going to public to our local VM.

Here's what my settings look like. Yours will be different.

Custom Docker Profile in Visual Studio

In order to get the settings YOU need, go to Kitematic and click Docker CLI to get a cool PowerShell preconfigured command prompt all setup with knowledge of your system.

Type "docker-machine config default" and you'll get a command line showing where your certs are and the IP and port of your Docker setup.

Note the result is missing a carriage return there after the port 2376.

docker-machine config default

Fill out the form with the Server Url, and image name, and some ports. I mapped port 5000 inside the container because I'll have the ASP.NET Kestrel web server listening on Port 5000.

Here's what my "Auth Options" text box looks like. Your paths will be different.

--tlsverify 

--tlscacert=C:\Users\scott\.docker\machine\machines\default\ca.pem
--tlskey=C:\Users\scott\.docker\machine\machines\default\server-key.pem
--tlscert=C:\Users\scott\.docker\machine\machines\default\server.pem

Click Validate Connection and you'll hopefully get a green checkbox.

WEIRD BUG: As of this writing the November 2015 version of the preview Docker Tools for Visual Studio 2015 has a bug when publishing to a custom host. The generated .ps1 in the PublishProfile is wrong. I think they'll fix it ASAP but the fix is to fake publish a Hello World ASP.NET project to a Docker container in any Azure VM and grab the .ps1 it generates. You don't need to hit publish, the file gets generated when you hit Next. Copy that file off somewhere and copy it OVER the wrong one in your actual project. You only have to do this once. I'm sure it will get fixed soon. You can confirm you have the right .ps1 because it'll say "Docker" at the top of the file.

image

When you hit publish, the project will build locally, and deploy into a new Docker container. You can watch Kitematic update as the deploy happens. The selected Container there is ASP.NET, and I know it worked because Kitematic puts a nice Web Preview there as well!

ASP.NET 5 in Docker in Kitematic

Brainstorming Improvements

So this is what I was able to do with existing bits. What I'd like to see is:

  • Press Ctrl-F5 in Visual Studio and have it build the project, deploy to Docker, and launch the browser all in one go. Do you agree?
    • I was thinking to make a "docker" command in the ASP.NET 5 "launchSettings.json" which would appear like this in Visual Studio.
      Docker in VS
  • Today you have to delete the container manually in Kitematic and publish again. How would you want things to work?
  • If Docker is promoting Kitematic as the best way to get started with Docker, should Visual Studio plugins know that Kitematic and Docker Machine are there and auto-configure things?

Additionally, when  Windows Containers happens, Visual Studio should clearly be able to publish an ASP.NET 5 application to the container, but even better, if this Docker flow works cleanly, I should be able to publish via Docker to Linux OR Windows from the same dialog in VS. Then after a local deployment to Docker I could Right-Click Publish and publish to Docker in an Azure VM and or Azure Container Service.

IMHO given an ASP.NET 5 app, you should be able to:

  • Publish to a folder
  • Publish to a Docker container (Linux or Windows)
    • Ctrl-F5 build AND F5 debug that container.
    • Publish to Docker in any cloud
  • Publish to an Azure VM, Web Site (App Service), or Docker within Azure Container Service
  • Editor support and syntax highlighting for Dockerfiles and Docker Compose files.
  • Docker Tools for VS should make a basic Dockerfile if one doesn't exist
  • Run xUnit and tests in the Docker Container

What do you think, Dear Reader? How much Visual should Visual Studio have? I personally like these lightweight dialogs that launch command line tools. How do you expect Docker to integrate with Visual Studio?


Sponsor: Big thanks to Infragistics for sponsoring the feed this week. Responsive web design on any browser, any platform and any device with Infragistics jQuery/HTML5 Controls.  Get super-charged performance with the world’s fastest HTML5 Grid - Download for free now!


© 2015 Scott Hanselman. All rights reserved.
     

The 2015 Christmas List of Best STEM Toys for your little nerds and nerdettes

$
0
0

My 8 year old (recently 7, they grow so fast) asked recently, "are we nerds yet?" Being a nerd doesn't have the negative stigma it once did. A nerd is a fan, and everyone should be enthusiastic about something. You might be a gardening nerd or a woodworking nerd. In this house, we are Maker Nerds. We've been doing some 3D Printing lately, and are trying to expand into all kinds of makings.

NOTE: We're gearing up for another year of March Is For Makers coming soon in March of 2016. Now is a great time for you to catch up on March 2015's content!

Here's a Christmas List of things that I've either personally purchased, tried for a time, or borrowed from a friend. These are great toys and products for kids of all genders and people of all ages.

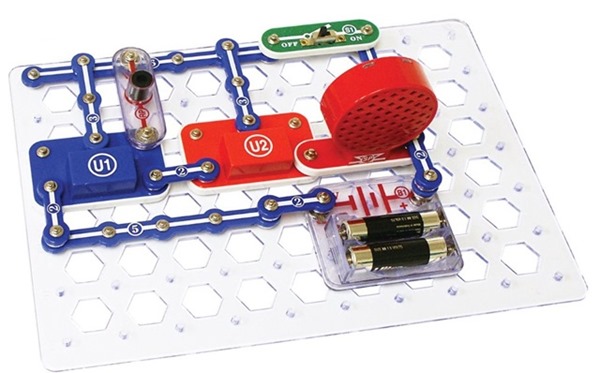
Snap Circuits

Snap Circuits

I love Snap Circuits and have talked about them before on my blog. We quickly outgrew the 30 parts in the Snap Circuits Jr. Even though it has 100 projects, I recommend you get the Snap Circuits SC-300 that has 60 parts and 300 projects, or do what we did and just get the Snap Circuits Extreme SC-750 that has 80+ parts and 750 projects. I like this one because it includes a computer interface (via your microphone jack, so any old computer will work!) as well as a Solar Panel.

Dremel 3D Printer

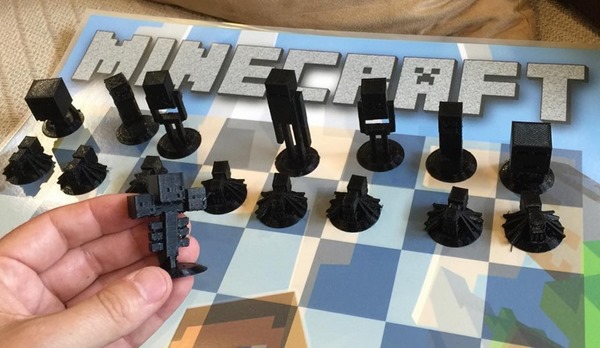
We still use our Dremel 3D Printer at least two or three times a week. We're printing a quadcopter, making Minecraft Chess sets, and creating gifts for the family.

Minecraft 3D Printed Chess Set

Here's some of my 3D Printing posts so far:

It's been extremely reliable. Some folks complain that the Dremel system and software is proprietary, but it's very easy to use. Additionally, if you really don't like their custom software, companies like Simplify3D have Dremel support built right in. You can also use third party filament like Proto-pasta with great success. We even extended the Dremel with a custom 3D printed spool adapter for Proto-pasta and upgraded nozzle and build plate. It's been fantastically reliable and I recommend the Dremel highly.

littleBits Electronics Gizmos and Gadgets

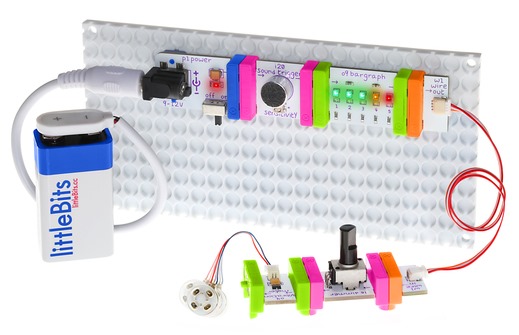
LittleBits are a more expensive than Snap Circuits, but they operate at a higher level of abstraction. While Snap Circuits will teach you about resistors and current and voltage, litlteBits is more oriented towards System Thinking. The littleBits Electronics Gizmos & Gadgets kit is massive and has kept my kids entertained for the last few weeks. It includes motors, wheels, lights, switches, servos, buzzers even a remote control. In fact, the remote control lets you remote any signal and make any gadget you come up with a wireless one.

littleBits

LittleBits also has a LEGO compatibility system which, while a little persnickety, has allowed the kids to create remote controlled LEGO cars in minutes. They are very expandable and everything is modular. You can build more with additional kits, or you can get just one sensor or that one motor that you need.

The HP Stream 11.6 Laptop

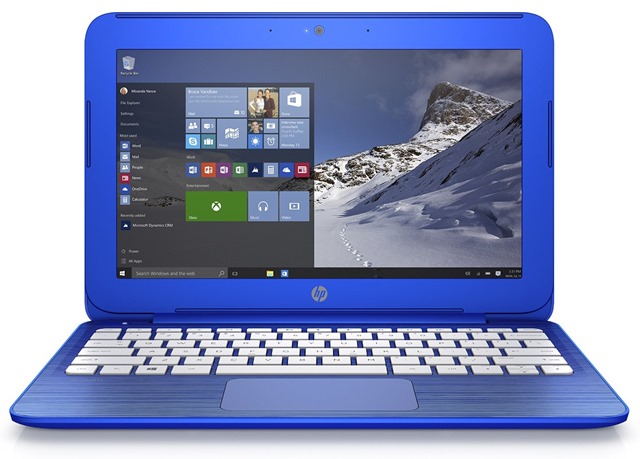
First, let's be serious. The HP Stream is a $199 laptop with an 11.6" screen. Surprisingly, you can get a 13.3" screen for just $210. But on the real, it's not for office workers. It's not even for you. It's for the kids in your life. It's a good, solid, beginner laptop for kids. 2 gigs of ram, and a very modest 1.6 Ghz processor with just a 1366x768 screen, it runs Windows 10 pretty well, in fact and even includes Office 365 Personal for a year (that's Word, Excel, etc).

HP Stream 11.6" Laptop

I've even heard a parent call the HP Stream the "Minecraft Laptop." My sons took a week-long summer school Minecraft class with a room filled with these little laptops and they did just fine. It has just a 32gig SSD for a hard drive, but for <$20 you can add and drop in a 64gig SD Card and tell Windows 10 to put downloaded apps onto the SD Card directly.

This is a great machine for <$200 that you can feel comfortable giving to an 8 year old or tween and teach them how to code.

Raspberry Pi (any kind!)

Little boys on the Raspberry Pi

Every STEM house should have a Raspberry Pi or six! We've got 4? Or 5? They end up living inside robots, or taped to the garage door, or running SCUMMVM Game Emulators, or powering DIY GameBoys.

I recommend a complete Raspberry Pi Kit when you're just getting started as it guarantees you'll be up and running in minutes. They include the SD Card (acts as a hard drive), a power supply, a case, etc. All you need to provide is a USB Keyboard and Mouse. I ended up getting a cheap Mini USB wired keyboard and cheap USB wired mouse for simplicity.

Raspberry Pis will give you back as much as you can put into them. While you can treat it as a very low-powered browser or basic machine, you should really explore the breadth of projects you can make with a Raspberry Pi. Sure, the kids can learn Scratch or Python, but they can also build Raspberry Pi Robots or run a version of Windows 10 and play with C#. They can add their own electronics, lights, sounds, make radios, and more.

If you want to save money, get just a Raspberry Pi alone for <$40 and use a micro-USB Cell Phone Power Supply, and whatever electronics you have around the house. Once I took a local kid to Goodwill (a thrift store) and we found the power supply, mouse, keyboard, AND LCD Monitor all in the electronics junk pile of the store for $25 total.

OWI Robotic Arm Edge

The OWI Robotic Arm Edge isn't a kit but it's a reasonably priced robotic arm to get kids thinking in terms of command and control and multiple dimensions. OWI also has a cool 3in1 robot RC kit if you prefer driving robots around and more "rebuildability."

OWI Robotic Arm Edge

What educational toys do YOU recommend this holiday season?

FYI: These Amazon links are referral links. When you use them I get a tiny percentage. It adds up to taco money for me and the kids! I appreciate you - and you appreciate me-  when you use these links to buy stuff.


Sponsor: Big thanks to Infragistics for sponsoring the feed this week. Responsive web design on any browser, any platform and any device with Infragistics jQuery/HTML5 Controls.  Get super-charged performance with the world’s fastest HTML5 Grid - Download for free now!


© 2015 Scott Hanselman. All rights reserved.
     

Announcing Open Live Writer - An Open Source Fork of Windows Live Writer

$
0
0

Open Live Writer is the spiritual successor to Windows Live Writer

Meta enough for you?Today is the day. An independent group of volunteers within Microsoft has successfully open sourced and forked Windows Live Writer. The fork is called Open Live Writer (also known as OLW) and it is part of the .NET Foundation and managed by this group of volunteers. Read the fantastic announcement at the .NET Foundation Blog! Download Open Live Writer now!

Windows Live Writer 2012 was the last version Microsoft released and can still be downloaded from http://www.windowslivewriter.com. If you're not comfortable using Open Source Software, I recommend you stick with classic WLW.

If you're willing to put up with some bugs, then join us in this brave new world, you can download Open Live Writer from http://www.openlivewriter.org. We're calling today's release version 0.5.

Here's some of the added features, the removed features, the stuff that doesn't work, and our plans for the future:

  • REMOVED: Spell Checking. The implementation was super old and used a 3rd party spell checker we didn't have a license to include an open source release. Going forward we will add Spell Check using the built-in spell checker that was added in Windows 8. Open Live Writer on Windows 7 probably won't have spell check.
  • REMOVED: The Blog This API. It was a plugin to Internet Explorer and Firefox and was a mess of old COM stuff.
  • REMOVED: The "Albums" feature. It uploaded photos to OneDrive but depended on a library that was packaged with Windows Live Mail and Live Messenger and we couldn't easily get permission to distribute it in an open source project.
  • ADDING VERY SOON: Google runs the excellent Blogger blog service. We've worked with the Blogger Team within Google on this project, and they've been kind enough to keep an older authentication endpoint running for many months while we work on Open Live Writer. Soon, Google and Blogger will finally shut down this older authentication system. Blogger will use the more modern OAuth 2 and Open Live Writer will be updated to support OAuth 2. Windows Live Writer will never support this new OAuth 2 authentication system, so if you use Blogger, you'll need to use Open Live Writer.
  • BROKEN/KNOWN ISSUES: We are actively working on supporting Plugins. We have an plan in place and we are looking for your feedback on the most popular plugins that you want brought over from the Windows Live Writer ecosystem.

Our roadmap for the future is published here on GitHub.

NOTE: Open Live Writer is NOT a Microsoft product. It is an open source project under the .NET Foundation and is managed and coded by volunteers. Some of the volunteers work for Microsoft and are doing this work in their spare time.

Are you an existing user of Windows Live Writer?

We encourage you to install Open Live Writer and try it out! OLW will run side-by-side with your existing Windows Live Writer installation. Open Live Writer installs VERY quickly and updates itself automatically. Try it out! It's early but it's a start. Please bear with us as we work to improve Open Live Writer.

if you do find bugs, please share your bugs at https://github.com/OpenLiveWriter/OpenLiveWriter/issues and be specific about what's not working. And please, be patient. We are doing this as volunteers - we are NOT representing Microsoft. Open Live Writer is no longer a Microsoft project, so while we will do our best to support you, let's all try to support one another!

Are you a developer/designer/writer?

We've got dozens of volunteers and a few dedicated core committers. Your Pull Requests and code ARE appreciated, but please talk to the team and comment on issues before submitting any major Pull Requests (PRs). Community is appreciated and we don't want to reject your hard work, so it's best you talk to the team in a GitHub Issue and get approved for large work items before you spend a lot of time on OLW. We welcome http://firsttimersonly.com to open source as well! Help us with our docs, as well!

IMPORTANT HISTORICAL NOTE: Much of the code in Open Live Writer is nearly 10 years old. The coding conventions, styles, and idioms are circa .NET 1.0 and .NET 1.1. You may find the code unusual or unfamiliar, so keep that in mind when commenting and discussing the code. Before we start adding a bunch of async and await and new .NET 4.6isms, we want to focus on stability and regular updates. 

Building Open Live Writer and making your own personal copy!

To be clear, you don't need to be a programmer to run OLW. Just head over to http://www.openlivewriter.org and download now. However, if you do want to hack on OLW here's how!

  • Clone the sources: git clone https://github.com/OpenLiveWriter/OpenLiveWriter.git

At this point, you can build and run inside Visual Studio 2015 Community. It's free to download at https://www.visualstudio.com/free. A solution file for OLW is located at.\src\managed\writer.sln.

  • Alternatively, you can build at the command prompt:
    • Run .\build to compile. The binaries are dropped in .\src\managed\bin\Debug\i386\Writer\
    • Run .\run to launch Writer.

Going Forward

I know it felt like it took a long time to open source Open Live Writer. In fact, my buddy John Gallant found the first email where we started asking questions in April of 2013. There was a lot involved both legally and technically as we were breaking new ground for Microsoft. Consider this. We've successfully open sourced a previously completely proprietary piece of Windows software that shipped as part of Windows Live Essentials. This software was used by millions and contained code as old as a decade or more. Persistence pays off.

This is just the beginning! Big thanks to the team that made this possible. Specifically I want to call out Will Duff, Rob Dolin, and Robert Standefer who have been there from the beginning offering coding, logistical, and legal support. Thanks to Ben Pham for our logo, and Martin Woodward from the .NET Foundation for his support, Azure Storage account, and code signing certificate! I can't thank everyone here, there's a longer list of contributors on our home page!

We are looking forward to hearing from you and perhaps you'll join us in our open source journey.


Sponsor: Big thanks to Infragistics for sponsoring the feed this week. Responsive web design on any browser, any platform and any device with Infragistics jQuery/HTML5 Controls.  Get super-charged performance with the world’s fastest HTML5 Grid - Download for free now!


© 2015 Scott Hanselman. All rights reserved.
     

Signing into Windows 10 with your Face - Using an Xbox One Kinect with Windows Hello

$
0
0

The original version of the Kinect camera had an Xbox version and a PC version, and this sucked for a few reasons. Fast forward to the days of Xbox One, and the Kinect v2 for Xbox One has changed a lot. It has a 1080p color camera, IR capabilities that are separate from color, a wider FOV (field of view), and can track 6 skeletons. AND, most importantly, you can use your existing Xbox One Kinect with your PC with an adapter. No need for a second Kinect. The Kinect Adapter for Windows is $50 and took me 5 min to set up. It's basically a power brick and a USB 3 bridge to your PC.

You do need a decent machine to handle the Kinect for Xbox One, so there's a Kinect Configuration Verifier Tool that can quickly tell you if you're up to spec. If you are developing applications, download and install the free SDK 2.0. It's worth getting this even if you aren't, if only to see the cool stuff your Kinect can see about you.

A Kinect can see you in 3D

The Kinect knows too much!

Setting up your Kinect v2 to support Windows Hello on your Windows 10 PC

Here's how you setup Windows Hello. It's pretty awesome because my home computer unlocks and logs in when I sit down and look at it.

  • Update the Registry to get Drivers that aren't available yet. Make a text file "kinectdrivers.reg" and put this text in it. Double-click it to import into your Registry.
Windows Registry Editor Version 5.00

[HKEY_LOCAL_MACHINE\SOFTWARE\Microsoft\DriverFlighting\Partner]
"TargetRing"="Drivers"
  • If you've already set up your Kinect, refresh it's drivers in the Device Manager.
    1. Open Device Manager (Windows Key + X, then press M)
    2. Expand “Kinect sensor devices”.
    3. Right-click on "WDF KinectSensor Interface 0"
    4. Click "Update Driver Software..."
    5. Click "Search automatically for updated driver software"
    6. Allow it to download and install the new driver
    7. Reboot
  • Set up Windows Hello. Press the Start button and type "hello" or "face sign-in" and you'll get here. You'll want to setup a PIN first.
Windows Hello

Run through the wizard, except look nicer than this.

ZOMG HELLO WINDOWS

You're all set! Now when you sit at your computer and see the Lock Screen, it will look for you.

Privacy Note: The camera isn't on and looking all the time. It's just looking when the screen is locked AND the screen saver (power saver) isn't going. Additionally, the Kinect light will turn on showing you that it's on. It's not streaming your face to any remote servers, it's using what it knows about your face as a key to unlock secure storages locally.

Making sure it's you

Then you just hit the space bar or click the mouse and you're in!

It is! Hello!

Windows Hello is also built into the Surface Pro 4 and the SurfaceBook, but you can add this functionality to your PC with a Kinect...OR....

If you don't want a Kinect + Adapter or a new PC, you can buy an eye tracker like the Tobii Eye Controller or the SteelSeries Gaming Eye Tracker. Tobii just added support for Windows 10 with Windows Hello to their controller! So for $139 you could get a nice upgrade to your PC with face recognition, not to mention all the other cool stuff a Tobii can do!

Tobii Eye Tracker adds Windows Hello to your PC

The Tobii $139 device can let you (or a disabled relative) control your computer with just your eyes. There's a wonderful open source tool called OptiKey that helps folks with Motor Neuron disease or ALS control their Windows machines, and I had the developer on my podcast recently. Definitely check it out as a compelling and accurate alternative way to control your PC!


Sponsor: Big thanks to Infragistics for sponsoring the feed this week! Responsive web design on any browser, any platform and any device with Infragistics jQuery/HTML5 Controls.  Get super-charged performance with the world’s fastest HTML5 Grid - Download for free now!


© 2015 Scott Hanselman. All rights reserved.
     

3D Printing is for so much more than just making brightly colored plastic pieces of crap

$
0
0

Cute, a red Groot...but so what?When you first start learning about 3D Printing you'll usually find yourself looking at a bunch of brightly colored plastic busts. The first 3D printed thing I ever saw was a florescent green Yoda head. First you're like "HOW DID YOU DO THIS?" but quickly you're more like "OK, how many brightly colored plastic pieces of crap do I really need in my life?"
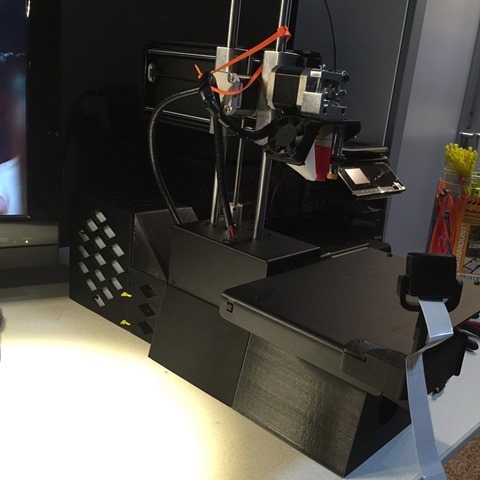
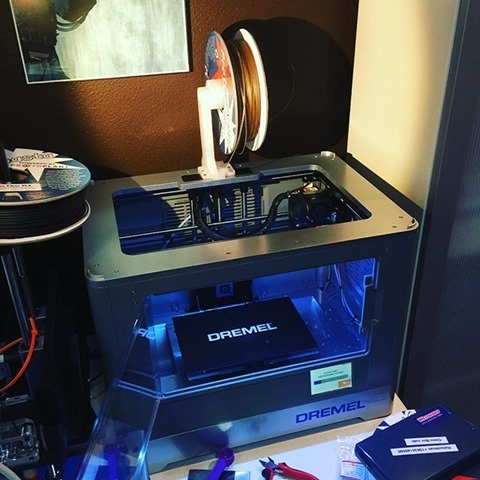
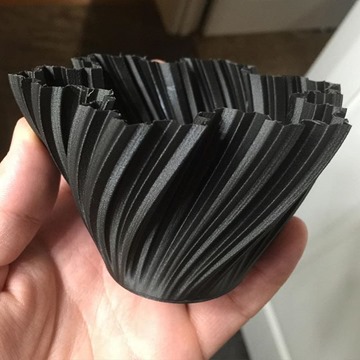
At this point you've likely dismissed 3D Printing as the world of the rich, the insane, or the nerdy, or all three. This is where I was.

I thought a 3D Printer was a $2000 thing, and of course, that's a heck of a lot of money. But I wanted to get into 3D Printing because I'd started to talk to some more advanced folks locally here in Portland and they assured me that it was cheaper than I thought and more useful than I thought. I got a $599 Printrbot Simple Metal from Amazon. You can also get a kit and assemble it yourself for $539 but the assembling is kind of hard work.

Later as I was having so much fun I got a Dremel 3D Printer for $899 also off Amazon and it's been absolutely reliable and super fun. I now consider the Printrbot a great "prosumer" hobbyist printer for folks to tinker with and improve, but the Dremel just prints, and it prints well. I had it printing well within 10 minutes of unboxing it. Both of these printers are great, but the Dremel (in my experience) has required less adjustment.

I've learned three things. They are perhaps obvious to you, but they have been amazing for me and my sons as we learn more about 3D Printing.

Lesson 1 - You can upgrade your 3D Printer

There's a great website called Thingiverse that is filled with models that others have made or remixed. You can join in and just download, or, ideally, create your own models and share. I've used Tinkercad with the kids to create new models.

One of the great jokes in 3D Printing is that people with printers never print anything useful, they just print upgrades to their printers. When you are getting started, this is actually kind of true. I took my PrinterBot and printed a base, a spool holder (figuring out where to safely and reliably hang the spools of plastic filament is a big problem.

11007949_1408985906069162_1188772249_n

The Dremel has a top lid and usually you'll have the filament inside on a special plastic spool holder. However, if you use larger or non-Dremel filaments you'll want a reliable "big spool" solution. There's a "system" at Thingiverse called the "OmniStand" that you can print that will literally replace the internal one. You can also print an OmniStand for the top of the printer (as seen in this picture below) that will let it print off very large spools.

12393609_1031042666937707_572014215_n

These were small but significant victories. This was a reminder to my sons and I that we could change these devices and make them work how WE wanted, not necessarily how the they were designed.

NOTE: You can also upgrade the Nozzle in your printer. Later I'll talk about "exotic" filaments that can give amazing results but are also more abrasive and can wear out the stock nozzles that come with your printer. I upgraded the nozzle on my Dremel for just $14.99 using this Brass Nozzle from Proto-Pasta and was able to make the swap and get back to printing in about 20 minutes, not counting the feeling of accomplishment.

OK, so you can print things to make your printer work better, cool...what else?

Lesson 2 - There are "exotic" plastic filaments that are game changers

There's a local small business just over the river in Vancouver, Washington called "Proto-Pasta." They a company of just three people that started as a Kickstarter two years ago. They sell "exotic" plastic filaments that have additives and properties that take your prints out of the "bright plastic crap" category and into something more interesting.

They have a filament with added Carbon Fiber that has created some of the smoothest and most amazing prints I've ever made. It doesn't gain strength with this addition, but rather rigidity. They have a Stainless Steel filament that is great for making jewelry or robots or anything that you want to have the heft and feel of steel. They've even got a filament with Iron so your prints can react to magnets.

I've used their High-Temperature filament that starts out clear but you bake it (literally, in your oven) afterwards and it'll shrink slightly and get VERY hard and turn opaque.

More recently I've been trying a filament with added Pine (yes, wood) that not only smells great but looks amazing with wood flecks inside the filament.

I've made dishes, vases, pieces of art for shelves, and geometric shapes for gifts this Christmas. Each one is VERTY different just by changing the filament. It's been more than changing color. These exotics change the texture and weight, and by making small changes in the software you can make them thicker or, in my case, thinner and more translucent.

12353895_1806846556209291_841574157_nIMG_2535

12356485_548999845269286_797360808_n12353821_516258631884232_813681694_n

I hope the folks who get these for Christmas appreciate the work and thought that went into them.

Lesson 3 - You can print parts and then assemble things using bolts, glue, etc.

This one may be obvious, but you don't have to do everything with plastic. My 8 year old and I are slowly making a "T4 Quadcopter" designed by Brendan from New Zealand (a reader of this blog) and this project will require not only lots of printed pieces but assembled pieces. You can super glue, screw, bolt, zip-tie and snap 3D printed parts together. I've been surprised at how string these parts can be when they are combined. This quadcopter will be held together with small metric nuts and bolts and zip-ties as well as some very clever snaps built-in as part of the 3D Printed model.

12276870_1634779493440548_1678693220_n

We are having a blast with this family hobby. We've fixed things around the house, made art, explored material science, thought about geometry, and learned about how software and hardware work together to create something bigger. Are you getting into 3D Printing?

Related Links

Also, please do follow my adventures on Instagram at @shanselman!


Sponsor: Big thanks to Infragistics for sponsoring the feed this week! Responsive web design on any browser, any platform and any device with Infragistics jQuery/HTML5 Controls.  Get super-charged performance with the world’s fastest HTML5 Grid - Download for free now!


© 2015 Scott Hanselman. All rights reserved.
     
Viewing all 1148 articles
Browse latest View live


<script src="https://jsc.adskeeper.com/r/s/rssing.com.1596347.js" async> </script>