Quantcast
Channel: Scott Hanselman's Blog
Viewing all 1148 articles
Browse latest View live

3D Printer Shootout - $600 Printrbot vs. $20,000 uPrint SE Plus

$
0
0

First, let's level set with a disclaimer. I am a smart enough person but a total beginner at 3D printing. I've been 3D printing for about two weeks using a Printrbot Simple Metal from Amazon that I got for US$599. Other than Amazon affiliate links (buy from my links and you buy me tacos!) I don't have ANY relationship with Printrbot or anyone in the 3D Printing space. I'm unaffiliated. This "shootout" is an interesting experience. I'm sure I did something wrong, or perhaps my partner in crime on this experiment, Brandon Potter, missed a step. Who knows? But this is how it went down.

Brandon saw that I was doing some 3D printing and mentioned they had a <$22,000 3D printer at his work and what did I think about doing a comparison? I had been having trouble printing with success, ruining at least 2 out of 3 prints, but recently got my Printrbot dialed in nicely. '

Here's my investment so far both in time and money.

So I'm into it for $722 and my time. I did NOT use a Heated Bed for my Printrbot Simple Metal but I am told it's a great upgrade.

Here's Brandon's company's outlay in his words:

  • uPrint SE Pro Printer and Dissolving Bath – about $22,000
  • 1 Spool of Model Material (Black) – $205.00 (produces 42 cubic inches of printing)
  • 1 Spool of Support Material – $200.00 (42 cubic inches worth)
  • Box of Build Plates – $125.00 for 24 (you need one for each print, so it costs about $5.20/each)
  • Soluble Concentrate – $149.00 for 12 bottles (dissolves support material, aka fancy drain-O)
  • Warranty Support – $2,000/year – because it does break from time to time.
  • Brandon says - Add a little bit of shipping, and for a mere $25K you’re ready to print your very own coffee cup.

We decided to print a coffee cup. I don't plan on drinking from it because who knows if the plastic will leech off, but it seemed like an interesting and common object. As a 3D model it has some nice curves, the handle overhang is a small challenge and it's something we can easily compare.

I printed one on my Printrbot and Brandon printed one on their Stratasys uPrint SE Pro. Then Brandon mailed me his cup and I'm sitting here holding them both in my hands.

Here is a timelapse video of my cup printing. My 0.2mm print took about 7 hours and this video is 90 seconds. I used Octoprint and the Raspberry Pi to create the video.

I downloaded the Coffee Cup model from Thingiverse as an STL 3D model. I ran the STL model through the Microsoft 3D Printing NetFabb online service to make sure the model was watertight. Then I loaded the result directly into Repetier and used Cura to slice the model into individual instructions for the printer. I made one adjustment to the slicing settings, telling it to make a "support structure" when it sees an overhang over 30 degrees. I was concerned about the cup's handle. Other than that one settings change which resulted in the support being added (which is easily pulled off after the print) it was a "printing as is." Brandon's model also used a support structure to print the cup and keep the handle stable so we decided this was pretty typical. He also printed on his pro printer with no changes.

My 3D model with support

Here is a picture of my setup. There's my printer on the right with some stuff I've made and my box of tools/crap on the left. You can see the spool, the printer (the red lipstick looking thing is where the hot plastic comes out), the Raspberry Pi and the tape that I print on. I can print objects up to 6 inches on a side, so a big 6 inch cube. If I paid more money I could get the 10 inch model, but so far for my hobbies I'm happy with that size. I can break things up and assemble them with acetone or bolts if I want to make larger models. One fellow 3D-printed a whole full-sized motorcycle with a small printer and assembled the parts.

My 3D Printing setup with Octoprint and a Printrbot Simple Metal

Here is Brandon's printer. Again, $600 vs. $25000.

Stratasys

By the way, is this a silly comparison? Perhaps. But no more than a Tesla vs. a Challenger Hellcat. Actually, I think my printer is a Geo Metro. But I get great mileage!

Ok, here's the prints. Feel free to click to zoom in to make your decision. Which cup came from which printer?

Coffee Cup 3D Print from a Printrbot Simple Metal on one side and a Stratasys uPrint SE Pro on the otherCoffee Cup 3D Print from a Printrbot Simple Metal on one side and a Stratasys uPrint SE Pro on the other

Coffee Cup 3D Print from a Printrbot Simple Metal on one side and a Stratasys uPrint SE Pro on the otherCoffee Cup 3D Print from a Printrbot Simple Metal on one side and a Stratasys uPrint SE Pro on the other

Here's slightly larger pics. Note I am not/have not moved the cups side to side. Left/right is consistent for this photo series.

Coffee Cup 3D Print from a Printrbot Simple Metal on one side and a Stratasys uPrint SE Pro on the other

Coffee Cup 3D Print from a Printrbot Simple Metal on one side and a Stratasys uPrint SE Pro on the other

Which is which?

The $599 Printrbot Simple Model printing at 0.2mm is on the left. The $20k uPrint SE Plus printing at 0.1mm is on the right.

The uPrint's base was messed up somehow. A bad start perhaps, but unfortunate as it's supposed to just work since Brandon used the one-time-use custom bases that the uPrint comes with. He also used the dissolving bath to take the white support structure off. You can see some of the white still there, perhaps it wasn't in long enough. My print had supports but I just pulled them off with my hands. Of course, if you have an intricate print with small parts that's not always possible. This is a very simple object, to be clear. It's not interlocking gears or something.

Here's the uPrint cup. Brandon said it took 8 hours and 22 minutes.

Coffee Cup 3D Print from a Stratasys uPrint SE Pro

Here's the Printrbot's cup. Note the "Z scar" (an artifact from the printer moving up the Z-Axis) on the print? On my print it ended up by the handle, but on Brandon's it ended up on the side of the cup, marring the print, in my opinion.

Coffee Cup 3D Print from a Printrbot Simple Metal

What's the takeaway? If we assume that I have a totally dialed-in well calibrated super cheap consumer/hobbyist 3D Printer and that Brandon has a $20k professional 3D Printer that's maybe got some calibration issues, they seem very comparable.

However, in real one-time costs my cup cost me 21.02 meters of filament, costing me perhaps $2 maybe a little more if you count the few pieces of tape. For Brandon and his Pro printer, in direct costs, he used $23.62 in model material, $2.06 in support material, and $5.20 build plate, for a total of $30.88 for this cup.

Naysayers will say that this isn't a great model to have chosen. Clearly my little Printrbot Simple Metal can only make things of a certain size, but it's clearly fair to say that it's a surprisingly competent printer when it's calibrated well. Additionally, if I were a 3D modeling shop with a Pro printer, I think I would definitely pick up a few sub-$1000 printers for basic stuff as the big printers may be costing you money. If I was a small business I would really do my homework before buying a pro printer that claims to be problem- and maintenance-free. Go read Brandon Potter's account of his "pro print" and compare notes!

NOTE: This post is intended in no way to talk up Printrbot nor to talk down Stratasys. It's a simple one time anecdote as it happened, using a simple model.

What do you think, Dear Reader?


Sponsor: Big thanks to Infragistics for sponsoring the feed this week! Responsive web design on any browser, any platform and any device with Infragistics jQuery/HTML5 Controls.  Get super-charged performance with the world’s fastest HTML5 Grid – Download for free now!


© 2014 Scott Hanselman. All rights reserved.
     

Announcing: Running Ruby on Rails on IIS8 (or anything else, really) with the new HttpPlatformHandler

$
0
0

For years there's been numerous hacks and ways to get Ruby on Rails to run on IIS. There's also ways to get Java via Tomcat or Jetty, Go, and other languages and environments to run as well. There's ways to get Node.JS running on IIS using iisnode but that's been node-specific. The blog posts you do find say things like "get Rails to run on IIS in 10 steps" and I'm like JUST TEN?!? Why not 13? Others say "You can deploy Rails under IIS, it's just very difficult and there's not a lot of documentation. You'll need a special Fast-CGI implementation...WELCOME TO HELL."

No longer.

Azure Websites has supported node AND Java (again, Tomcat or Jetty) for a while now, in production and it's very nice and it runs under IIS. How? They've now brought that support to Windows running IIS 8+ with the release of the HttpPlatformHandler. Here's their example on how to get IIS 8+ running Java, easily.

Let's see if this works well with Ruby on Rails as well!

Why is HttpPlatformHandler interesting? Check this from the docs...it means IIS can host anything that runs on Windows now, easily. These things were possible before, but with all kinds of hacks and FastCGI this and that. What's great about HttpPlatformHandler is that it isn't about Rails. It's about any process that's listening on a port. You get all the value of IIS *and* total control of your self-hosting scenario.

The HttpPlatformHandler is an IIS Module, for IIS 8+, which does the following two things:

  1. Process management of http listeners - this could be any process that can listen on a port for http requests.  For example - Tomcat, Jetty, Node.exe, Ruby etc;
  2. Proxy requests to the process that it manages.

To be clear, you can work with Ruby on Rails on Windows and have it host itself with WEBrick locally, but if you're going to go production on Windows you'll want to have IIS and more likely, jRuby in a Tomcat container, similar to using Nginx on linux. What value does IIS provide in a scenario like this? Static file hosting, Reverse Proxy, complex auth that can span multiple apps, languages and frameworks, it monitors and manages your process looking at memory and CPU, crashes, etc.

Running Ruby on Rails on IIS 8 with the HttpPlatformHandler

First make sure you have Ruby on Rails. If you do, skip forward.

I use the http://railsinstaller.org for Windows and go. You'll get Ruby, Rails, Bundler, Sqlite, and TinyTDS. Even SQL Server support. Very kind of them. Another good Rails on Windows on is RailsFTW.

I go to Turn Windows Features On and Off to make sure I have IIS installed as well.

Turn on IIS in Windows Features

Then get the HttpPlatformHandler. You can get it with the Web Platform Installer, or just install it from here: x86/x64

I make a folder for the app I'm going to make. I put it in c:\inetpub\wwwroot\rails but you can move it around if you like.

Make sure your Rails app is an application in IIS

I right-click my folder in IIS Manager and "Convert to Application."

My Rails application in IIS

I run "gem install rails" to make sure I have Rails in the first place. ;) You will if you installed with the RailsInstaller. If you installed with the RubyInstaller, then this will get you Rails.

NOTE: If you have issues with SSL running gem on Windows, you'll need manually to update gem to 2.2.3 as of the time of this writing. I'm not sure why this isn't already done by the installer. The symptom I saw was weird errors on 'bundle install' that was fixed by this.

Installing Rails

Then, from inside c:\inetpub\wwwroot\rails, I ran "rails new helloworld." I ended up moving this folder up. I should have just made the app first, then converted the folder to an app in IIS. Order of operations and all that, eh?

OK, now I'll "rails server" from within c:\inetpub\wwwroot\rails, just to make sure Rails can run under the local WEBrick server. And it does:

Rails on Windows

Now, let's do it under IIS.

I need to make sure there's a web.config file in the same root folder as my Rails app. WHAT?!? Web.config is for ASP.NET, right? Well, no. It's config for any IIS application. You'll need this for Go, Java, PHP, Rails, node, ASP.NET, whatever. IIS can host basically anything.

Lemme add a hello world controller and edit its view. I'll "rails generate controller welcome index" then edit app\views\welcome\index.html.erb for good measure.

I put my Rails app under http://localhost/rails rather than at the root http://localhost so I did need to tell Rails 4 about the fact it's running in a subdirectory with a change to /config.ru, otherwise my routes wouldn't line up.

Rails.application.config.relative_url_root = '/rails' map Rails.application.config.relative_url_root || "/" do   run Rails.application end

Make special note of the paths below AND the encoded &quot; there in the arguments. That's important, because it's a quoted argument passed into the ruby.exe process that IIS will kick off. Note also the %HTTP_PLATFORM_PORT% environment variable reference. That is passed in by IIS and will be a localhost-bound high port.

I also put in foo and bar for theoretical environment variables you might want your Rails app to know about. For example, I might add:

<environmentVariable name="RAILS_ENV" value="production"/>

...when it's time. I put in some standard debug logging there with the "stdout" but you can remove that if you don't want the clutter. Make sure your IISR_ users have write access to the folders if you want to see any logs.

WARNING/DISCLAIMER: This first example is just showing you what's possible. You DON'T want to go to production with the little built-in Ruby WEBrick web server. As Fabio Akita very kindly points out in the comments, and I'll pull his comment out here:

"One thing to be careful with the example using Rails. When running Ruby for Windows, when you run "rails server" it's going to spawn a single process that's mono-threaded, meaning that it can only respond to 1 request at a time. If IIS starts receiving too many requests simultaneously and each request is slow, it's going to generate a long queue until they start timing out.
In Linux we put NGINX to reverse-proxy HTTP requests to Unicorn, or Puma, or Rainbows, or Passenger. They all coordinate multiple Ruby processes (which in Unix, is very cheap as each process reuses memory from it's parent process upon forking - copy-on-write memory). So we can handle simultaneous requests."

You'd want to use JRuby and Tomcat with Puma under IIS for production on Windows.

KEEP SCROLLING FOR EXAMPLES USING JRuby, Trinidad/Tomcat, and Puma! They are farther down the page.

Also, on slower machines when running in development, you might need to up your startupTimeLimit if you are seeing IIS stop your Ruby processes that take to long to startup.

<?xml version="1.0" encoding="UTF-8"?>

<configuration>
<system.webServer>
<handlers>
<add name="httpplatformhandler" path="*" verb="*" modules="httpPlatformHandler" resourceType="Unspecified" requireAccess="Script" />
</handlers>
<httpPlatform stdoutLogEnabled="true" stdoutLogFile="rails.log" startupTimeLimit="20" processPath="c:\RailsInstaller\Ruby2.1.0\bin\ruby.exe"
arguments="&quot;C:\RailsInstaller\Ruby2.1.0\bin\rails&quot; server -p %HTTP_PLATFORM_PORT% -b 127.0.0.1">
<environmentVariables>
<environmentVariable name="foo" value="bar"/>
</environmentVariables>
</httpPlatform>
</system.webServer>
</configuration>

Here's a screenshot of Ruby within the SysInternals Process Explorer application. I wanted to show you this so you could see the Process Tree and see who started which process. You can see w3wp (that's IIS) which is a Service, and it's hosting Ruby, running Rails. Make note of the command line arguments as well.

image

And here it is. Ruby on Rails 4 running under IIS8 on my Windows 8 machine.

Ruby on Rails on IIS on Windows

Big thanks to Ranjith Ramachandra (@ranjithtweets) and Andrew Westgarth (@apwestgarth) at Microsoft for the help with the web.config values!

TL;DR

So, basically, to give you the TL;DR version, except at the end. When you have IIS, install HttpPlatformHandler and add a web.config as appropriate and you're all set. Run what you like, passing in the port that IIS will proxy to.

UPDATE: Puma and Trinidad (with Tomcat) on IIS

As pointed out in the comments, it's silly to use WEBrick in Production. Don't'.

I'm told JRuby is the way to go for prod. I was able to install JRuby and both Trinidad (with Tomcast) and Puma and get my HelloWorld running under IIS in an hour.

Here's Trinidad (I'm told Trinidad is out of vogue, however). I did a "JRuby -S gem install trinidad" and was on my way.

Note the JAVA_HOME environment variable setting. I also had to update some security policy files due to a "Illegal key size" error which was a Javaism. Otherwise, it just worked once the paths lined up. If you see problem, it'll be path related or you'll be loading the wrong Java version. Also, experiment but you don't really need to mess with processesPerApplications. If you create a lot of individual processes, Java can take up a lot of memory (300megs or so) per process and you can thrash your system.y

You'll get 10x the perf when running under production, so note I'm explicitly running in the prod environment.

<?xml version="1.0" encoding="UTF-8"?>

<configuration>
<system.webServer>
<handlers>
<add name="httpplatformhandler" path="*" verb="*" modules="httpPlatformHandler" resourceType="Unspecified" requireAccess="Script" />
</handlers>
<httpPlatform stdoutLogEnabled="false" processesPerApplication="1" stdoutLogFile="rails.log" startupTimeLimit="20" processPath="C:\jruby-1.7.19\bin\jruby.exe"
arguments="-S trinidad --context /jRubyonRails --env production --dir C:\inetpub\wwwroot\jRubyonRails -p %HTTP_PLATFORM_PORT% ">
<environmentVariables>
<environmentVariable name="JAVA_HOME" value="C:\Program Files\Java\jre1.8.0_31"/>
</environmentVariables>
</httpPlatform>
</system.webServer>
</configuration>

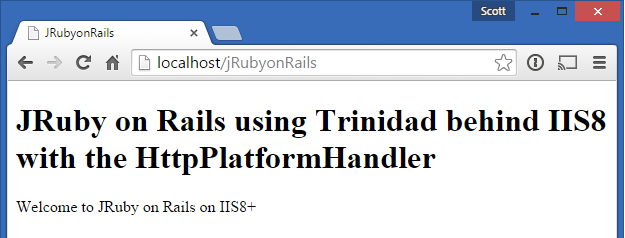
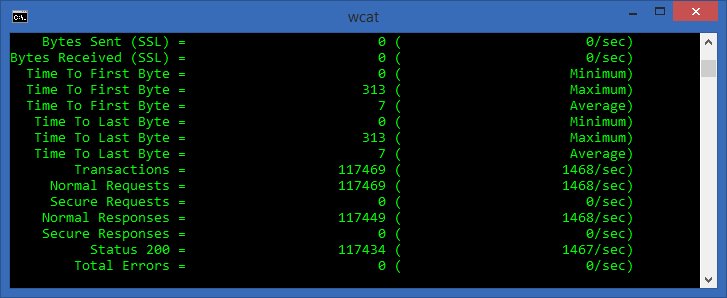
And it works. I was easily able to get 1600+ req/sec on my laptop with minimal effort. I'm sure I could do better with some tuning and a better machine.

JRuby on Rails using Trinidad behind IIS8 with the HttpPlatformHandler

OK, let's swap out Trindad/Tomcat for Puma. I put Puma in the Gemfile and did "bundle exec puma" to test. That worked. Now I need to hook it into IIS. I also had to add gem 'jruby-openssl', :require => false to  my Gemfile to avoid some weird errors.

Basically it was the same thing, as IIS is the reverse proxy and process manager in this case.

<?xml version="1.0" encoding="UTF-8"?>

<configuration>
<system.webServer>
<handlers>
<add name="httpplatformhandler" path="*" verb="*" modules="httpPlatformHandler" resourceType="Unspecified" requireAccess="Script" />
</handlers>
<httpPlatform stdoutLogEnabled="false" processesPerApplication="1" stdoutLogFile="rails.log" startupTimeLimit="20" processPath="C:\jruby-1.7.19\bin\jruby.exe"
arguments="-S puma --env production --dir C:\inetpub\wwwroot\jRubyonRails -p %HTTP_PLATFORM_PORT% ">
<environmentVariables>
<environmentVariable name="JAVA_HOME" value="C:\Program Files\Java\jre1.8.0_31"/>
</environmentVariables>
</httpPlatform>
</system.webServer>
</configuration>

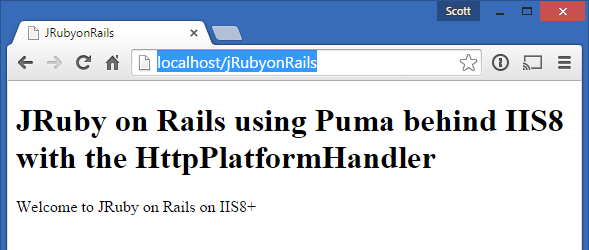
I'm using just 1 processPerApplication and I'm getting 1500 req/s easily. I don't know anything about Puma or JRuby but I assume it can do better if I knew how to tune it.

Load testing JRuby on Windows under IIS

I tested without IIS against Puma itself and saw essentially the same results. IIS has minimal overhead that I can't measure in this case and you get its process management and other benefits. If you're having issues with perf doing this kind of stuff, it's unlikely it will be IIS.

JRuby on Rails using Puma with the HttpPlatformHandler

All in all, the HttpPlatformHandler just maybe the reverse proxy you've always wanted for Windows!

Related Links


Sponsor: Big thanks to Infragistics for sponsoring the feed this week! Responsive web design on any browser, any platform and any device with Infragistics jQuery/HTML5 Controls.  Get super-charged performance with the world’s fastest HTML5 Grid – Download for free now!


© 2014 Scott Hanselman. All rights reserved.
     

JavaScript Has Won: Run Flash with Mozilla Shumway and Develop Silverlight in JS with Fayde

$
0
0

Well this is some amazing news that has been a long time coming. You can take your Flash apps and run them without Flash, and take your Silverlight apps and (almost) run them without Silverlight.

If you still don't think JavaScript has won the web, please read on.

Shumway - Flash in JavaScript and HTML 5

The Mozilla Project "Shumway" has been a long time coming (as long ago as 2012, but it's now ready to be looked at more deeply).

Chris Peterson, a Program Manager on the Mozilla Shumway says:

"Shumway is in a race to stay relevant as Flash fades from the web, but there will always be a long-tail of Flash content that would/will be lost when Adobe or browsers stop supporting the Flash plugin."

Think about that. We've all largely got "Evergreen Browsers" now that update themselves as often as weekly, but sometimes it feels like Adobe Flash is being attacked daily, so we're told to update that as well. Flash itself has more than fallen from grace, as Chris points out, it's fading from the web itself. Fast forward a year or so when there is no more Flash installed, but there's still Flash on the web. Enter Shumway - it's a renderer for SWF (Flash files) without native code! Shumway literally.

Why is it called Shumway? Again, Chris:

"The name "Shumway" is derived from "Gordon Shumway", the actual name of the TV character ALF: Flash -> Flash Gordon -> Gordon Shumway -> Shumway."

That's awesome. What else is awesome? "Shumway is written in TypeScript. It has an ActionScript interpreter and a JIT that generates JavaScript, compiled using eval()."

Shumway makes Flash into HTML5

So Shumway is an HTML experiment that uses TypeScript (a modern typed JavaScript compiler/transpiler) to read ActionScript and resources and JIT the result into evaluated JavaScript. Fantastic. It's also open source and on GitHub. Even better, the Firefox Nightly is using Shumway for Flash videos on Amazon.com. This is the beginning of their test, I presume, to sunset Flash in Firefox.

Fayde - Silverlight in JavaScript and HTML5 Canvas

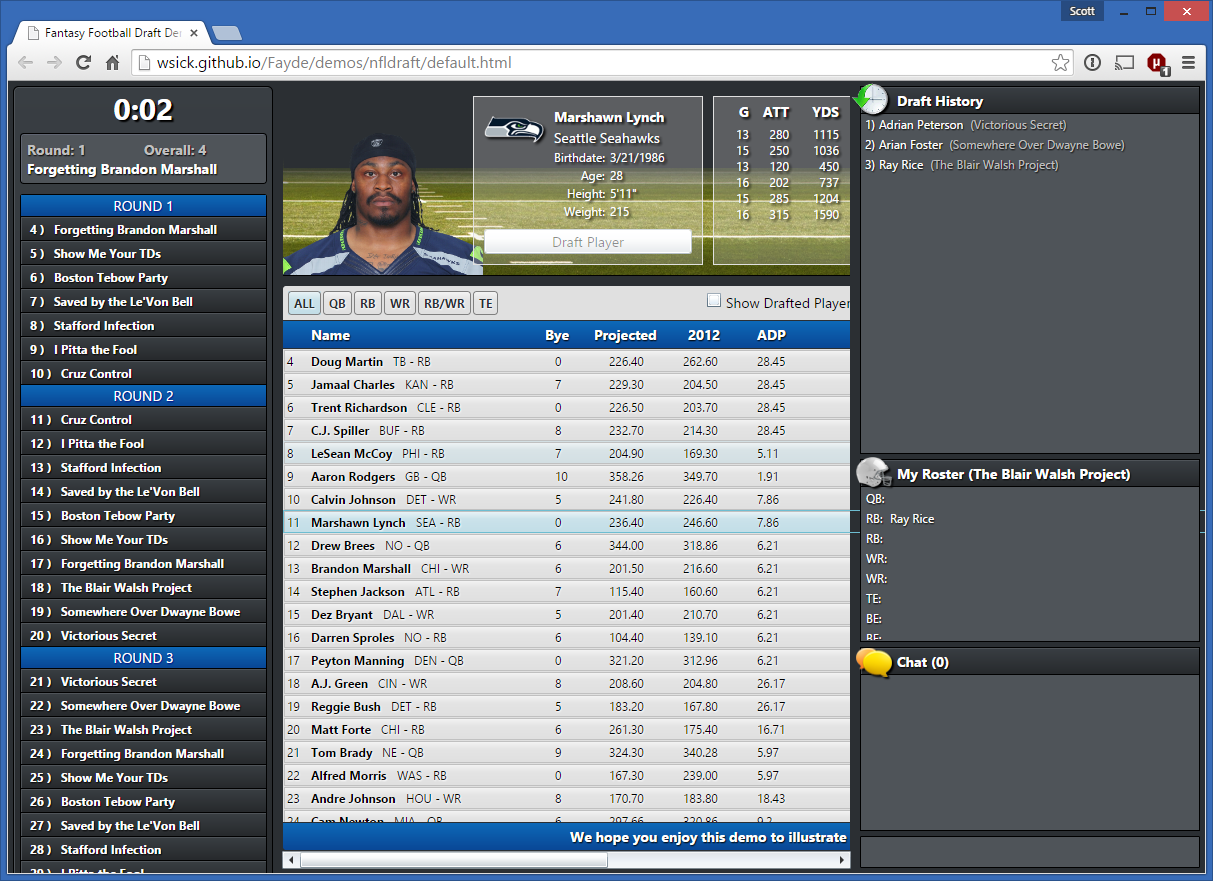
At the same time, there's The Fayde project. Also Open Source, Fayde also compiles to JavaScript. But Fayde transforms Silverlight into HTML5 Canvas and JavaScript! It's an implementation of a XAML engine in JS. Here's a near-Silverlight implementation of the classic Todo application, expressed on the web without plugins. Not enough? Here's a complex Fantasy Football app written in a Silverlight-like environment but running in your browser, again, without Silverlight.

Fayde - Silverlight in HTML5

To be clear, there are significant architectural differences between these two projects. Shumway reads the binary SWF format and tries to Be Flash, while Fayde is reimagining, if you will, that takes the Silverlight concepts of ViewModels and Views in XAML and adds TypeScript (a comfortable language for the C#-familiar) with the result rendered on a Canvas. It's not a Silverlight Emulator, it's a Silverlight-like implementation and app development pattern for HTML5. It's open source, and they are looking for participation, so head over and get involved! Fayde may be the Silverlight migration strategy you've been looking for.

Aside: From my perspective, it's not unreasonable to imagine taking something like JSIL (listen to my podcast on this amazing project) or a similar IL->JS system and combine it with Fayde to somehow run XAPs as well.

I love how crazy JavaScript is and what people have been able to do with it. Now, go run this PC Emulator (~virtual machine) written by Fabrice Bellard in JavaScript. It's Linux, on a 486, in your browser, in JavaScript. *brain explodes*

Have a lovely day and enjoy today's Open Web.


© 2015 Scott Hanselman. All rights reserved.
     

NuGet Package of the Week: A different take on ASP.NET MVC Forms with ChameleonForms

$
0
0

One of the nice things about any modular system (like ASP.NET) is the ability to swap out the parts you don't like. As the authors of ChameleonForms state, HTML forms is a pain. It's repetitive, it's repetitive, and it's boring. While ASP.NET MVC's Form Helpers help a lot, they felt that helper methods like Html.EditorForModel didn't go far enough or give you enough flexibility. ChameleonForms adds its own templating model and attempts to be as DRY as possible. It also takes a number of issues head on like better handling for drop-down lists and lists of radio buttons, and it even supports Twitter Bootstrap 3 to you can bang out HTML forms ASAP.

ChameleonForms also is a nice example of a tidy and well-run small open source project. They've got a public Trello backlog board, excellent documentation, a continuous integration build, a good example project, and of course, they're on NuGet. Check out the other projects that the folks in the "MRCollective" work on as well, as they've got their own GitHub organization.

NuGet Install ChameleonForms

Often ChameleonForms tries to use C# for the whole form, rather than switching back and forth from Div to Html Helper. For example:

@using (var f = Html.BeginChameleonForm()) {

using (var s = f.BeginSection("Signup for an account")) {
@s.FieldFor(m => m.FirstName)
@s.FieldFor(m => m.LastName)
@s.FieldFor(m => m.Mobile).Placeholder("04XX XXX XXX")
@s.FieldFor(m => m.LicenseAgreement).InlineLabel("I agree to the terms and conditions")
}
using (var n = f.BeginNavigation()) {
@n.Submit("Create")
}
}

This is the whole form using usings for scoping, and it's nice and clean.  How about a comparison example? Here's standard ASP.NET MVC:

@using (Html.BeginForm())

{
<fieldset>
<legend>A form</legend>
<dl>
<dt>@Html.LabelFor(m => m.RequiredString, "Some string")</dt>
<dd>@Html.TextBoxFor(m => m.RequiredString) @Html.ValidationMessageFor(m => m.RequiredString)</dd>
<dt>@Html.LabelFor(m => m.SomeEnum)</dt>
<dd>@Html.DropDownListFor(m => m.SomeEnum, Enum.GetNames(typeof(SomeEnum)).Select(x => new SelectListItem {Text = ((SomeEnum)Enum.Parse(typeof(SomeEnum), x)).Humanize(), Value = x})) @Html.ValidationMessageFor(m => m.SomeEnum)</dd>
<dt>@Html.LabelFor(m => m.SomeCheckbox)</dt>
<dd>@Html.CheckBoxFor(m => m.SomeCheckbox) @Html.LabelFor(m => m.SomeCheckbox, "Are you sure?") @Html.ValidationMessageFor(m => m.SomeCheckbox)</dd>
</dl>
</fieldset>
<div class="form_navigation">
<input type="submit" value="Submit" />
</div>
}

And here is the same form with ChameleonForms.

@using (var f = Html.BeginChameleonForm()) {

using (var s = f.BeginSection("A form")) {
@s.FieldFor(m => m.RequiredString).Label("Some string")
@s.FieldFor(m => m.SomeEnum)
@s.FieldFor(m => m.SomeCheckbox).InlineLabel("Are you sure?")
}
using (var n = f.BeginNavigation()) {
@n.Submit("Submit")
}
}

But these are basic. How about something more complex? This one has a bunch of variety, a number overloads and customizations, as well as a FileUpload (note that the form is a Multipart form):

@using (var f = Html.BeginChameleonForm(method: FormMethod.Post, enctype: EncType.Multipart))

{
<p>@f.LabelFor(m => m.SomeCheckbox).Label("Are you ready for: ") @f.FieldElementFor(m => m.SomeCheckbox) @f.ValidationMessageFor(m => m.SomeCheckbox)</p>
<p>@f.FieldElementFor(m => m.RequiredStringField).TabIndex(4)</p>
using (var s = f.BeginSection("My Section!", InstructionalText(), new{@class = "aClass"}.ToHtmlAttributes()))
{
using (var ff = s.BeginFieldFor(m => m.RequiredStringField, Field.Configure().Attr("data-some-attr", "value").TabIndex(3)))
{
@ff.FieldFor(m => m.NestedField).Attr("data-attr1", "value").TabIndex(2)
@ff.FieldFor(m => m.SomeEnum).Attr("data-attr1", "value")
@ff.FieldFor(m => m.SomeEnum).Exclude(SomeEnum.SomeOtherValue)
}
@s.FieldFor(m => m.SomeCheckbox).AsDropDown()
using (var ss = s.BeginSection("Nested section"))
{
@ss.FieldFor(m => m.FileUpload).Attr("data-attr1", "value")
}
@s.FieldFor(m => m.RequiredStringField).OverrideFieldHtml(new MvcHtmlString("Custom html <b>she-yeah</b>!"))
@s.FieldFor(m => m.TextAreaField).Cols(60).Rows(5).Label("Some Label").AutoFocus().TabIndex(1)
@s.FieldFor(m => m.SomeCheckbox).InlineLabel("Some label").WithHint("Format: XXX")
@s.FieldFor(m => m.SomeCheckbox).AsRadioList().WithTrueAs("True").WithFalseAs("False")
@s.FieldFor(m => m.ListId)
@s.FieldFor(m => m.ListId).AsRadioList()
@s.FieldFor(m => m.SomeEnums)
@s.FieldFor(m => m.SomeEnumsList).AsRadioList()
@s.FieldFor(m => m.Decimal)
@s.FieldFor(m => m.Int).AsInputGroup().Append(".00").Prepend("$")
@s.FieldFor(m => m.DecimalWithFormatStringAttribute)
@s.FieldFor(m => m.NullableInt)
@s.FieldFor(m => m.Child.ChildField)
@s.FieldFor(m => m.Child.SomeEnum).AsRadioList()
@s.FieldFor(m => m.RequiredStringField).Disabled()
@s.FieldFor(m => m.RequiredStringField).Readonly()
}
using (var n = f.BeginNavigation())
{
@n.Submit("Submit")
@n.Reset("Reset")
}
}

ChameleonForms also has a special NuGet package if you're using TwitterBootstrap that changes how forms with the BeginChameleonForm method render.

ChameleonForms also has some convenient extra abilities, like being able to automatically infer/create a [DisplayName] so you don't have to. If you're doing Forms in English and your preferred Display Name will end up just being your variable name this can be a useful time saver (although you may have opinions about its purity.)

So instead of the tedium of:

[DisplayName("Email address")]

public string EmailAddress { get; set; }

[DisplayName("First name")]
public string FirstName { get; set; }

You can just say this once, picking just one...this is an example where they use HumanizedLabels.

HumanizedLabels.Register(LetterCasing.AllCaps) => "EMAIL ADDRESS"

HumanizedLabels.Register(LetterCasing.LowerCase) => "email address"
HumanizedLabels.Register(LetterCasing.Sentence) => "Email address"
HumanizedLabels.Register(LetterCasing.Title) => "Email Address"

If you've got a lot of Forms to create and they're just no fun anymore, you should definitely give ChameleonForms a try. If you're a Twitter Bootstrap shop, doubly so, as that's where ChameleonForms really shines.

I'll do a few other posts exploring different ways to for Forms in ASP.NET MVC in the coming weeks. Be sure to explore the NuGet Package of the Week Archives as well!


PLUG: Did you know I have a YouTube channel? Subscribe over here. I've got tutorials on how to effectively use Windows 8 and 8.1, Build to Build walkthroughs of the latest versions of Windows 10, and I just started a new series I'm sure you'll want to share with your family called "How to REALLY use Microsoft Office." Help me out and spread the word!


© 2015 Scott Hanselman. All rights reserved.
     

Proper benchmarking to diagnose and solve a .NET serialization bottleneck

$
0
0

From http://adrianotto.com/2010/08/dev-null-unlimited-scale/Here's a few comments and disclaimers to start with. First, benchmarks are challenging. They are challenging to measure, but the real issue is that often we forget WHY we are benchmarking something. We'll take a complex multi-machine financial system and suddenly we're hyper-focused on a bunch of serialization code that we're convinced is THE problem. "If I can fix this serialization by writing a 10,000 iteration for loop and getting it down to x milliseconds, it'll be SMOOOOOOTH sailing."

Second, this isn't a benchmarking blog post. Don't point this blog post and say "see! Library X is better than library Y! And .NET is better than Java!" Instead, consider this a cautionary tale, and a series of general guidelines. I'm just using this anecdote to illustrate these points.

  • Are you 100% sure what you're measuring?
  • Have you run a profiler like the Visual Studio profiler or DotTrace?
  • Are you considering warm-up time? Throwing out outliers? Are your results statistically significant?
  • Are the libraries you're using optimized for your use case? Are you sure what your use case is?

A bad benchmark

A reader sent me a email recently with concern of serialization in .NET. They had read some very old blog posts from 2009 about perf that included charts and graphs and did some tests of their own. They were seeing serialization names (of tens of thousands of items) over 700ms and sizes nearly 2 megs. The tests included serialization of their typical data structures in both C# and Java across a number of different serialization libraries and techniques. Techniques included their company's custom serialization, .NET binary DataContract serialization, as well as JSON.NET. One serialization format was small (1.8Ms for a large structure) and one was fast (94ms) but there was no clear winner. This reader was at their wit's end and had decided, more or less, that .NET must not be up for the task.

To me, this benchmark didn't smell right. It wasn't clear what was being measured. It wasn't clear if it was being accurately measured, but more specifically, the overarching conclusion of ".NET is slow" wasn't reasonable given the data.

Hm. So .NET can't serialize a few tens of thousands of data items quickly? I know it can.

Related Links: Create benchmarks and results that have value and Responsible benchmarking by @Kellabyte

I am no expert, but I poked around at this code.

First: Are we measuring correctly?

The tests were using DateTime.UtcNow which isn't advisable.

startTime = DateTime.UtcNow;

resultData = TestSerialization(foo);
endTime = DateTime.UtcNow;

Do not use DateTime.Now or DateTime.Utc for measuring things where any kind of precision matters. DateTime doesn't have enough precision and is said to be accurate only to 30ms.

DateTime represents a date and a time. It's not a high-precision timer or Stopwatch.

As Eric Lippert says:

In short, "what time is it?" and "how long did that take?" are completely different questions; don't use a tool designed to answer one question to answer the other.

And as Raymond Chen says:

"Precision is not the same as accuracy. Accuracy is how close you are to the correct answer; precision is how much resolution you have for that answer."

So, we will use a Stopwatch when you need a stopwatch. In fact, before I switch the sample to Stopwatch I was getting numbers in milliseconds like 90,106,103,165,94, and after Stopwatch the results were 99,94,95,95,94. There's much less jitter.

Stopwatch sw = new Stopwatch();

sw.Start();

// stuff

sw.Stop();

You might also want to pin your process to a single CPU core if you're trying to get an accurate throughput measurement. While it shouldn't matter and Stopwatch is using the Win32 QueryPerformanceCounter internally (the source for the .NET Stopwatch Class is here) there were some issues on old systems when you'd start on one proc and stop on another.

// One Core

var p = Process.GetCurrentProcess();
p.ProcessorAffinity = (IntPtr)1;

If you don't use Stopwatch, look for a  simple and well-thought-of benchmarking library.

Second: Doing the math

In the code sample I was given, about 10 lines of code were the thing being measured, and 735 lines were the "harness" to collect and display the data from the benchmark. Perhaps you've seen things like this before? It's fair to say that the benchmark can get lost in the harness.

Have a listen to my recent podcast with Matt Warren on "Performance as a Feature" and consider Matt's performance blog and be sure to pick up Ben Watson's recent Book called "Writing High Performance .NET Code".

Also note that Matt is currently exploring creating a mini-benchmark harness on GitHub. Matt's system is rather promising and would have a [Benchmark] attribute within a test.

Considering using an existing harness for small benchmarks. One is SimpleSpeedTester from Yan Cui. It makes nice tables and does a lot of the tedious work for you. Here's a screenshot I stole borrowed from Yan's blog.

image11

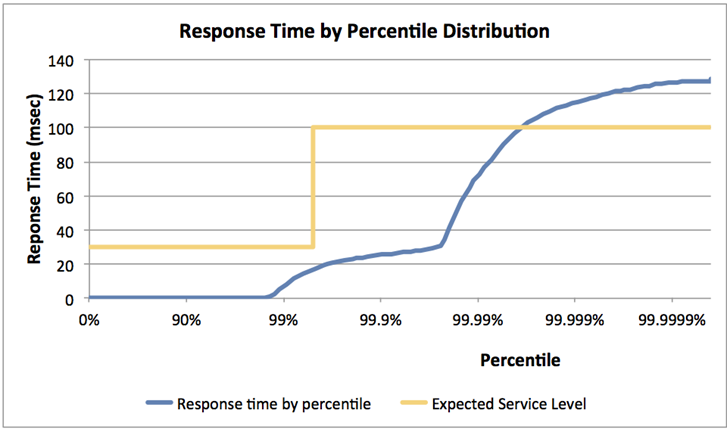
Something a bit more advanced to explore is HdrHistogram, a library "designed for recoding histograms of value measurements in latency and performance sensitive applications." It's also on GitHub and includes Java, C, and C# implementations.

PercentileHistogramExample

And seriously. Use a profiler.

Third: Have you run a profiler?

Use the Visual Studio Profiler, or get a trial of the Redgate ANTS Performance Profiler or the JetBrains dotTrace profiler.

Where is our application spending its time? Surprise I think we've all seen people write complex benchmarks and poke at a black box rather than simply running a profiler.

Visual Studio Profiler

Aside: Are there newer/better/understood ways to solve this?

This is my opinion, but I think it's a decent one and there's numbers to back it up. Some of the .NET serialization code is pretty old, written in 2003 or 2005 and may not be taking advantage of new techniques or knowledge. Plus, it's rather flexible "make it work for everyone" code, as opposed to very narrowly purposed code.

People have different serialization needs. You can't serialize something as XML and expect it to be small and tight. You likely can't serialize a structure as JSON and expect it to be as fast as a packed binary serializer.

Measure your code, consider your requirements, and step back and consider all options.

Fourth: Newer .NET Serializers to Consider

Now that I have a sense of what's happening and how to measure the timing, it was clear these serializers didn't meet this reader's goals. Some of are old, as I mentioned, so what other newer more sophisticated options exist?

There's two really nice specialized serializers to watch. They are Jil from Kevin Montrose, and protobuf-net from Marc Gravell. Both are extraordinary libraries, and protobuf-net's breadth of target framework scope and build system are a joy to behold. There are also other impressive serializers in including support for not only JSON, but also JSV and CSV in ServiceStack.NET.

Protobuf-net - protocol buffers for .NET

Protocol buffers are a data structure format from Google, and protobuf-net is a high performance .NET implementation of protocol buffers. Think if it like XML but smaller and faster. It also can serialize cross language. From their site:

Protocol buffers have many advantages over XML for serializing structured data. Protocol buffers:

  • are simpler
  • are 3 to 10 times smaller
  • are 20 to 100 times faster
  • are less ambiguous
  • generate data access classes that are easier to use programmatically

It was easy to add. There's lots of options and ways to decorate your data structures but in essence:

var r = ProtoBuf.Serializer.Deserialize<List<DataItem>>(memInStream);

The numbers I got with protobuf-net were exceptional and in this case packed the data tightly and quickly, taking just 49ms.

JIL - Json Serializer for .NET using Sigil

Jil s a Json serializer that is less flexible than Json.net and makes those small sacrifices in the name of raw speed. From their site:

Flexibility and "nice to have" features are explicitly discounted in the pursuit of speed.

It's also worth pointing out that some serializers work over the whole string in memory, while others like Json.NET and DataContractSerializer work over a stream. That means you'll want to consider the size of what you're serializing when choosing a library.

Jil is impressive in a number of ways but particularly in that it dynamically emits a custom serializer (much like the XmlSerializers of old)

Jil is trivial to use. It just worked. I plugged it in to this sample and it took my basic serialization times to 84ms.

result = Jil.JSON.Deserialize<Foo>(jsonData);

Conclusion: There's the thing about benchmarks. It depends.

What are you measuring? Why are you measuring it? Does the technique you're suing handle your use case? Are you serializing one large object or thousands of small ones?

James Newton-King made this excellent point to me:

"[There's a] meta-problem around benchmarking. Micro-optimization and caring about performance when it doesn't matter is something devs are guilty of. Documentation, developer productivity, and flexibility are more important than a 100th of a millisecond."

In fact, James pointed out this old (but recently fixed) ASP.NET bug on Twitter. It's a performance bug that is significant, but was totally overshadowed by the time spent on the network.

Thanks to Marc Gravell and James Newton-King for their time helping with this post.

What are your benchmarking tips and tricks? Sound off in the comments!


© 2015 Scott Hanselman. All rights reserved.
     

Running the Ruby Middleman Static Site Generator on Microsoft Azure

$
0
0

Middleman is "a static site generator using all the shortcuts and tools in modern web development." With any static site generator you can run it all locally and then push/FTP/whatever the resulting HTML to any host. However, static site generators are even more fun when you can host the source code in Git and have your static site build and deploy in the cloud.

Middleman uses Ruby for its build system and views, and some of the Gems it uses are native gems. That means if you are a Windows user, your system will need not just Ruby, but the Ruby DevKit so you can build those native gems. The DevKit is a lovely set of tools that "makes it easy to build and use native C/C++ extensions such as RDiscount and RedCloth for Ruby on Windows."

Azure Websites supports not just ASP.NET today, but also node.js, PHP, Python, and Java, all built in. But not Ruby, directly, yet. Also, Azure Websites doesn't know formally about the idea of a static site generator. You might be thinking, oh, this'll be hard, I'll need to use a VM and do this myself.

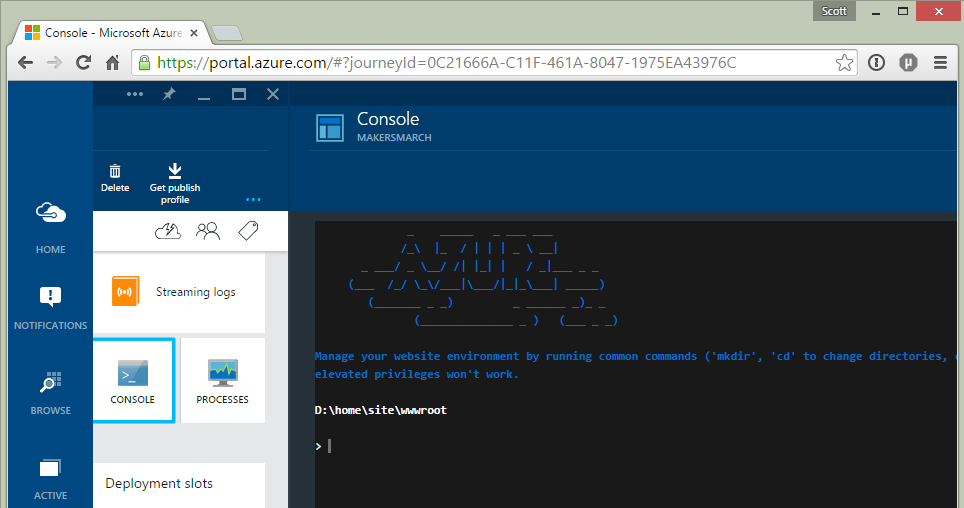
However, even though Azure Websites are totally "platform as a service" there's still a Windows Virtual Machine underneath, and you can use the disk space however you like. You've got a LOT of control and can even get a hold of a console where you can run commands and install stuff. The Azure Portal lets you open a command line from your website.

The New Azure Portal

Check me out, here in the new Azure Portal. This is where I did my practice work to see if I could programmatically download and install Ruby via a script. I tried a number of different commands, all from the browser, and explored a number of ideas. When I got it working, I put together a batch file called GetRuby. I could have also used a shell script or PowerShell, but Batch was easy given what I was doing.

ASIDE: You may recognize that console from this video I did about the "Super Secret Debug Console" in Azure. It's not so secret now, it's a feature.  There is still a cool debug "sidecar" website for every Azure site, it's at http://YOURSITENAME.scm.azurewebsites.net/DebugConsole but now a version of the console is in the portal as well.

Azure Websites uses an open source project called Kudu to deploy from locations with source like Github. Kudu supports custom deployment scripts where you can jump in and do whatever you like (within the limits of the security sandbox)

Basically I needed to do these things before running Middleman on my source:

  • Ensure Ruby is installed and in the path.
  • Ensure the DevKit (which includes native compilers, etc) is installed
  • Initialize and setup DevKit for builds
  • Update RubyGems to 2.2.3 until the Windows version of Ruby has this included
  • Install eventmachine 1.0.7, a problematic gem on Windows
  • Run the Ruby Bundler's update
  • Install Middleman

And then, every deployment run the Middleman static site generator.

  • Middleman build

The first part is a one time thing for a new website. I just need to make sure Ruby is around and in the path. The second part is what runs every time a source file for my static site generator is checked in. It runs middleman build. Then at the very end, Kudu takes the results from the /build folder and moves them to /wwwroot, which makes the changes live.

Here's an annotated part of the first bit, but the actual file is on GitHub. Note that I'm putting stuff in %temp% for speed. Turns out %temp% a local drive, so it's a few times faster than using the main drive, which makes this deployment faster. However, it's cleared out often, so if I wanted things to be persistent but slower to deploy, I'd put them in D:\deployments\tools. As it is, the deploy is fast (less than a minute) when Ruby is there, and just about 3 minutes to get and setup Ruby when it's not. The exists check handles the case when a deploy happens but %temp% has been cleared so it'll get Ruby again.

NOTE: If this seems confusing or complex, it's because I like to give folks LOTS of detail. But just look at my repository. All we have is a standard "Middleman init" site plus the Azure-generator deploy.cmd and my getruby.cmd. That's all you need, plus a Basic Azure Website. The getruby.cmd is my automating what you'd have to any way on a Windows machine without Ruby.

REM Note that D:\local\temp is a LOCAL drive on Azure, and very fast

SET PATH=%PATH%;D:\local\temp\r\ruby-2.1.5-x64-mingw32\bin

pushd %temp%
REM If you need things to be persistent, then put them elsewhere, not in TEMP
if not exist r md r
cd r
if exist ruby-2.1.5-x64-mingw32 goto end

echo No Ruby, need to get it!

REM Get 64-bit Ruby
curl -o ruby215.zip http://dl.bintray.com/oneclick/rubyinstaller/ruby-2.1.5-x64-mingw32.7z?direct
ECHO START Unzipping Ruby. 7Zip is already on Azure Websites
REM Note Azure deployments run faster with 7Zip not spewing so much. Redirect to a file.
d:\7zip\7za x -y ruby215.zip > out

REM Get DevKit to build Ruby native gems
REM If you don't need DevKit for your Gems, rem this out.
curl -o DevKit.zip http://cdn.rubyinstaller.org/archives/devkits/DevKit-mingw64-64-4.7.2-20130224-1432-sfx.exe
ECHO START Unzipping DevKit
d:\7zip\7za x -y -oDevKit DevKit.zip > out
ECHO DONE Unzipping DevKit

ruby DevKit\dk.rb init

REM Tell DevKit where Ruby is
echo --- > config.yml
echo - d:/local/temp/r/ruby-2.1.5-x64-mingw32 >> config.yml

REM Setup DevKit
ruby DevKit\dk.rb install

REM Update Gem223 until someone fixes the Ruby Windows installer https://github.com/oneclick/rubyinstaller/issues/261
curl -L -o update.gem https://github.com/rubygems/rubygems/releases/download/v2.2.3/rubygems-update-2.2.3.gem
call gem install --local update.gem
call update_rubygems --no-ri --no-rdoc > updaterubygemsout
ECHO What's our new Rubygems version?
call gem --version
call gem uninstall rubygems-update -x

REM This is needed on Windows, why is this gem such a problem?
ECHO Install eventmachine 1.0.7
call gem install eventmachine -v '1.0.7' --no-ri --no-rdoc > updateventmachineout

call bundle update

ECHO Install middleman...the whole point!
call gem install middleman --no-ri --no-rdoc

:end
popd

call middleman build

REM KuduSync and actual /build to /wwwroot is after this in deploy.cmd!

And in the Deploy.cmd all I needed to change was this under SETUP. This is where YOU can do whatever you like. Note since I'm using Batch, I need to put CALL in front of other Batch files (and Ruby uses them also!) otherwise my script will just end early.

ECHO CALLING GET RUBY


call getruby.cmd

ECHO WE MADE IT

Then later, still in Deploy.cmd, I just added \build to the source directory name.

call :ExecuteCmd "%KUDU_SYNC_CMD%" -v 50 -f "%DEPLOYMENT_SOURCE%\build" -t "%DEPLOYMENT_TARGET%" -n "%NEXT_MANIFEST_PATH%" -p "%PREVIOUS_MANIFEST_PATH%" -i ".git;.hg;.deployment;deploy.cmd"

And that's it.  Now whenever I updated my views or other things in my Middleman source on GitHub, it automatically deploys to my live site.

Yes, again, to be clear, I realize it's a static site generator that I could run locally and FTP the results, but I'm working in a small team and this is a great way for us to collaborate on our static site. Plus, when it's done, it's all done and I don't have to mess with it again.

Middleman Static Site Generator on Azure

Debugging Custom Azure Website Deployments

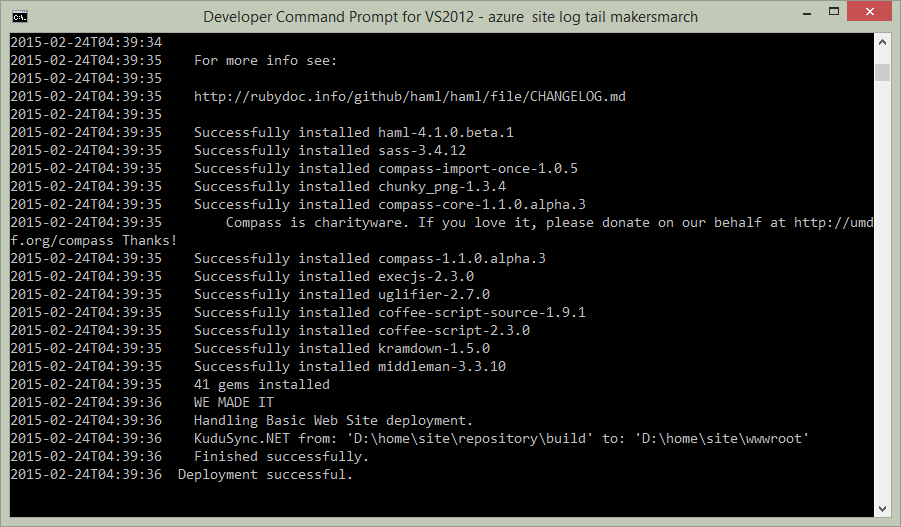
I thought debugging my GetRuby batch file was going to be a nightmare. However, it turns out that the Azure cross-platform command line (the Azure x-plat CLI, open source, and written in nodejs, BTW) can connect to Azure's log streaming service. "Azure Site Log Tail" lets me see the LIVE console output as the deploy happens!

Azure Site Log Tail

Now, note that the need for this whole "getruby.bat" file totally goes away if the Azure Websites folks start including Ruby and DevKit in the Azure Websites VM image by default. That would make Ruby, Rails, Gems, DevKit, etc. available to everyone. Do you want Ruby on Azure? Do you care? Sound off in the comments!

HELP: The batch file could use more testing, especially for robustness as well as Ruby-correctness as I'm likely confused about a few things, but it works for me and it's a great start. Sometimes different native gems don't build, though, or Gems complains about conflicting versions and asks me to run Bundler. I have no idea why. Running things twice clears it. It's either my bug or someone else's. :)

I'm just happy that Azure Websites is as flexible as it is that I was able to console into it from the browser, look around, add my own custom deployment hook, and do something I initially didn't think was possible!

Give Azure Websites a try FOR FREE, no signup, no credit card for an hour in a sandbox with PHP, Node, ASP.NET, or Java at http://try.azurewebsites.net. (Full Disclosure, I helped a little with this site, so I'm a fan.)

Related Links


© 2015 Scott Hanselman. All rights reserved.
     

How to run ASP.NET 5 Beta 3 or GoLang on a Raspberry Pi 2

$
0
0
Hanselman's Desk of Hardware

Hanselminutes and CodeNewbie are teaming up to produce two new podcast episodes a week for the month of March, featuring incredible makers in the hardware space. There will be new content every weekday in March, so bookmark http://www.marchisformakers.com and join us!

  • CodeNewbie is the most supportive community of programmers and people learning to code. Tune in every week for stories about people on their coding journey.
  • Hanselminutes: Fresh Air for Developers is a weekly talk show that brings interesting people together to talk about the web, culture, education, technology and more.

Our hashtag for this event is #MarchIsForMakers and YOU, Dear Reader, can help us out by being our Street Team.

Share our website http://marchisforamakers.com!

...with friends, kids, teachers, family, anyone you think my be benefit from learning about hardware and today's maker culture.

This is just Day 1! At the end of March we'll have as many as 10 great podcasts, amazing guests, Live Google Hangouts, blog posts, Twitter Chats on Wednesdays, and a huge collection of links and projects for you to explore.


How to run ASP.NET Beta 3 running on a Raspberry Pi 2

I love Raspberry Pi, the tiny $35 computer. I've gone through 6 at least count. Have they died? Not at all! They've been gifted forward. Right now I've got one running my 3D Printer, one running as a media center, and a Raspberry Pi 2 that my kids are using as their primary computer. There's so many Raspberry Pi projects - How can you not love a tiny computer?

This actually a dual tutorial/how-to. I've been so impressed with the Raspberry Pi 2 I've wanted to see how far one can take it. It's still a modest little machine, but it's definitely twice as fast or more in single-tasking and perhaps 6x faster in multitasking in my experience than the previous Raspberry Pi.

Basic Raspberry Pi set up

I use the Raspbian Operating System image for my Raspberry Pi 2. It's a Debian Wheezy image for techies, that's a Unix for non-techies.

I use this hardware (these are Amazon links) that I put together myself, although you can get a kit that includes memory, power, wifi, cables, case, etc.

You can get the disk image and follow the setup instructions here. I also added TightVNC so I could remote into my Raspberry Pi from my desktop. This also allowed me to run it "headless" without a monitor, but it's up to you.

You can see me VNC'ed into my Raspberry Pi 2 here. Of course, you can always connect it to your monitor or TV.

VNC'ed into a Raspberry Pi

I wanted to see how hard it would be to run .NET on this Raspberry Pi. Depending on how deep you want to go, it's not hard at all.

Running ASP.NET on a Raspberry Pi 2

NOTE/DISCLAIMER: This is a point in time. It's a beta/daily build of an early thing. I'm sure this will get down to a few simple lines in the future, so don't panic thinking that ASP.NET on Linux will suck. It's early.

Frist, you can get an old (3 years old) version of the open source Mono runtime with

sudo apt-get mono-complete

And this will get you version 2.1. You can do basic stuff. Make a HelloWorld.cs and run it with

gmsc HelloWorld.cs

mono HelloWorld.exe

Debian likes to be very stable, I'm told, so if you want to get a very NEW version of Mono and as such, run things like ASP.NET 5, you'll need to do a little more work.

You could git clone the Mono repository and build it. I found this process slow, so I downloaded the source from an archive instead, then unzipped it into a folder.

mkdir ~/monosource

cd ~/monosource
wget http://download.mono-project.com/sources/mono/mono-3.10.0.tar.bz2
tar -xjvf mono-3.10.0.tar.bz2

Then here's a bunch of prerequisites I needed, plus htop because I like it.

sudo apt-get install build-essential autoconf automake binutils libtool libglib2.0-dev libxrender-dev libfontconfig1-dev libpng12-dev libgif-dev libjpeg8-dev libtiff5-dev libexif-dev gettext libcairo2-dev htop 

Then start the build. This too an hour or so, and is dependent on the speed of your Pi AND the speed of your SD card. It should be a Class 10 if possible.

./configure --prefix=/usr/local; sudo SKIP_AOT=true make; sudo SKIP_AOT=true make install;

Note this is three lines in one. Do a sudo reboot when you're done. If you can run mono -V and see version 3.10.0 then you're in a good place.

Mono 3.10.0 on a Raspberry PI

You can add ASP.NET 5 at this point by downloading the samples directly from Github and running the "kvminstall.sh" to setup the ASP.NET runtime manager.

mkdir ~/sources/aspnet5 

cd ~/sources/aspnet5
git clone git://github.com/aspnet/home.git
sh ~/sources/aspnet5/kvminstall.sh
source ~/.kre/kvm/kvm.sh
kvm upgrade

Then per this GitHub issue you need to tell your system about the SSL certs for NuGet to restore correctly.

CERTMGR=/usr/local/bin/certmgr

sudo $CERTMGR -ssl -m https://go.microsoft.com
sudo $CERTMGR -ssl -m https://nugetgallery.blob.core.windows.net
sudo $CERTMGR -ssl -m https://nuget.org

mozroots --import --machine --sync

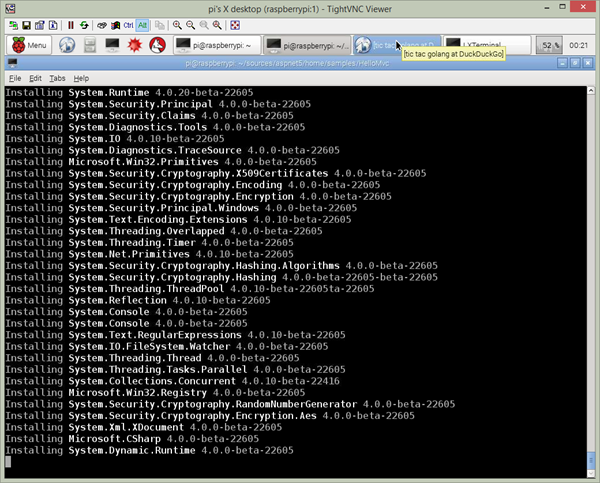
Then go to one of the samples like ~/sources/aspnet5/home/samples/HelloMvc and run "kpm restore." Note this uses about 400 megs of RAM for a minutes so you'll want a newer Raspberry Pi.

Running kpm restore on Raspberry Pi

NOTE: Make sure the sample version in project.json match your local runtime version. I needed to update version strings to beta3 to match what "kvm list" said. I'm sure this will get fixed soon.

The "Kestrel" web server uses libuv, an HTTP library. Here is how to build libuv. I found this on Punit Ganshani's blog, which I'm actually wishing I'd found earlier in this blog post. ;)

wget http://dist.libuv.org/dist/v1.0.0-rc1/libuv-v1.0.0-rc1.tar.gz 

tar -xvf libuv-v1.0.0-rc1.tar.gz
cd libuv-v1.0.0-rc1/
./gyp_uv.py -f make -Duv_library=shared_library
make -C out
sudo cp out/Debug/lib.target/libuv.so /usr/lib/libuv.so.1.0.0-rc1
sudo ln -s libuv.so.1.0.0-rc1 /usr/lib/libuv.so.1 Then run

Then run "k kestrel" and hit the port mentioned in the project.json.

ASP.NET 5 Beta 3 on a Raspberry Pi 2

How to run Go on a Raspberry Pi 2

I wanted to Go running as well. Go has fewer dependencies but no official ARM builds. The Raspberry Pi 2 is an ARMv5. However, a very kind gentleman named Dave Cheney has been building and hosting his own unofficial ARM tarballs for Go. You take the instructions from the GoLang site and his links and you're all set on your Raspberry Pi or Pi 2.

Here's what I did for a Raspberry Pi 2.

wget http://dave.cheney.net/paste/go1.4.2.linux-arm~multiarch-armv6-1.tar.gz

sudo tar -C /usr/local -xzf go1.4.2.linux-arm~multiarch-armv6-1.tar.gz

Then, add it to your path, or .profile, or whatever.

export PATH=$PATH:/usr/local/go/bin

Make a HelloGo.go, compile and run.

Go on a Raspberry Pi

Personally, I'd love to see "dotnet" be as easy to get running on Linux as Go.

package main


import "fmt"

func main() {
fmt.Println("Hello Go on Raspberry Pi 2")
}

The Raspberry Pi is just a little joy. It's a lot of fun and has a lot of potential. Definitely pick up some for the kids (yourself.)

Don't forget, visit http://marchisformakers.com, tell your friends and tweet us at #MarchIsForMakers!

Related Links


© 2015 Scott Hanselman. All rights reserved.
     

Arduino 101 with an Intel Edison - Hooking up JSON to an LCD Screen

$
0
0
Playing with Arduino and Nightscout

Hanselminutes and CodeNewbie are teaming up to produce two new podcast episodes a week for the month of March, featuring incredible makers in the hardware space. There will be new content every weekday in March, so bookmark http://www.marchisformakers.com and join us!

  • CodeNewbie is the most supportive community of programmers and people learning to code. Tune in every week for stories about people on their coding journey.
  • Hanselminutes: Fresh Air for Developers is a weekly talk show that brings interesting people together to talk about the web, culture, education, technology and more.

Our hashtag for this event is #MarchIsForMakers and YOU, Dear Reader, can help us out by being our Street Team.

Share our website http://marchisformakers.com!

...with friends, kids, teachers, family, anyone you think my be benefit from learning about hardware and today's maker culture.

This is Week 2! At the end of March we'll have as many as 10 great podcasts, amazing guests, Live Google Hangouts, blog posts, Twitter Chats on Wednesdays, and a huge collection of links and projects for you to explore.


Please note that I'm learning. I'm sure some of you are fantastic experts, while others are working on Hello World. If you find errors, naïve or otherwise, in my code or solution, DO let me know in the comments and I'll update this post with notes and asides so we can all learn!

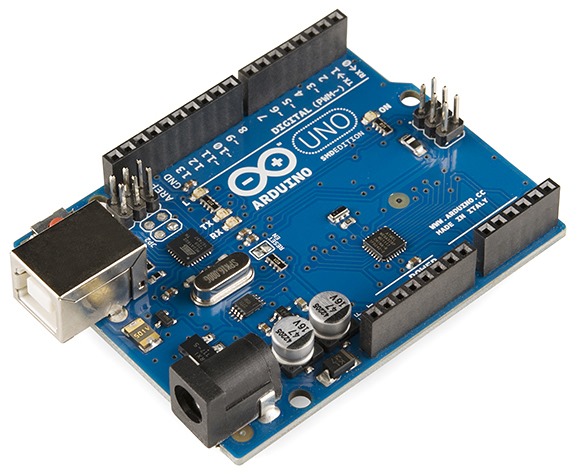
I wanted to learn a little about Arduino this week. It's an huge and enthusiastic community based around an open-source electronics platform. The hardware is small and relatively inexpensive, and it brings hardware hacking to folks (like myself) that may not feel up to doing really low level electronics work. There or stackable "shields" you can plug on top and easily add new features, screens, sensors, and more.

Arduino_Uno_-_R3

There's lots of different choices for Arduino development, including some more interesting versions like the Intel Edison with Arduino Breakout Board. The Intel Edison supports not just Arduino, but also can run a full version of Yocto Linux, and can run Python and node.js. I have an older Arduino Atmega328 which was like $12.99, but I wanted a more flexible option that included on board Wi-Fi. Getting Wi-Fi connectivity is kind of a hassle if it's not built in.

The Arduino Yún is a great choice, but I figured I'd spend more for the Edison and get a lot more options. I also got the "Seeed Studio Grove Starter Kit." This is a cool Arduino Shield that lets me (and the kids) attached sensors, buttons, screens, and lots of other stuff without soldering!

intel-lot-edition-gen2

I download the Arduino software, but also found that Intel now has a complete Integrated IoT Windows 64 Installer that will get everything you need to get started with the Intel Edison. It makes it REALLY easy to start.

I tried a few small "Sketches" out, turning on a light with a button press, and such.

image

But I wanted to make something more interesting to me personally. I'm a Type 1 Diabetic, and I wear an insulin pump and Dexcom Continuous Glucose Meter. They are connected to the cloud via a project called Nightscout.  Nightscout takes my sugar values and pushes them into Azure, where they are available via a JSON web service.

NOTE: I've put my Arduino Sketch on GitHub here. https://github.com/shanselman/NightscoutArduinoPlayground

Nightscout has a /pebble endpoint that is used to feed the Pebble Watch Face and show folks their blood sugar on their wrist. I thought it would be cool to hook up an Arduino to get my blood sugar from the cloud and display it on an LCD. It'll show the current value, change the background to green/yellow/red to display risk, and then a custom character to show trends (flat, up, down, etc).

The JSON the Nightscout service returns looks like this, but I just want the "sgv" value and the "direction."

{

status: [{
now: 1426017007130
}],
bgs: [{
sgv: "102",
bgdelta: 2,
trend: 4,
direction: "Flat",
datetime: 1426016912000,
filtered: 115232,
unfiltered: 118368,
noise: 1,
rssi: 191,
battery: "59"
}]
}

I needed to bring in three libraries to achieve my goal. Remember I want to:

  • Connect to my Wi-Fi network
  • Download some JSON and parse it
  • Display values on an LCD screen

So I needed:

As with all problems when you're learning new things, you'll want to break them down one at a time.

I wanted to just display a string on the LCD, that was easy, there's lots of examples online in the Arduino community.

lcd.clear();

lcd.setCursor(0, 0);
lcd.print("Hello World");

Connecting to Wi-Fi was pretty easy also:

while (status != WL_CONNECTED) {

// Connect to WPA/WPA2 network. Change this line if using open or WEP network:
status = WiFi.begin(ssid, pass);

// wait 3 seconds for connection:
lcd.setCursor(0, 0);
lcd.print("Waiting...");
delay(3000);
}

When doing an HTTP call (given the libraries I was learning about) it's pretty low level. Constrained memory Arduinos (not like the Edison) don't seem to have SSL support, nor do they have high-level HTTP libraries. I had to craft the HTTP headers manually:

lcd.print("Connecting...");

if (client.connect(server, 80)) {
lcd.clear();
lcd.print("Server connected");
// Make a HTTP request:
client.println("GET /pebble HTTP/1.1");
client.println("Host: hanselsugars");
client.println("Connection: close");
client.println();
}

Then I spin through the HTTP Response looking for the start of the JSON, and store it away. At this point I'm wondering if I'm doing it wrong. It isn't very robust.

boolean jsonFound = false;

int bytes = 0;
while (client.available()) {
char c = client.read();
//look for first {, yes it could be in a cookie but I'm thinking positively.
if (c == '{') jsonFound = true;
if (!jsonFound) continue;

stringBuffer[bytes++] = c;
if (bytes >= MAXBUFFER) break; //that's all we have room for or we're done
}

Then once I've got the stringBuffer, I use the aJSON library to get the values I need. This isn't pretty, but it's how you use this library.

I also added a little bit to turn the color of the screen red/green/yellow.

if (root != NULL) {

aJsonObject* bgs = aJson.getObjectItem(root, "bgs");
if (bgs != NULL) {
aJsonObject* def = aJson.getArrayItem(bgs, 0);
if (def != NULL) {
aJsonObject* sgv = aJson.getObjectItem(def, "sgv");
String bg = sgv->valuestring;
int bgInt = bg.toInt();
if (bgInt > 180) lcd.setRGB(255, 0, 0);
if (bgInt > 150 && bgInt <= 180) lcd.setRGB(255, 255, 0);
if (bgInt <= 150) lcd.setRGB(0, 255, 0);
lcd.clear();
lcd.setCursor(0, 0);
lcd.print("Glucose (mg/dl)");
lcd.setCursor(0, 1);
lcd.print(bg);
}

I also created some custom characters to show trends, based on a string (pretending to be an enum) that comes back from the JSON service. For example, an up arrow:

byte SingleUp[8] = {

B00000,
B00100,
B01110,
B10101,
B00100,
B00100,
B00100,
B00000
};

All the questionable code is up at https://github.com/shanselman/NightscoutArduinoPlayground

At this point I'm confused/learning about a few things:

  • It runs for a while and then stops.
    • I don't know what state it's in.
    • I would like it to call out to the web service every 5 min and update the LCD. I suspect I am not managing Wi-Fi connection state correctly (as in, not at all).
    • So the question is, how does one take a working prototype and turn it into a real appliance that can run forever?
  • I'm reusing the stringBuffer which is a bad idea. I need to clear it out.
  • Sometimes the Custom Characters are corrupted on the screen.
    • No idea why. It works 8 out of 10 times. Perhaps it's an Edison bug or a SeeedStudio bug.

When I get it working reliably, I'd like to 3D Print a case and mount it somewhere. :)

Arduino for Visual Studio

One other thing I found out, there's a fantastic add-in for Visual Studio that will give you a great Arduino Development Environment inside of Visual Studio. It includes simple debugging, breakpoints, a nice serial monitor and more. I'm still finding debugging to be challenging as local watches and step over isn't supported, but it's vastly superior to the tiny Arduino IDE.

Visual Micro - Arduino for Visual Studio

Arduino Emulator

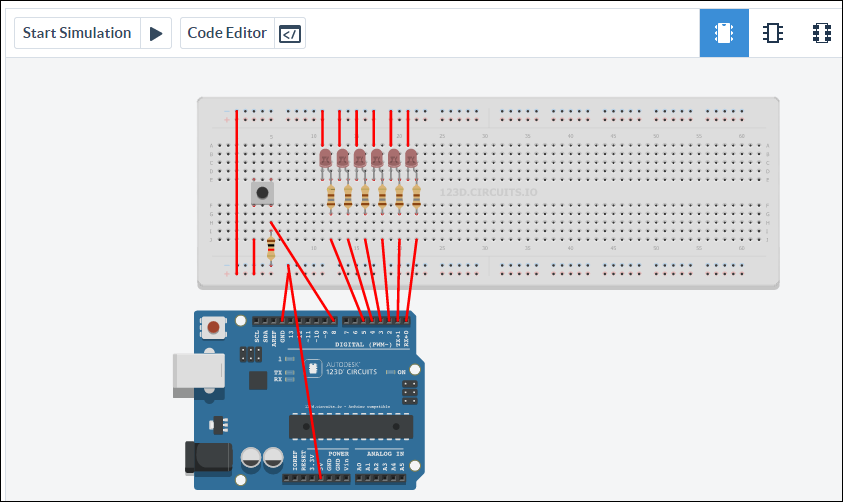
Don't have an Arduino or a breadboard? Check out http://123d.circuits.io online. It's amazing. It's an Arduino Circuit Simulator online. Check this out!

image

You can setup boards, write code, and practice in software before you test it out on hardware.

image

Don't forget, visit http://marchisformakers.com, tell your friends and tweet us at #MarchIsForMakers!


Sponsor: Big thanks to Aspose for sponsoring the blog feed this week! Are you working with Files? Aspose.Total for .NET has all the APIs you need to create, manipulate and convert Microsoft Office documents and many other formats in your applications. Start a free trial today.


© 2015 Scott Hanselman. All rights reserved.
     

Bridging Dexcom Share CGM Receivers and Nightscout

$
0
0

Dexcom Share

I've long lamented the sad state of Diabetes technology. For the last 20 years I've been told that it'll be cured in the next few years. (Spoiler: That hasn't happened.)

Fortunately some technological breakthroughs have happened, like the CGM (Continuous Glucose Meter). This device has a transmitted embedded in my belly that transmits to a small receiver. However, my wife couldn't see my blood sugar remotely, so the Nightscout open source project pretends to be computer connected to the receiver, then uploads it to your own website. Then you can see your blood sugar on your watch, or family and friends can log in also. This project has been moving along nicely for a year or so now.

Just last month Dexcom, the CGM maker, released an update to their receiver that includes Bluetooth, called the Dexcom Share. Now my transmitter goes to my Dexcom device which then bounces via Bluetooth LE to my phone, which is then uploaded to the Dexcom site. The Dexcom iPhone app will support the Apple Watch in the future as well, they say.

However, I'd like more control over my data. Dexcom's solution (as of the time of this writing) is iPhone/iPad only. Not everyone can afford an iWatch and iDevices. I'd like to use my Pebble Watch, for example, which is supported in Nightscout today.

I got the Dexcom Share at 3:30pm today in the mail. By 4:40pm it was paired to my iPhone and working nicely. So what I really need is a simple bridge that takes my Dexcom Share data and copies it to Nightscout. From there I can analyze it, send it to my Pebble, or do whatever.

Watching iPhone Traffic from a Windows Machine

First, I need to understand the Dexcom Api. Let's watch the iPhone talk to Dexcom. I'll install Fiddler on my Windows machine and configure Fiddler as a proxy server. I'll need to trust the Fiddler SSL cert (only for dev purposes) on both the iPhone and the Windows machine. My machine is called Hexpower7 and the proxy is on port 8888. I'll visit http://hexpower7:8888 on my iPhone and install the cert there also, which will allow me to watch the traffic and learn about the API.

I learned a few things by watching the traffic.

Watching Traffic

Calling Dexcom with CURL

First, when you login to the Dexcom API you get a Session ID, which is common and to be expected. With that Session ID you can get your sugar values. After the login I retrieved my latest sugar number:

curl -k -X POST "https://share1.dexcom.com/ShareWebServices/Services/Publisher/ReadPublisherLatestGlucoseValues?sessionID=GUID&minutes=1440&maxCount=1" -H "Accept: application/json" -H "Content-Length: 0"

resulting in:

[{"DT":"\/Date(1426290216000-0700)\/","ST":"\/Date(1426293817000)\/","Trend":4,"Value":113,"WT":"\/Date(1426290240000)\/"}]

Here's a screenshot:

Talking to Dexcom Share from CURL

Cool. So I pair-programmed with Benjamin West from the Nightscout project and we spent an hour writing a script to get my Dexcom Share data and bridge/POST it to Nightscout.

I put the script in an Azure WebJob and it's pulling my Share data and putting it into Nightscout every few minutes. I won't post the code here, rather the Nightscout team will take our prototype from here, but the result is lovely.

I don't have to carry an extra Android device anymore, I just use my Dexcom Share and its supported iPhone uploader application. Very cool.

Now it's 7:30pm, just a few hours after I got my Dexcom Share and I've got the best of both worlds. The API was easy to use and we didn't spend more than two hours on it. Most of the time was waiting for the transmitter to complete its warmup cycle.

My Blood Sugar in the Cloud

I'll do a formal Dexcom review soon, but I can already tell you it's a winner. Everyone who can get a CGM should get a Dexcom Share. It's a thrilling device. I would like the iPhone app to support iPhone 6 and 6+ screen-sizes better, and a nicer UI, but all in all, it's a great device.

Don't forget, visit http://marchisformakers.com, tell your friends and tweet us at #MarchIsForMakers!


Sponsor: Big thanks to Aspose for sponsoring the blog feed this week! Are you working with Files?Aspose.Total for .NET has all the APIs you need to create, manipulate and convert Microsoft Office documents and many other formats in your applications. Start a free trial today.

RELATED READING


© 2015 Scott Hanselman. All rights reserved.
     

Tragedies of the Remote Worker: "Looks like you're the only one on the call"

$
0
0

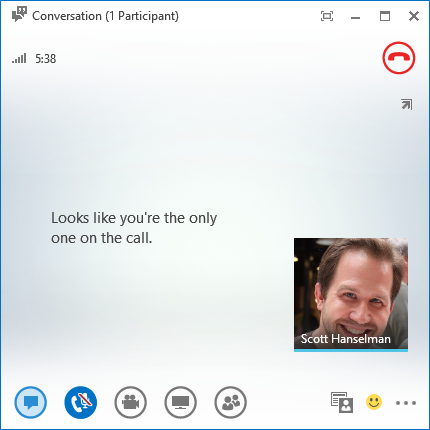
You're the only one on the callI'm writing this as I sit alone in a remote meeting room. As a remote worker, this is just one of the tiny, daily paper cuts. To be clear, I like being remote and I wouldn't change it, but some days Being a Remote Worker Sucks.

This is a rant, but if you were remote you'd understand.

You're the only one on the call.

It was nice of them put a link to join the meeting into the invitation, except they never joined the meeting. They've changed their IM status to Do Not Disturb and aren't answering their phones. You're all alone in a virtual room and are now late for a meeting you were originally early for.

When's the next time you're up?

Whenever you are on-site, folks always say "when are you up next?" Seriously. Like I'm just on vacation the other 6 weeks I'm not at the mother ship.

If only there were a global network with cameras and audio that would allow us to have a conversation while I'm away? But, alas, there isn't, so I'll see you again in 6 to 8 weeks.

I'm remote but that doesn't mean I'm not available EVERY WORK DAY.

Fifteen Minutes of "Can you hear me?"

Please. Unmute your damn phone. http://howtounmute.com. Learning how to use your basic VOIP camera and audio is a sign of respect for your remote workers.

You have a Webcam, use it.

You can see each other, but I can't see you. I don't care that you "don't like to use your webcam." We are having a business meeting, turn it on so the remote works can get one of their 5 senses back. Seeing your face is the whole point. It really helps. Bonus points if you adjust your webcam when it's time to see the whiteboard.

Have Empathy - Put yourself in the remote person's shoes

When I came to work here I sent five managers gift-wrapped web cams with a note on how to use them. During my next office visit I found 4 of them opened and shoved off to the side of their desks. If I had a gluten allergy I think you'd be more accommodating. But I don't, I'm a remote worker.

Remote iPad on a Stick - Double Robotics

I'm remote, please add call link to the meeting invite

Thanks for scheduling that meeting. Awesome that you got a room and everything. But I'm going to email you right back and remind you to add a call bridge/goto meeting/lync invite/google hangout. I just need access.

Move closer to the mic

You're in your office talking to me remotely, but not only will you not turn on your camera but you're talking on a speaker phone with your back to me as you spin in your desk chair.

Did the meeting end? Guys? Any one there?

It's so sad when I'm left on the table and you've all left the room. I'm just trapped in the Klingon Phone and you've got feet.

Don't fade away. When someone is remote it's so important to check in as you're closing the meeting.

The Klingon PhoneYour Inability to Deal with Me Remotely

Everyone has some special need. Mine is I'm remote. Your inability to be even slightly flexible to that fact causes me problems literally daily. Remote workers go out of their way to be available.

I'm on Lync, Skype, Slack, Twitter, and my cell phone is published in the company directory.

And you just literally said with a straight face, "I couldn't get ahold of you." O_O

Hearing an Important Conversation...as they hang up

This happens more often than you'd think. The meeting is over and they are hanging up. You can see their hand dropping to hit "End Call" and then someone starts mentioning something TOTALLY IMPORTANT and....dial tone.

Why don't you move up here?

Wow! I never thought of that. After 7 years of working remotely for a dozen reasons, you finally asked the right question! Why don't I just move up there?

Because. Reasons.

What tiny indignities do you deal with as a remote worker? Sound off in the comments.

Related Links


Sponsor: Big thanks to Aspose for sponsoring the blog feed this week! Are you working with Files? Aspose.Total for .NET has all the APIs you need to create, manipulate and convert Microsoft Office documents and many other formats in your applications. Start a free trial today.


© 2015 Scott Hanselman. All rights reserved.
     

Getting admin by adding a new user to sudoers when you're locked out of an Azure Linux VM

$
0
0

So I got locked out of an Ubuntu VM that's running in Azure  Long story, but an employee left and some now the "admin" user I had access to no longer had "sudo" powers anymore. I needed to run apt-get update && apt-get upgrade but literally had no user available with admin on the box.

If the machine was local, I could perhaps boot into recovery mode but this is a VM in the cloud.

I do however, have access to the Azure portal because I do own the VM. While the operating system  doesn't think I'm powerful inside, I am powerful outside. ;)

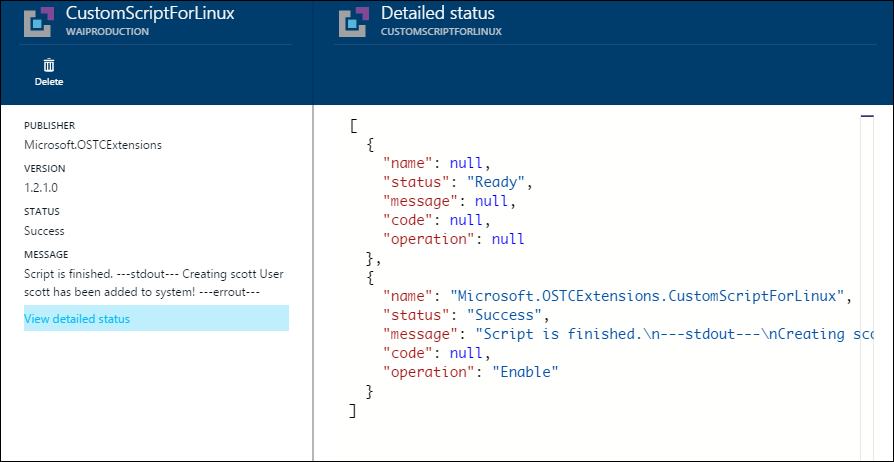
Corey Sanders, the head of the IAAS team was kind enough to remind me of the CustomScriptForLinux "VM Extension." VM Extensions can inject/install software like Chef and Puppet into VMs. I talked to Kundana Palagiri about this on Azure Friday (http://friday.azure.com)

He pointed me to his "AddUser.sh" script on GitHub. It's pretty straightforward, but how do I run it?

#!/bin/bash # Script to add a user to Linux system if [ $(id -u) -eq 0 ]; then         username="$1"         password="$2"         echo "Creating $username"         egrep "^$username" /etc/passwd >/dev/null         if [ $? -eq 0 ]; then                 echo "$username exists!"                 exit 1         else                 pass=$(perl -e 'print crypt($ARGV[0], "password")' $password)                 useradd -G adm,dialout,cdrom,floppy,sudo,audio,dip,video,plugdev,netdev -m -p $pass $username                 [ $? -eq 0 ] && echo "User $username has been added to system!" || echo "Failed to add a $username!"         fi else         echo "Only root may add a user to the system"         exit 2 fi

I don't have root, but Azure has root. Azure has all the power, in fact. I need to run this script with parameters (my new username and password) then SSH in and put things right. I can return my original user to sudoers:

sudo adduser <username> sudo

And there's other administration I may want to do, including deleting this user I just added. Doing this dance is how I'm going to regain access to my VM, though.

NOTE: There are other ways to regain access to a Linux VM if you've lost a SSH Key or forgotten your password, like the VMAccess Extension in PowerShell. However, not everyone has a Windows machine, and I wanted in fast without any local setup. I'm going to use the Custom Script extension.

First, I'll log into the Azure Portal at http://portal.azure.com and select the VM, then under All Settings, select Extensions. Click ADD and pick Custom Script for Linux.

Adding Custom Script for Linux

Note that my bash script has two parameters, so I'll put my preferred USERNAME and PASSWORD in the Arguments box there and hit done.

Successfully added a VM Extension

After it's done, I click look at the detailed results. Do note that the Azure Portal is called into the backend REST services that manage all of Azure so you can certainly script all of this if you need to.

Script Success

Now I can SSH into the machine (I use bitvise) and then add my original user back into sudoers.

Adding user to group sudo

At this point I can generally tidy up this machine and put it as it was. I've regained control of a Linux VM that I no long had root on.

Please check out http://friday.azure.com, subscribe on iTunes, and tweet and tell your friends! There are over 150 episodes of Azure Friday, each just around 15 min long!


Sponsor: Big thanks to Aspose for sponsoring the blog feed this week! Are you working with Files?Aspose.Total for .NET has all the APIs you need to create, manipulate and convert Microsoft Office documents and many other formats in your applications. Start a free trial today.


© 2015 Scott Hanselman. All rights reserved.
     

March was for Makers - Fantastic Hardware Tutorials, Videos, Podcasts and more!

$
0
0
Hanselman's Desk of Hardware

I'd like to take a moment and be proud of myself and my friend Saron. This last month, March of 2015, we teamed up at decided to come up with a scheme to get folks excited about Making. By making, I mean creating physical things with hardware like Arduino, Raspberry Pi, soldering things, and generally using electricity and software to do awesome stuff.

A lot of us are software engineers, but we don't realize how powerful we can feel when we do things with the software and hardware.

Getting that LED to flash is just the beginning. When you can affect your physical world, the sense of empowerment is intoxicating. This is fantastic not only for old-timers like myself, but also young people and kids who may be looking into engineering as a career.

All month long we did podcasts, blog posts, Twitter chats, and live Google hangouts, all with the goal to get you, dear reader, excited about hardware. I'm REALLY proud of what we accomplished. Note that we both do this on the side as volunteers while holding down regular jobs.

Please Subscribe Now

I don't think I ask you for much, but I will ask you right now to take a moment and subscribe to our two podcasts using your favorite podcast application:

  • CodeNewbie is the most supportive community of programmers and people learning to code. Tune in every week for stories about people on their coding journey.
  • Hanselminutes: Fresh Air for Developers is a weekly talk show that brings interesting people together to talk about the web, culture, education, technology and more.

March Is For Makers

Our little mini event was a great success, as far as we're concerned. We were not measuring things like page views, but rather excited people. Here's a few choice tweets.

The http://www.marchisformakers.com site will continue to live on year-round with occasional updates, and we are planning next years event to be even bigger and more exciting. Until then, all of our content lives on.

Here's some of the highlights of this fantastic month. You can get ALL the content on our site.

And there's SO MUCH MORE.

Again, please subscribe, and SHARE our adventure with your family, friends, teachers, students, kids, and others who you think would be great makers! #MarchIsForMakers.

Related Links


© 2015 Scott Hanselman. All rights reserved.
     

Setting up a VPN and Remote Desktop back into your home with a Synology (from an iPhone)

$
0
0

It's amazing that I can basically be my own IT Department. The kinds of things we can do in our homes as individuals with off-the-shelf hardware would have needed an IT Dept of a dozen just 10 years ago, ya know? Amazing.

I wanted to be able to VPN into my home and remotely access my machines and files. I do very much realize there are a lot of different options to do this, and have been for years. From GoToMyPc to Hamachi, again, there's dozens of ways. I wanted a VPN solution I could use on my iPhone/iPad and Surface. I wanted it to be standards-based and not require any additional software installations.

I have a a Synology 1511+ NAS appliance and I love it. It's not just a file server, it's an everything server, in my house. I use it for Plex, it hosts my files and photos, it manages my surveillance cameras and acts as a camera DVR, it runs a Minecraft Server, it's a Git server, it even runs Docker.

The Synology will act as my VPN server as well.

Here's how I set up four things. The Synology, my Router, my iOS device, and my Windows PC/Surface.

The result is I can now remote into my home and manage things from any device I own.

Setting up a Synology for L2TP VPN

First, in the Synology Package Manager, ensure that you've got the Synology VPN Server package installed and running.

Adding VPN Server on Synology

You should give some though as to which VPN technique you want to use. I decided on L2TP, although there is some concern the NSA has weakened it. Benefits are that it's on all major platform, it's generally considered secure, and it's easy to setup.

Select L2TP (or whatever you want), and Enable it. Notice also that I selected my INTERNAL DNS server. I found this worked best for me when trying to access internal resources. You can also setup a hosts file if you want to just hit a few things inside your house.

L2TP in Synology

Now click on Privilege. Just give the minimum privileges to the user that needs them. NO need to give VPN access to users who won't use it.

VPN Server in Synology

Setup your Router for VPN (L2TP)

My router is a Linksys WRT1900ac that I like very much. It supports port forwarding, and the Synology can often talk directly to a router and request open ports. However, there's something to be said for handling things yourself. It lets you know exactly what's going on, and it can be less of a "black box."

Login to your router and in this case of L2TP, forward UDP ports 1701, 500, and 4500. On my Linksys, it's under Security, Apps and Gaming.

The Device IP is the internal IP address of your Synology. It's best to have your Synology use a Static IP address, or at least have a DHCP reservation so this IP doesn't change and things stop lining up.

Port Forwarding in a Router

Also, ensure that your Router is passing L2TP traffic as well. I changed this under Security.

L2TP Passthrough

At this point, you should be able to at least try to connect to your house via VPN. I did this as a quick test by taking my iPhone off the wireless networking (thereby being on the open internet) and VPN'ing back in.

If you succeed, you should be able to see yourself in the VPN Server | Connection List area on our Synology.

VPN Server

Here's what I did on my iDevice to setup VPN.

Setting up iOS/iPhone/IPad for VPN

From the iOS Settings app, go General | VPN. Touch Add VPN Configuration. I selected L2TP and put in my Server name or IP and named the account "home."

NOTE: If you don't want to use your IP address, you can use the Synology.me dynamic DNS feature built into your Synology, or any one of many dynamic DNS systems that will give you a nice domain like "myhanselmanhouse.foofoo.com" or whatever. You can also, if you like, setup a CNAME with your own domain and point it to that dynamic domain. So vpn.hanselman.com could be your server, if you wanted.

With L2TP you'll need your username and password, as well as a Shared Secret. That's like another password. Specifically the Secret text box in iOS is the "pre-shared key" from your Synology L2TP VPN setup.

Add VPN in iOS

At this point you'll get a nice VPN option on your Settings app under Personal Hotspot that wasn't there before. You can turn it on and off now, easily.

VPN Connecting in Settings

Once I'm VPN'ed in I can see a [VPN] indicator in the top status bar. I've installed the FREE Microsoft Remote Desktop Client for iOS.

RD Client on an iPhone - Remote Desktop

And here's me VPN'ed into my home PC from my iPhone. This of course, can be done on Android and Windows Phone as well.

Remoted into my desktop at home with RDP

It looks small, but in reality it's very usable, especially from an iPad with a Bluetooth Keyboard.

Setting up L2TP VPN on Windows 8.1

Now I'll setup VPN back to home on my Windows 8.1 machine. For some reason this was super easy in Windows 7, but in Windows 8.1 there isn't a clear way to just add a L2TP VPN. You can add other simpler (or Vendor) VPNs in a straightforward manner, but not L2TP.

Just hit the Windows key (or Start Menu) and type "Add VPN." When you get to the VPN management screen, you'll see this and can fill it out.

Adding VPN

But L2TP VPN setup with a pre-shared key requires some more work. If you know of a simpler way, let me know. I can see about three different ways to get to the same result.

Go ahead and create a new VPN connection with the menu above. Select Microsoft as the VPN type and put in your server address and optionally name and password. This will create the VPN connection.

Pay attention now. Go back to the Start Menu and type "Network Connection." You want the first item called "View Network Connection" (a classic control panel, not a fullscreen 'metro' one).

Opening Network Connections

From there, yo;'ll open a classic control panel and see your VPN connection. Right click and click Properties.

Network Connections with VPN

Click Security, make sure L2TP is set, then click Advanced Settings.

L2TP VPN in Windows 8'

Put your pre-shared key there.

Setting a preshared key

Connect to your home VPN and have fun

Of course, please do remember to use strong passwords, strong pre-shared keys, and change them. Don't be lazy.

At this point you can connect to your home/office and work to your heart's content.

VPN Connection in Windows 8

For some of you this is "duh" or old hat, but for me it was something I just never got around to doing. Mostly laziness prevented. But just last week I had to drive 30 miles back to my house from a dinner in order to move a file from my Desktop into Dropbox. I'm pretty sure I'm not the only reasonably smart techie with a story like that. This VPN setup would have meant I could do that from my phone and it would have saved me a big hassle and over an hour of my time.

RELATED LINKS


© 2015 Scott Hanselman. All rights reserved.
     

On the importance of OpenSearch

$
0
0

I'm a big fan of Open Search, the idea, the format, and the user experience it can enable. You start typing a domain you've hit before that you want to search within. When it starts autocompleting, you hit tab, and then type your search.

So, "stacko - TAB - json - ENTER" has me searching StackOverflow for json results. I don't have to google/bing and then add "site:stackoverflow.com" to my query. I don't have to hit the home page then look around for a search box. The site just includes a meta tag and an opensearch.xml file and poof, the site has taught my browser how to search. Once you've tried this, you'll find it hard to browse/search without. You'll prefer sites that include it and be frustrated with sites that don't. (More on that later.)

IMPORTANT UPDATE/NOTE: A buddy of mine points this out, and he's right. That said, I want to say that I like BOTH of them, and I'm very much enamored with the Tab Search feature.

"Just to be clear, these things are not the same thing.

  • OpenSearch is a format for specifying how to search a site. 
  • Tab Search is a particular UX for allowing you to do a search on a non-default search provider. It happens to use OpenSearch to learn how to search different search providers."
  • I setup OpenSearch at Hanselman.com back in 2009!

    Chrome has a great implementation of Open Search.

    Type, Tab, Type, Enter

    I just add to add a one line META tag and a static XML file. Boom.

    <link rel="search" type="application/opensearchdescription+xml" href="http://feeds.hanselman.com/~/t/0/0/scotthanselman/~www.hanselman.com/blog/opensearch.xml" title="Hanselman Search">

    Your static XML file describes what the resulting URL should look like. Here's a small example.

    <OpenSearchDescription xmlns="http://a9.com/-/spec/opensearch/1.1/">
    
    <ShortName>Hanselman Search</ShortName>
    <Description>Search Scott Hanselman's Blog</Description>
    <Url type="text/html" method="get" template="http://www.hanselman.com/blog?q={searchTerms}"/>
    <Image width="16" height="16">http://www.hanselman.com/blog/favicon.ico</Image>
    <InputEncoding>UTF-8</InputEncoding>
    <SearchForm>http://www.hanselman.com/</SearchForm>
    </OpenSearchDescription>

    This is such a clean and obvious user story. It makes your web browsing experience better.

    User wants to easily search within a site they visit often. Every browser and OS should support OpenSearch.

    Amazon used to support it but in the last year or so removed it in a homepage redesign. It's more than a little ironic that it was a9.com and Amazon.com that came up with OpenSearch and actually host the http://opensearch.org websites, but now the Amazon.com home page doesn't support it.

    If you work for Amazon and are reading this blog post, consider this your calling out. Please put OpenSearch back on Amazon.com.

    Dear Reader, take a minute and see if your favorite browser supports OpenSearch. If it does, try it out. If not, ask them for it. Same for your favorite sites. If you run a site, you can easily add OpenSearch in a few minutes.


    © 2015 Scott Hanselman. All rights reserved.
         

    Introducing Azure Resource Explorer for the Azure Resource Management APIs

    $
    0
    0

    When managing Azure resources (Virtual Machines, Web Apps, etc) I like to do most of my work in Azure from the command line using the "Azure xplat cli" - the Azure Cross Platform Command Line Interface. It's an Open Source node.js app that you can get with "npm install -g azure-cli" and it calls the backend REST services that all of Azure uses to manage itself. In fact, when you are using the Azure Portal it's calling the same backend.

    It's mostly an "Azure Noun Verb" structure, as you can see in the figure below. You can Azure Site Create or Azure VM Restart, etc.

    Azure Command Line Syntax

    You can ALSO add --json to the xplat cli to see a JSON representation of the result of your call. So Azure Site List --json gives you a lot more information than without the json switch.

    There's a PowerShell interface to Azure, this xplat nodejs one I'm using, as well as other libraries like the Azure Management Libraries for .NET again, all calling the backend REST API.

    However, that REST API is huge and confusing. Enter David Ebbo, a Principal Development Lead on the Azure App Platform. He's made the Azure Resource Explorer at https://resources.azure.com as a great way to explore the Azure Resource Management APIs visually and interactively!

    And, wait for it, Azure Resource Explorer is, of course, Open Source and hosted here at GitHub https://github.com/projectkudu/ARMExplorer. It's a preview/beta and not done, but we're all interested in what YOU think! Does it do what you'd expect? Feel free to add issues and get involved in the repository.

    Go hit http://resources.azure.com/ and login with your Azure Credentials. It's an Object Explorer if you've ever used Visual Studio to move around a large object model, except this is a resource try of all the hypermedia nodes within your view of Azure.

    Azure Resource Explorer

    Here I am moving around my Web Applications that I host in the West US Region of Azure. I can see the deployment slots for staging and production, the source control system and web hooks that deploy my site and lots more. Notice that I can click Actions as well, and (when I turn Read-Only off) perform POST and DELETE calls that will affect my Azure resources.

    If you're familiar with Postman, the REST API development tool, this is kind of like Postman for Azure. Here's a 5 min YouTube video by David Ebbo walking you through the Azure Resource Explorer.

    To be clear, this is NOT a new Portal, and it IS very low level. This is a tool for folks who want to know what's really going on when an Azure API is called. Perhaps you're creating your own explorer or your own API client in another language. This tool can give you documentation and live examples on how to call those APIs correctly.

    Again, it's Open Source and hosted here at GitHub. They would be thrilled to hear your thoughts. Is this useful? In what direction would you like it to go?

    By the way, if you'd like to try Azure for an hour for free without signing up for any trials or anything, go check out http://try.azurewebsites.net and play! Also, check out Azure Friday at http://friday.azure.com and subscribe on iTunes.


    © 2015 Scott Hanselman. All rights reserved.
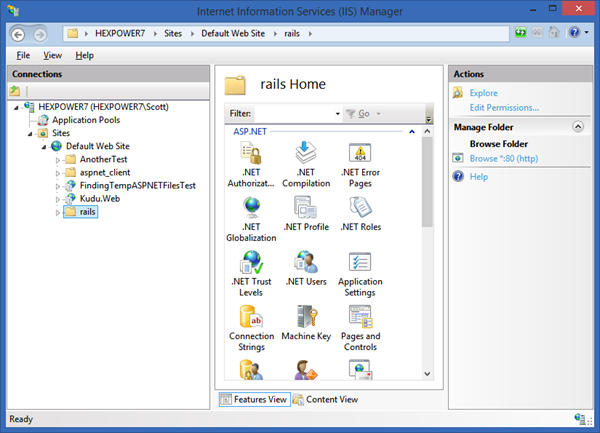
         

    Conference Season Spring 2015 - DotNetFringe, AngleBrackets, BUILD and more!

    $
    0
    0

    Amy, Maria, Lena, Adron, Noah

    What a lovely time we had at DotNetFringe last week here in my hometown of Portland. Wonderful speakers, great topics, good friends, and an energized open source community. Videos will be coming soon, I'm told, for you to enjoy!

    What is/was .NET Fringe?

    .NET Fringe is a new conference focused on .NET developers who are breaking the rules and pushing the boundaries. The .NET platform is more interesting today than it ever has been! The old Microsoft that was at odds with Open Source has been replaced with one that is actively contributing to OSS and hosts a huge number of important projects on GitHub! The .NET OSS community has been collaborating and creating new, really exciting, interesting, and innovative projects which are changing the landscape. They are defining the future!

    We had a great keynote from .NET OG Jimmy Bogard and lots of amazing talks. Here's just a sample:

    And really, so very much more. This is just a taste of the fun, fast, and often 300-level .NET content that the community brought to .NET Fringe.

    The DotNetFringe 3D Printing Labs!We also reached out to the Portland 3D Printing Lab and setup a number of inexpensive 3D Printers and had them running the whole time! I've been into 3D Printing of late and promoting the Maker Movement and we wanted to bring the joy of making to .NET Fringe as well! Many thanks to Ben and Bob for helping with this project!

    Fringe was a great kick off to conference season for me.

    BUILD

    Next up is BUILD in San Francisco. We've got some surprising announcements that are gonna blow your mind. You were impressed with what we've been doing with .NET and open source? We're just getting started. Big stuff coming soon.

    AngleBrackets

    If you couldn't get into BUILD or missed .NET Fringe, join me down in Arizona in May for AngleBrackets and DevIntersections.

    This time I'm also joined with my friend from CodeNewbie and Ruby Rogue, Saron Yitbarek to talk about all the great stuff we can do as developers on the open web.

    AngleBrackets will have sessions on node.js, ASP.NET 5, CSS, JavaScript, the Ionic Framwework, Google Analytics, AngularJS, IOT, Roslyn, and so much more.

    Register now for AngleBrackets and be sure to check out the Package deals that include Pre-Conference Workshops AND a Surface 3 or Xbox! Here's a nice video promo showing the fun we have at AB.

    I'm looking forward to meeting you, Dear Reader, at a conference one day, perhaps this year, perhaps next! Be well.


    Sponsor: Big thanks to our friends at Raygun for sponsoring the feed this week. I use Raygun myself and I encourage you to explore their stuff, it's really something special. Get full stack error reporting with Raygun! Detect and diagnose problems across your entire application. Raygun supports every major programming language and platform - Try Raygun FREE!


    © 2015 Scott Hanselman. All rights reserved.
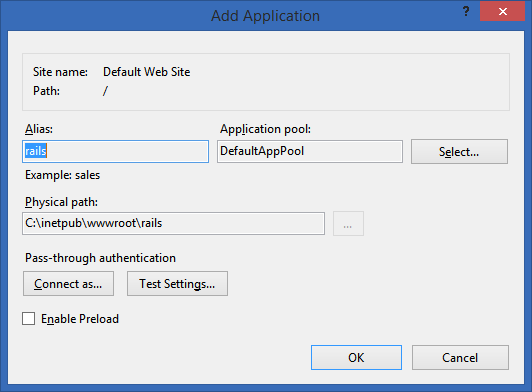
         

    UPDATED for 2015: How to install the nodejs Ghost blog software on Azure Web Apps (and the Deploy to Azure Button)

    $
    0
    0

    What? Didn't I blog about this before? Yes, in fact, in 2013 I did an article showing how to get Ghost - a lovely nodejs-based blogging app - running on Azure.  The instructions involved making some changes to Ghost itself to make it friendlier to Azure and doing a git deploy. Since this post both Ghost AND Azure have become friendlier. ;)

    Fast forward two years and the instructions have changed! In fact, they've gotten WAY easier. You can still theoretically follow most of my old instructions, but these new ones are WAY better, so just do it this way.

    STEP 1

    There's a "Deploy to Azure" button up at http://deploy.azure.com that you can get an put in YOUR GitHub project's Readme.md so folks can easily and quickly deploy your app as well!

    Here's what you do. Head over to the GitHub repository for Ghost Azure. Click Deploy to Azure. That will automatically install Ghost for you in Azure.

    The Deploy to Azure Button

    The Deploy.Azure.com website will look at the repository from the HTTP Referer header. You'll end up with a nice form like this.

    DO make sure to double check your settings, the Site Location is alphabetical right now, and you may not want your blog in Brazil. ;)

    image

    Hit Next, then check the summary that will warn you what's getting created, then hit Deploy. Boom. Azure will actually run through the template and setup Ghost (or whatever app you wanted) automatically.

    • Note it's setting it up from Source Control as well, although you can certainly change this. For example, you might want to Fork it yourself, and then Deploy.
    • However, as this is set up today, you won't get updates until you go to Deployments within the Azure Portal and click Sync. You decide if you want the app to update when new code is committed.

    After it's created, you can manage your site in the Azure Portal. I made a little free one for this example, as can you if you like.

    Ghost in the Azure Portal

    And it works just great!

    Ghost running on Azure

    It's not super obvious what to do next. You'll need click the little chevron there, or visit something like /admin, and you'll get redirected to the Ghost setup process online.

    image

    Now you can start your first post!

    My first post in Ghost

    What's going on here?

    Felix Rieseberg added a few files to Ghost and has the fork up here on GitHub. The most interesting one is the AzureDeploy.json. This is an Azure Resource Manager template. Here's another simple example from Elliot Hamai for an ASP.NET MVP app. This file tells Azure (and the Deploy to Azure button) what kinds of things it needs to create and actually gives the system enough information to build a whole form for you!

    Maybe this is the perfect time for you to start your own blog! Perhaps you've been putting it off. Go check out my FREE two-hour documentary movie with Rob Conery called Get Involved in Tech! We will get you ready to jump into the world of Social Software Development.

    Here's a video of Elliot and I talking about the Deploy to Azure button on Azure Friday. Here's Elliot's blog announcing Deploy to Azure and explaining more.

    Remember that Ghost is open source and you can learn more at https://ghost.org!

    DON'T WANT TO SIGN UP FOR AZURE? You can try Azure out for an hour without signing up for anything. Check out http://try.azurewebsites.net. You can make a PHP, Java, nodejs, Python, ASP.NET web app, or even setup Ghost itself. You can also try out Visual Studio online, which is basically a complete IDE in your browser written entirely in JavaScript.


    Sponsor: Big thanks to our friends at Raygun for sponsoring the feed this week. I use Raygun myself and I encourage you to explore their stuff, it's really something special. Get full stack error reporting with Raygun! Detect and diagnose problems across your entire application. Raygun supports every major programming language and platform - Try Raygun FREE!


    © 2015 Scott Hanselman. All rights reserved.
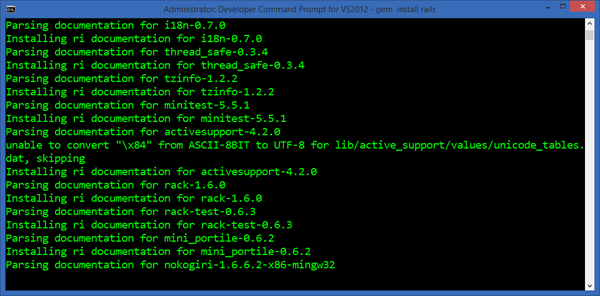
         

    Windows 10 - The Fast Ring and BUILD 10061

    $
    0
    0

    Take a moment, if you will, and please subscribe to my YouTube Channel at http://youtube.com/shanselman. I've actually got quite a bit of content over there, most recently a series of Microsoft Word and Office How-To videos.

    However, I've also been installing each new Fast Ring build of Windows 10 on real hardware and been going over the changes for you! Today Windows 10 Technical Preview Build 10061 came out.

    I've put my Windows 10 Technical Preview "Build-To-Build" YouTube Playlist up here and I encourage you to check it out. Windows 10 daily builds are still quite rough in spots, but that's part of the fun of getting these almost-daily builds. I wouldn't put this on my main machine, and I haven't. But, I do have a few extra laptops and have been keeping up to date with Windows 10, looking for changes and updates between builds.

    Below is my playlist and today's video on Windows 10 Build 10061 and the changes I've noticed.

    Have you installed Windows 10 on any machines? What's your reaction been so far?

    Related Links


    Sponsor: Big thanks to our friends at Raygun for sponsoring the feed this week. I use Raygun myself and I encourage you to explore their stuff, it's really something special. Get full stack error reporting with Raygun! Detect and diagnose problems across your entire application. Raygun supports every major programming language and platform - Try Raygun FREE!


    © 2015 Scott Hanselman. All rights reserved.
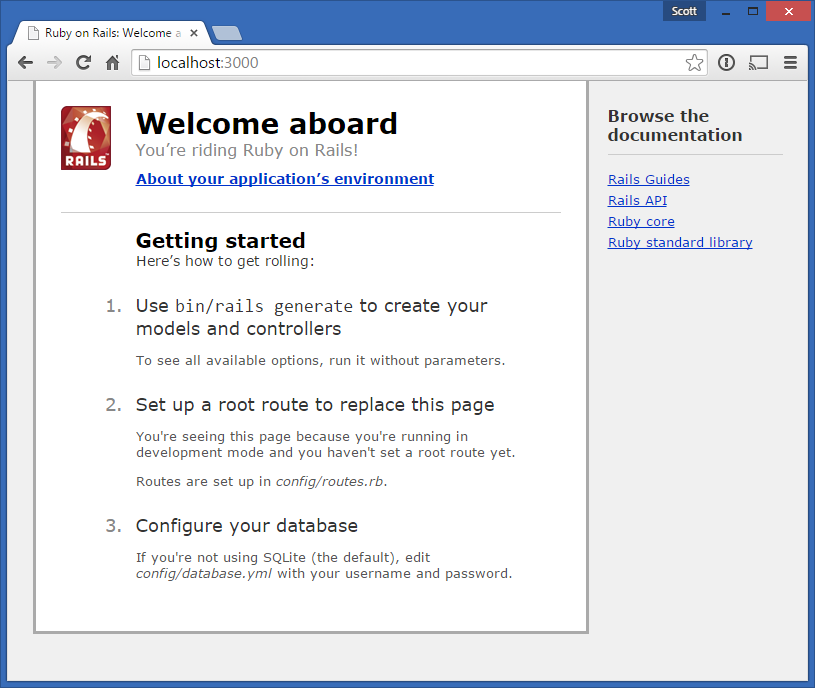
         

    Bad UX and User Self-Blame - "I'm sorry, I'm not a computer person."

    $
    0
    0

    You're evil, little man.In my recent podcast with UX expert and psychologist Dr. Danielle Smith the topic of "user self-blame" came up. This is that feeling when a person is interacting with a computer and something goes wrong and they blame themselves. I'd encourage you to listen to the show, she was a great guest and brought up a lot of these points.

    Self-blame when using technology has gotten so bad that when ANYTHING goes wrong, regular folks just assume it was their fault.

    My dad got some kind of evil "PC Tech Hotline" on his machine today because some web site told him his "Google was out of date and that he should update his Google." So he did. And he feels super bad. Now, in this case, it was a malicious thing so it would be really hard to figure out how to solve this for all users. It's like getting mugged on the way to your car. It happens to the best folks in the best situations, it can't always be controlled. But it shouldn't cause the person to blame themselves! He shouldn't fear his own computer and doubt his skills.

    People now publically and happily self-identify as computer people and non-computer people. I'll meet someone at a dinner and we'll be chatting and something technical will come up and they'll happily offer up "Oh, I'm not a computer person." What a sad way to separate themselves from the magic of technology. It's a defeatist statement.

    Get a Tablet

    Older people and people who are new to technology often blame themselves for mistakes. Often they'll write down directions step by step and won't deviate from them. My wife did that recently with a relatively simple (for a techie) task. She wanted to record a lecture with a portable device, load the WAV onto the PC, even out the speech patterns, save it as a smaller file (MP3), then put it in Dropbox. She ended up writing two pages of notes while we went over it, then gave up after 30+ min, blaming herself. I do this task now.

    Advanced users might say, you should get your non-technical friend a tablet or iPad. But this is a band-aid on cancer. That's like saying, better put the training wheels back on. And a helmet!

    Tablets might get a user email and basic browsing and protect them from basic threats, but most also restrict them to one task at a time. And tablets have hidden UX patterns as well that advanced users use, like four-fingered-swipes and the like. I've seen my great aunt accidentally end up in the iPad task switcher and FREAK OUT. It's her fault, right?

     Um....

    This harkens back to the middle ages when the average person couldn't read. Only the monks cloistered away had this magical ability. What have we done as techies to make regular folks feel so isolated and afraid of all these transformative devices? We MAKE them feel bad.

    There used to be a skit on Saturday Night Live called "Nick Burns, Your Company's Computer Guy" that perfectly expresses what we've done to users, and to the culture. Folks ask harmless questions, Nick gives precise and exasperated answers, then finally declares "MOVE." He's like, just let me get this done. Ugh. Stupid Users. Go watch Nick Burns, this is a 19 second snippet.

    I basically did this to my own Dad today after 45 min of debugging over the phone, and I'm sorry for it.

    I'm not a techie

    When users blame themselves they don't feel safe within their own computer. They don't feel they can explore the computer without fear. Going into Settings is a Bad Idea because they might really mess it up. This UX trepidation builds up over the years until the user is at a dinner party and declares publically that they "aren't a computer person." And once that's been said, it's pretty hard to convince them otherwise.

    Googling: Why are users so...and google recommends "stupid"

    Even Google, the most ubiquitous search engine, with the most basic of user interfaces can cause someone to feel dumb. Google is a huge database and massive intelligence distilled down to a the simplest of UI - textbox and a button. And really, it's just a textbox these days!

    But have all had that experience where we google for something for an hour, declare defeat, then ask a friend for help. They always find what we want on the first try. Was it our fault that we didn't use the right keywords? That we didn't know to not be so specific?

    I think one of the main issues is that of abstractions. For us, as techies, there's abstractions but they are transparent. For our non-technical friends, the whole technical world is a big black box. While they may have a conceptual model in their mind on how something works, if that doesn't line up with the technical reality, well, they'll be googling for a while and will never find what they need.

    Sadly, it seems it's the default behavior  for a user to just assume its their fault. We're the monks up on the hill, right? We must know something they don't. Computers are hard.

    How do YOU think we can prevent users from blaming themselves when they fail to complete a task with software


    Sponsor: Big thanks to our friends at Raygun for sponsoring the feed this week. I use Raygun myself and I encourage you to explore their stuff, it's really something special. Get full stack error reporting with Raygun! Detect and diagnose problems across your entire application. Raygun supports every major programming language and platform - Try Raygun FREE!


    © 2015 Scott Hanselman. All rights reserved.
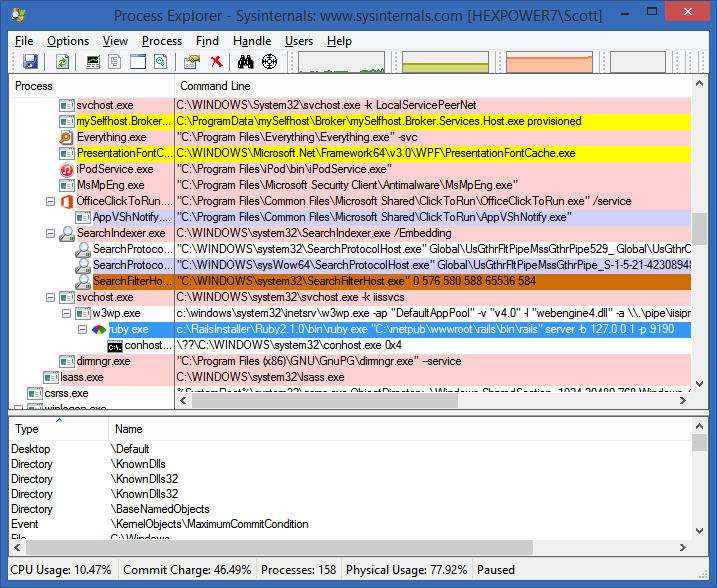
         

    Running Suave.io and F# with FAKE in Azure Web Apps with Git and the Deploy Button

    $
    0
    0

    I was told by some lovely folks in the F# community that there is a nice web framework called Suave.io. Best name ever, eh? Suave is a clean, lightweight, and very F#y (pronounced F-Sharp-ie, I say) in its syntax.

    Frameworks like this do well when they are easy to deploy, especially for Hello World. I always find that if a framework can quickly and easily give me a sense of accomplishment I'll be more likely to stick with it. I like to "fall into the pit of success."

    I wanted to see if I could make Suave on Azure work easily as well. With the help of Steffan Forkman and the encouragement of the F# community (who have felt historically that support for F# in Visual Studio and Azure has been lacking) I put this little proof of concept together. I used the HttpPlatformHandler that is available in Azure Web Apps now by default, along with a basic Kudu Deployment Script from my Ruby/Middleman post.

    Most of the F# community uses a NuGet alternative called Paket that is more F#-friendly. There's also a tiny Paket.Bootstrapper so I could curl things down, then run Paket like this, as part of an Azure Web App deployment. This script modified from Steffan:

    @echo off
    
    cls

    mkdir .paket
    REM TODO - might want to do an IF EXISTS *or* a SHA check
    curl https://github.com/fsprojects/Paket/releases/download/1.2.0/paket.bootstrapper.exe -L --insecure -o .paket\paket.bootstrapper.exe

    .paket\paket.bootstrapper.exe prerelease
    if errorlevel 1 (
    exit /b %errorlevel%
    )

    .paket\paket.exe restore
    if errorlevel 1 (
    exit /b %errorlevel%
    )

    Then we need web.config to tell Azure Web Apps (IIS8+) to start FAKE to get F# and Suave going. Note the use of %HOME%, full paths and the %HTTP_PLATFORM_PORT%:

    <?xml version="1.0" encoding="UTF-8"?>
    
    <configuration>
    <system.webServer>
    <handlers>
    <remove name="httpplatformhandler" />
    <add name="httpplatformhandler" path="*" verb="*" modules="httpPlatformHandler" resourceType="Unspecified" />
    </handlers>
    <httpPlatform stdoutLogEnabled="false" stdoutLogFile="fake.log" startupTimeLimit="20" processPath="%HOME%\site\wwwroot\packages\FAKE\tools\FAKE.exe"
    arguments="%HOME%\site\wwwroot\build.fsx port=%HTTP_PLATFORM_PORT%">
    <environmentVariables>
    <environmentVariable name="WhateverYouLike" value="GoesHere"/>
    </environmentVariables>
    </httpPlatform>
    </system.webServer>
    </configuration>

    I added logging but it's off by default. You can use it to debug if you have issues, as the FAKE.exe output will go into a series of log files. You can then access them with the Kudu debug console.

    I like running "azure site log tail YOURSITE" with the Azure Cross Platform command line. It lets me see the deployment and output as it happens.

    FAKE and F# in Azure Web Apps

    Here is Steffan's build.fsx:

    // --------------------------------------------------------------------------------------
    
    // FAKE build script
    // --------------------------------------------------------------------------------------

    #r @"packages/FAKE/tools/FakeLib.dll"

    open System
    open System.IO
    open Fake

    Environment.CurrentDirectory <- __SOURCE_DIRECTORY__

    // Step 2. Use the packages

    #r "packages/Suave/lib/net40/Suave.dll"

    open Suave // always open suave
    open Suave.Http.Successful // for OK-result
    open Suave.Web // for config
    open Suave.Types
    open System.Net

    let port = Sockets.Port.Parse <| getBuildParamOrDefault "port" "8083"

    let serverConfig =
    { defaultConfig with
    bindings = [ HttpBinding.mk HTTP IPAddress.Loopback port ]
    }

    startWebServer serverConfig (OK "Hello World! It's Suave.io on Azure Websites. <a href='https://github.com/shanselman/suavebootstrapper'>So easy to setup. Just click Deploy.</a>")

    I just added the Azure Deploy button to my Readme.md like this. This is markdown, of course, but could be HTML

    [![Deploy to Azure](http://azuredeploy.net/deploybutton.png)](https://azuredeploy.net/) 

    And you can try this yourself by visiting the repository here and pressing Deploy to Azure, or hit it here:

    Hopefully this is a decent clear start towards easily deploying F# Web Apps to Azure via Git, and/or the Deploy Button.

    Your thoughts?


    Sponsor: Big thanks to the folks over at Grape City for sponsoring the feed this week. GrapeCity provides amazing development tools to enhance and extend application functionality. Whether it is .NET, HTML5/JavaScript, Reporting or Spreadsheets, they’ve got you covered. Download your free trial of ComponentOne Studio, ActiveReports, Spread and Wijmo.


    © 2015 Scott Hanselman. All rights reserved.
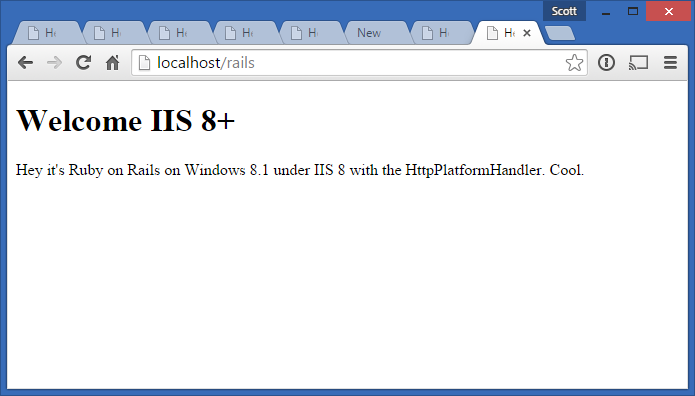
         
    Viewing all 1148 articles
    Browse latest View live


    <script src="https://jsc.adskeeper.com/r/s/rssing.com.1596347.js" async> </script>