Eight years ago I stumbled on the husk of an old arcade cabinet and along with my buddy John Batdorf, proceeded to reclaim the cabinet, refinish, paint, and turn it into a proper MAME (Multi-Arcade Machine Emulator)
As an aside, a bit after helping me this project, John happened to start an amazing business making furniture with reclaimed wood, check him out at http://deercreekfurnishings.com. Amazing stuff, truly.
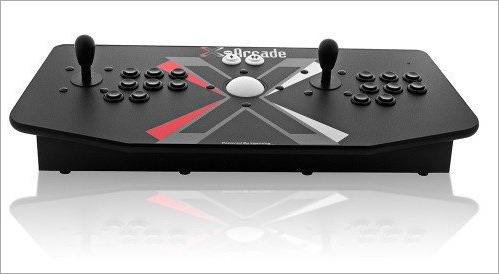
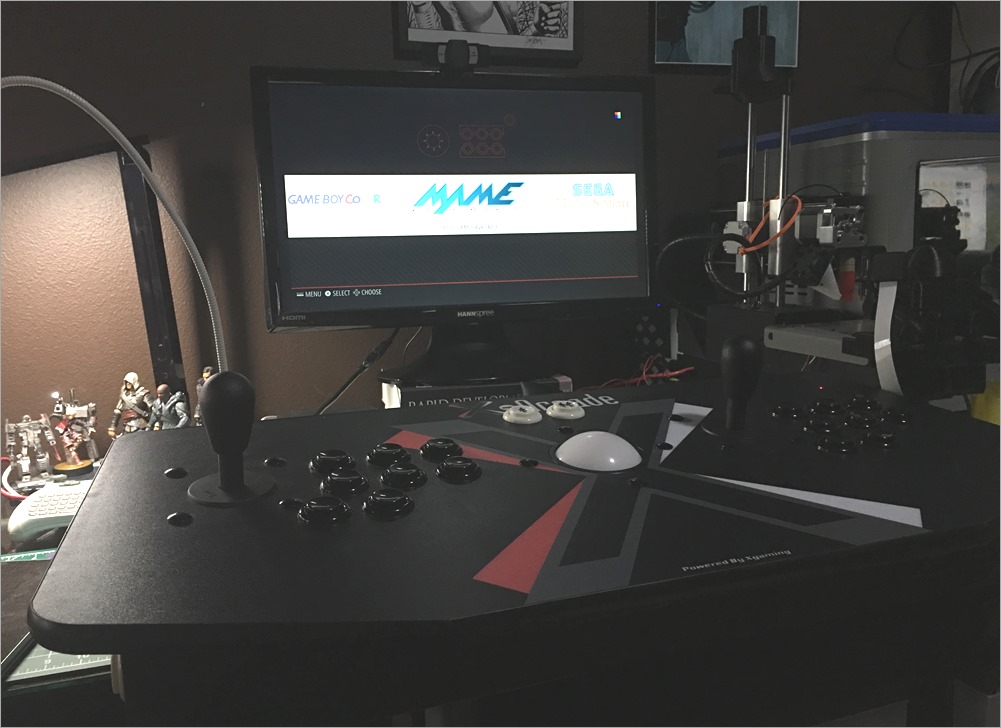
Last week I build a RetroPie into an X-arcade tankstick. This is my best retro arcade yet because it's got HDMI out and I can take it to friends' houses. That said, I'm going to briefly go over my other systems because they may be more attractive for your needs. If you have no patience, scroll down.
A full size MAME Cabinet - The Complete MAME Cabinet How-To
I wrote up a complete 7 part series on making your own MAME Arcade Cabinet. It's super fun and will only take a few weekends and perhaps a few hundred bucks.
- Cabinet and Power
- Monitor and Mounting
- Control Panel
- Sound and Lights
- Paint and Art
- Computer Hardware and Software
- Success and Conclusion
When I made my first MAME cabinet I put a small "Shuttle PC" inside. The MAME system is in my office and runs to this day on Windows 7 with a HyperSpin frontend.
Software Disclaimer 1: There's all sorts of iffy legal issues around emulating arcade games with boards/ROMs you don't own. This series of posts has nothing to do with that. I do own some original arcade boards, but if you want to emulate arcade games with MAME (Multiple Arcade Machine Emulator), you can search the 'tubes. What I'm doing here is putting a computer in a pretty box.
Hardware Disclaimer 2: Many folks that build arcade cabinets have a purist view of how these things should be done. They will prefer original Arcade CRT monitors and more expensive, higher quality parts. I am more of a pragmatist. I also have no idea what I'm doing, so I've also got ignorance on my side.
There's been a huge amount of work done in the last few years to reconcile the dozens of emulators and systems and the nightmare of keybindings, menus, and configuration. My first MAME machine was a few hours to install and literally weeks of messing around with the settings of various emulators. I started with the legendary v1 "X-Arcade Tankstick" that had was effectively a PS2 keyboard. I took it apart and built it into my MAME system's control panel. I then needed to tell each individual emulator the key codes for up, down, left, right, a, b, x, y, etc. Each emulator had a different configuration file. Some were INI files, some XML, some freaking magic.
It's a lot to ask in 2017 to dedicate a complete PC to a retroarcade - in fact, it's just not necessary. A $35 Raspberry Pi 3 (or even an overclocked Raspberry Pi 2) has enough power to handle all but the most complex emulators.
Tiny Raspberry Pi Powered "CupCade"
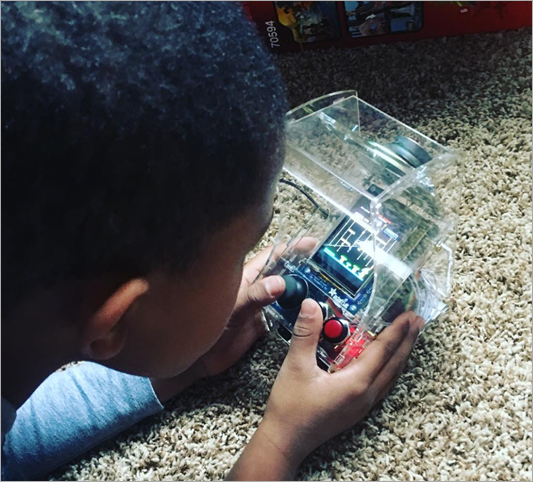
Later I discovered RetroPie and built a tiny "cupcade" with plans from AdaFruit. It is/was a tiny little thing that with just a basic menuing system but it got me thinking about how powerful the Raspberry Pi is. The AdaFruit site has all the plans and parts you can buy. I had a local makerspace laser-cut the case. Assembly was just a weekend.
Hyperkin - An off-the shelf RetroArcade Console
We also picked up a Hyperkin Retron console. This is a great legal way to plan retro games because it requires actual cartridges. We buy our games at Retro Game Trader. If you are EVER near Portland you HAVE to stop and check it out. It's insane.
There's a old joke about building a retro arcade machines - Is it more fun to play retro arcade games, or is it more fun to build a retro arcade machine with a cool front-end where every keybinding works in every emulator but you never get around to playing games?
A RetroPie inside an X-Arcade Tankstick
There's a whole series of gotchas that took me a few weeks to work through when taking a Raspberry Pi, RetroPie software, and an X-Arcade and getting them to work well together.
THIS blog post is going to be a collection of all the stuff I wish I'd known BEFORE I started on this path. Even one of these tips would have saved me an hour, so the collection of them is days of googling, forum reading, and trial and error.
Start with this 7-part short video series (they are less than 10 min long, so it's not so scary) on the X-Arcade with the RetroPie.
Parts List
You'll want at least these things to start.
- Raspberry Pi 3 - Don't skimp, get a 3. Yes you can use a 2, but you'll be far happier with a 3.
- Raspberry Pi 3 Heatsink Set - Raspberry Pi's can be persnickety. Spend the $5 and get a heatsink.
- 128gig high-speed microSDXC card - Get the largest and fastest microSD card you can get. Class 10 is ideal.
- 2amp+ powersupply with a 5 foot microUSB cable. Make sure your powersupply does at LEAST 2 amps. Less and your Raspberry Pi may not boot up with keyboards or mice attached.
- Remember that the goal here is to be able to plug this into your TV while you're sitting near or on your couch. You might even want a longer cable.
- Make sure the microUSB powersupply cable length matches your HMDI cable length. You're only as useful as the shortest cable between these two.
-
- PS2 keyboard - Yes, PS2. I picked one up at Goodwill or a local Thrift Shop. You'll need this to program the X-Arcade Tankstick. You change its mode switch, press a button on the controller while simultaneously pressing a key on the PS2 keyboard. You'll repeat this until all your keys are set.
- Also, you can never have too many cable ties.
And finally, last but not least. An X-Arcade Stick. You can get them with or without a Trackball (which acts as an independent mouse and uses its own additional USB cable). As I mentioned, I'd long-been a fan of all X-Arcade products. Their stuff is legendarily reliable and built like, well, a tank. They're fantastic in that you can even get adapters for your X-Box, X-Box One, Wii, Dreamcast, whatever.
My brother recently found an X-Arcade stick at a local thrift story for $30 and grabbed it for me. I opened it up and noticed it was the PS2 version from years ago. Fear not - you should be aware that there is the PS2 X-Arcade that requires a PS2 keyboard be attached, and there's the newer USB version. Here's the epic part - and reason #564 why I love X-Gaming as a company - you can upgrade the electronics in your v1 X-Arcade stick with a simple board for $35. And I did just this. This kit takes any existing X-Arcade to the latest hardware and you're going to want the latest if you want your X-Arcade to work smoothly with RetroPie.
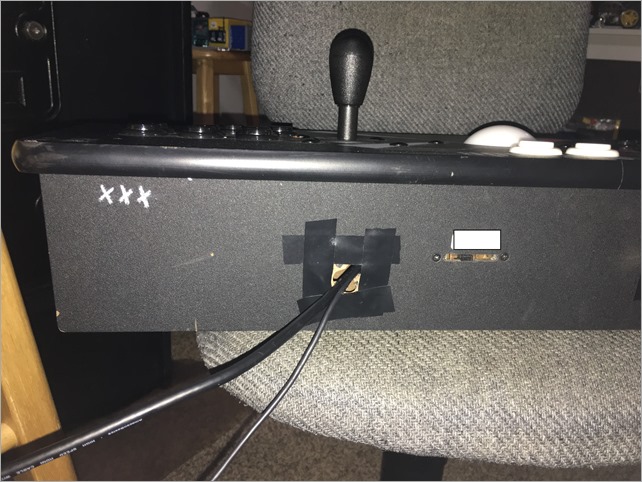
I took the back off the X-Arcade and threaded the HDMI cable and USB micro cable through the back holes. I 3D-printed a case (the yellow cage in the photo below) for the Raspberry Pi but really any case will do as long as wires aren't touching wires. There's an RS232 cable and the vestigial green PS2 male that you can tuck away in there. I used the remaining hole to keep the purple PS2 female connector handy as it'll be used for "programming" the keys for the X-Arcade.
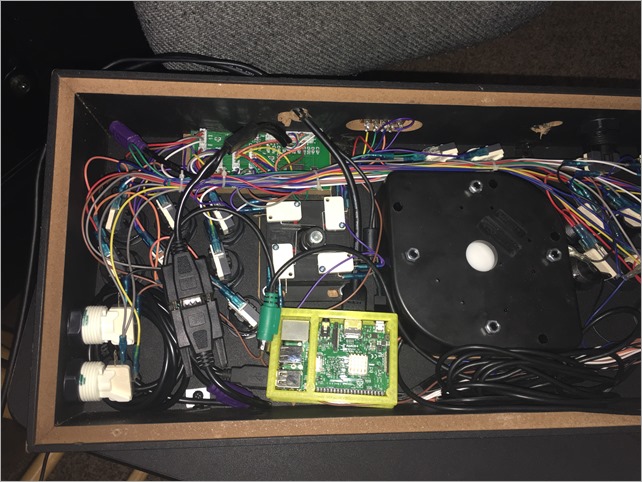
Yes, it's janky, but all I had was electrical tape. Ideally I'd get a rubber gasket for the wires to keep the tension off the Raspberry Pi and make it more "kid safe."
Again, follow these videos. If you're a little technical it's pretty straightforward stuff. The general idea is this.
- The Raspberry Pi uses the SD Card as its hard drive.
- The X-Arcade is a keyboard and you'll have the PS2 keyboard temporarily plugged into it for setup.
- The Raspberry Pi 3 is best not only because it's fast but it's also got built-in WiFi. If you use a Raspberry Pi 2, you'll need a Wifi adapter.
- With your computer, you will use Win32DiskImager to copy a pre-made image of RetroPie to the SD Card.
- You'll put the SD Card into the Pi, connect the X-Arcade via USB to the Pi, connect the PS2 keyboard to the X-Arcade , connect the Pi's HDMI to a monitor or TV, connect the power, and boot up.
- You'll follow some on-screen prompts (again, see the videos) and setup RetroPi.
- Be sure to configure your wi-fi
- You'll program the X-Arcade to act as a keyboard.
- Then you'll see what works and start debugging.
- Debugging often consists of using putty and/or Bash for Windows to ssh into the Raspberry Pi. The user name is pi and the password is raspberry so that's usually "ssh pi@retropie" then the password.
Little Gotchas when Hooking up RetroPie and an X-Arcade
Now to the little details that took me weeks that will hopefully help you.
- Xarcade2Jstick vs standard keyboard mapping - Some people swear that the X-Arcade stick will/can get detected as a joystick using a user-space driver called Xarcade2Jstick. This driver is built into Retropie now and it takes your keyboard/xarcade and "lies" to the system and makes it look like two gamepads. Some folks swear by it. I fought with it for a week and decided that since I understand keyboards, I would just stick with keyboard mapping. Your mileage may vary, but the good thing to know (and try) is that if your system "just works" when you boot up, then perhaps Xarcade2jstick worked amazingly for you and you can skip a LOT of this mess. Sound off in the comments.
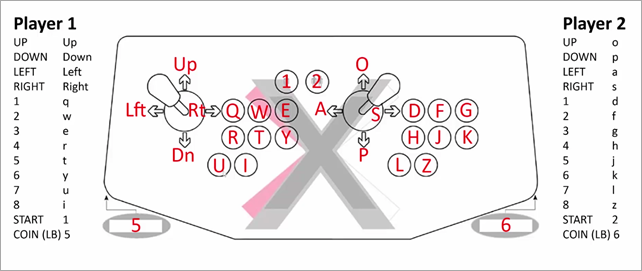
The gent who made the videos also believes that keyboard mapping is more reliable and recommends this "non-standard" set up and programs it in "bank 2" of the X-Arcade. That means the toggle switch is in the second position inward, away from the serial point when you program it. He recommends this layout and I've used it also. This is a screenshot from his video.![Keyboard mappings are in the linked to Zip file Keyboard mappings are in the linked to Zip file]()
- NOTE: I needed to go into optional components in RetroPie setup and specifically disable xarcade2jstick. You can re-run RetroPie-setup from the command line as often as you like.
cd RetroPie-Setup
sudo ./retropie_setup.sh
- Keyboard Bindings for RetroArch compliant emulatiors - Now, I think I understand this, but if I get it wrong, let me know in the comments. There is an organization called "libRetro" that comprises the libRetro library, the RetroArch frontend that runs libRetro programms, and Lakka, a Linux that's meant for retroarcades. You don't need to sweat Lakka as you used a default RetroPie image. But RetroArch you'll be hearing a lot about. Remember earlier when I was complaining about all the trouble configuring emulators? RetroArch has scoped, nested config files (with includes) that allow you specify your config and keyboard/gamepad/joystick mapping once and then participating emulators will "just work."
Another way to look at it is this. In the past you needed lots of emulator programs from lots of people with lots of config that was all different. Retroarch tries to unify all of this so there's "cores" for each emulated system that Retorarch calls out to for the emulation.
Follow the videos, but you'll basically go to /opt/retropie/configs/all and edit retroarch.cfg to support the keymapping above. MOST of the emulators will pick these settings up. But not all. More on that in a second.
Like this:
input_player1_a = t
input_player1_b = r
input_player1_y = q
input_player1_x = w
input_player1_start = num1
input_player1_select = num5
input_player1_l = e
input_player1_r = y
input_player1_left = left
input_player1_right = right
input_player1_up = up
input_player1_down = down
input_player1_l2 = u
input_player1_r2 = i
input_player1_l3 = nul
input_player1_r3 = nulinput_player2_a = j
input_player2_b = h
input_player2_y = d
input_player2_x = f
input_player2_start = num2
input_player2_select = num6
input_player2_l = g
input_player2_r = k
input_player2_left = a
input_player2_right = s
input_player2_up = o
input_player2_down = p
input_player2_l2 = l
input_player2_r2 = z
input_player2_l3 = nul
input_player2_r3 = nul - Exiting Games with the Xarcade controller - One of the most common questions I saw in the forums was "I can move around in the menus and launch and emulator but I can't exit it!" Folks were forced to pull the plug and hard reboot which isn't a sustainable solution. The xarcade has a "flipper" (imagine a pinball flipper's controlling button position) button on each side. The standard hotkey for exiting an emulator has historically been pressing the Player 1 start button PLUS the left flipper button. That's the 1 and 5 keys together if you look at the diagram above.
You'll want to go to /opt/retropie/configs/all and edit retroarch.cfg and confirm that you have these lines somewhere:
input_enable_hotkey = num1
input_exit_emulator = num5
Then launch emulationstation (or reboot), launch an emulator, and press P1 and left bumper/flipper. You'll also come to know the left and right flipper buttons as the virtual "insert coin" buttons for Player 1 (P1) and Player 2 (P2) respectively. - Some emulators don't listen to RetroArch settings - Depending on the RetroPie image you downloaded, you may find that some emulators don't listen or respect your core retroarch.cfg settings. Or, perhaps the defaults buttons don't feel right. For example, Sega controller buttons are two rows of three buttons each. You can override your settings to make your xarcade more intuitive. Go to /opt/retropie/configs/megadrive and edit the retroarch.cfg in there. Note that it includes the MAIN "all" retroarch so you're just overriding some settings on an emulator by emulator basis.
# Settings made here will only override settings in the global retroarch.cfg if placed above the #include line
input_player1_a = y
input_player1_b = t
input_player1_y = r
input_player1_x = w
input_player1_l = q
input_player1_r = einput_player2_a = k
input_player2_b = j
input_player2_y = h
input_player2_x = f
input_player2_l = d
input_player2_r = ginput_remapping_directory = /opt/retropie/configs/megadrive/
#include "/opt/retropie/configs/all/retroarch.cfg"
- MAME isn't working at all with the Xarcade - This hit me and I see lots of folks struggling. If the MAME core/emulator you're using doesn't integrate with RetroArch, you may need to manually keymap within MAME itself. Use the attached keyboard (while it's still attached) and when inside MAME press Tab. You'll go into the "Input (general) and go down the line one at a time and remap the keys. It's NOT obvious that you have to press and hold the buttons on your XArcade before MAME will pick up the new mapping. It's also not obvious that if you press AGAIN and hold that you can tell MAME another alternate key. In other words, the "OR" key. As in "1 OR 5" if you like.
You might like to know that mame-advmame stores these configurations in /opt/retropie/configs/mame-advmame in *.rc files. For example, I had advmame-0.94.0.rc and wanted to be able to exit MAME from my xarcade. If I had a keyboard attached, I'd press "ESC" but with the Xarcade I wanted "Player 1 plus Left Flipper" to work. Then I wanted either "Enter" to confirm, or the main button for Player 1. I ended up with this. Again, this is for non-RetroArch advmame, but it makes the larger point in case you run into these kinds of emulators.input_map[ui_pause] keyboard[0,enter] or keyboard[0,tab] keyboard[0,up]
input_map[ui_select] keyboard[0,enter] or keyboard[0,q]
input_map[ui_cancel] keyboard[0,5] keyboard[0,1] or keyboard[0,esc]
That pretty much covers all the hairpullingout of the last few weeks. The result is very nice though. I hope you make one also!
Sponsor: Check out Seq: simple centralized logging, on your infrastructure, with great support for ASP.NET Core and Serilog. Download version 4.0.
© 2017 Scott Hanselman. All rights reserved.
