First, let's level set with a disclaimer. I am a smart enough person but a total beginner at 3D printing. I've been 3D printing for about two weeks using a Printrbot Simple Metal from Amazon that I got for US$599. Other than Amazon affiliate links (buy from my links and you buy me tacos!) I don't have ANY relationship with Printrbot or anyone in the 3D Printing space. I'm unaffiliated. This "shootout" is an interesting experience. I'm sure I did something wrong, or perhaps my partner in crime on this experiment, Brandon Potter, missed a step. Who knows? But this is how it went down.
Brandon saw that I was doing some 3D printing and mentioned they had a <$22,000 3D printer at his work and what did I think about doing a comparison? I had been having trouble printing with success, ruining at least 2 out of 3 prints, but recently got my Printrbot dialed in nicely. '
Here's my investment so far both in time and money.
- Printrbot Simple Metal from Amazon that I got for US$599
- Raspberry Pi and Raspberry Camera to watch my prints and do time-lapse videos with Octoprint. Figure $60.
- A spool of RioRand 1.75mm PLA Filament in Black for $28.
- Digital Calipers for measuring stuff. $20.
- And a number of printed parts to improve my 3D printer's performance including:
- Raspberry Pi mount and camera holder
- Printrbot Simple Metal filament spool holder
- Feet for the Printrbot (plus little rubber feet-bits)
- Uline brand blue tape. Works WAY WAY better than other blue tapes. This made a HUGE difference. $15
So I'm into it for $722 and my time. I did NOT use a Heated Bed for my Printrbot Simple Metal but I am told it's a great upgrade.
Here's Brandon's company's outlay in his words:
- uPrint SE Pro Printer and Dissolving Bath – about $22,000
- 1 Spool of Model Material (Black) – $205.00 (produces 42 cubic inches of printing)
- 1 Spool of Support Material – $200.00 (42 cubic inches worth)
- Box of Build Plates – $125.00 for 24 (you need one for each print, so it costs about $5.20/each)
- Soluble Concentrate – $149.00 for 12 bottles (dissolves support material, aka fancy drain-O)
- Warranty Support – $2,000/year – because it does break from time to time.
- Brandon says - Add a little bit of shipping, and for a mere $25K you’re ready to print your very own coffee cup.
We decided to print a coffee cup. I don't plan on drinking from it because who knows if the plastic will leech off, but it seemed like an interesting and common object. As a 3D model it has some nice curves, the handle overhang is a small challenge and it's something we can easily compare.
I printed one on my Printrbot and Brandon printed one on their Stratasys uPrint SE Pro. Then Brandon mailed me his cup and I'm sitting here holding them both in my hands.
Here is a timelapse video of my cup printing. My 0.2mm print took about 7 hours and this video is 90 seconds. I used Octoprint and the Raspberry Pi to create the video.
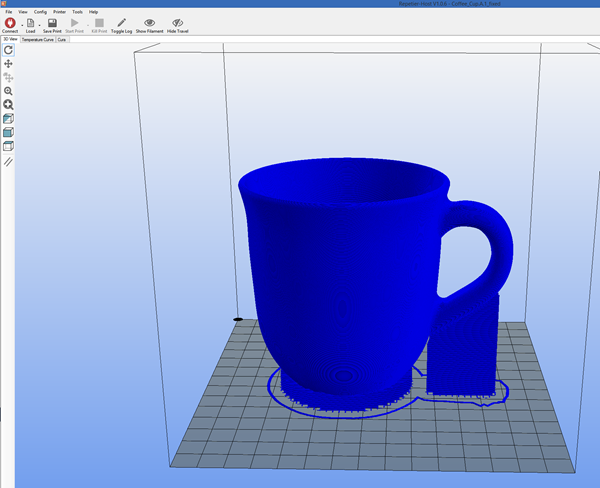
I downloaded the Coffee Cup model from Thingiverse as an STL 3D model. I ran the STL model through the Microsoft 3D Printing NetFabb online service to make sure the model was watertight. Then I loaded the result directly into Repetier and used Cura to slice the model into individual instructions for the printer. I made one adjustment to the slicing settings, telling it to make a "support structure" when it sees an overhang over 30 degrees. I was concerned about the cup's handle. Other than that one settings change which resulted in the support being added (which is easily pulled off after the print) it was a "printing as is." Brandon's model also used a support structure to print the cup and keep the handle stable so we decided this was pretty typical. He also printed on his pro printer with no changes.

Here is a picture of my setup. There's my printer on the right with some stuff I've made and my box of tools/crap on the left. You can see the spool, the printer (the red lipstick looking thing is where the hot plastic comes out), the Raspberry Pi and the tape that I print on. I can print objects up to 6 inches on a side, so a big 6 inch cube. If I paid more money I could get the 10 inch model, but so far for my hobbies I'm happy with that size. I can break things up and assemble them with acetone or bolts if I want to make larger models. One fellow 3D-printed a whole full-sized motorcycle with a small printer and assembled the parts.

Here is Brandon's printer. Again, $600 vs. $25000.

By the way, is this a silly comparison? Perhaps. But no more than a Tesla vs. a Challenger Hellcat. Actually, I think my printer is a Geo Metro. But I get great mileage!
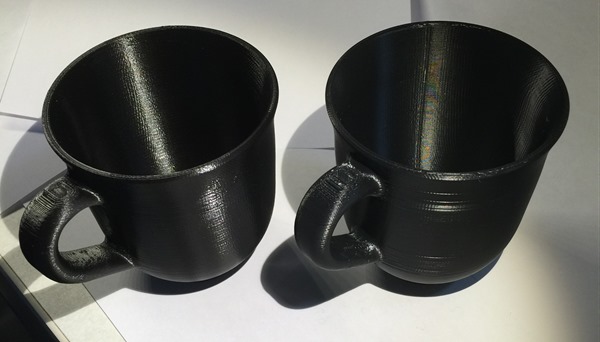
Ok, here's the prints. Feel free to click to zoom in to make your decision. Which cup came from which printer?
Here's slightly larger pics. Note I am not/have not moved the cups side to side. Left/right is consistent for this photo series.
Which is which?
The $599 Printrbot Simple Model printing at 0.2mm is on the left. The $20k uPrint SE Plus printing at 0.1mm is on the right.
The uPrint's base was messed up somehow. A bad start perhaps, but unfortunate as it's supposed to just work since Brandon used the one-time-use custom bases that the uPrint comes with. He also used the dissolving bath to take the white support structure off. You can see some of the white still there, perhaps it wasn't in long enough. My print had supports but I just pulled them off with my hands. Of course, if you have an intricate print with small parts that's not always possible. This is a very simple object, to be clear. It's not interlocking gears or something.
Here's the uPrint cup. Brandon said it took 8 hours and 22 minutes.
Here's the Printrbot's cup. Note the "Z scar" (an artifact from the printer moving up the Z-Axis) on the print? On my print it ended up by the handle, but on Brandon's it ended up on the side of the cup, marring the print, in my opinion.
What's the takeaway? If we assume that I have a totally dialed-in well calibrated super cheap consumer/hobbyist 3D Printer and that Brandon has a $20k professional 3D Printer that's maybe got some calibration issues, they seem very comparable.
However, in real one-time costs my cup cost me 21.02 meters of filament, costing me perhaps $2 maybe a little more if you count the few pieces of tape. For Brandon and his Pro printer, in direct costs, he used $23.62 in model material, $2.06 in support material, and $5.20 build plate, for a total of $30.88 for this cup.
Naysayers will say that this isn't a great model to have chosen. Clearly my little Printrbot Simple Metal can only make things of a certain size, but it's clearly fair to say that it's a surprisingly competent printer when it's calibrated well. Additionally, if I were a 3D modeling shop with a Pro printer, I think I would definitely pick up a few sub-$1000 printers for basic stuff as the big printers may be costing you money. If I was a small business I would really do my homework before buying a pro printer that claims to be problem- and maintenance-free. Go read Brandon Potter's account of his "pro print" and compare notes!
NOTE: This post is intended in no way to talk up Printrbot nor to talk down Stratasys. It's a simple one time anecdote as it happened, using a simple model.
What do you think, Dear Reader?
Sponsor: Big thanks to Infragistics for sponsoring the feed this week! Responsive web design on any browser, any platform and any device with Infragistics jQuery/HTML5 Controls. Get super-charged performance with the world’s fastest HTML5 Grid – Download for free now!
© 2014 Scott Hanselman. All rights reserved.


